Features
LinkedIn Ads
- LinkedIn Ads Revenue Attribution
- LinkedIn Ads Customer Journeys
- LinkedIn Ads CRM Sync
- LinkedIn Ads Intent Signals
- LinkedIn Ads Lift Analysis
- LinkedIn Ads Campaign Optimization
- LinkedIn Ads Benchmarks
Google Ads
Google Ads AttributionAI in Fibbler
Fibbler MCP ServerIntegrations
LOGin
Start todayPractical Guide to Tracking LinkedIn Ad Influence in Salesforce with Fibbler
Quick Links
Fibbler connects your LinkedIn ad campaigns and your Salesforce data (Plug-and-Play). You do not need to go through these steps, but doing so allows you to better visualize your data over time through salesforce reports and graphs.
If your sales team is flying blind on which accounts are engaging with your marketing, Fibbler solves that by sending real-time LinkedIn Ads data straight into Salesforce
This guide will walk you through how to set up that connection so you can:
- Automatically enrich your Account records with LinkedIn ad engagement
- Track clicks, impressions, and engagements from your target companies
- Visualize engagement trends inside Salesforce reports and dashboards
- Do all of this without needing to manually export or upload data
Here's the flow behind the scenes:
- LinkedIn Ads: Tracks impressions, clicks, and engagements from your campaigns.
- Fibbler: Collects this data and determines which accounts in your Salesforce CRM it relates to.
- Salesforce (via API): Fibbler securely pushes that data directly into your Salesforce instance, updating each Account with the latest ad activity.
This is done through Salesforce's REST API, using a secure OAuth token. This means no manual uploads, and no messy integrations to maintain.
Who This Guide Is For
- Salesforce Admins setting up the connection for the first time
- RevOps & Marketing teams looking to measure campaign performance across the funnel
- Developers or integrators needing to confirm field setup and API access
What You Need
- Fibbler Account: Ensure you have access to Fibbler with CRM Data Sync enabled.
- LinkedIn Ads Account: Must have read-only permissions.
- Salesforce Access: You'll need access to Salesforce Setup, and the ability to create or configure the following:
- OAuth - You'll authorize Fibbler through its prebuilt integration using OAuth - no Connected App setup required.
- Custom Fields on the Account object - To store clicks, impressions, and engagements from LinkedIn Ads
- API access - The Salesforce user that Fibbler connects as must have the API Enabled permission
- Read/Write Access to Account records and the custom fields
- (Optional): Field History Tracking enabled for custom fields, if you want audit logs
Chapter 1: Connect Salesforce and LinkedIn to Fibbler
The connection between Fibbler and Salesforce is made using a secure OAuth 2.0 flow through a preconfigured Fibbler app.
You do not need to create a Connected App or perform any advanced configuration - Fibbler handles this automatically.
Goal and Importance:
This step enables a secure connection between Fibbler and your Salesforce environment. Once connected, Fibbler can push weekly LinkedIn ad metrics directly into Salesforce - one record per Account, per Week, per Duration (7/30/90 days), per metric (Impressions, Engagements, Clicks) - with no manual setup needed.
Steps:
PART A: Connecting Fibbler to Sales Force
Log in to your Fibbler account and log in to your LinkedIn account to enable the CRM connection option.
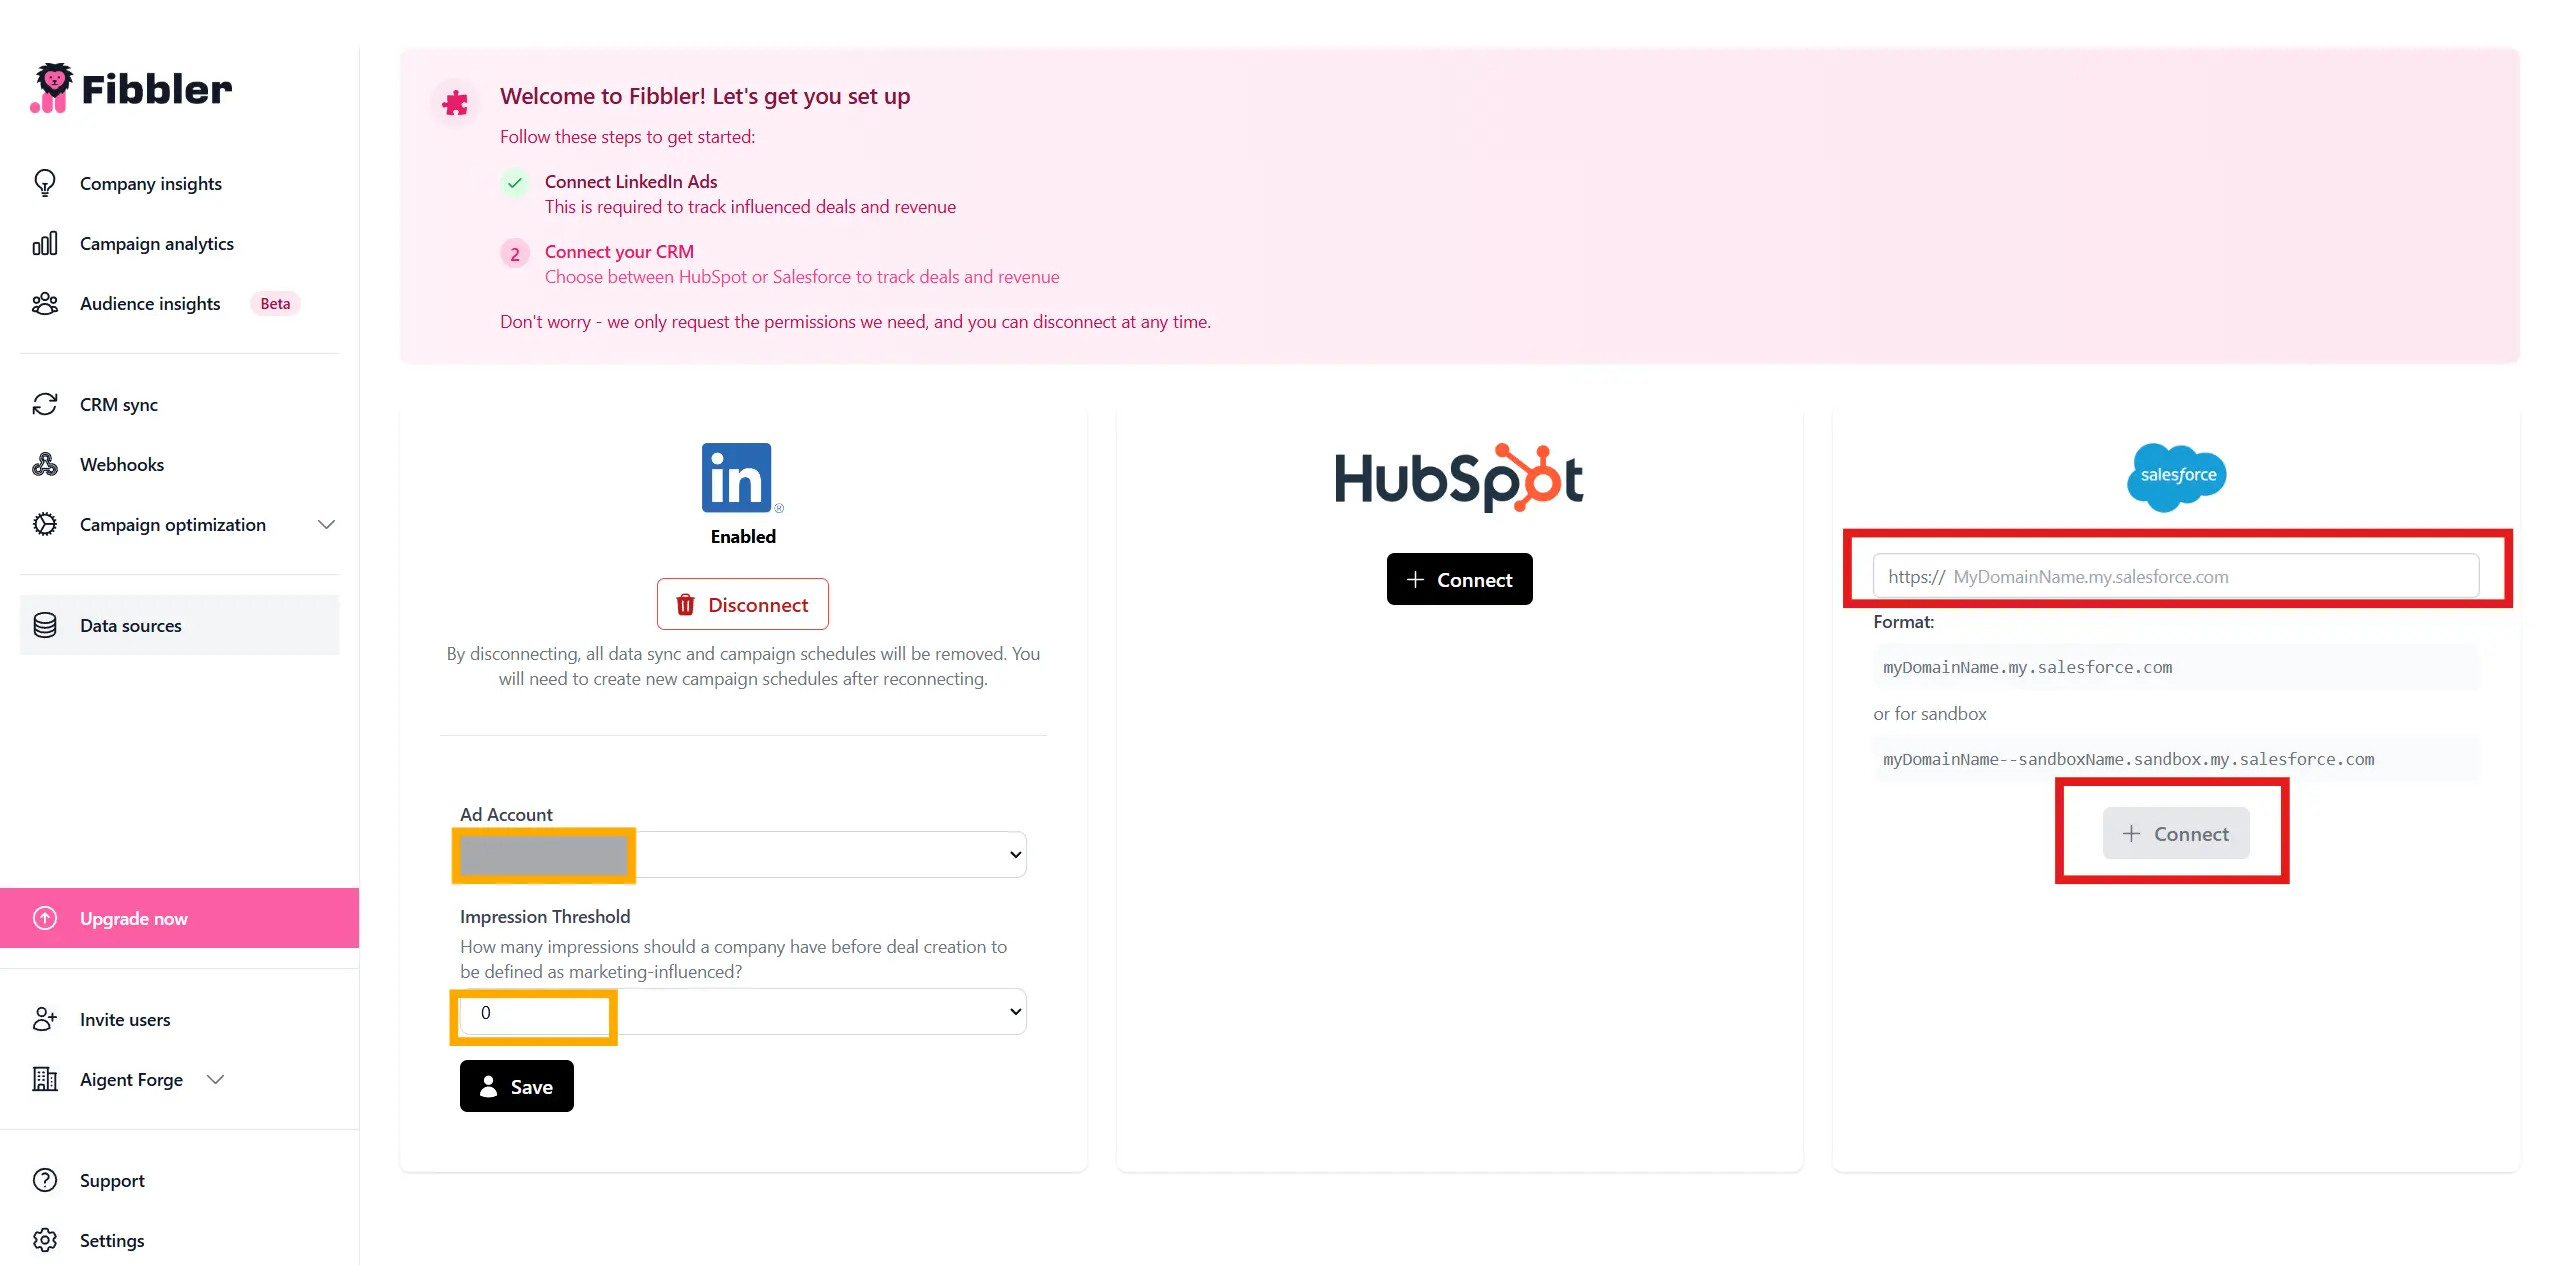
Note: When connecting Fibbler to Salesforce, you'll be redirected to the official Salesforce login page. Simply log in with your Salesforce credentials. Once authenticated, you'll be redirected back to Fibbler.
This process uses Salesforce's OAuth 2.0 authorization flow and requires no manual configuration of client ID/secret on your part. Secure tokens are handled automatically.
Outcome Step 1
You've successfully authorized Fibbler to connect with your Salesforce environment. The Fibbler app is now installed and securely connected via API, enabling automated data sync.
Note: Your dashboards and reports may appear empty or flat immediately after setup. This is normal - Fibbler begins pushing new metrics after the connection is live, meaning data will start to populate as Fibbler pushes new metrics into your Salesforce environment over the next days and weeks. Historical data builds over time.
If you'd like to confirm that the connection is working before metrics populate, you can push test data or check field updates on any Account. It is also a good practice to revisit these data fields weekly during the first couple of weeks to ensure data populates correctly.
Chapter 2: Add Custom Fields to the Account Object
Goal and Importance:
Custom fields store LinkedIn Ads data in Salesforce for each account. These fields make it easy to track clicks, impressions, and engagements across different timeframes. Without these fields, data cannot be synced or displayed in Salesforce. Here's how to set them up (either automatically through Fibbler or manually):
Option 1: Automated Setup (Recommended)
- Enable Data Sync in Fibbler after connecting Salesforce and LinkedIn Ads.
- Select the sync duration (7, 30, or 90 days).
- Fibbler will:
- Create custom fields for clicks, impressions, and engagements for each time interval.
- Configure these fields in the Account object.
- Confirm that fields are visible and accessible:
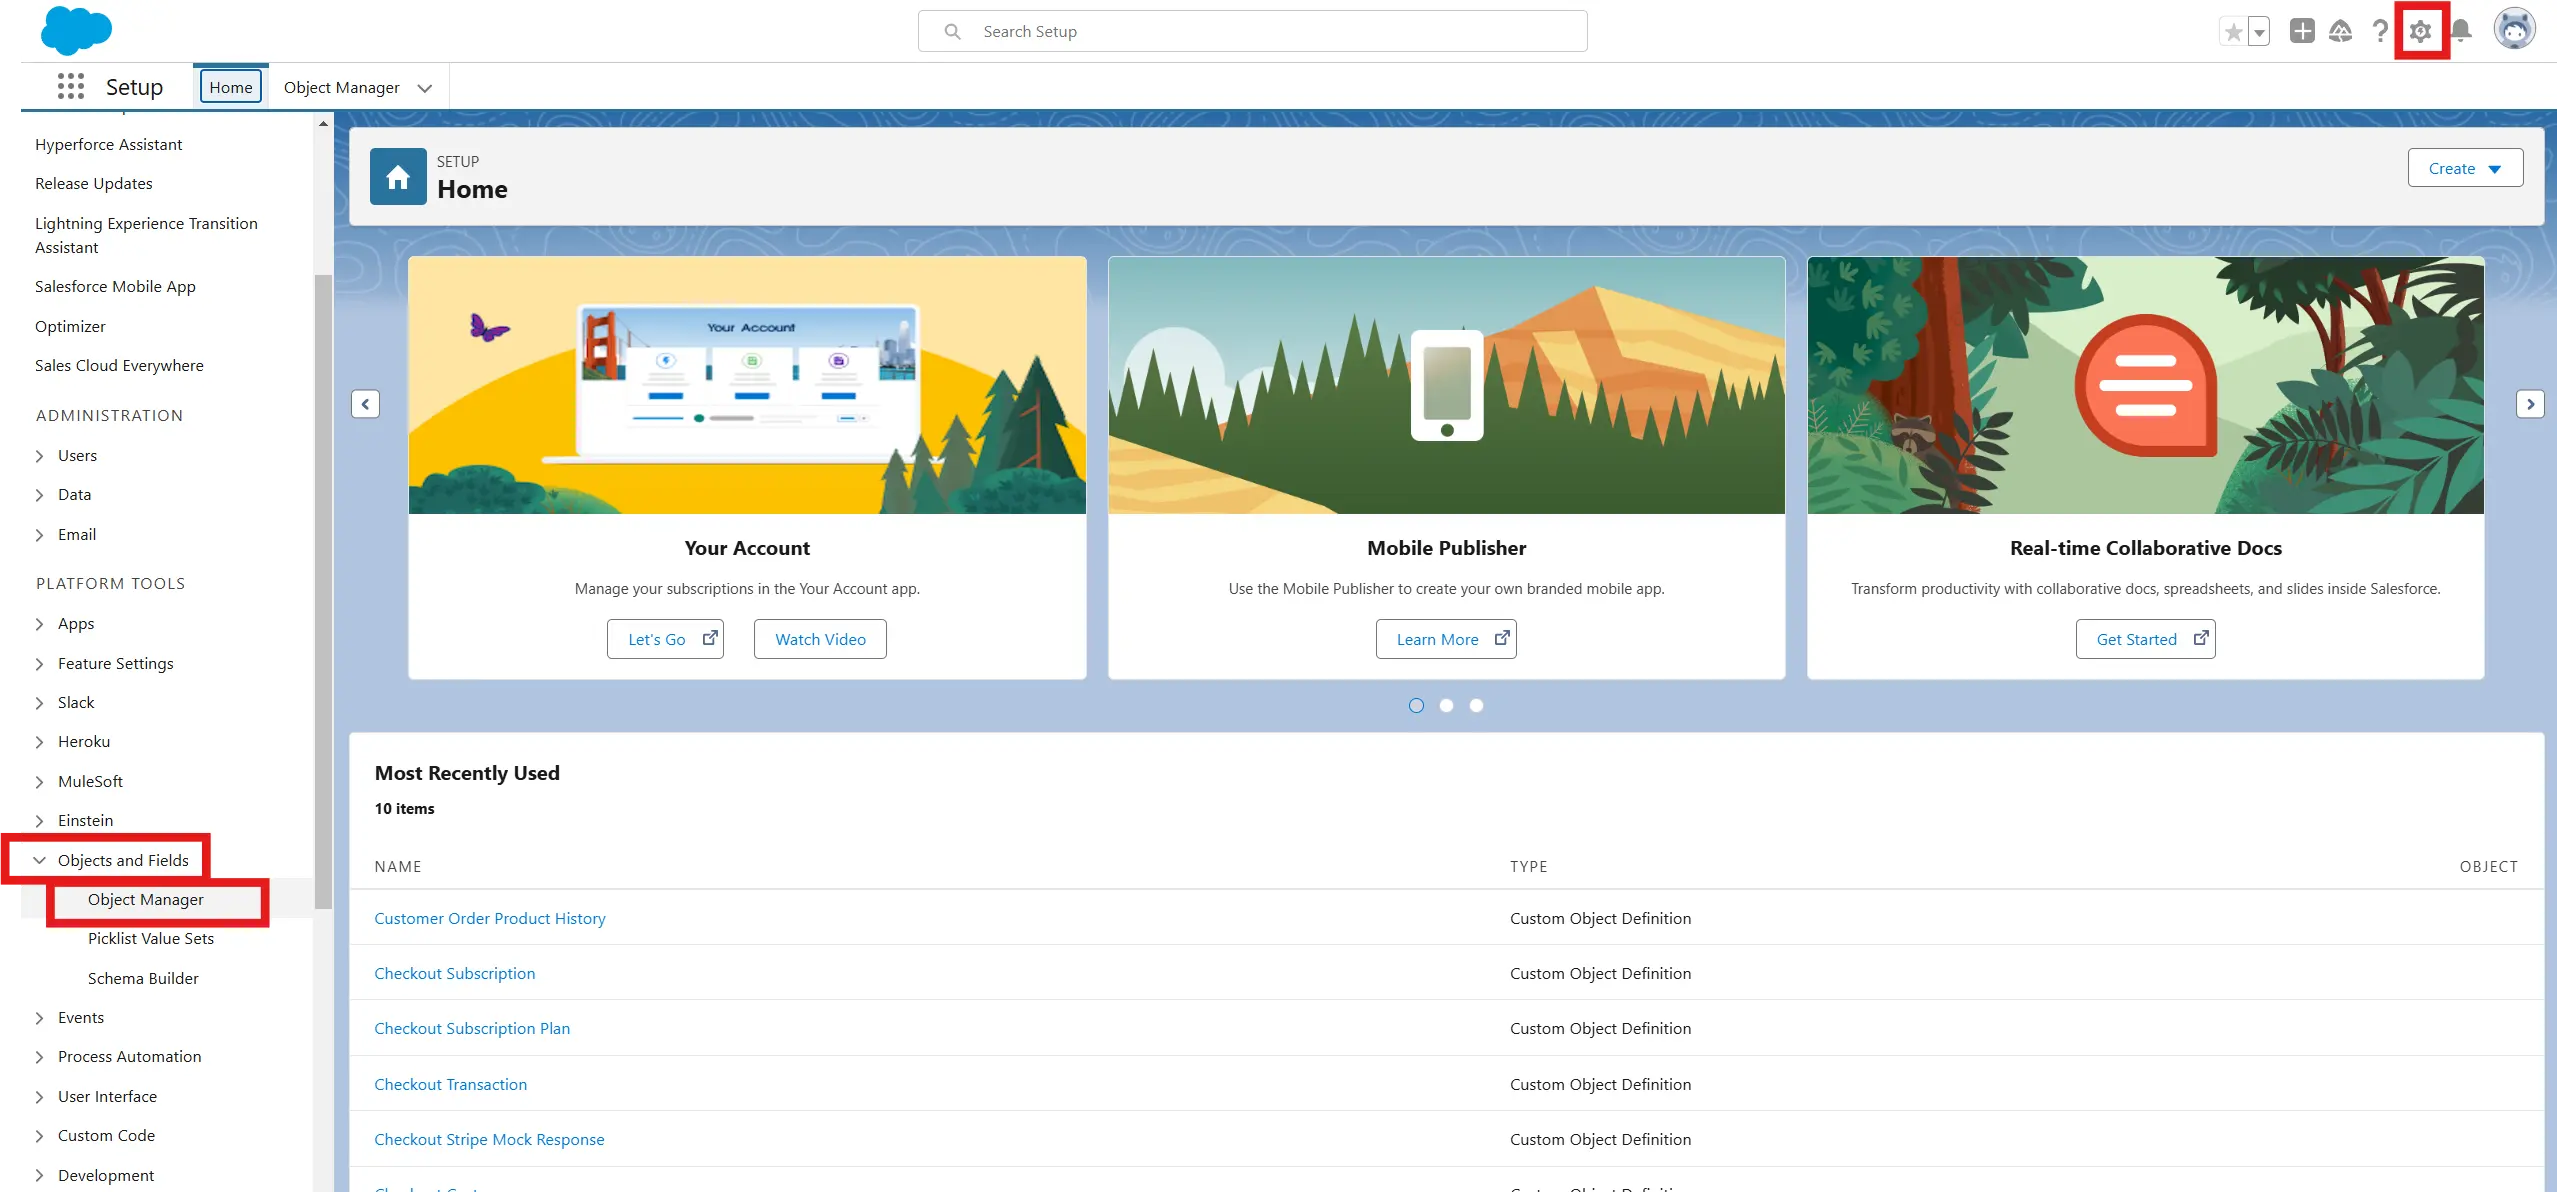
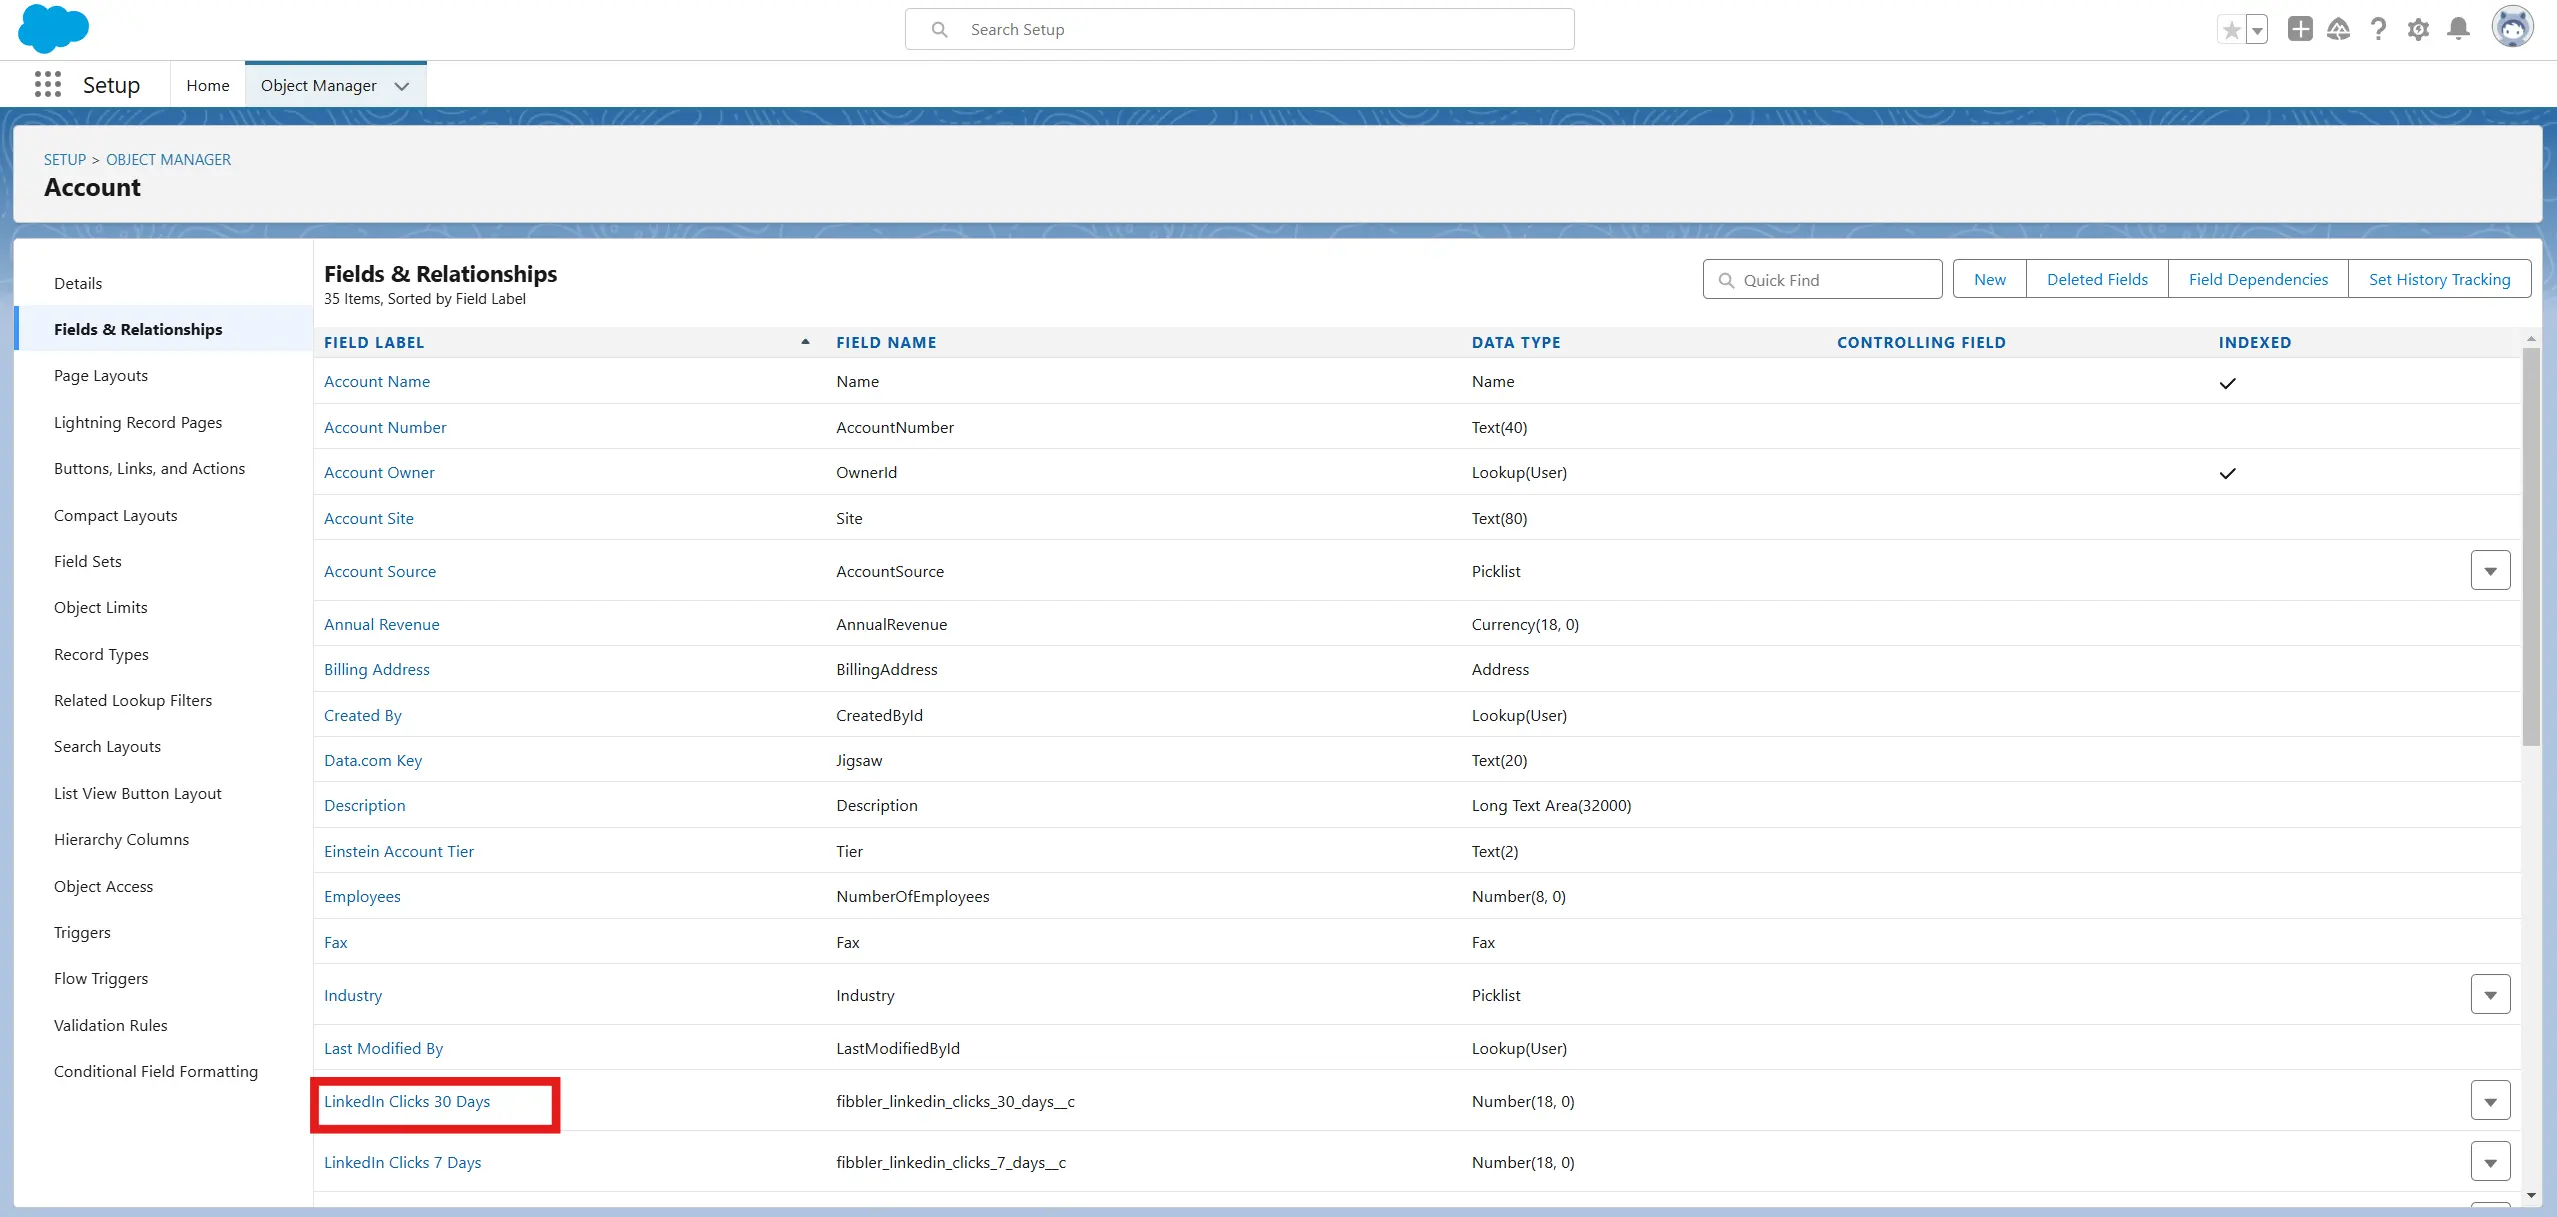
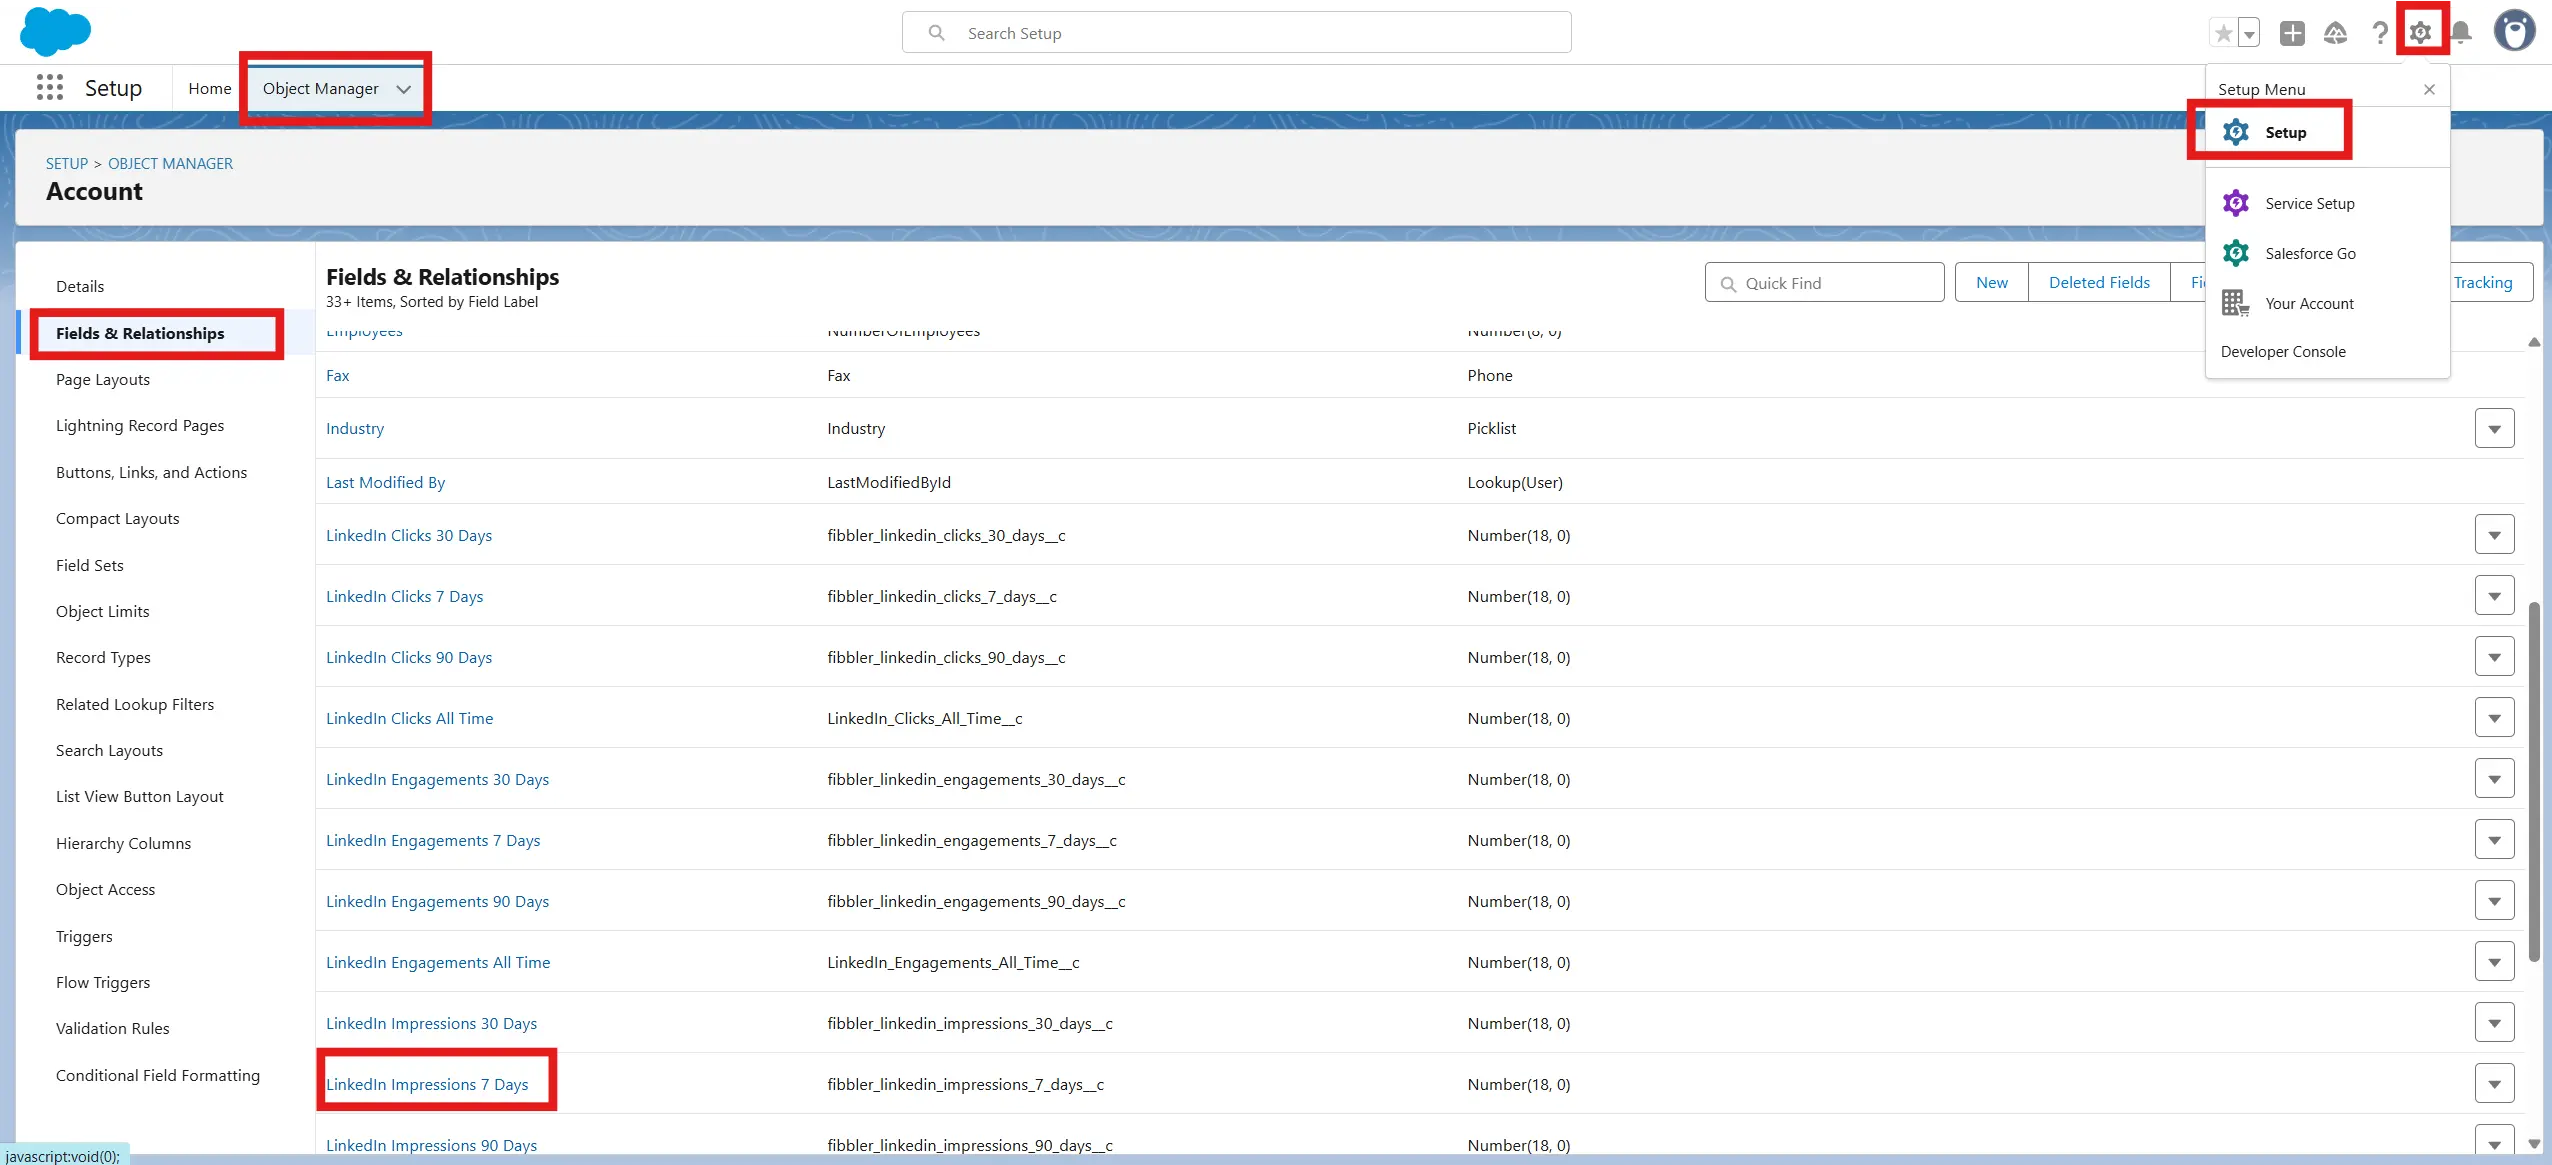
- Navigate to Setup > Object Manager > Account > Fields & Relationships.
- Verify the fields are created.
Option 2: Manual Setup
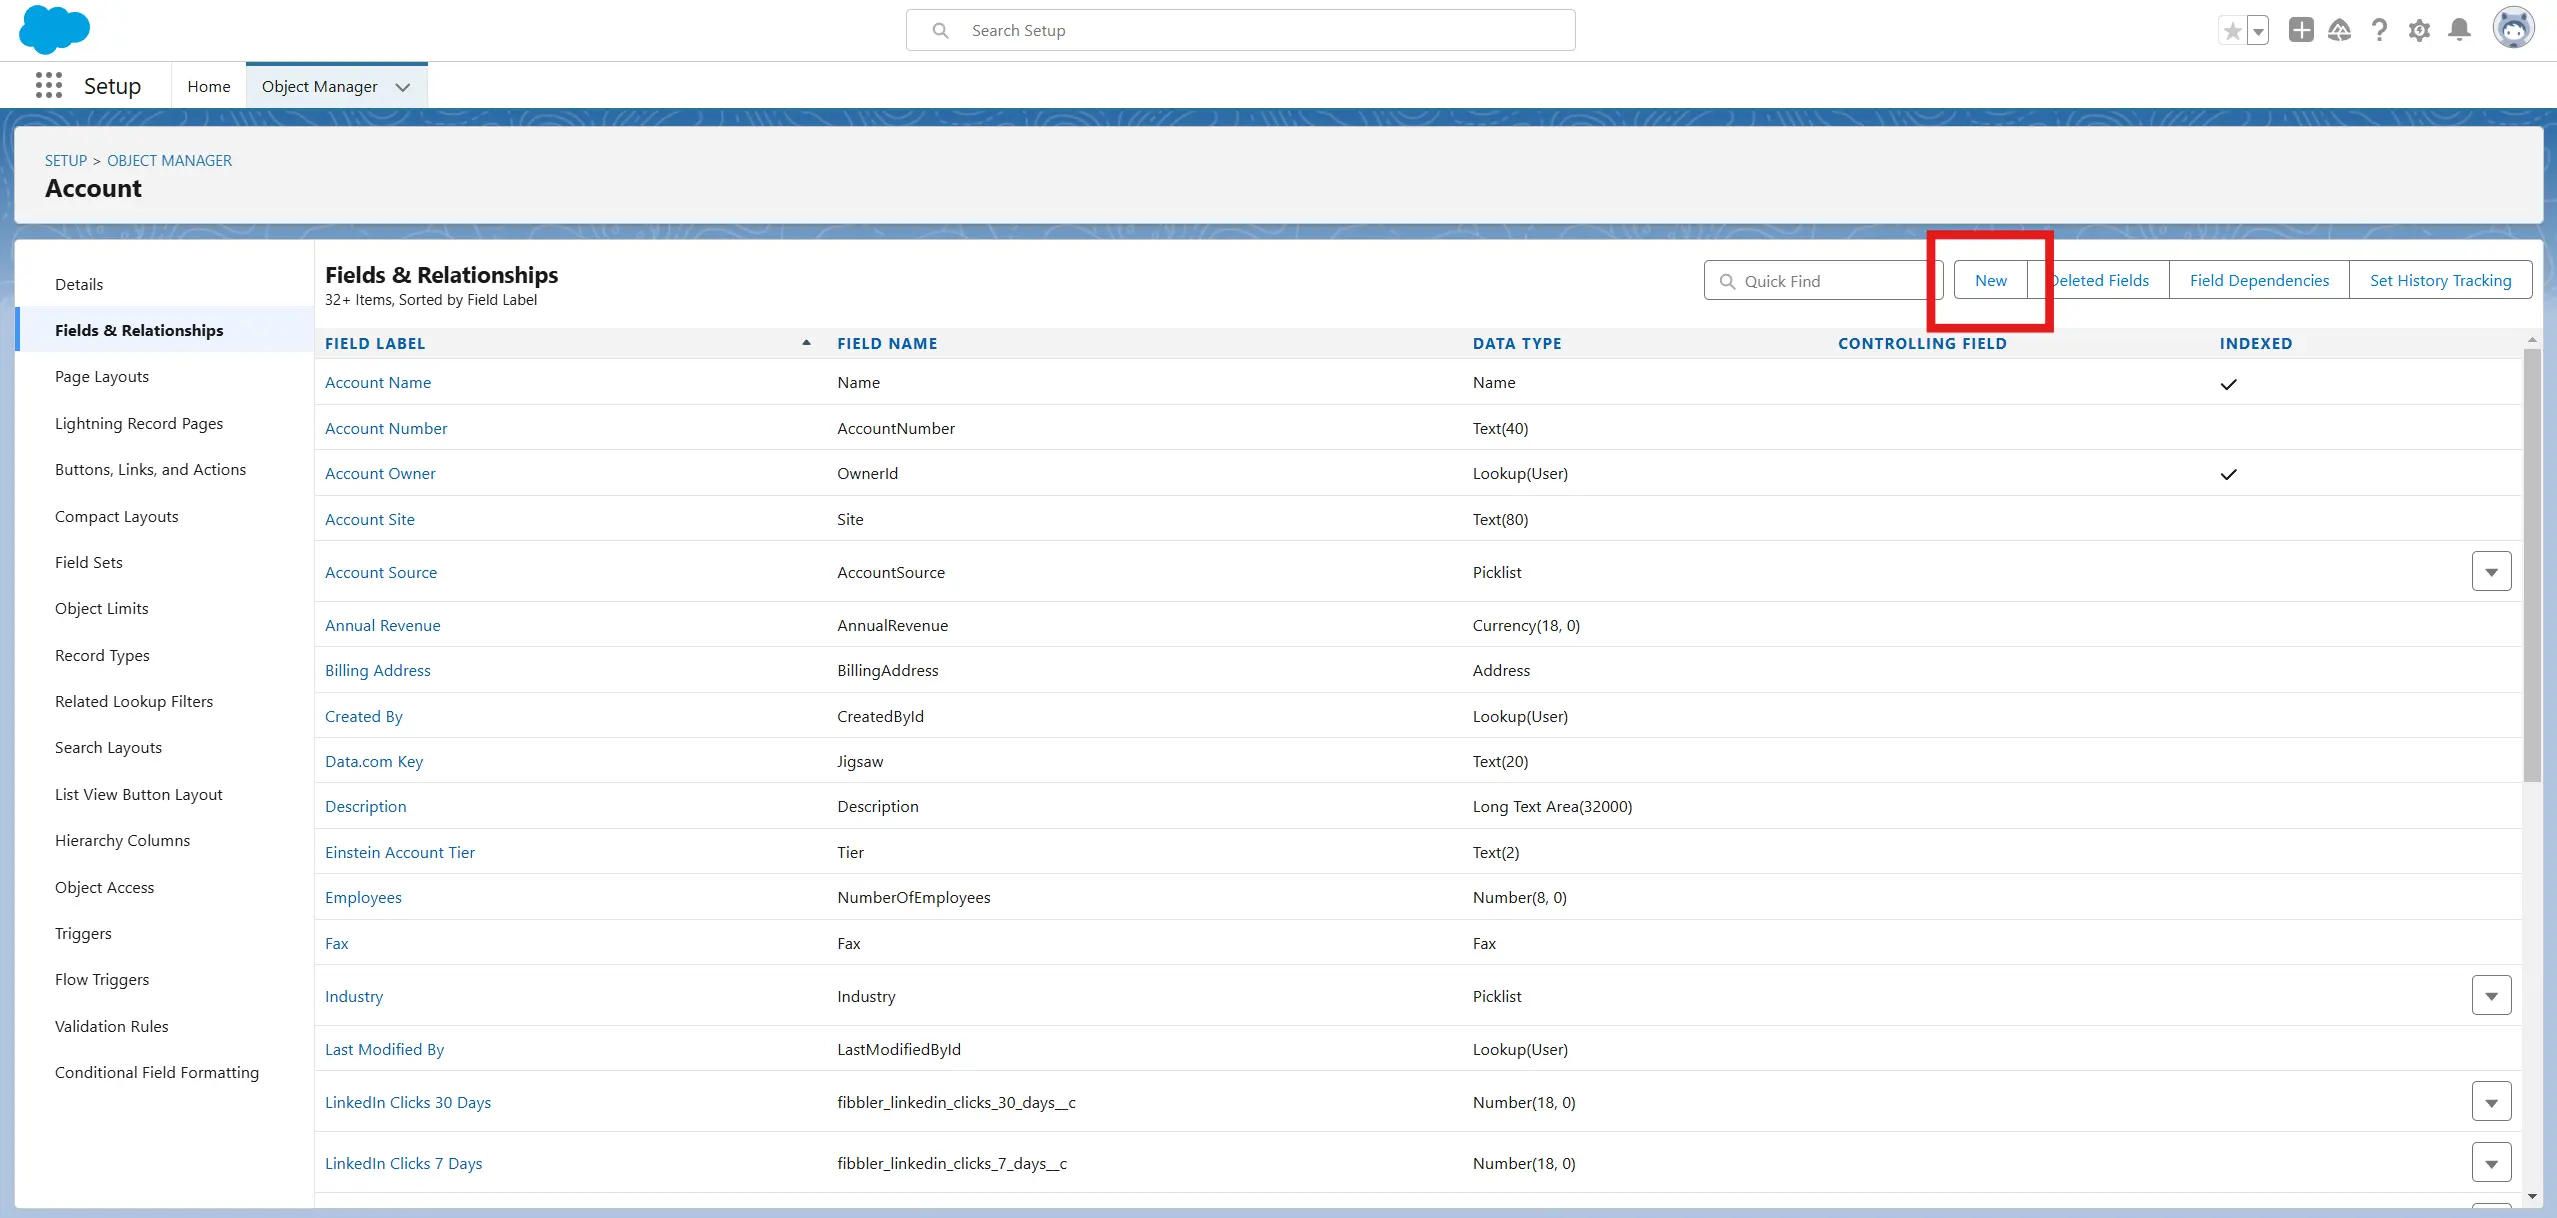
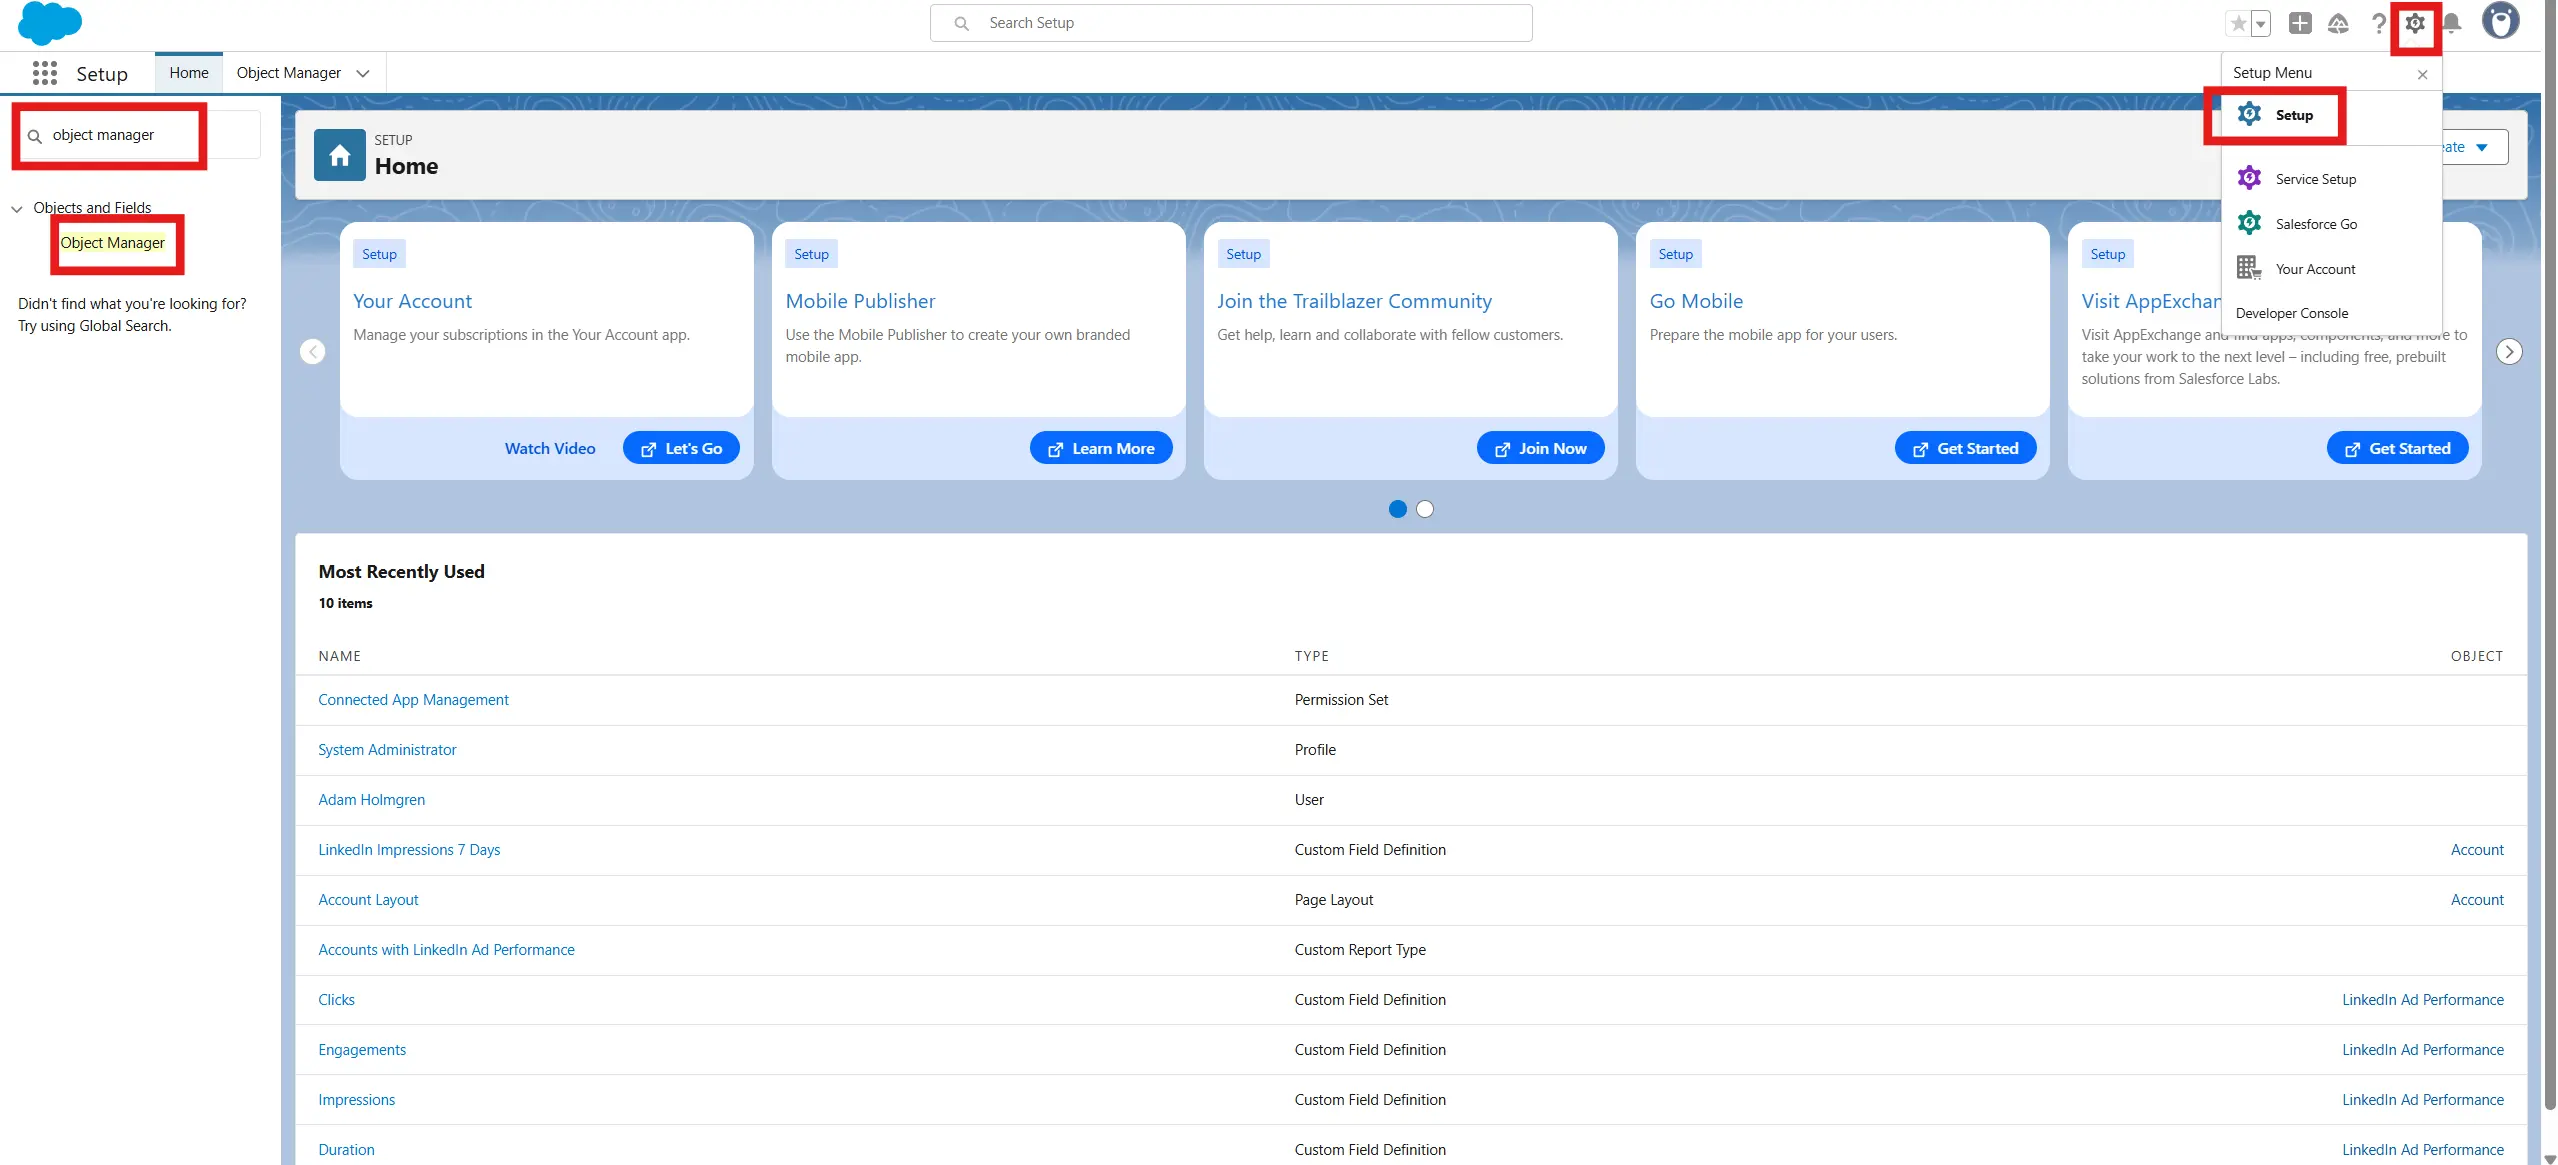
Navigate to Salesforce Setup to create a new field:
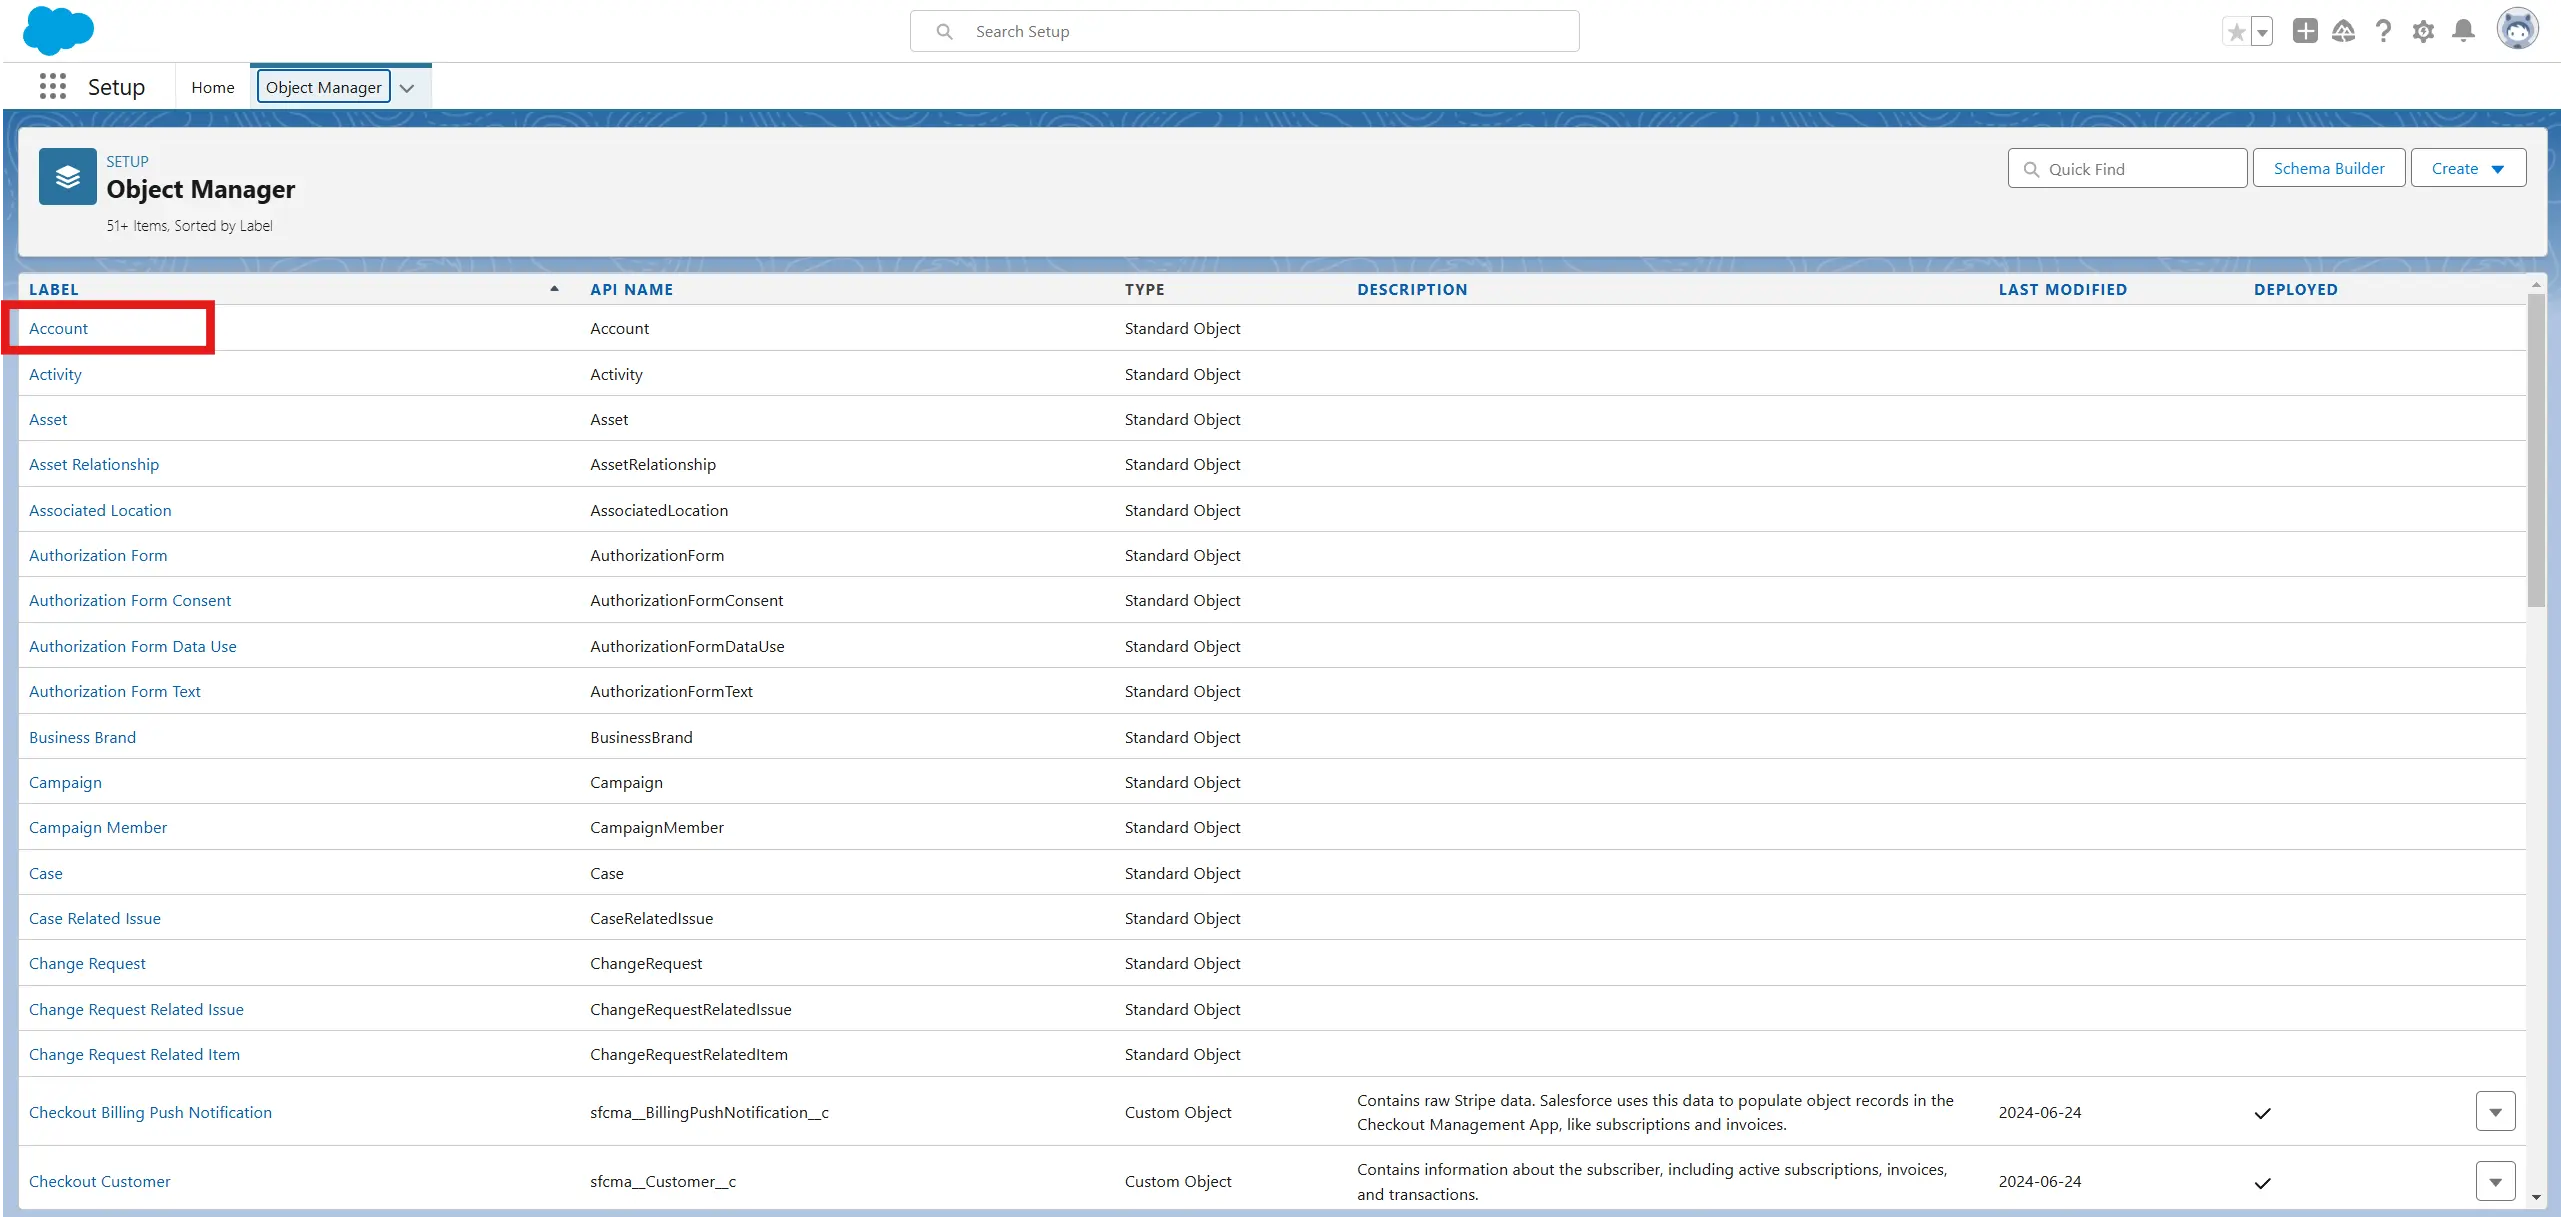
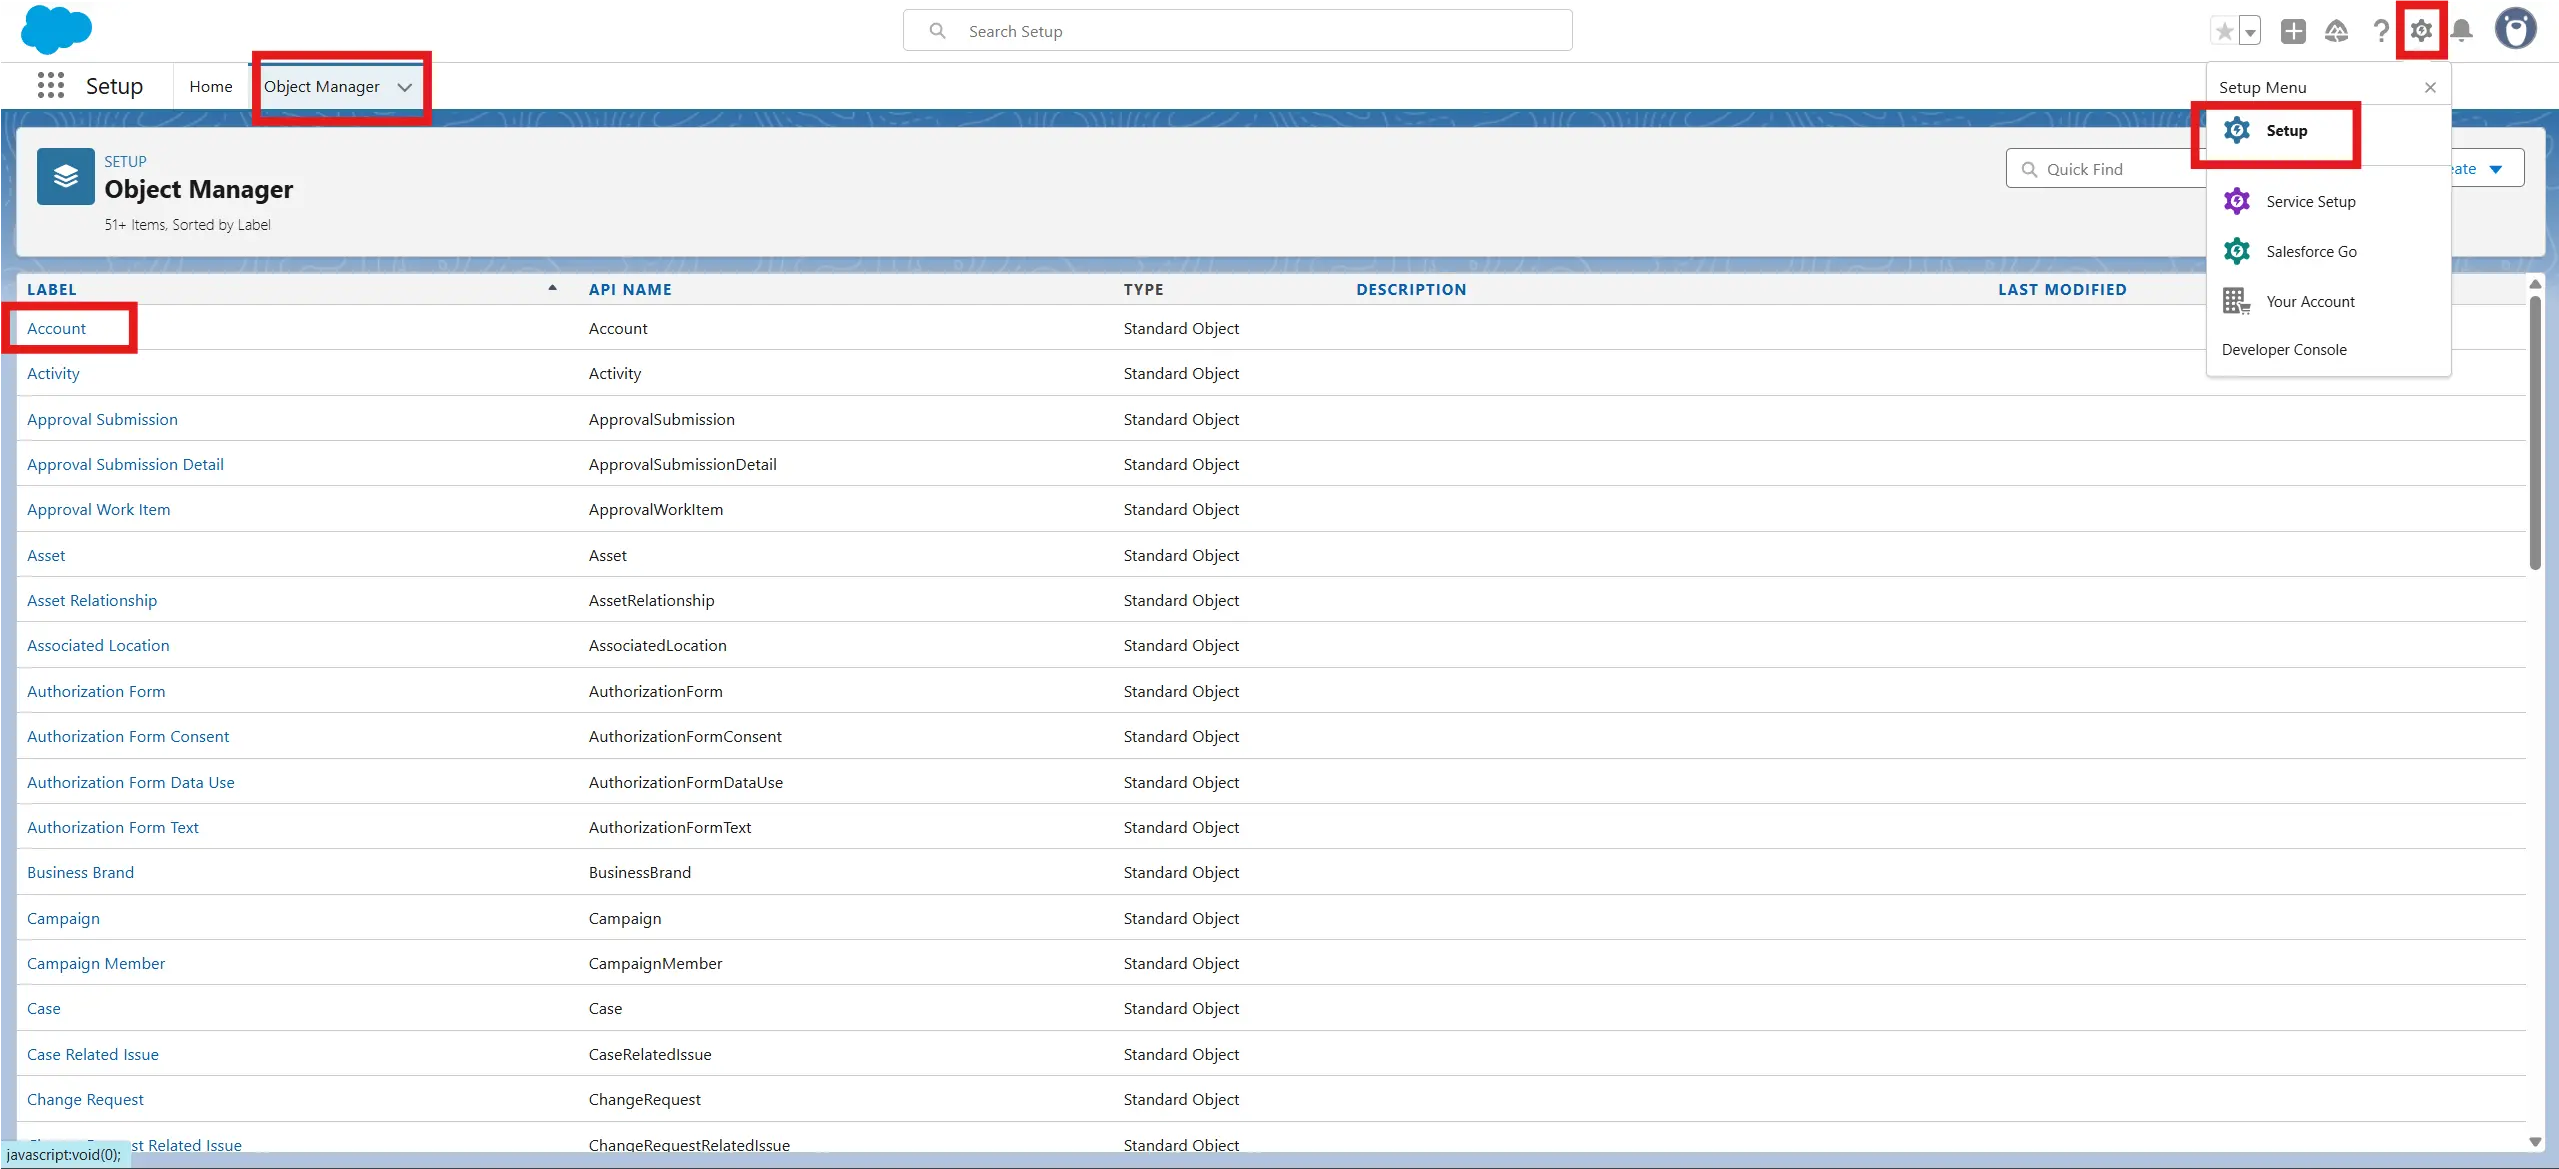
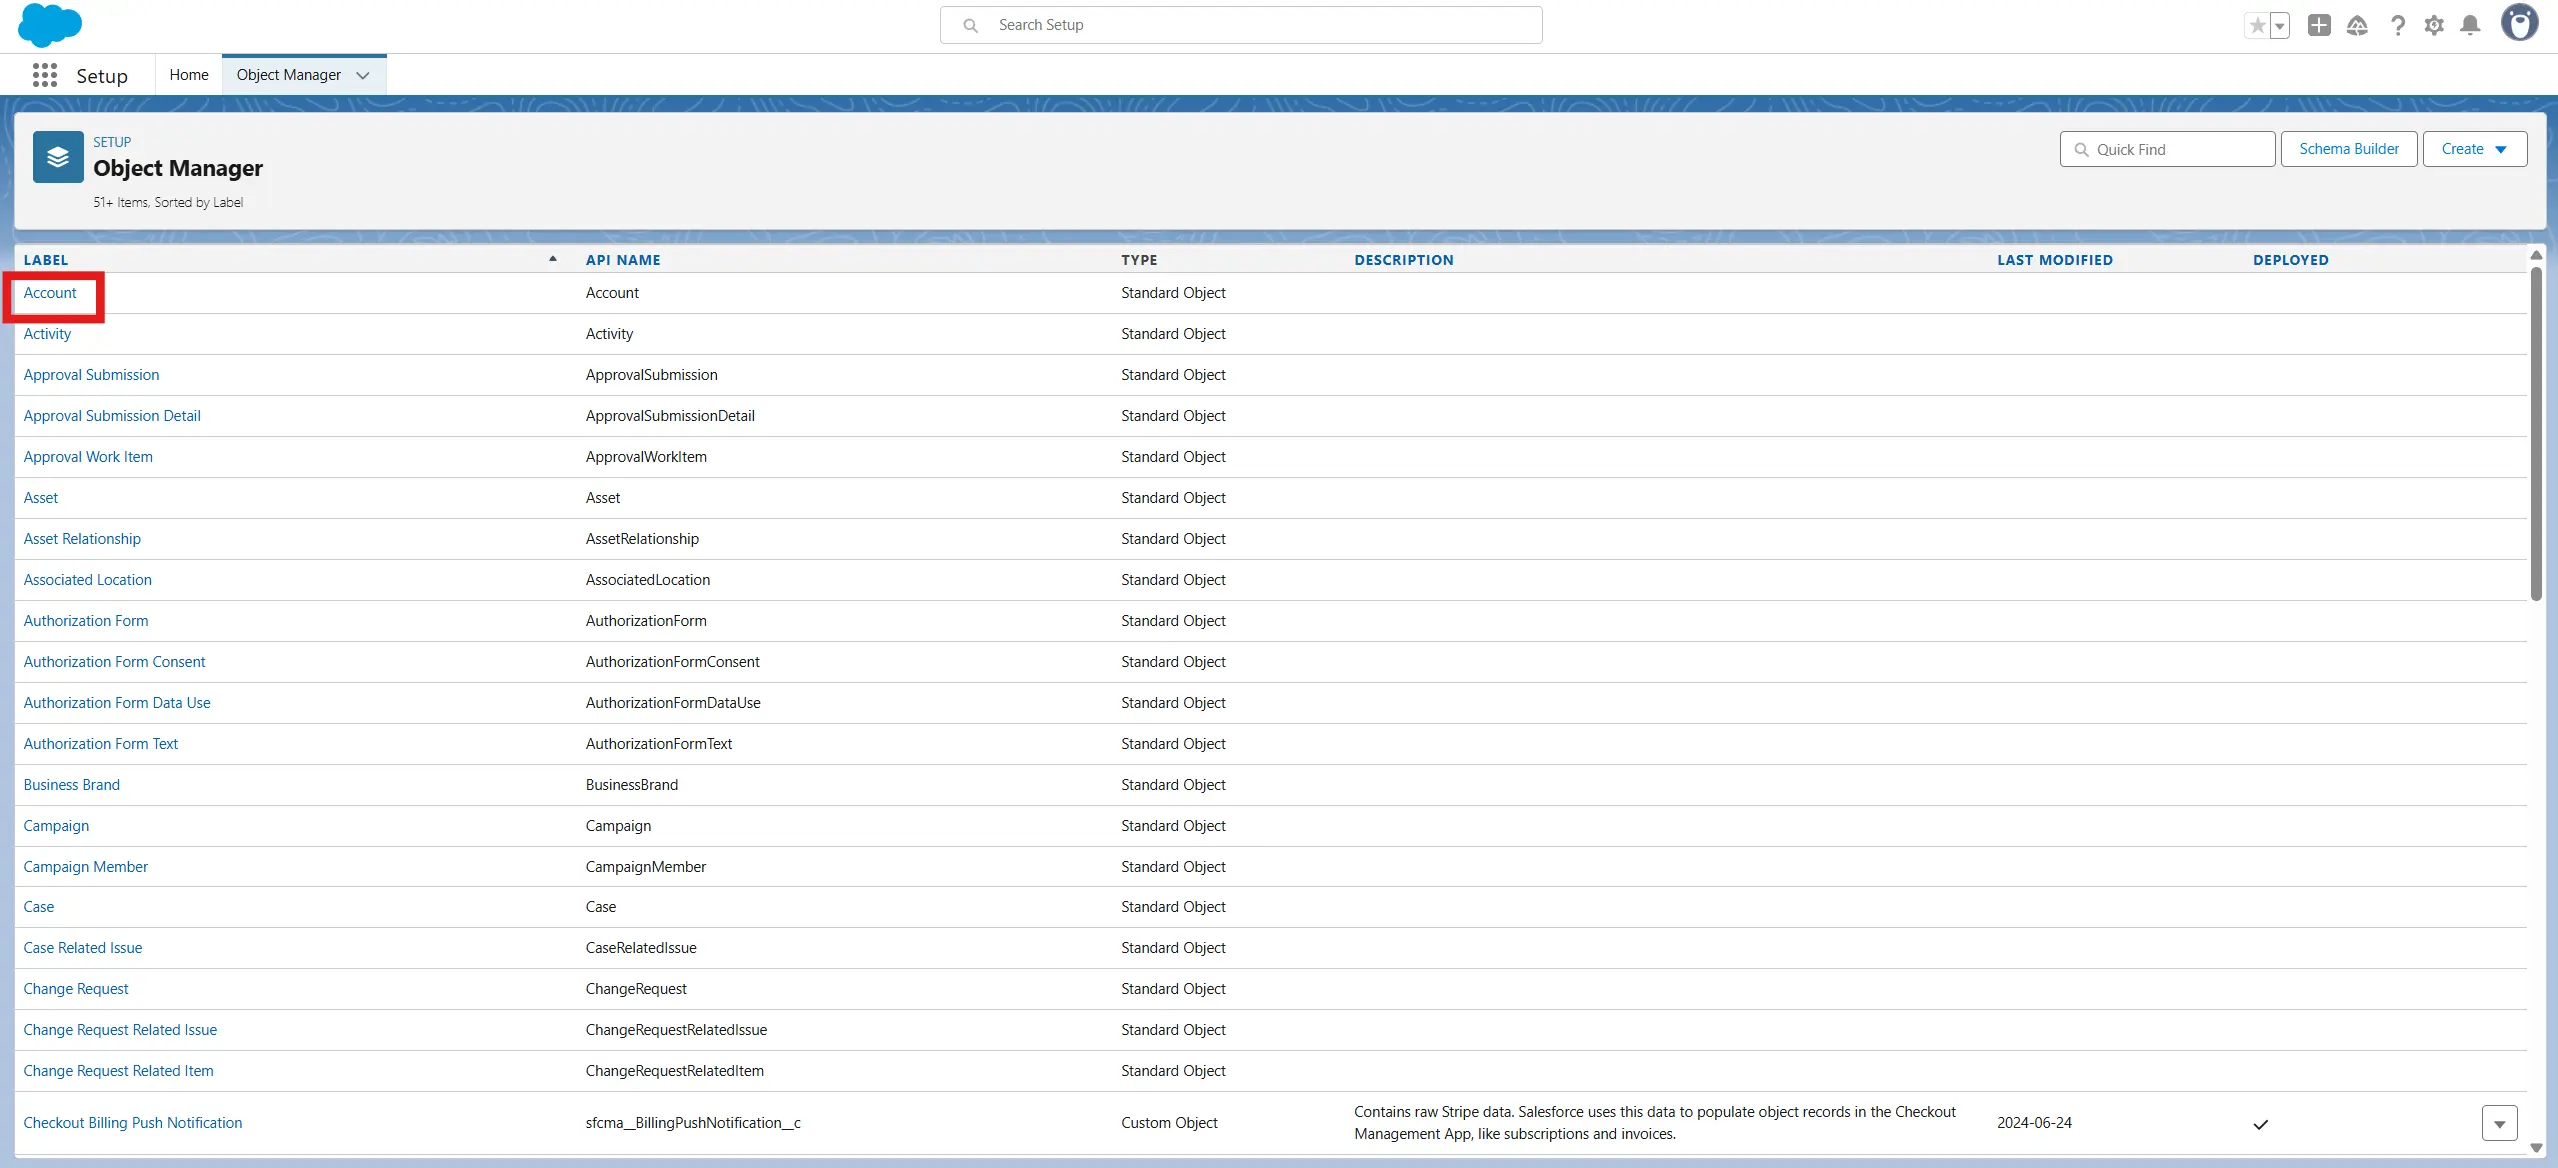
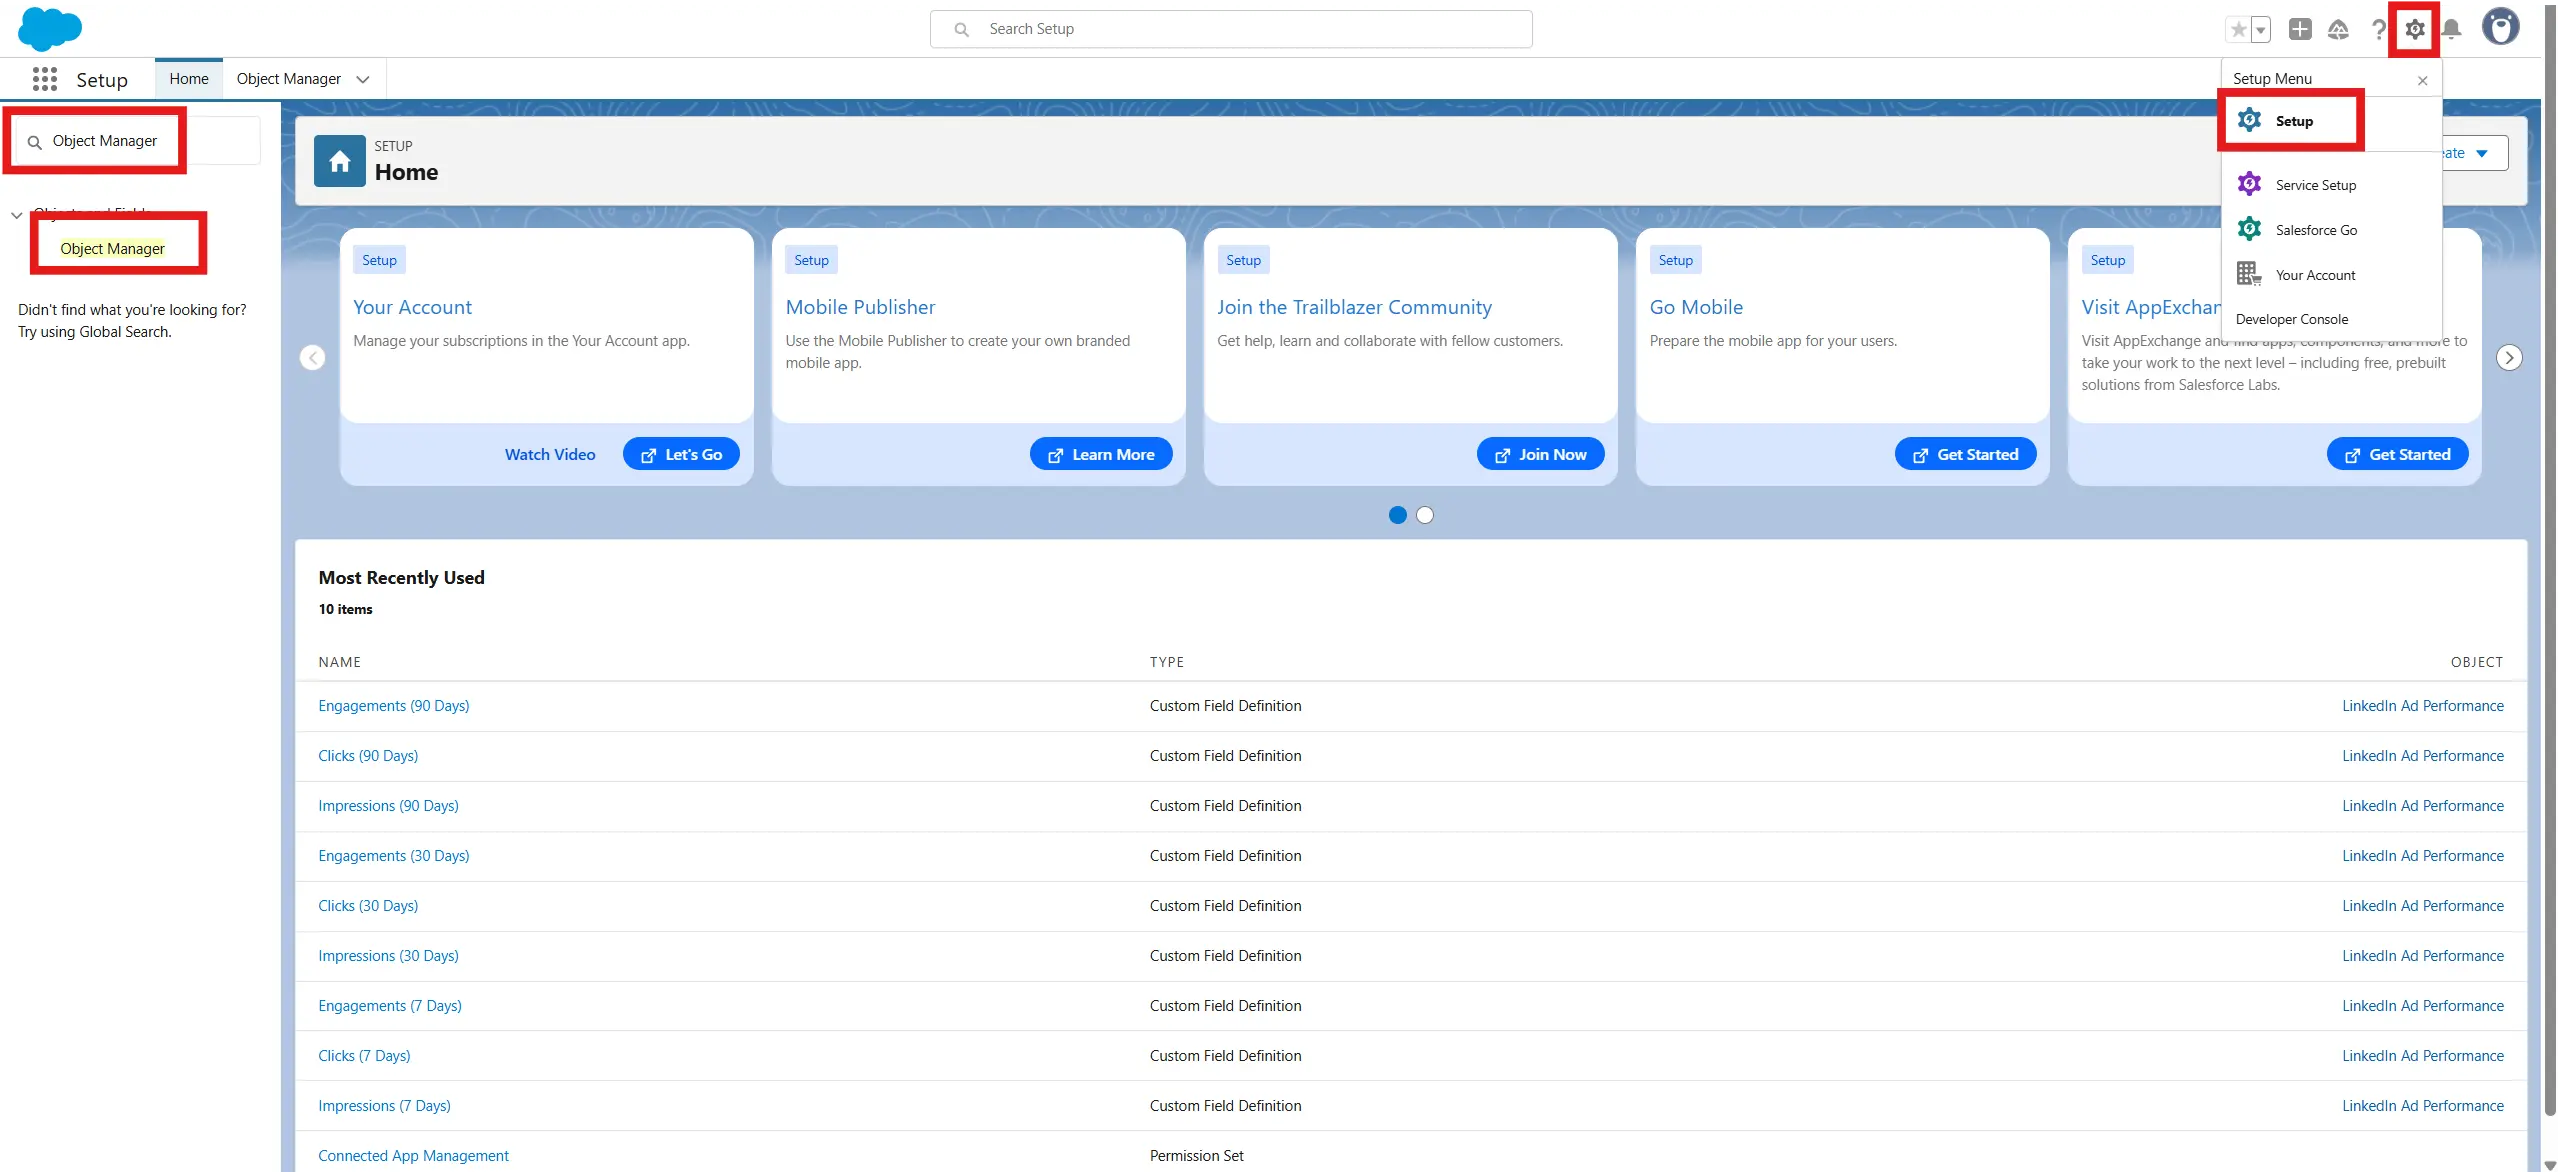
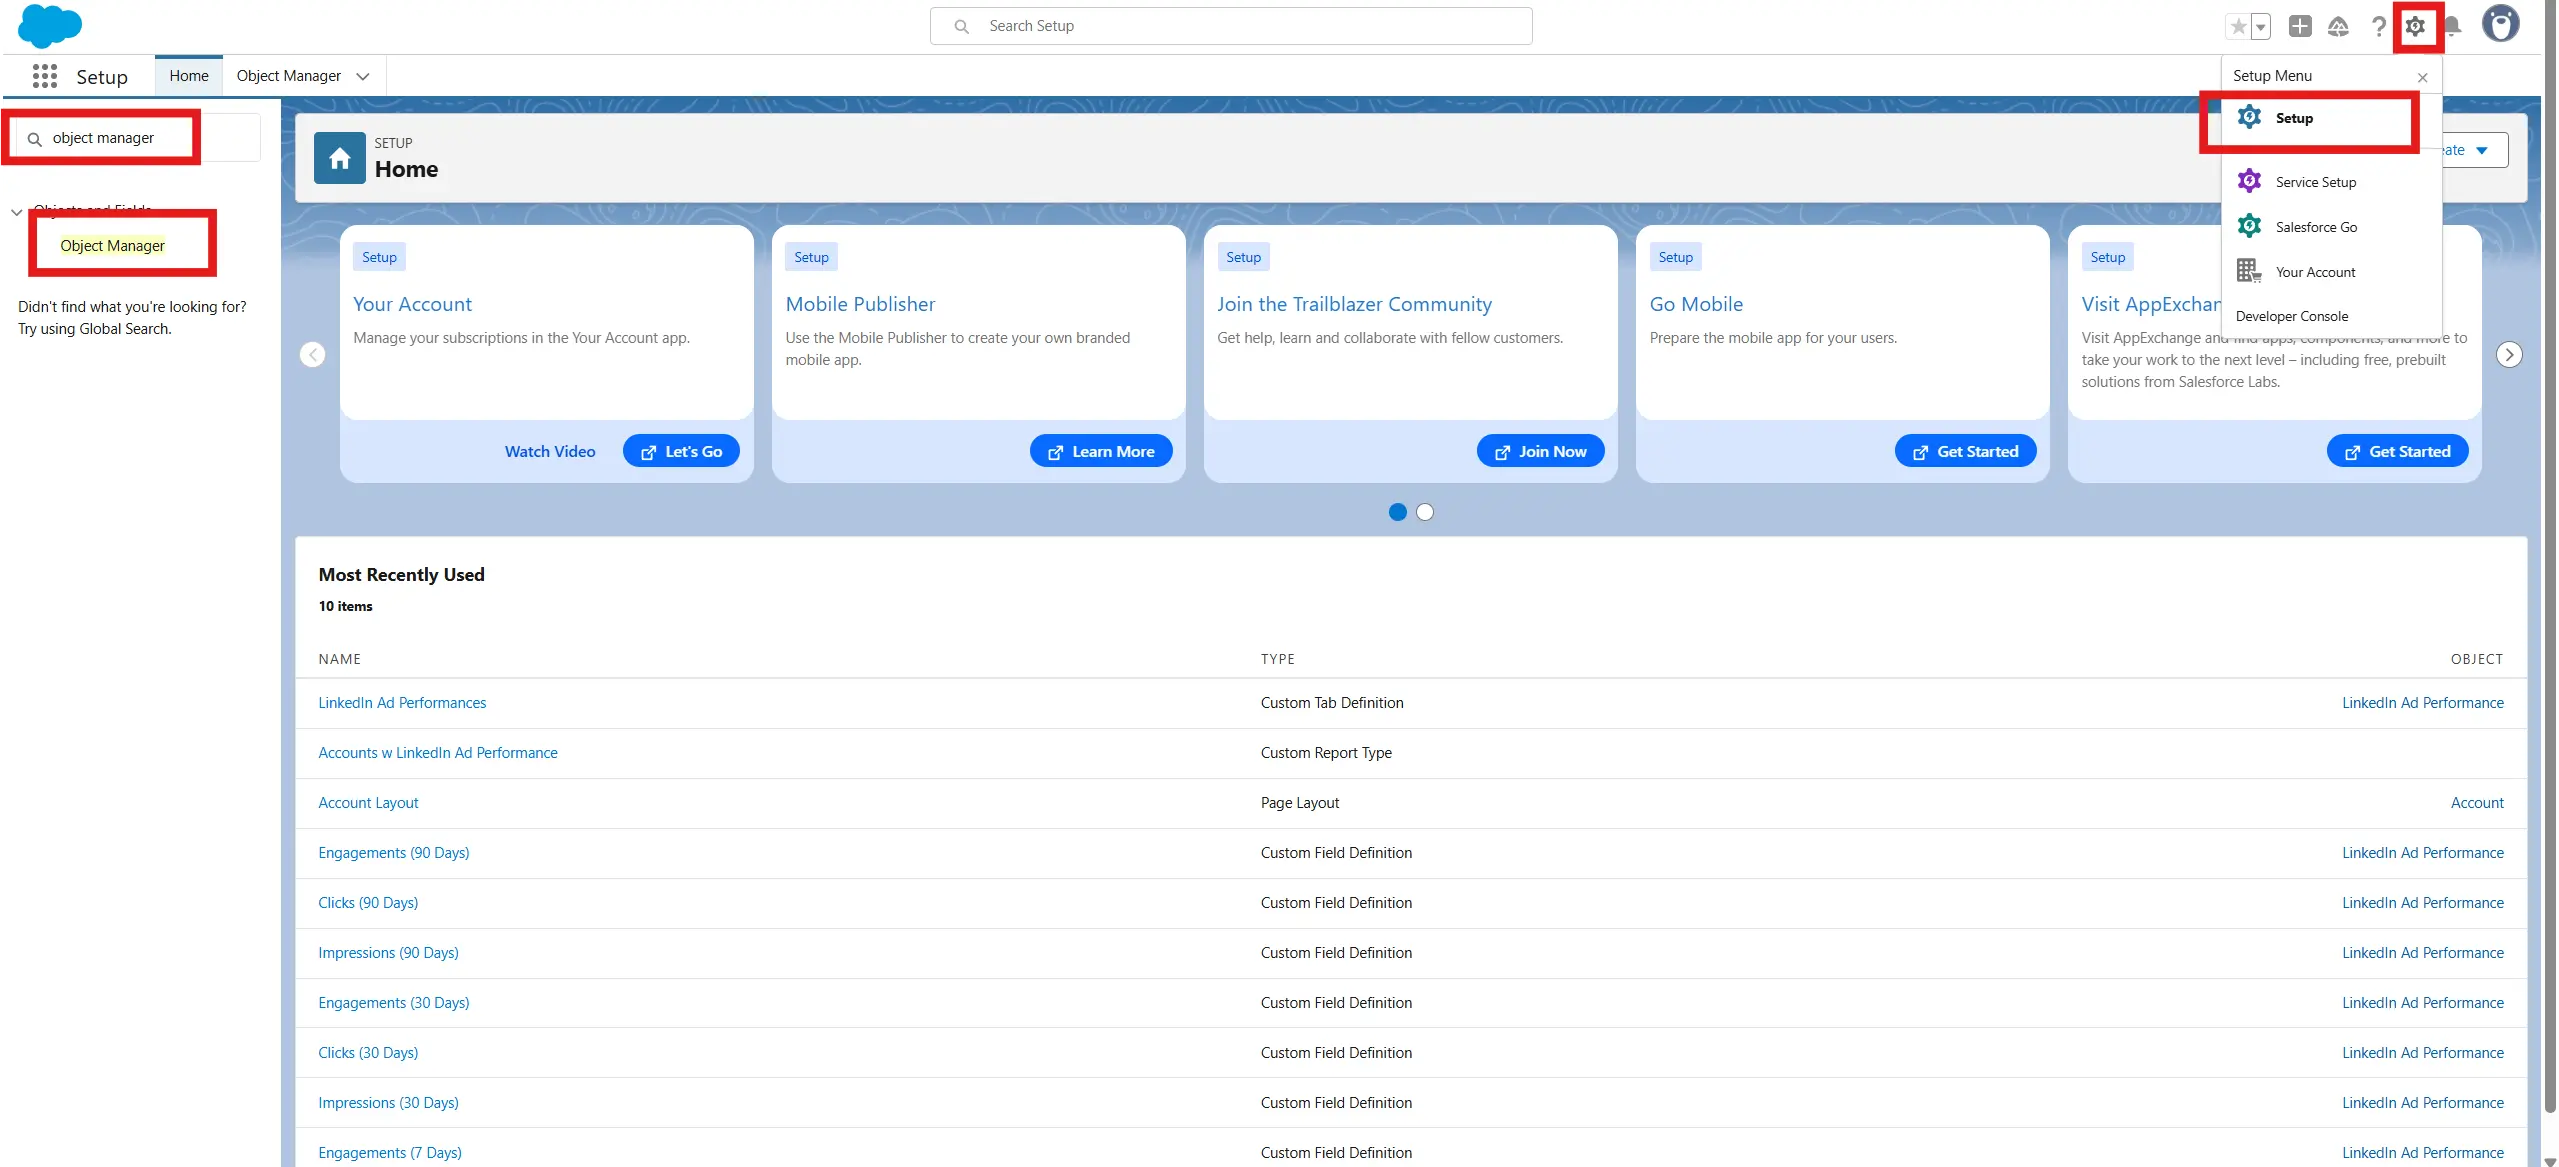
- Go to Setup > Object Manager
- In the object manager, go to Account
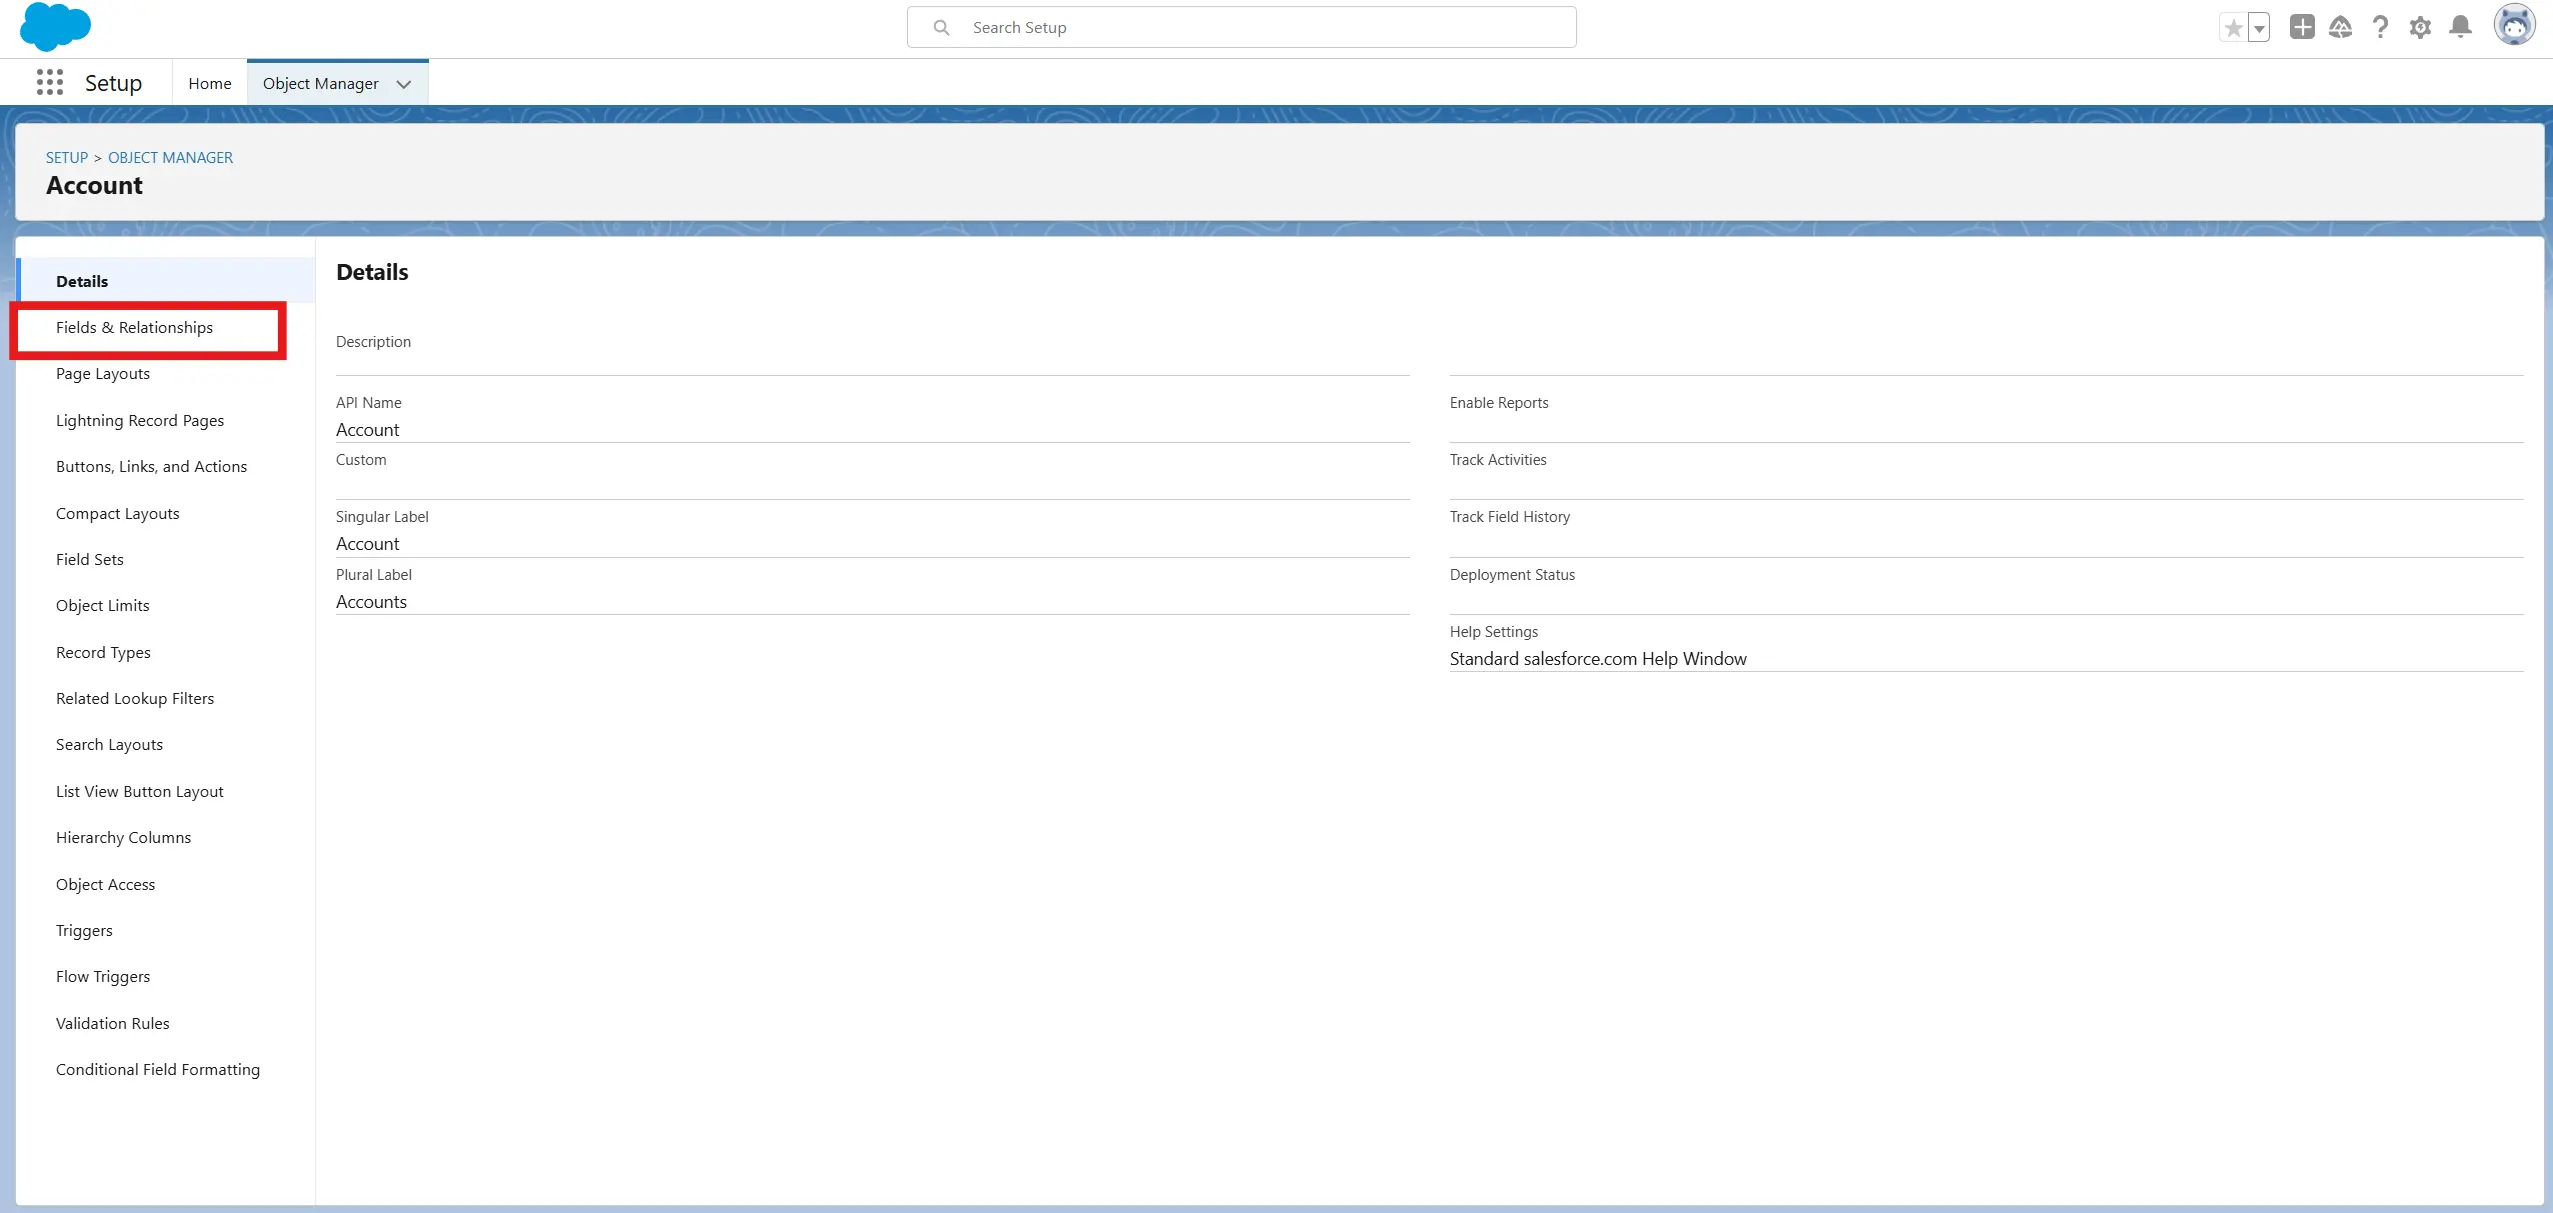
- In the "Account" view, go to Fields & Relationships
- In the "Fields & Relationships", go to New.
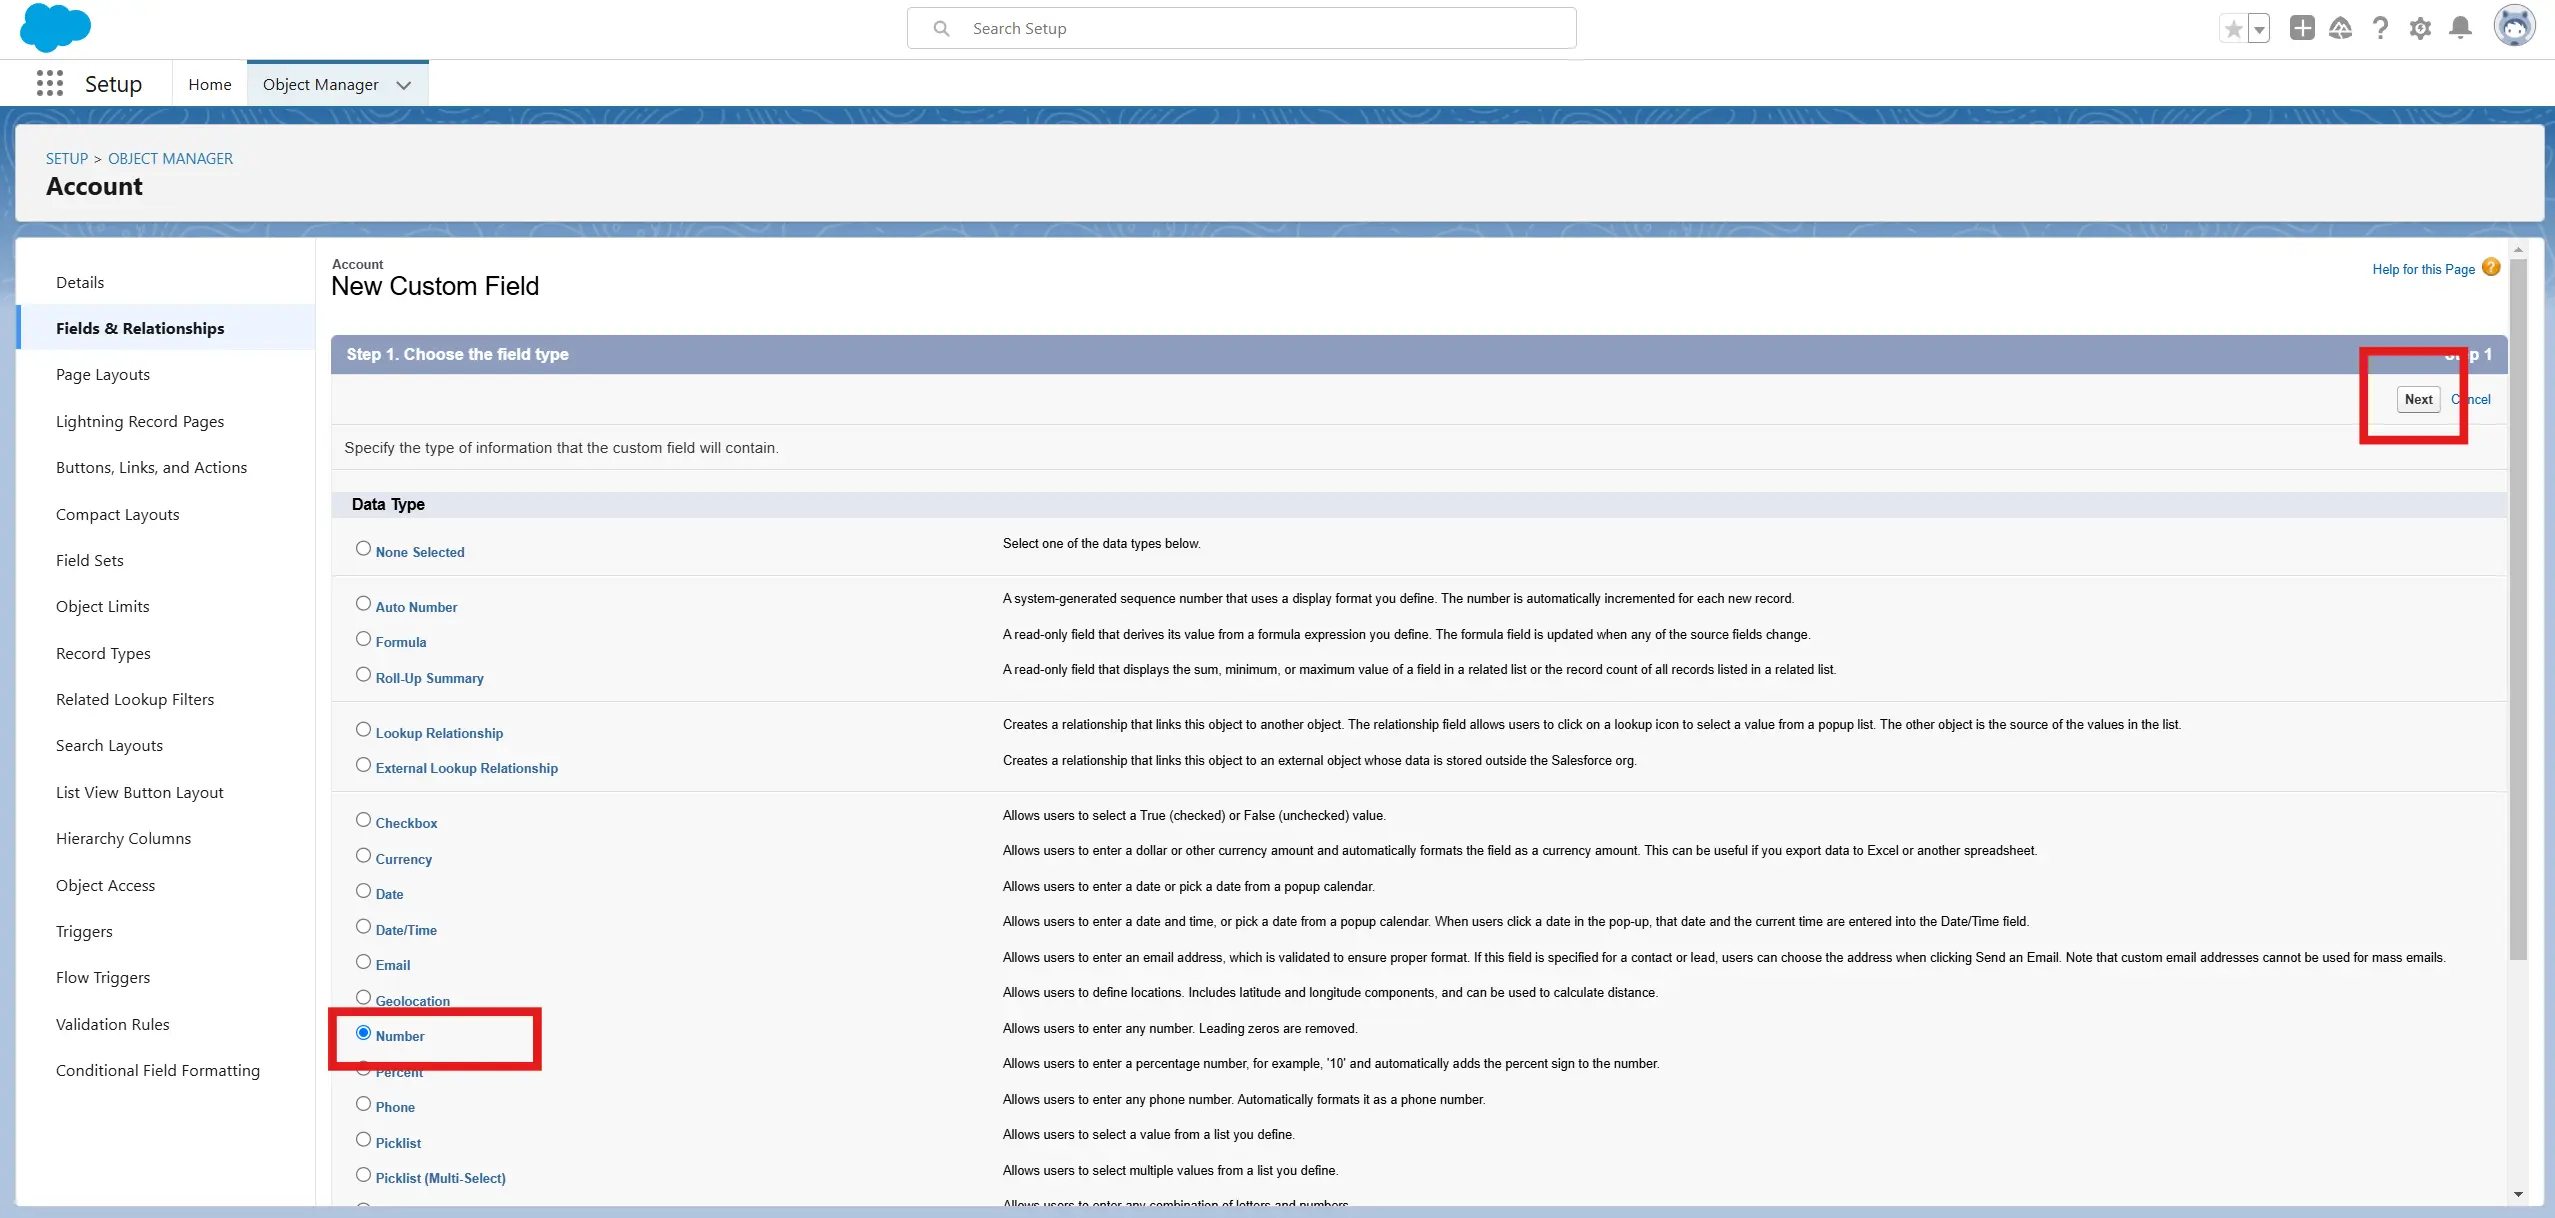
Create Custom Fields:
Choose Number as the field type. Then click Next.
Configure for each field (the yellow marked fields are either standard values or auto-fill based on what's been entered into the red field):
- Field Label: LinkedIn Clicks 30 Days.
- Field Name:
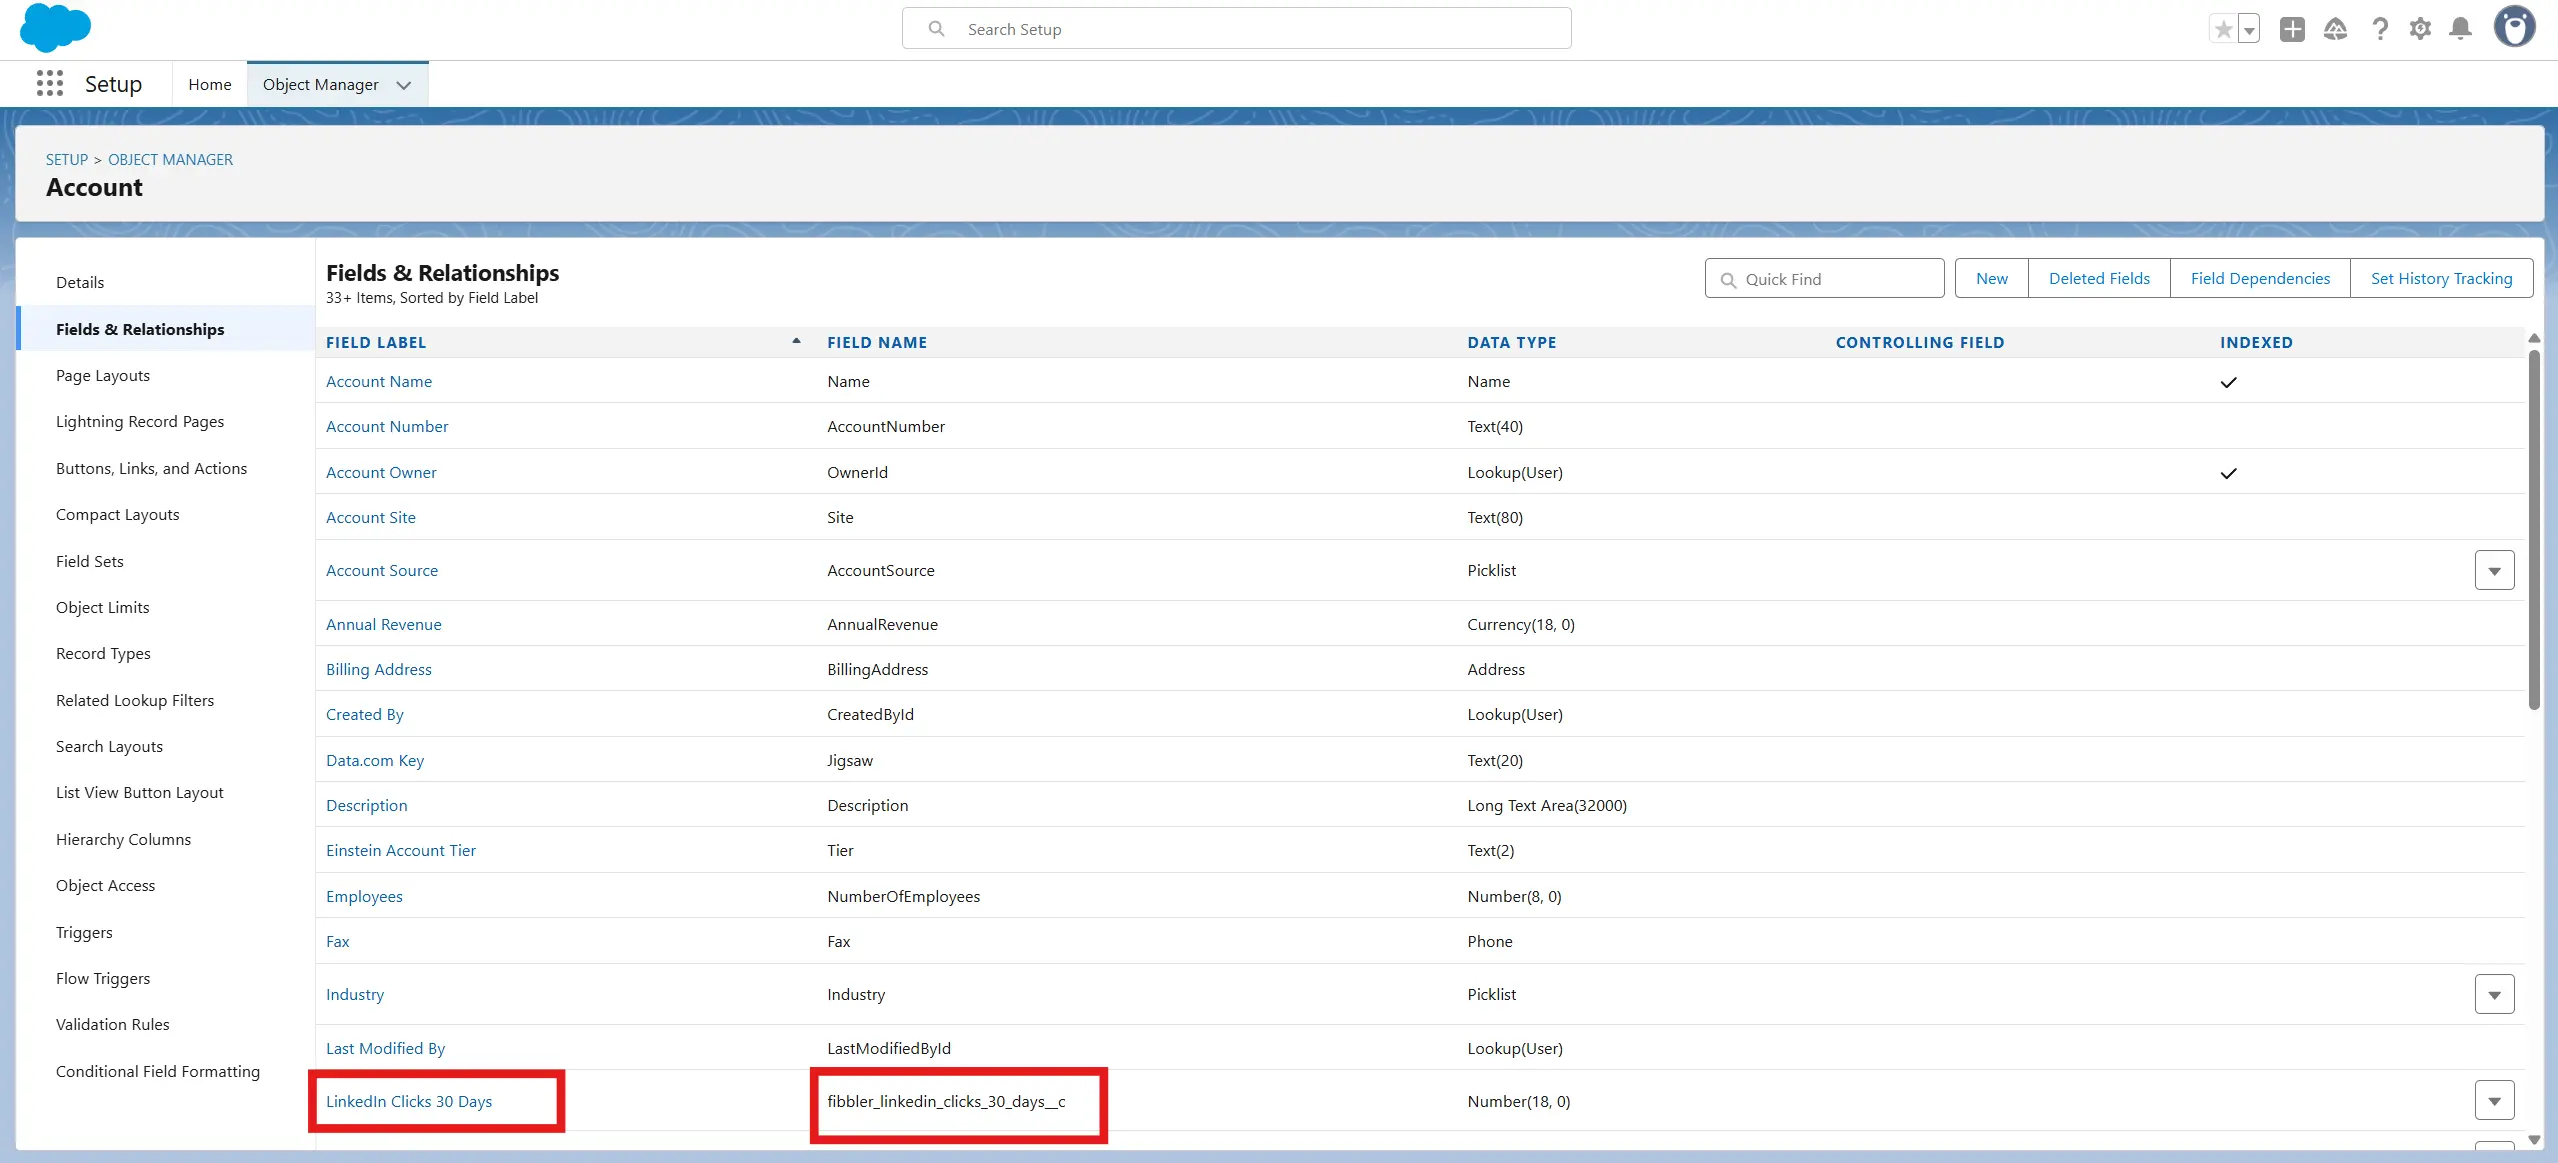
fibbler_linkedin_clicks_30_days. (this auto-fills based on the Field Label) Salesforce automatically generates the API Name asfibbler_linkedin_clicks_30_days__cfrom the field name specified. Adding"__c"indicates that this is a custom field. You can verify the field is set up correctly by taking the following steps:- Go to Setup > Object Manager > Account > Fields & Relationships.
- Find the field you just created (
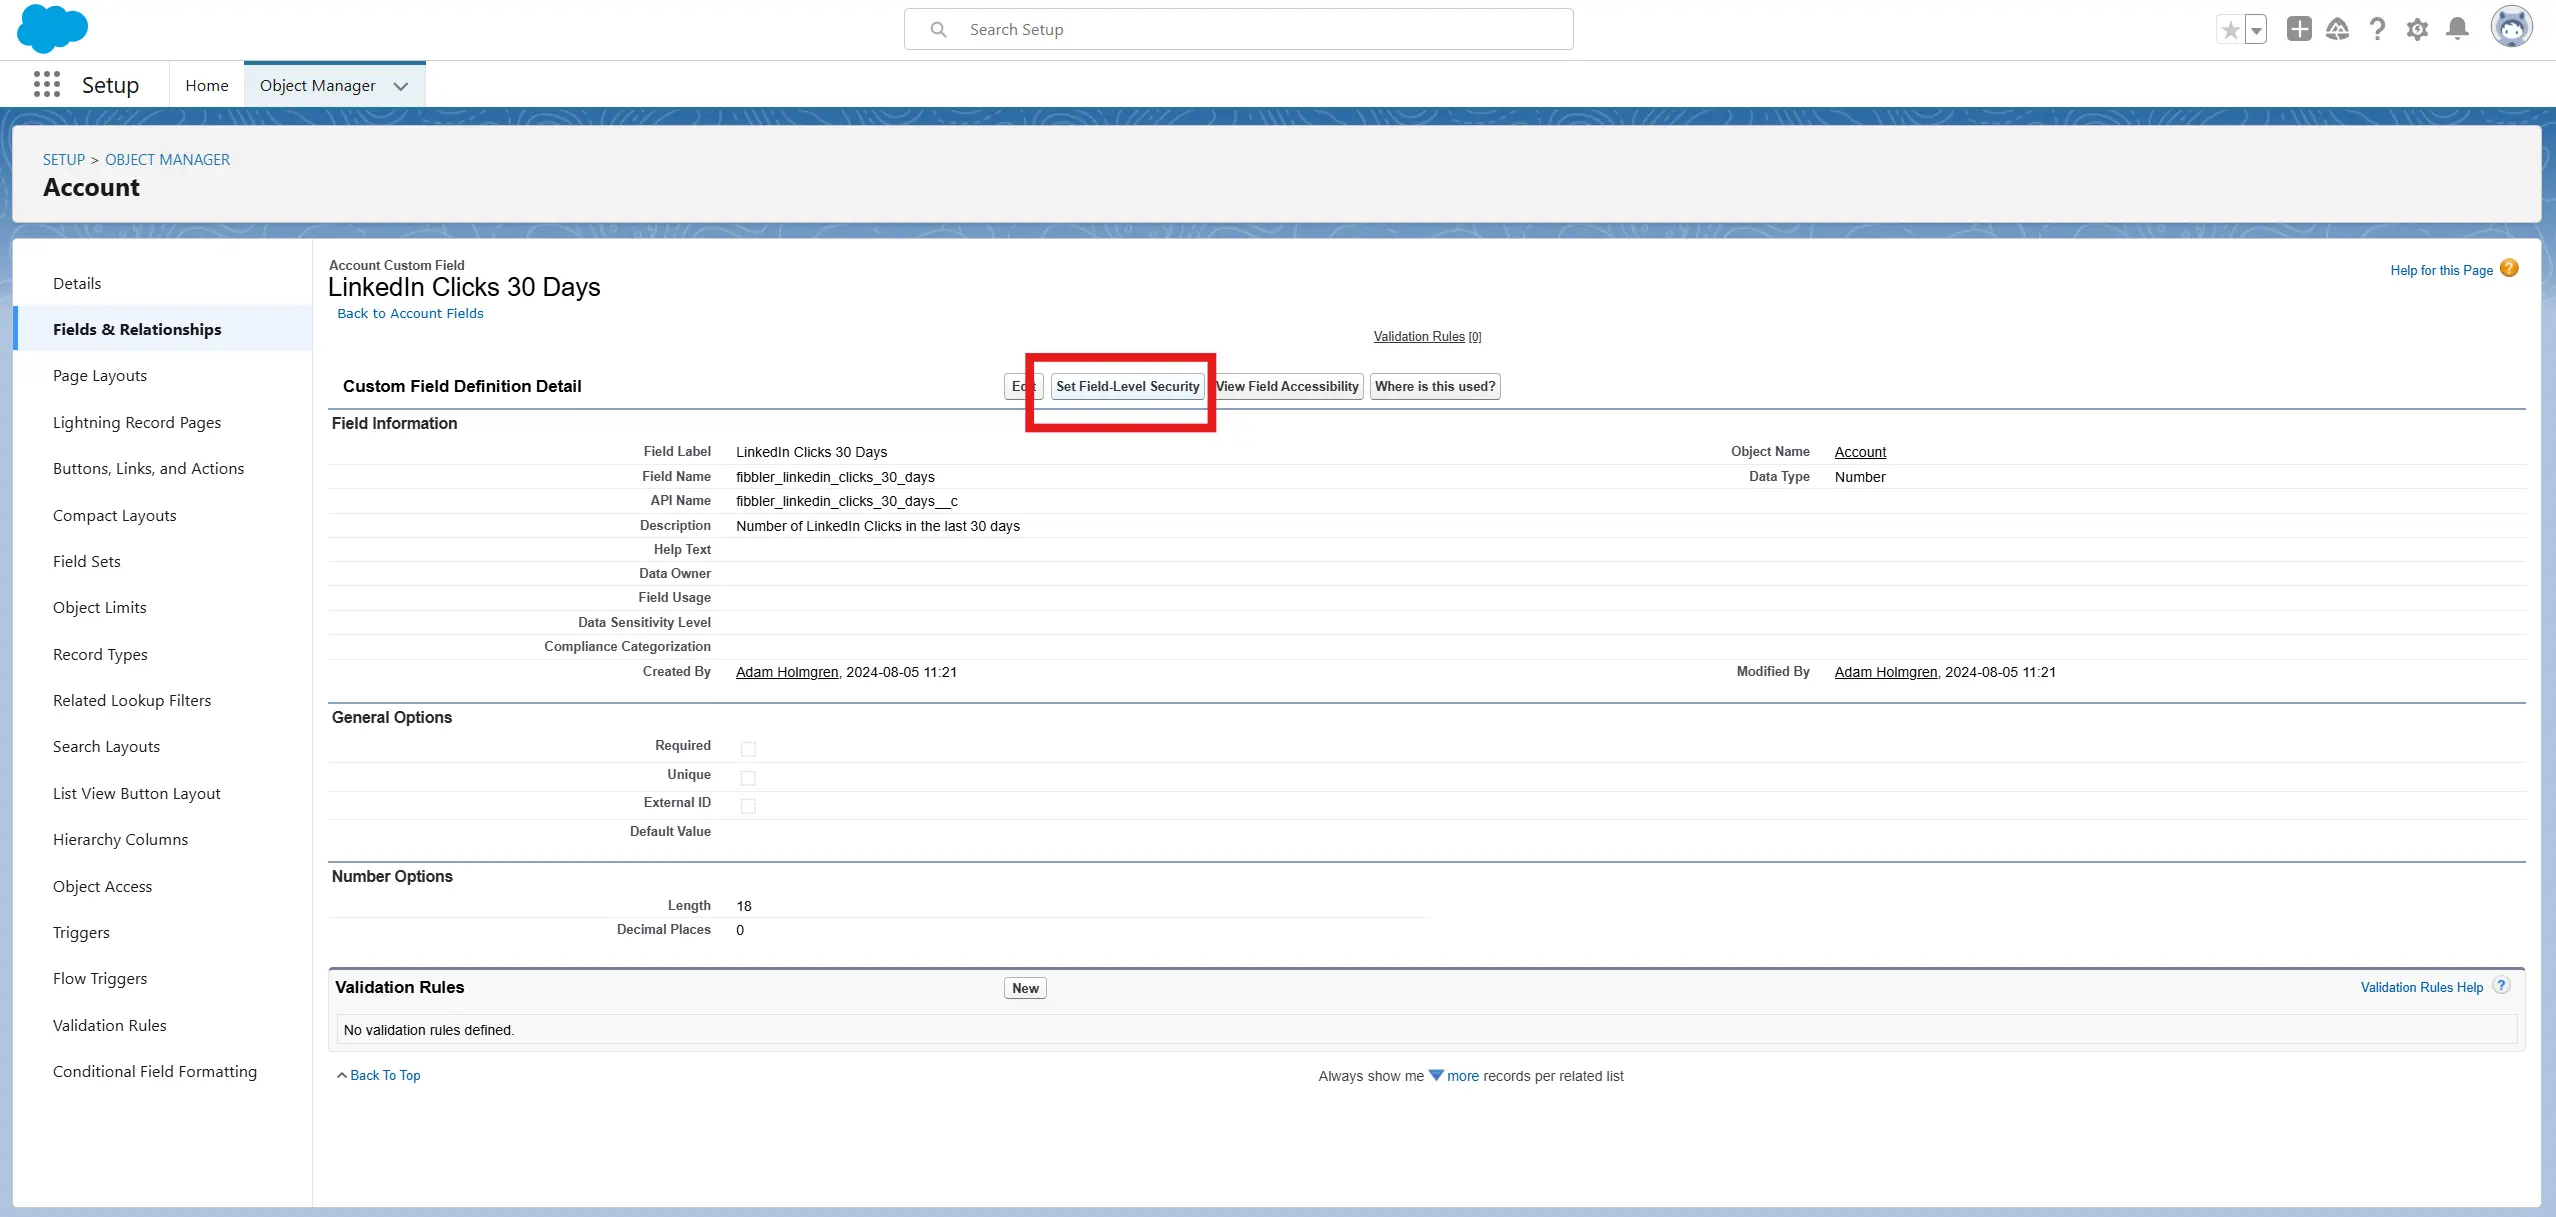
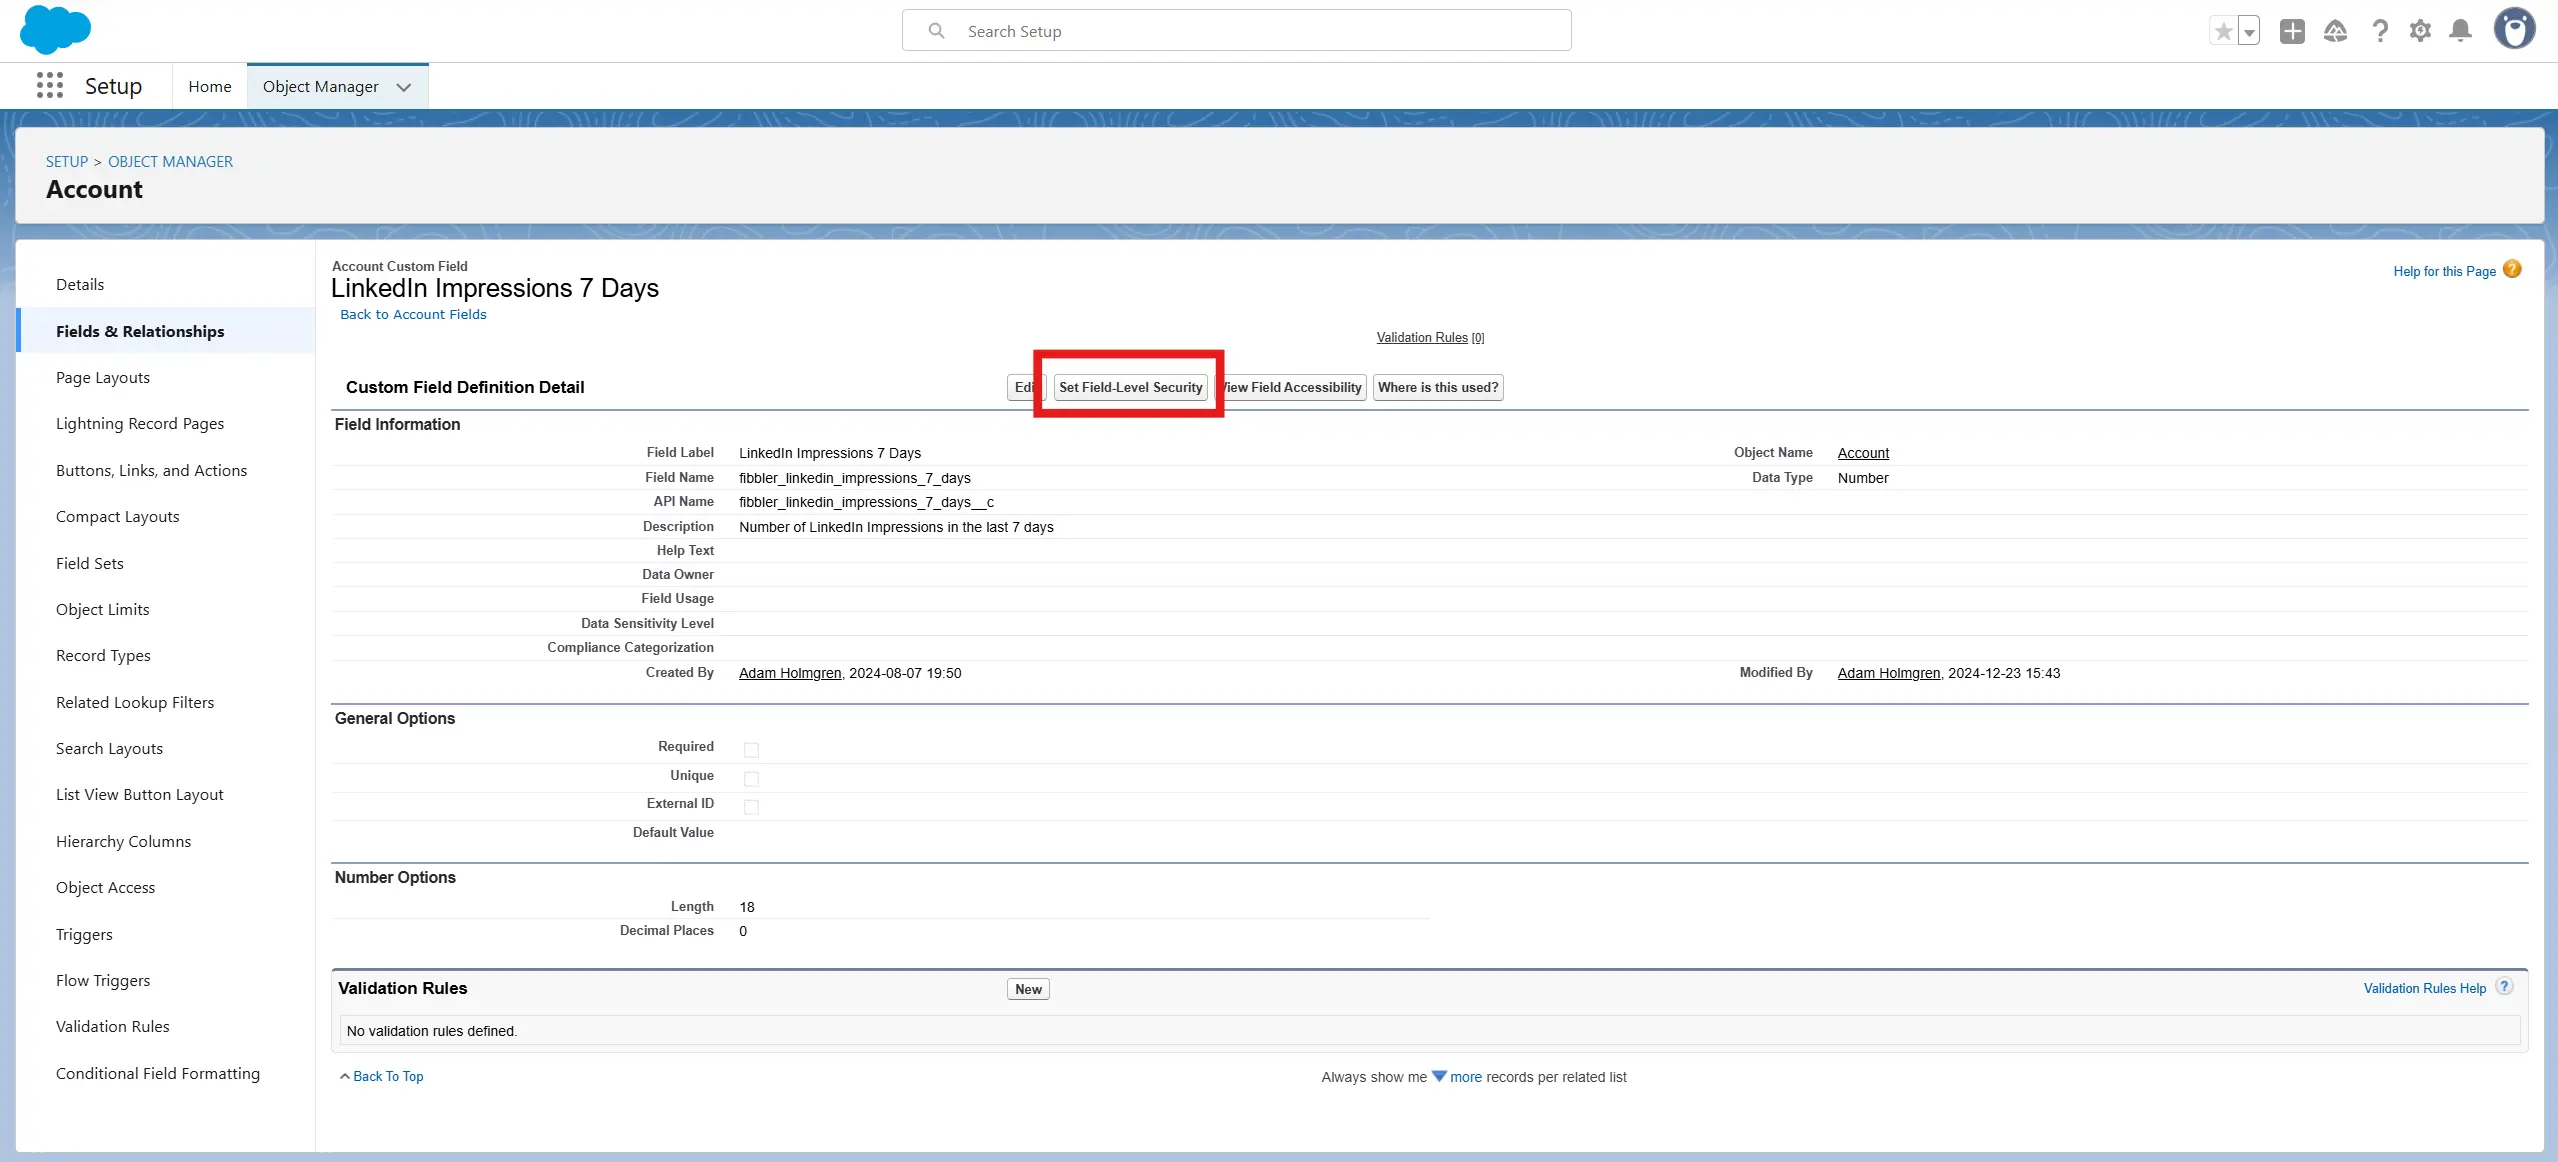
LinkedIn Clicks 30 Days) and click on its name. - In the Field Definition Detail view, you will see:
- Field Name: The friendly name used for user-facing purposes (e.g.,
LinkedIn Clicks 30 Days). - API Name: The programmatic identifier used by integrations and the Salesforce API (e.g.,
fibbler_linkedin_clicks_30_days__c).
- Field Name: The friendly name used for user-facing purposes (e.g.,
- Length: 18
- Decimal Places: 0
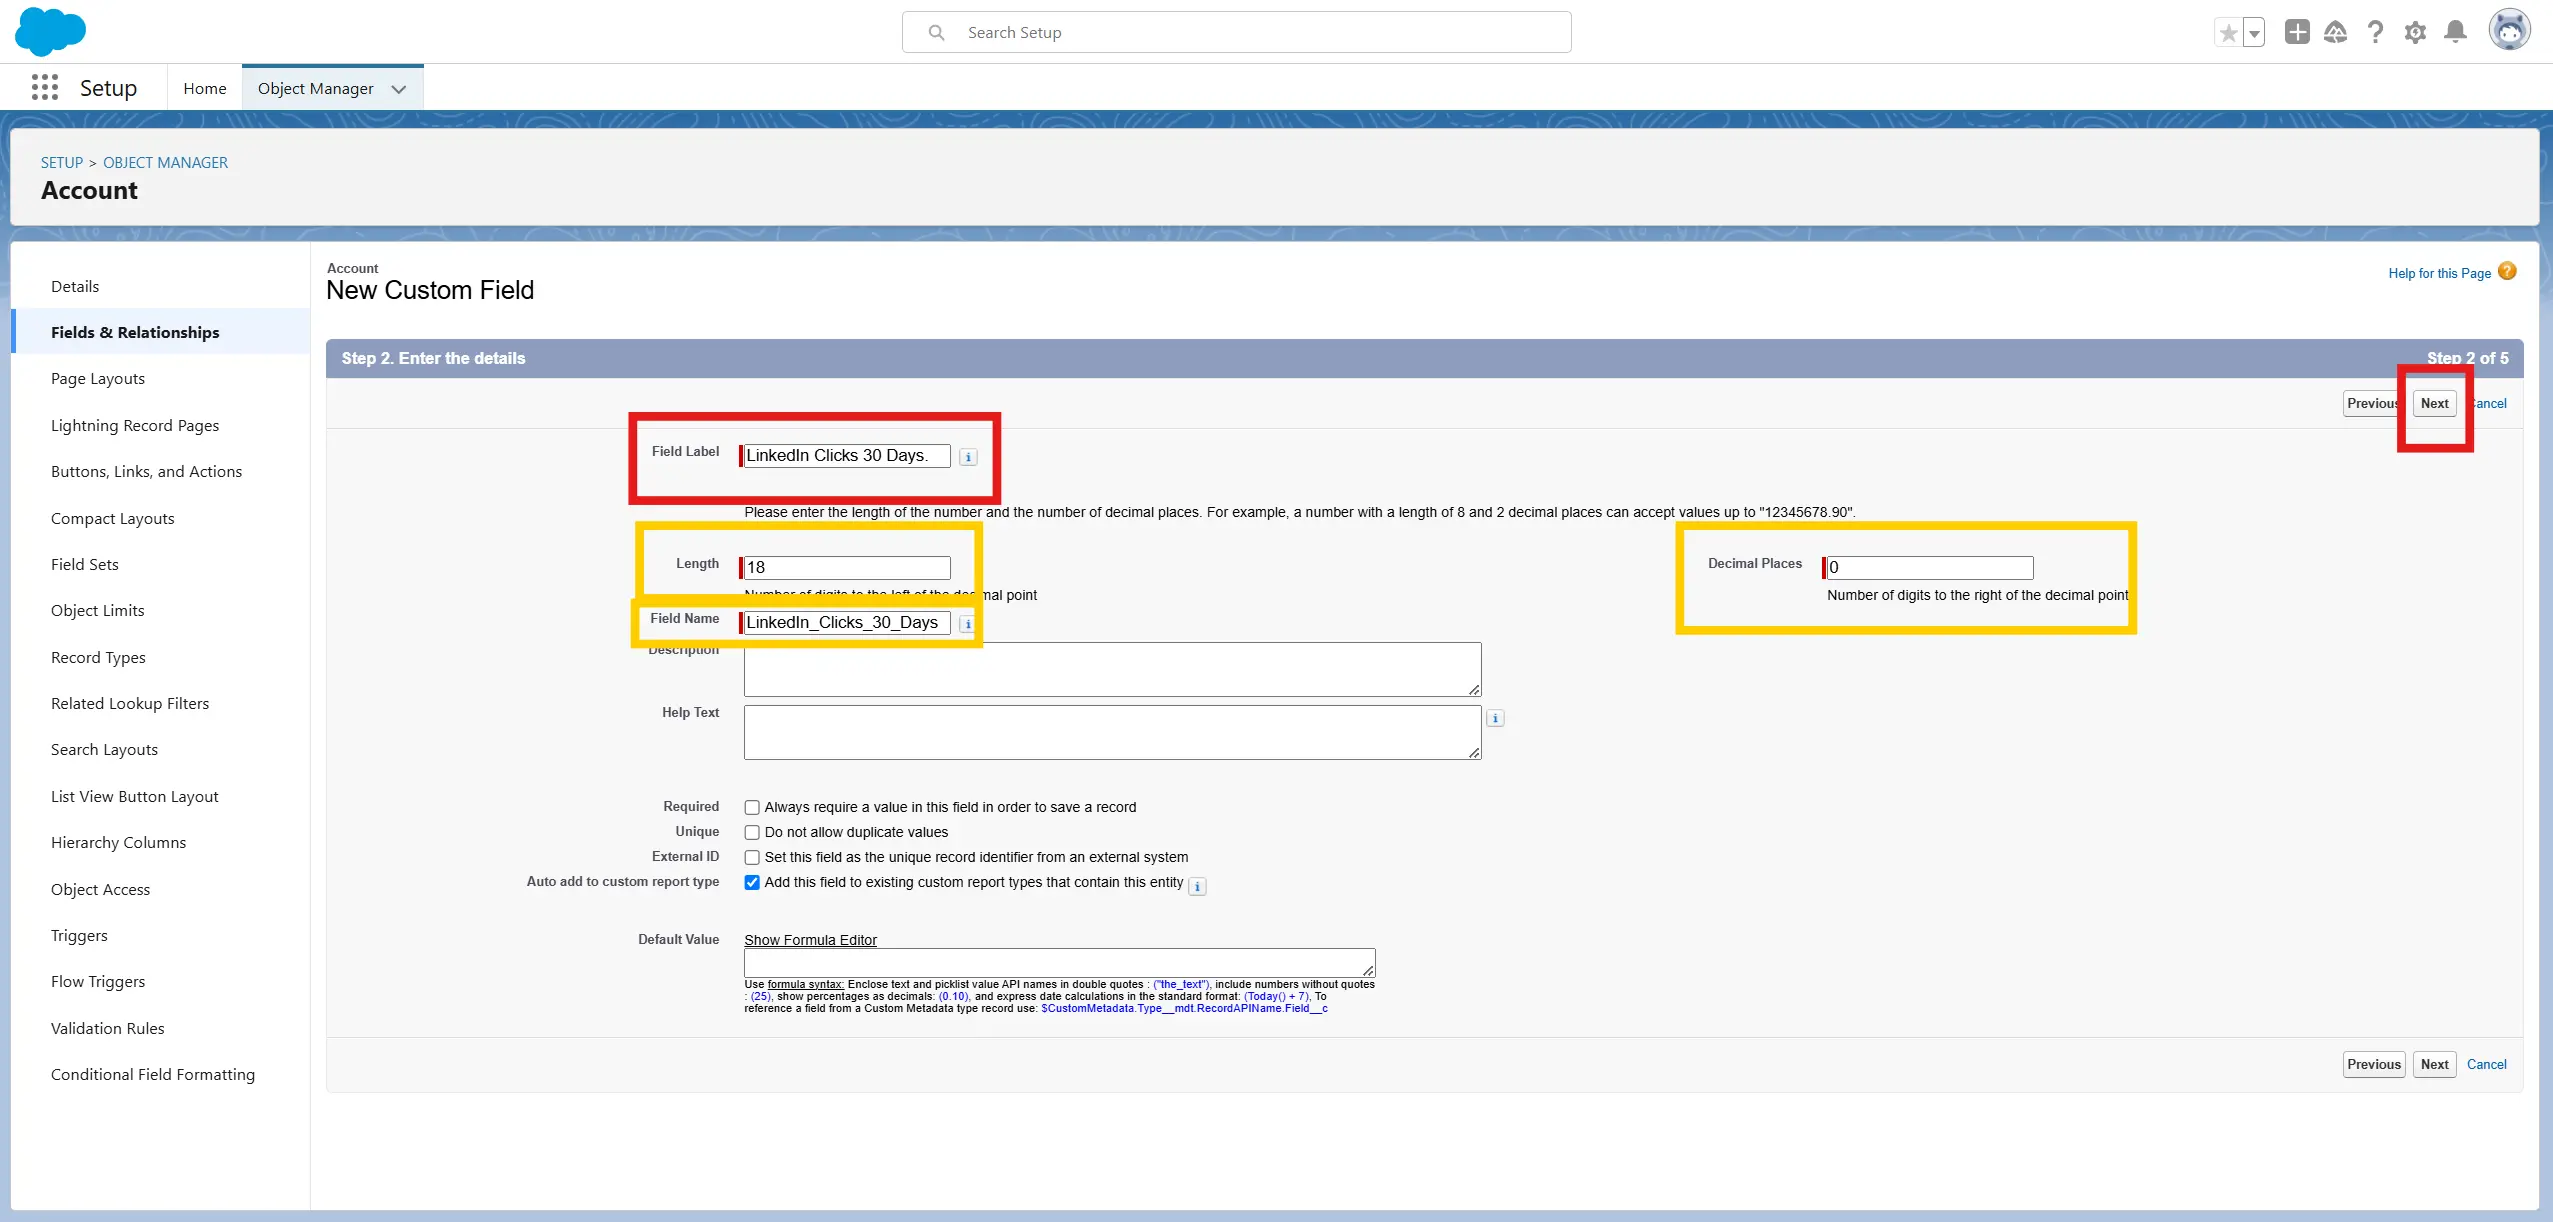
Make sure the custom field is visible for the right profiles. When you're happy with the permissions, click Next.
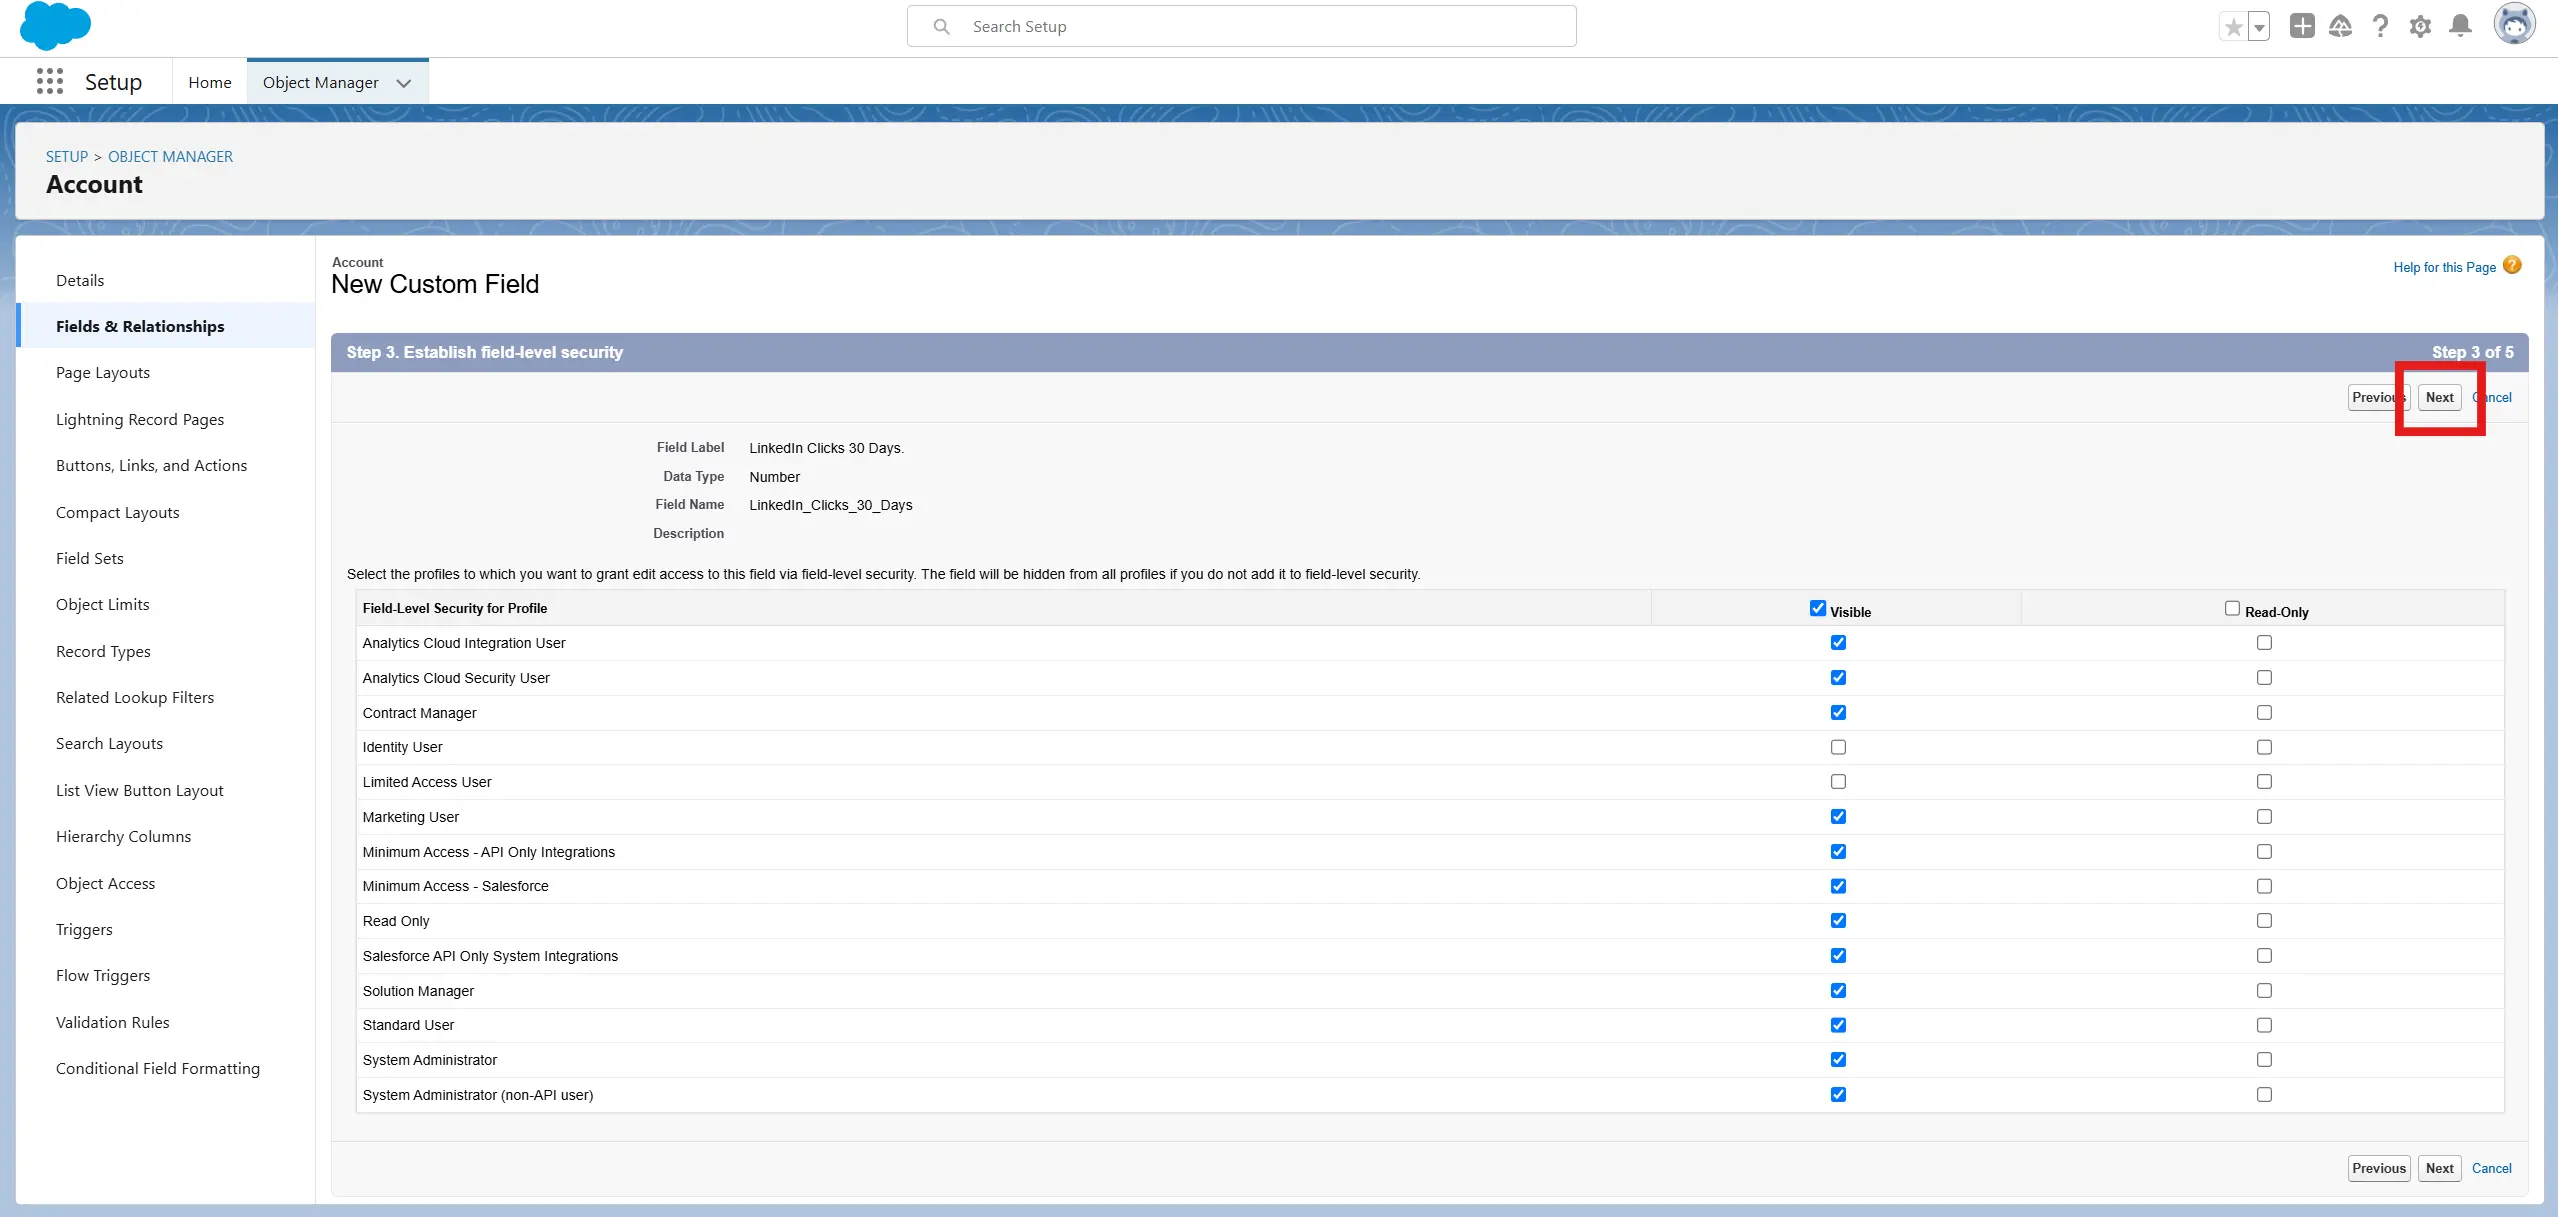
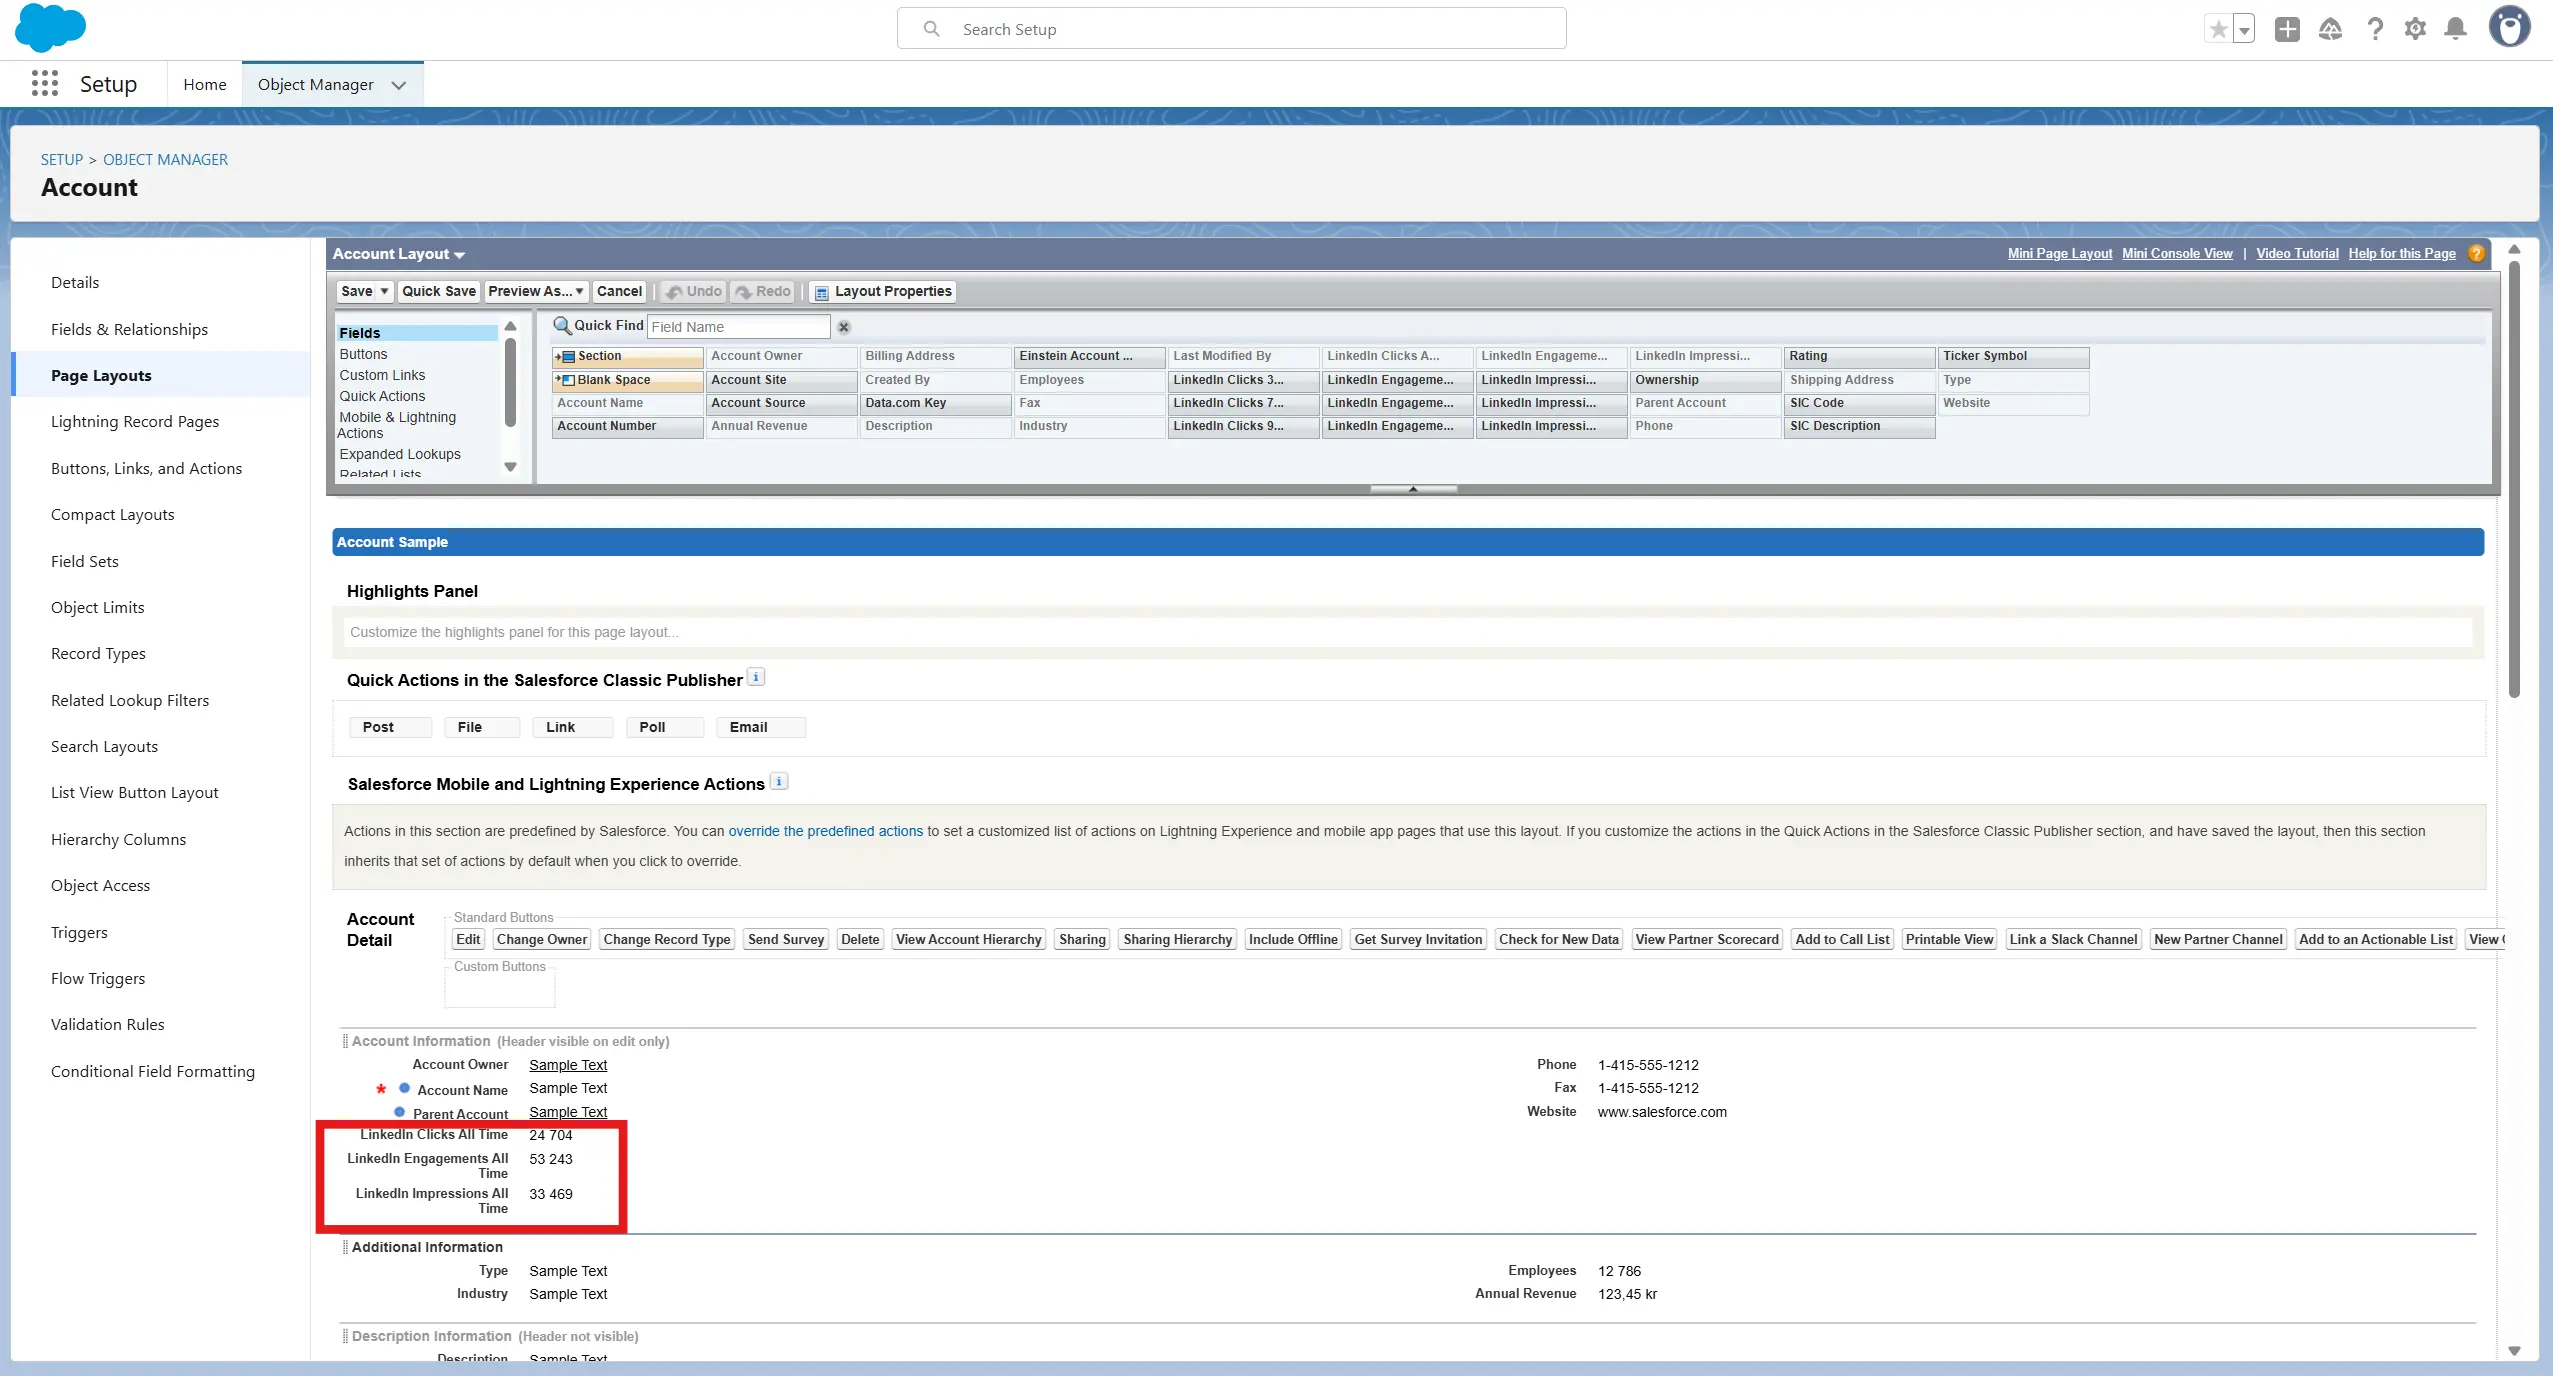
Add the field to Page Layouts (this controls whether the field shows on the record page when you're using page layouts). Click Next.
If you use Dynamic Forms, you may also need to add the field to the Lightning Record Page in Lightning App Builder (Dynamic Forms controls fields on the Lightning page).
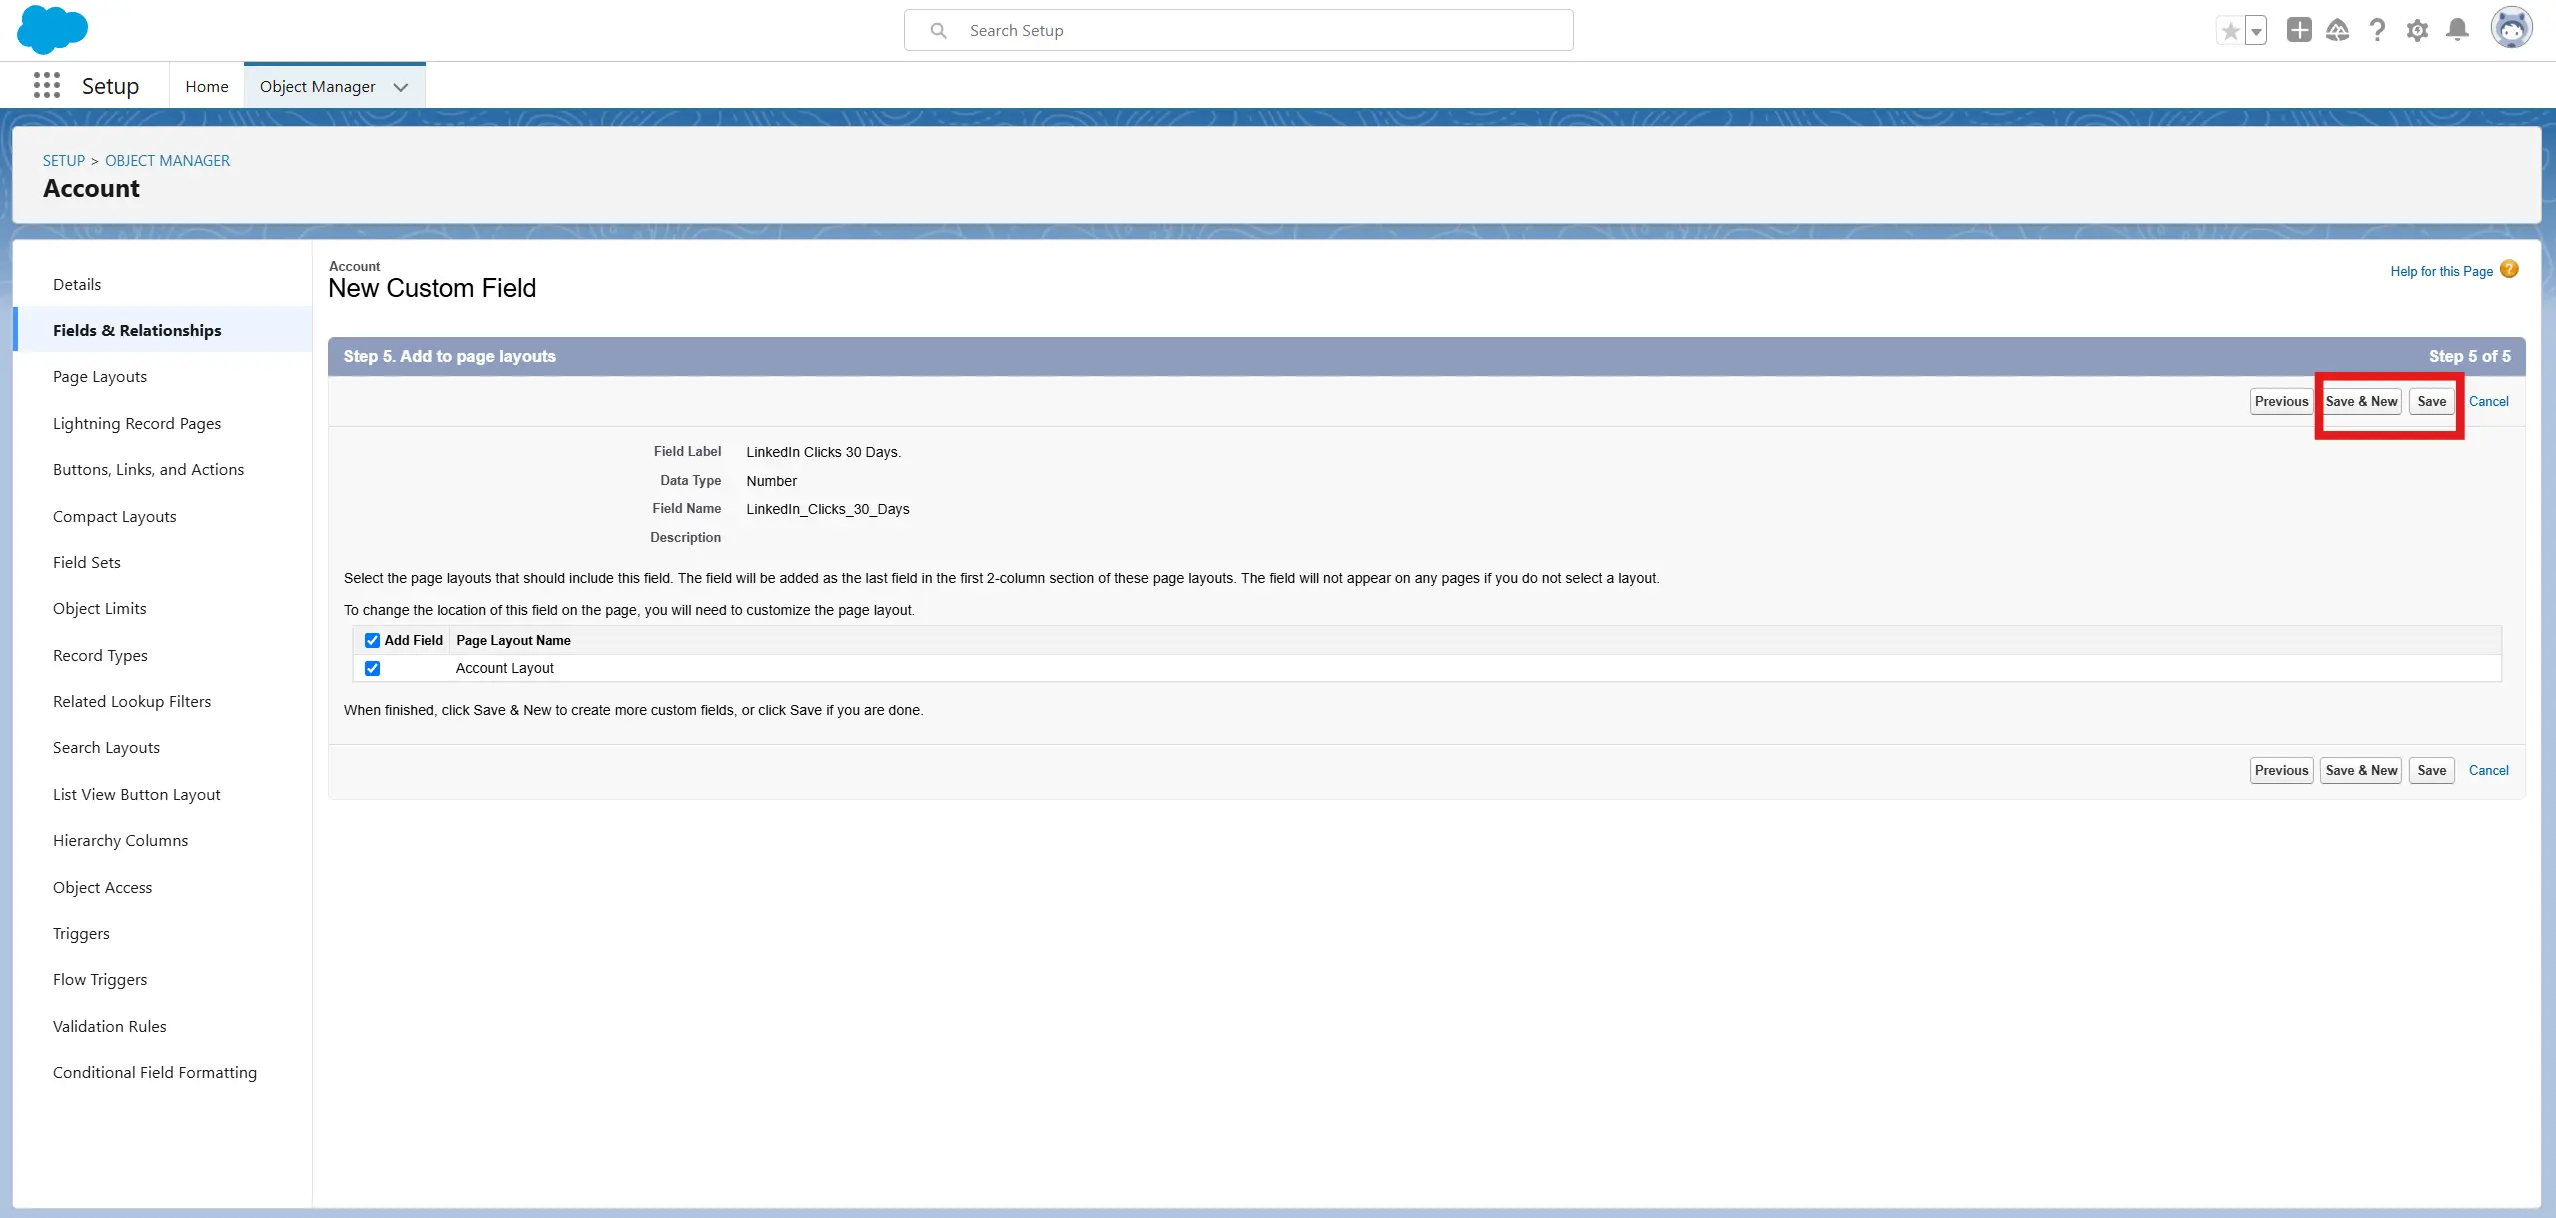
Select all page layouts where the custom field should be visible. Click Save & New if you want to create additional fields (such as those listed below). Click Save if you are finished creating custom fields.
- Repeat for LinkedIn Clicks 7 days
- Repeat for LinkedIn Clicks 90 days
- Repeat for LinkedIn Impressions (7, 30, and 90 days)
- Repeat for LinkedIn Engagements (7, 30, and 90 days)
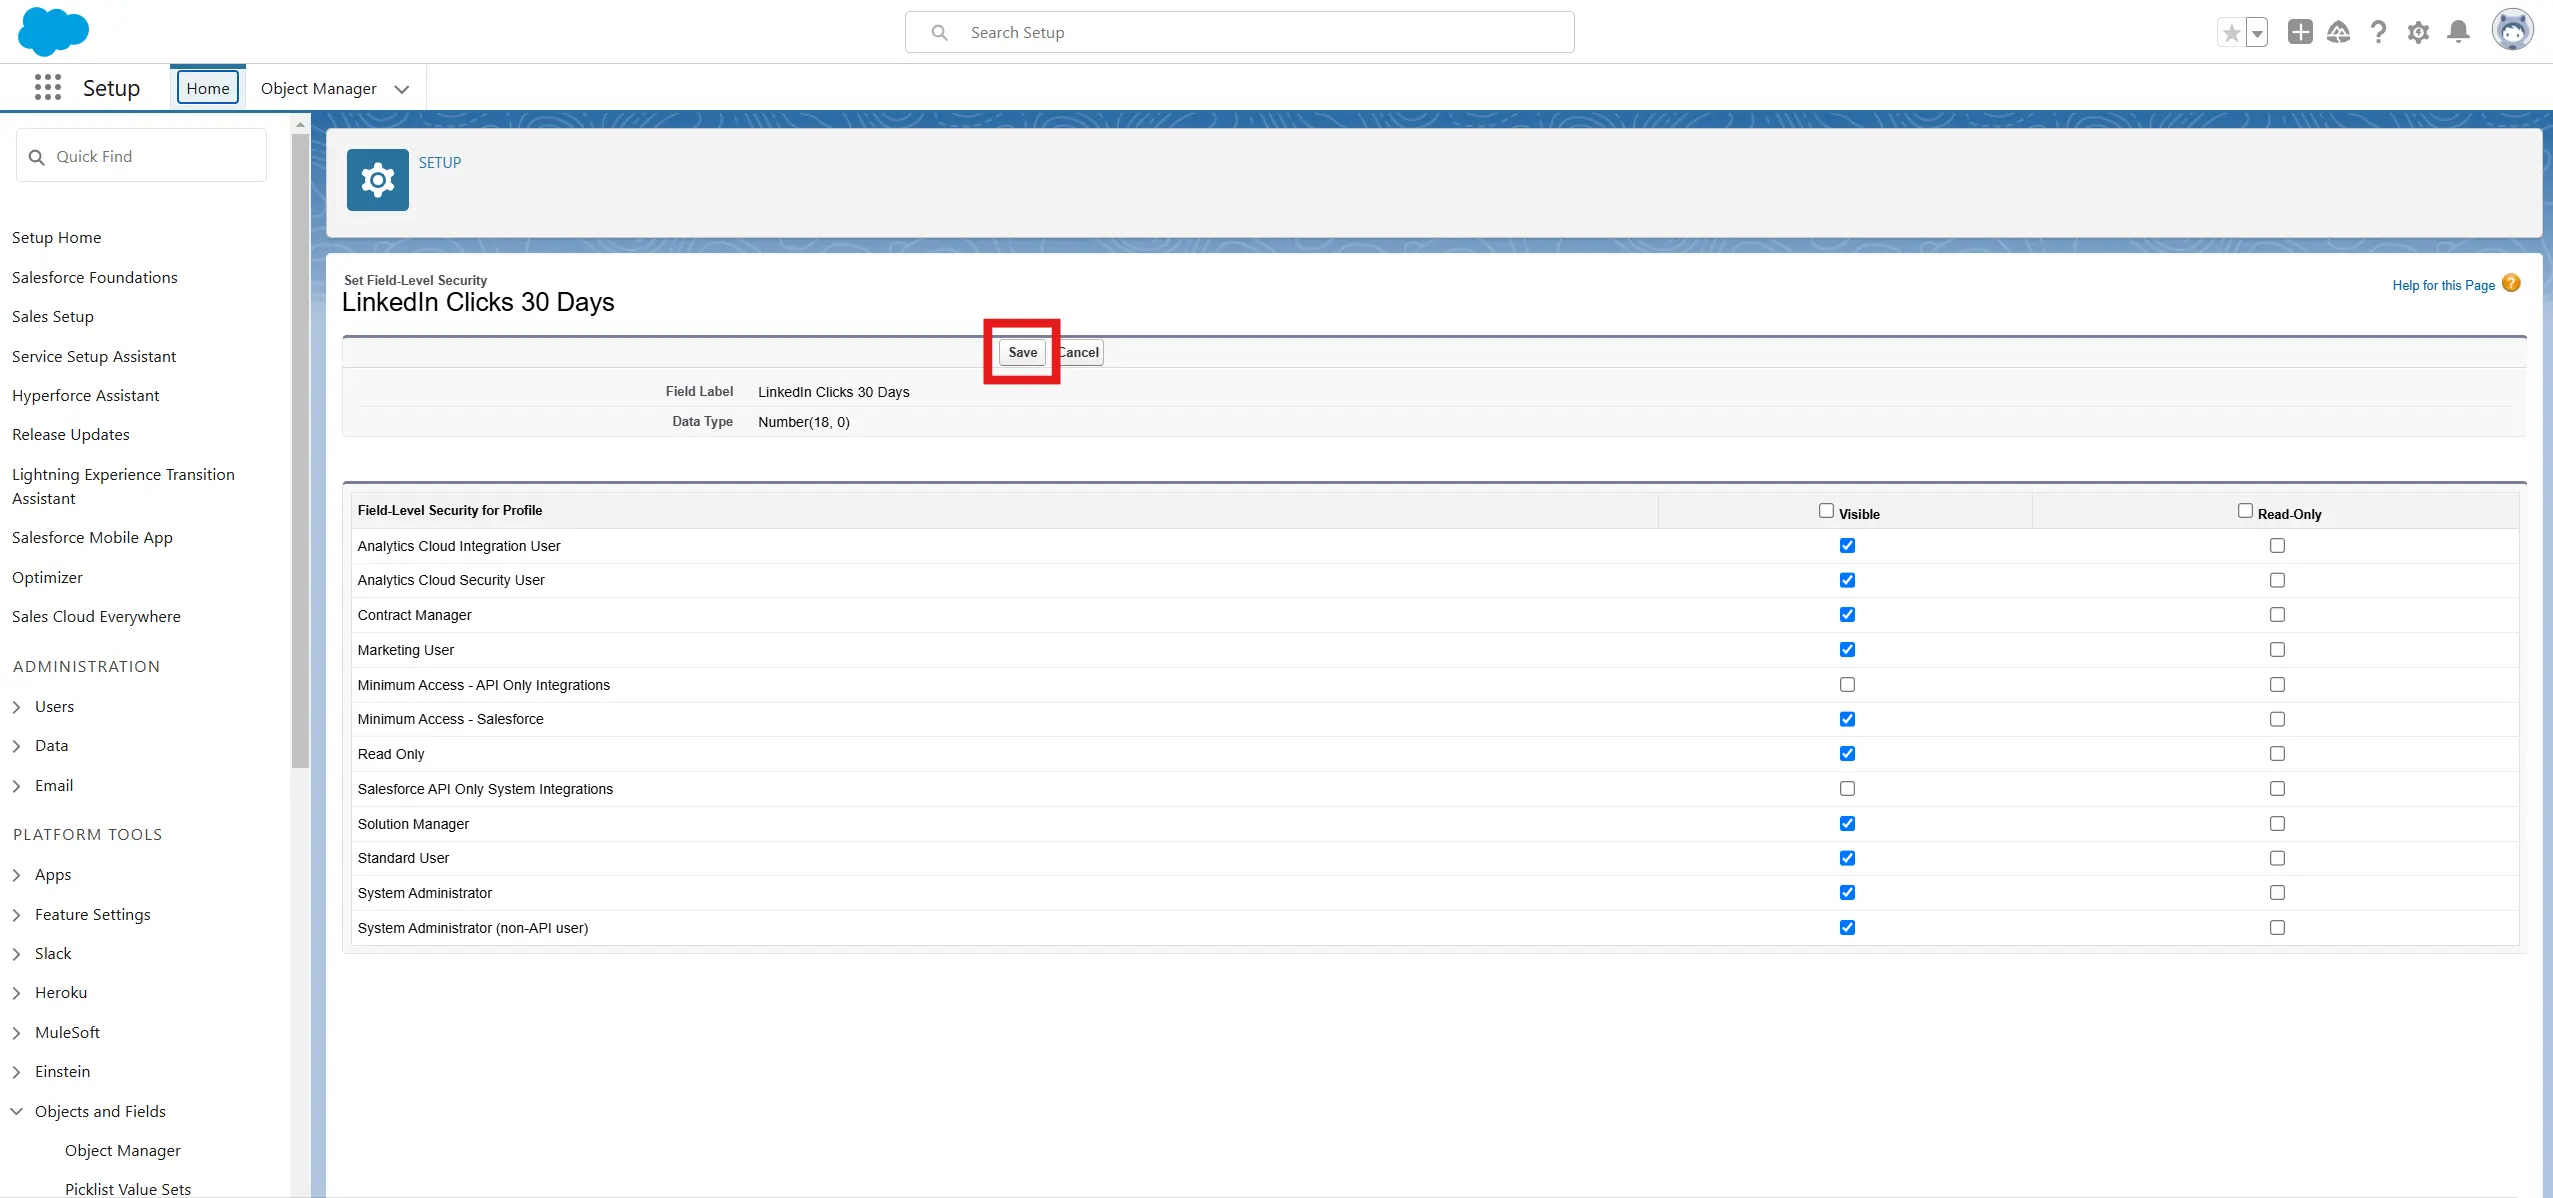
Verify Field-Level Security
Navigate to Setup > Object Manager > Account > Fields & Relationships and click on LinkedIn Clicks 30 days.
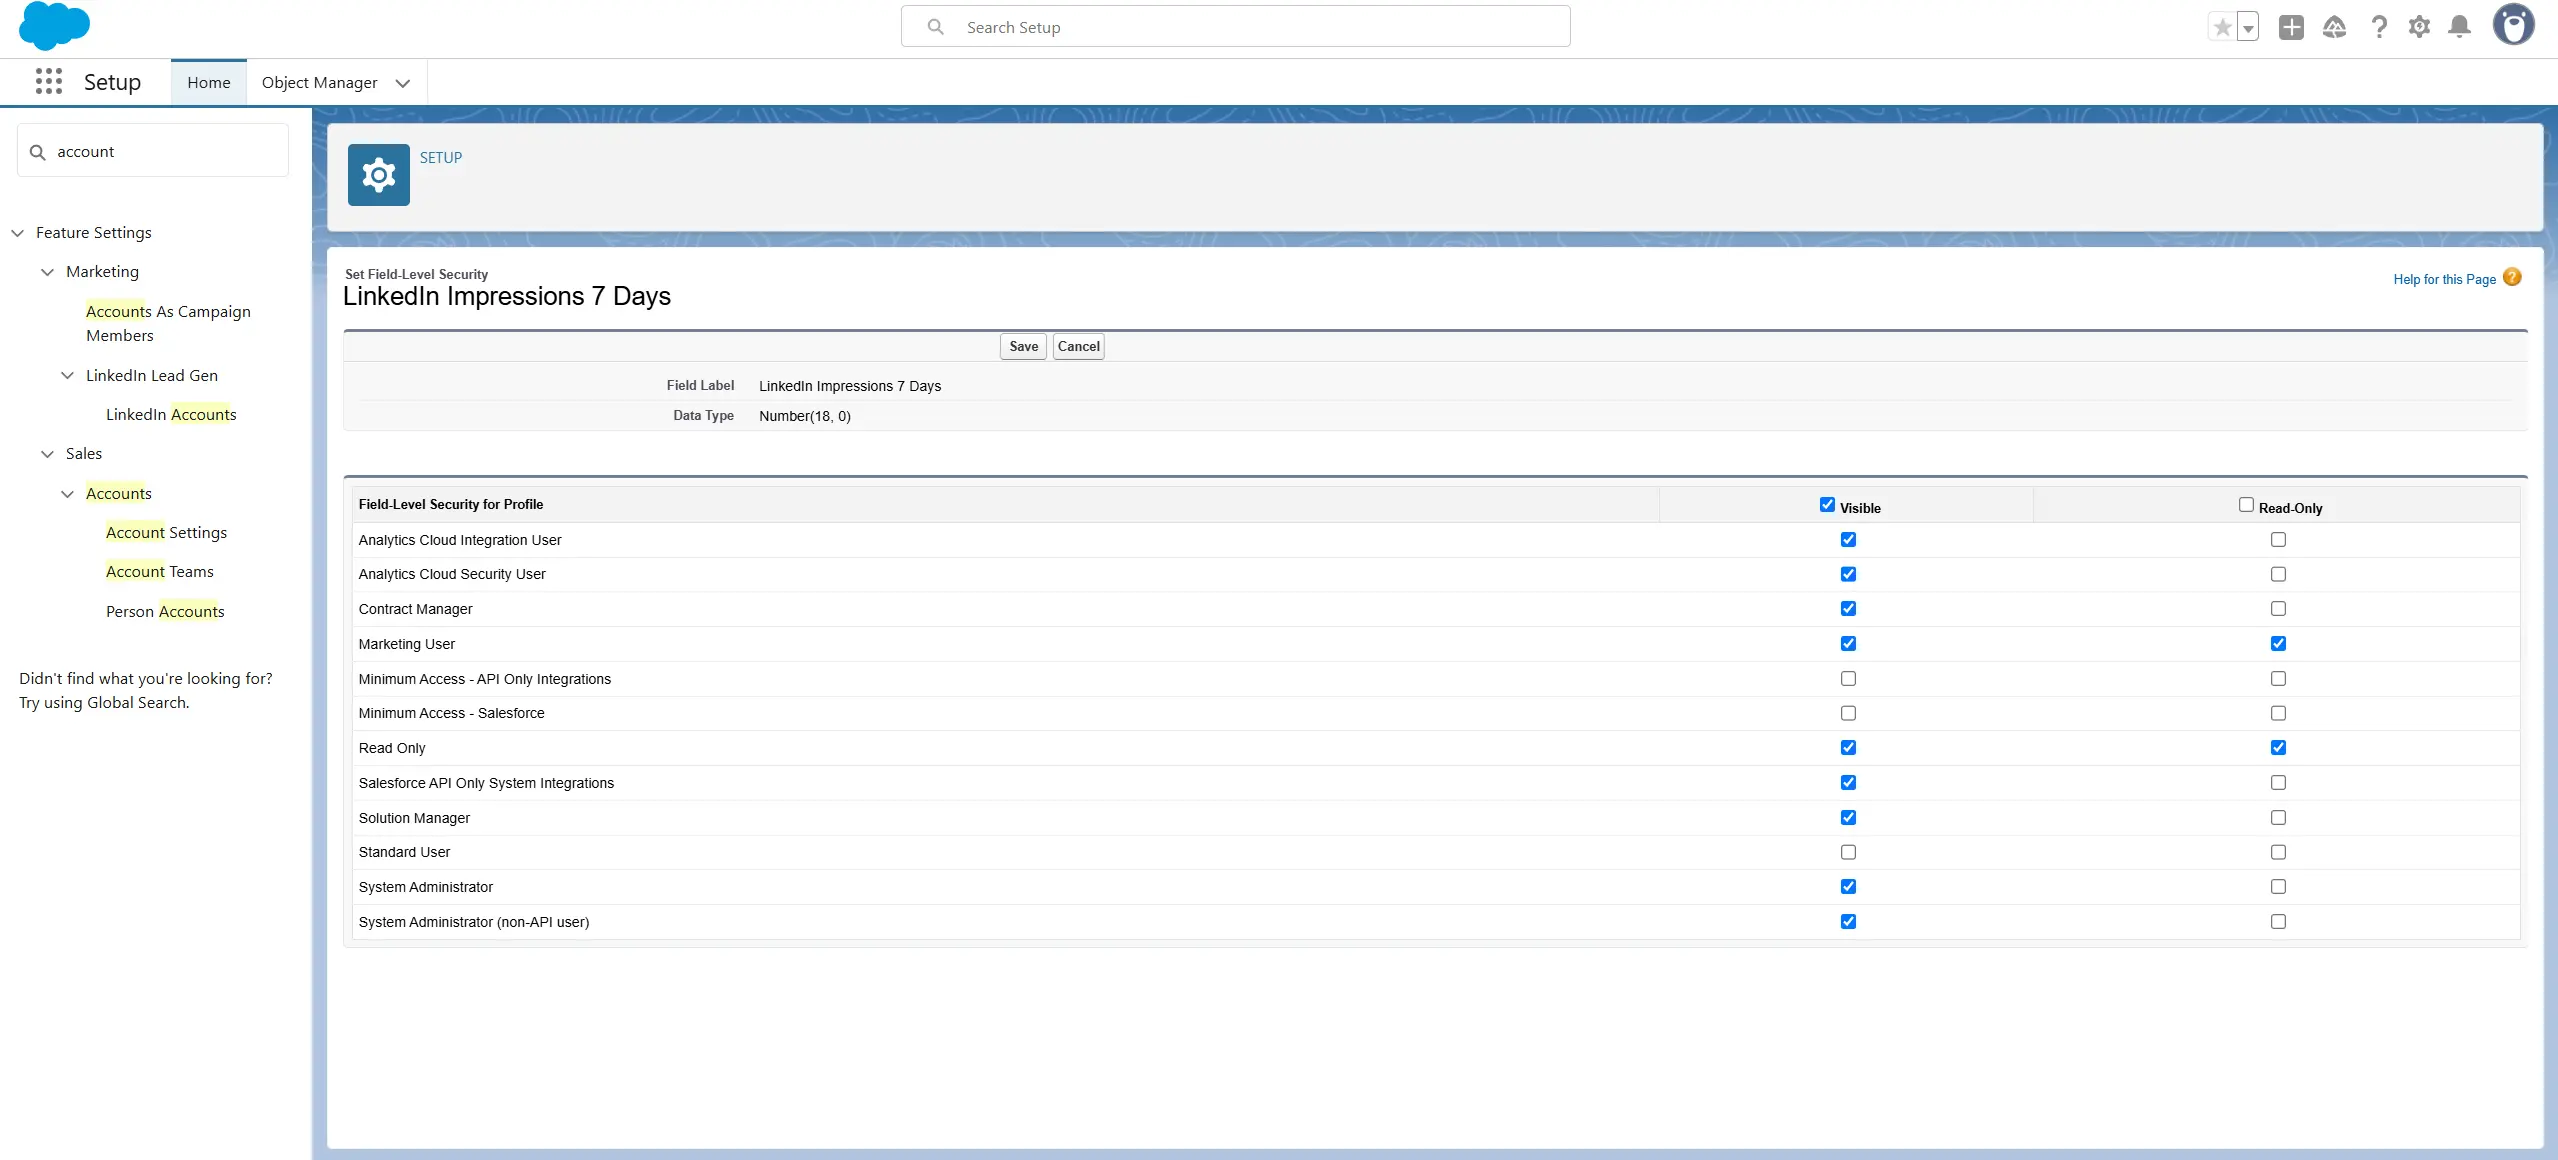
Go to Set Field-Level Security section and verify the following:
- Read Access: Ensure profiles that need to view the field (e.g., Sales or Marketing users) have Read access.
- Edit Access: Ensure the profile or integration user (used for the Fibbler API) has Edit access.
Make any changes that might be necessary. Click Save.
Enable API Access (System Permissions):
Two options depending on if your organization manages permissions with Profiles or Permission Sets (recommended).
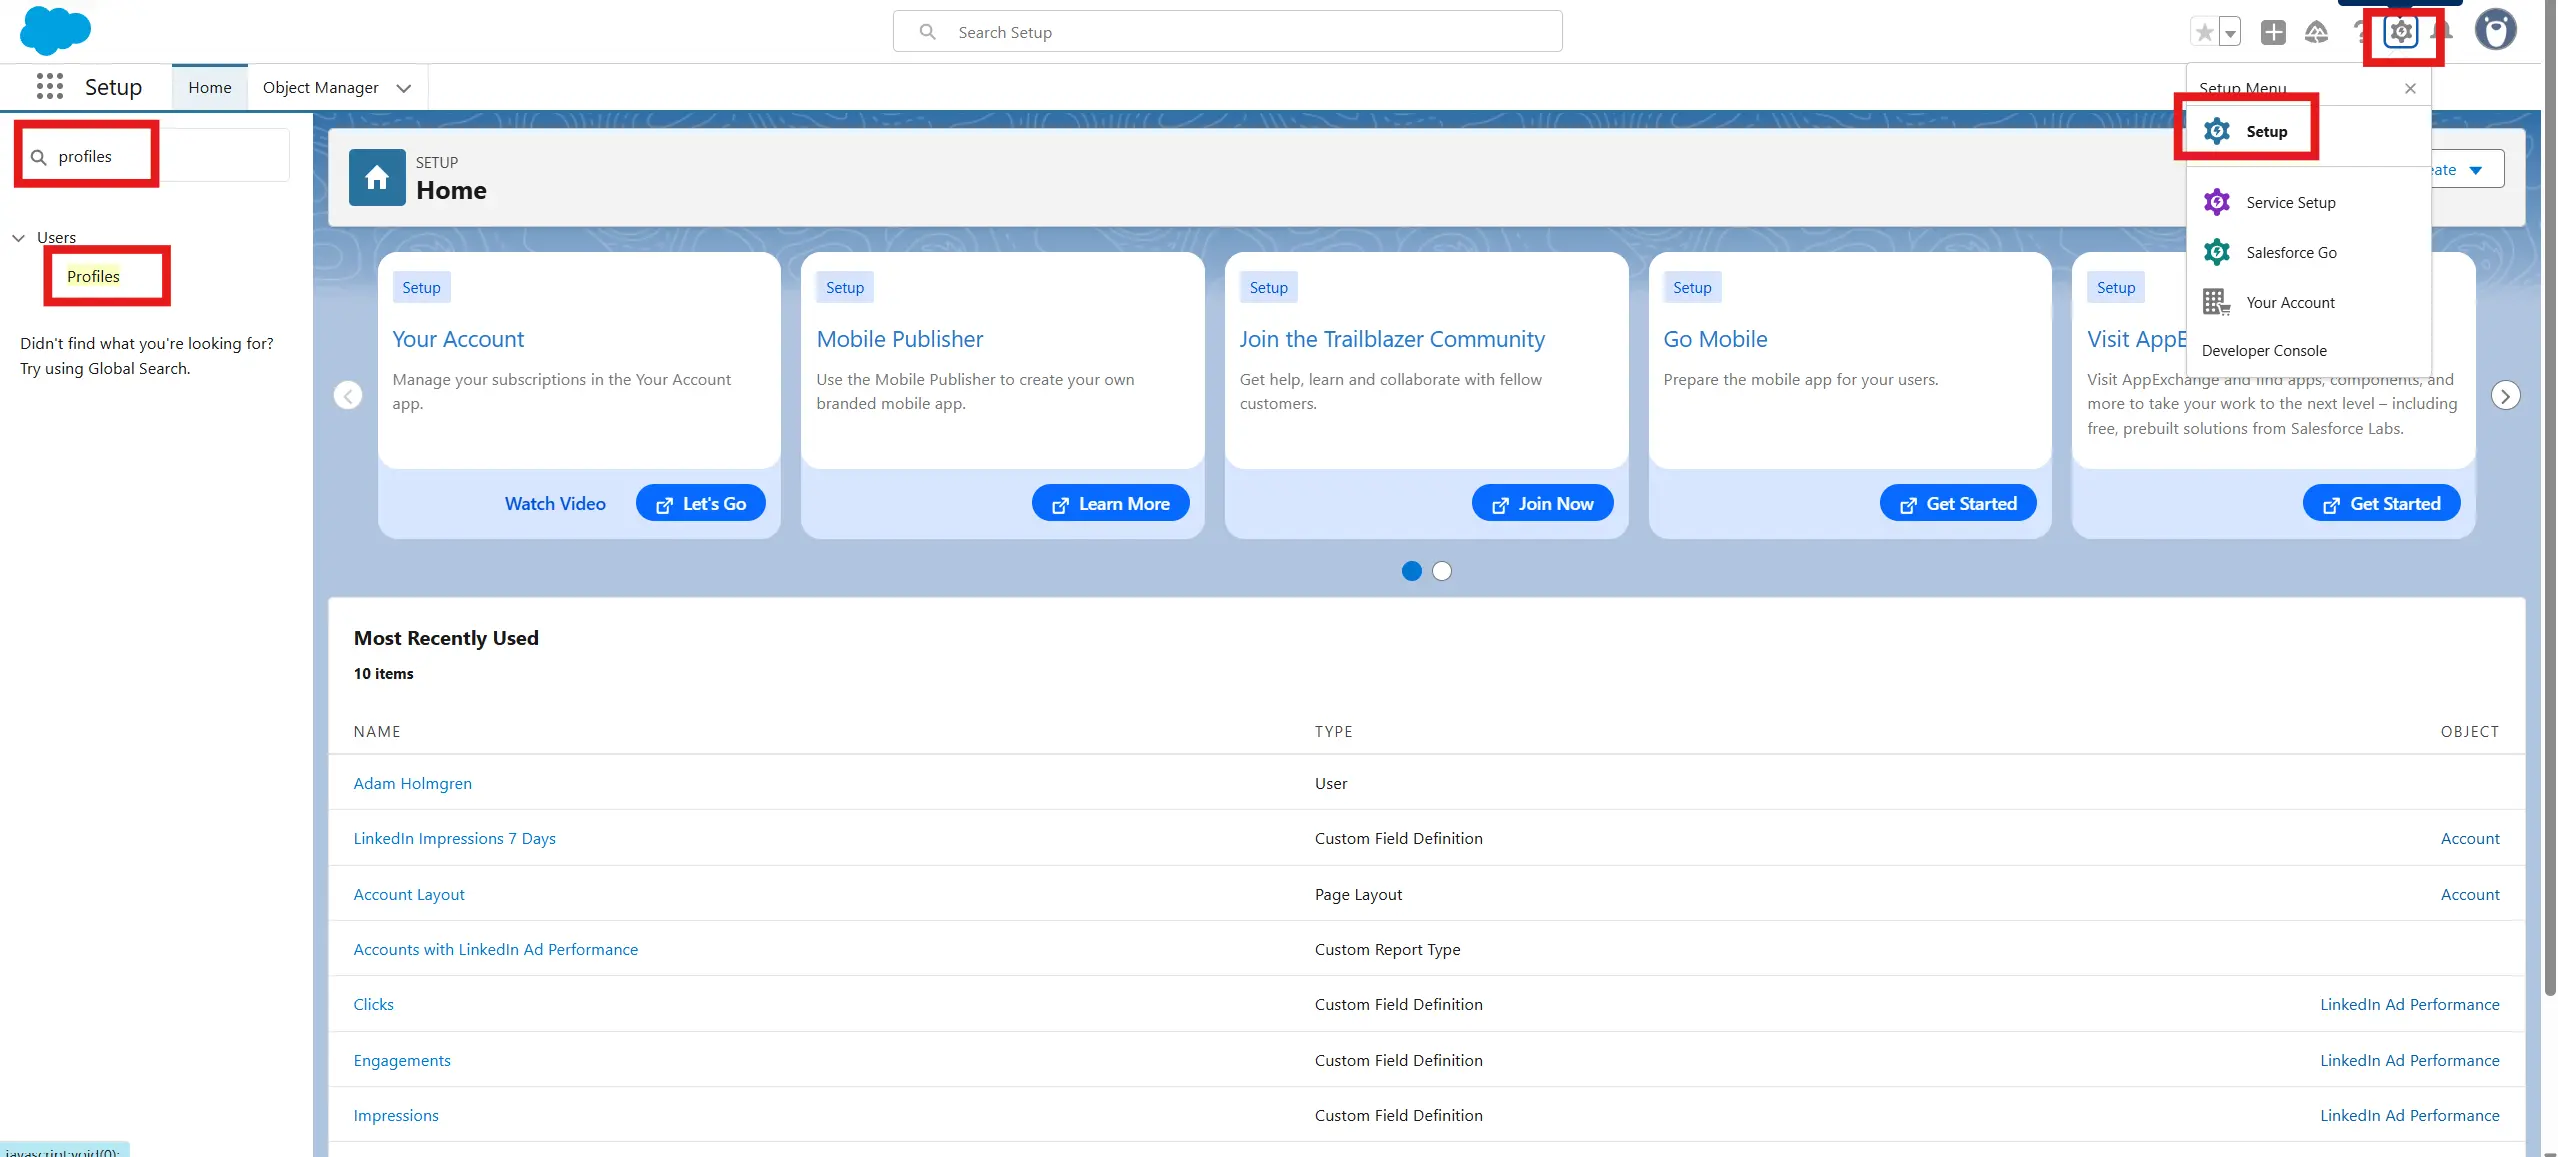
Option A - Profile (if your org still manages access primarily with Profiles):
- Go to Setup > Profiles
- Open the integration user's profile
- Open System Permissions (or "Administrative Permissions" in some layouts)
- Click Edit, check API Enabled, click Save
Option B — Permission Set (recommended):
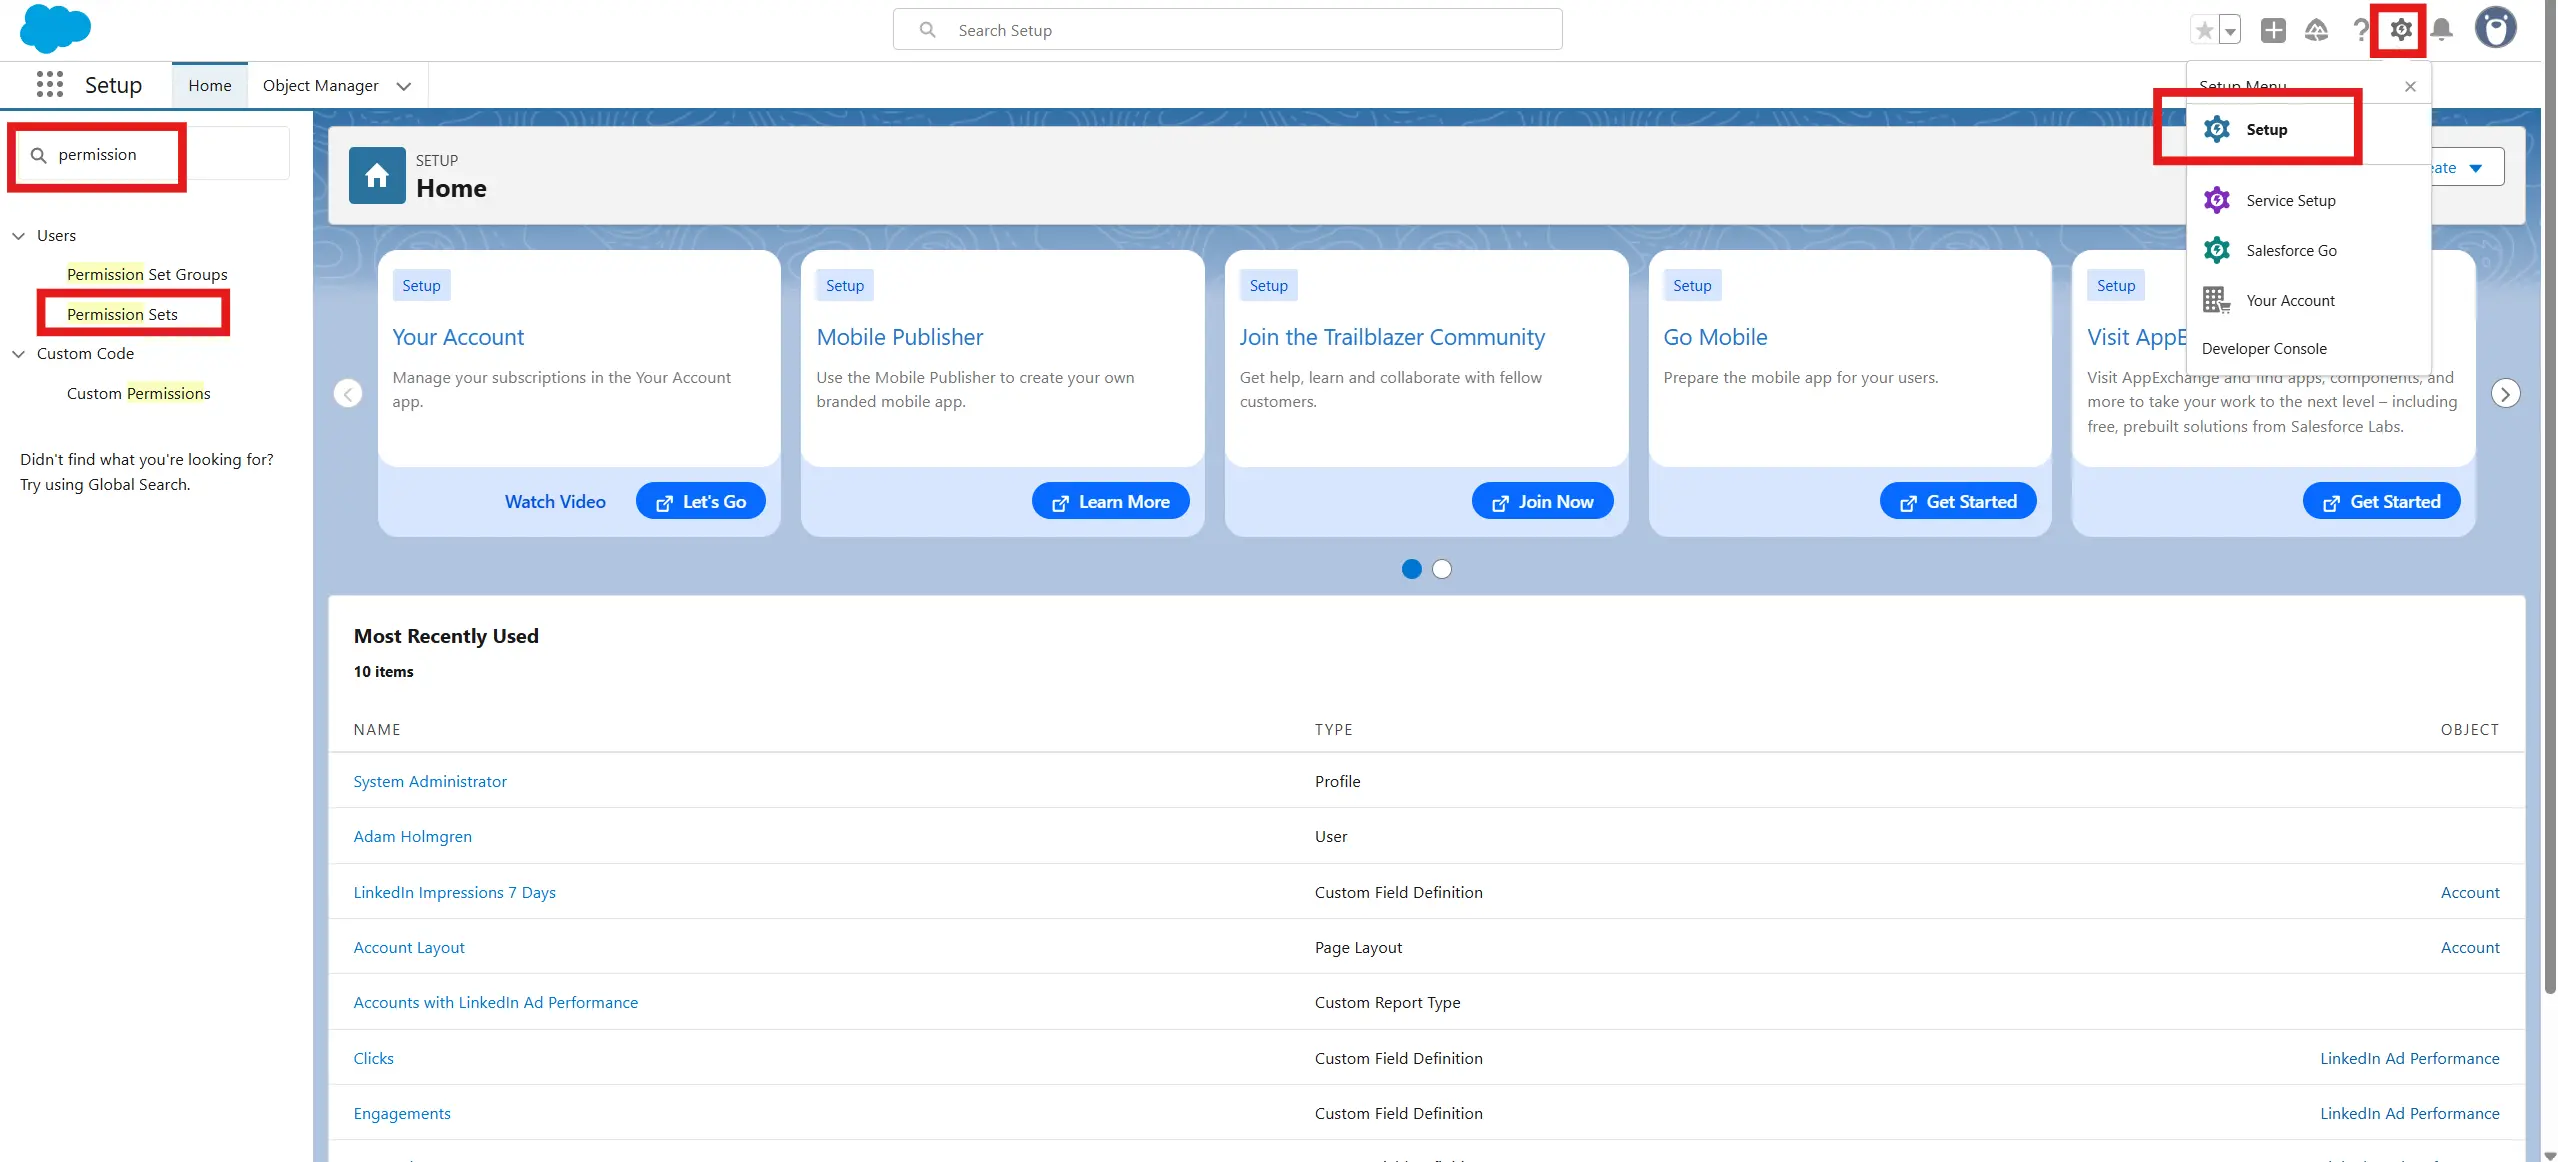
- Go to Setup > Permission Sets
- Open the permission set assigned to the integration user
- Open System Permissions
- Click Edit, check API Enabled, click Save
Then (either way): confirm Account has Read + Edit, and your 9 LinkedIn fields (LinkedIn Clicks/Impressions/Engagements 7/30/90 Days) have Read + Edit in Object Settings > Account > Field Permissions.
OPTIONAL: Hide fields from Sales Reps
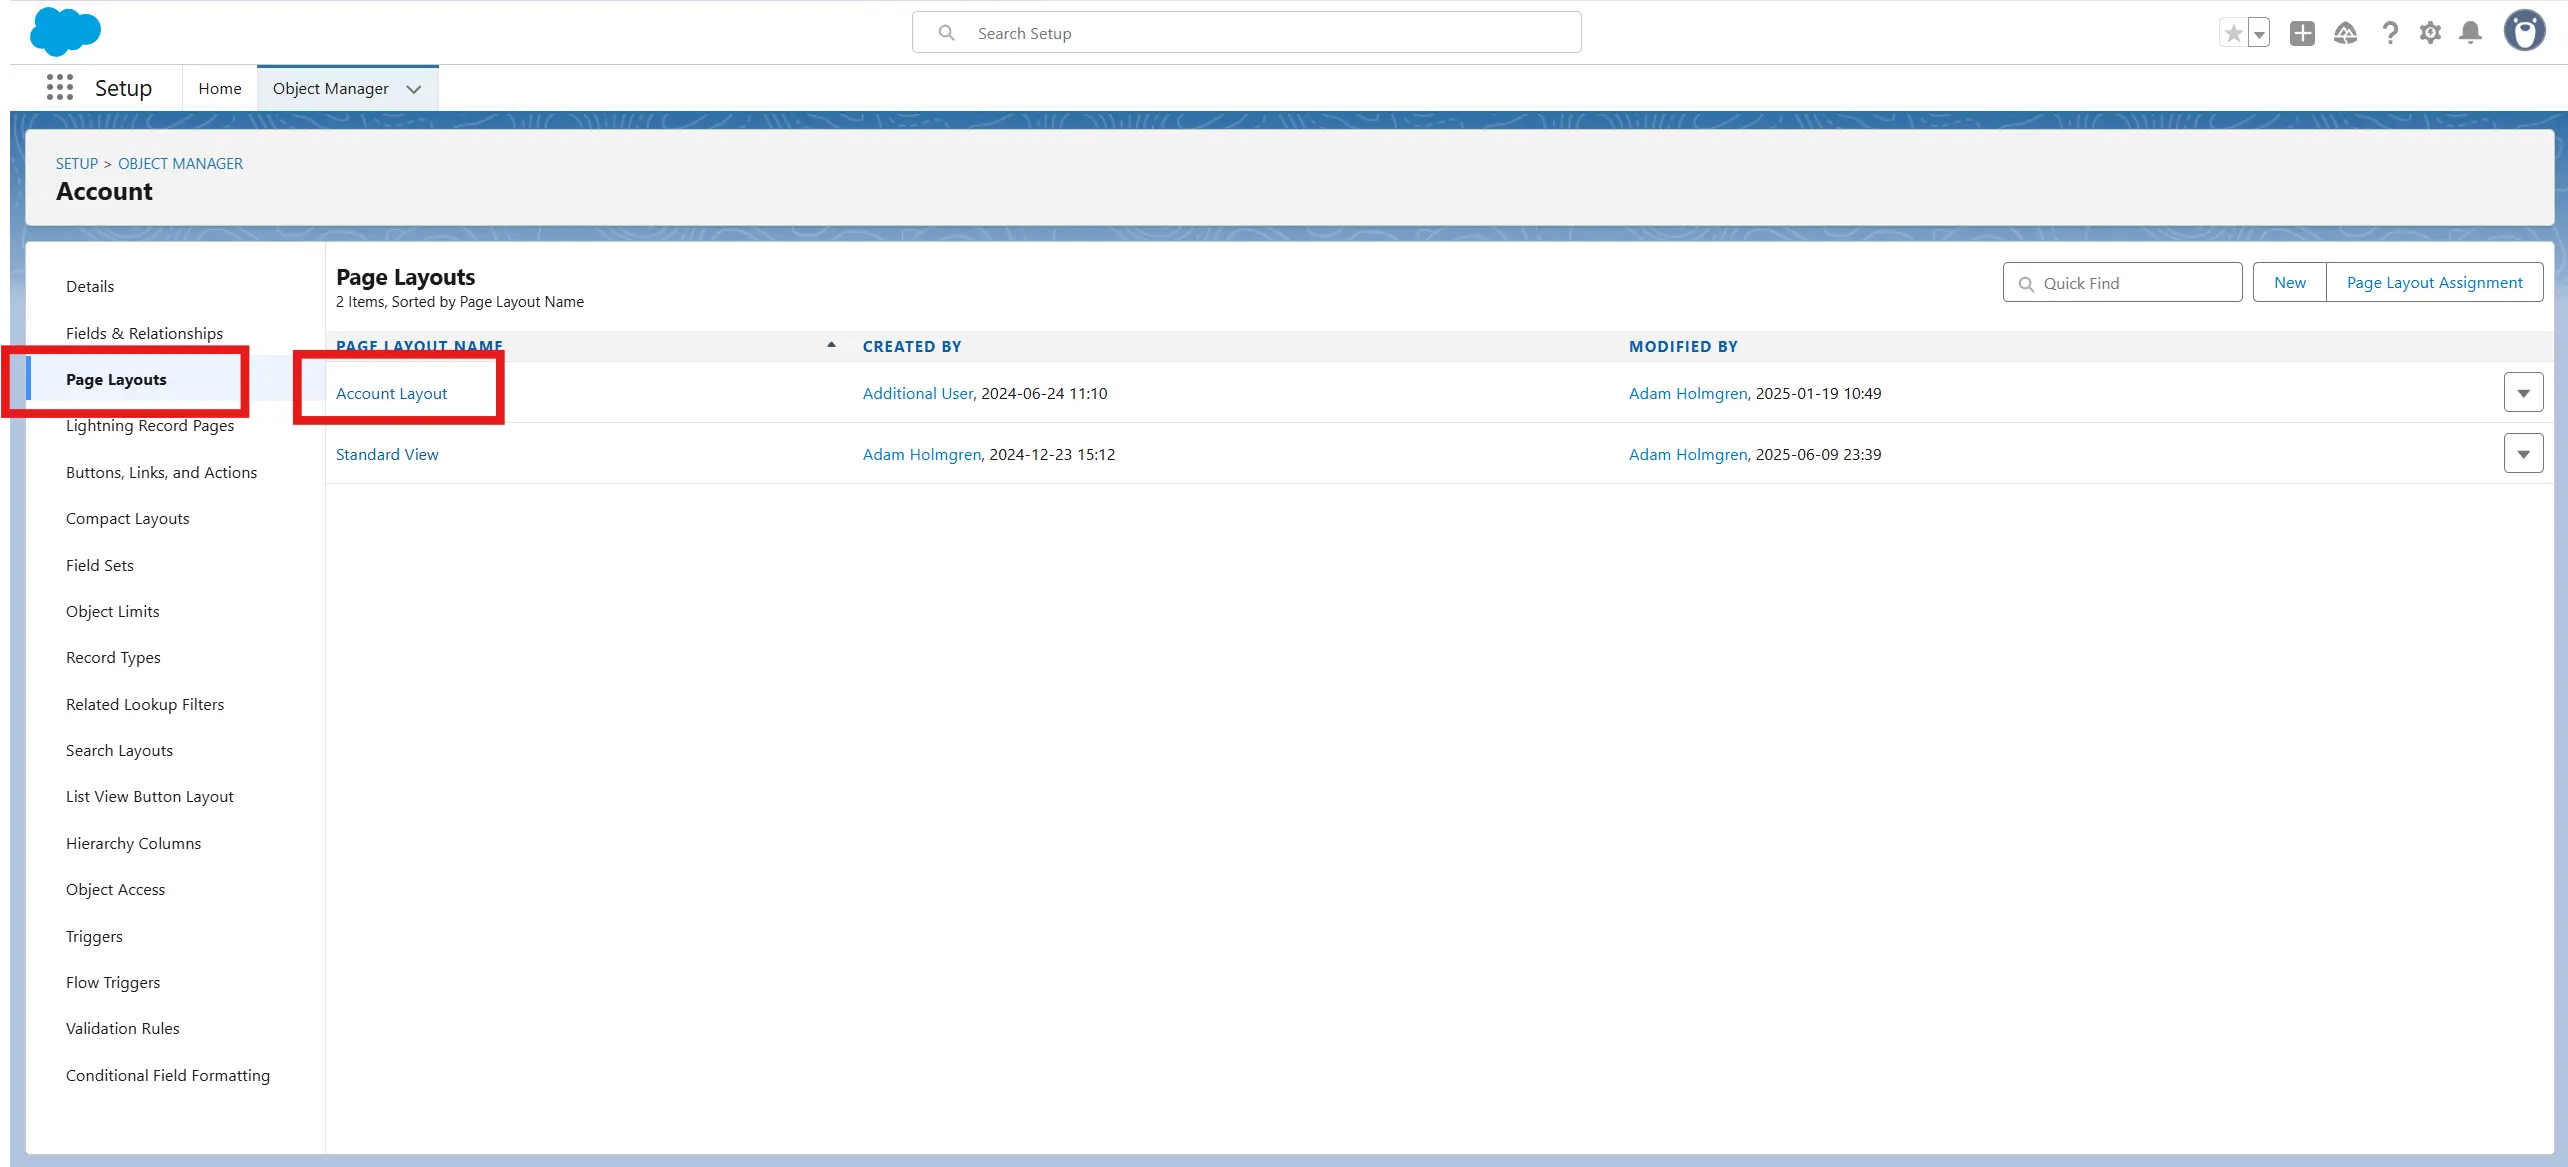
Option 1: Remove Fields from the Account Page Layout
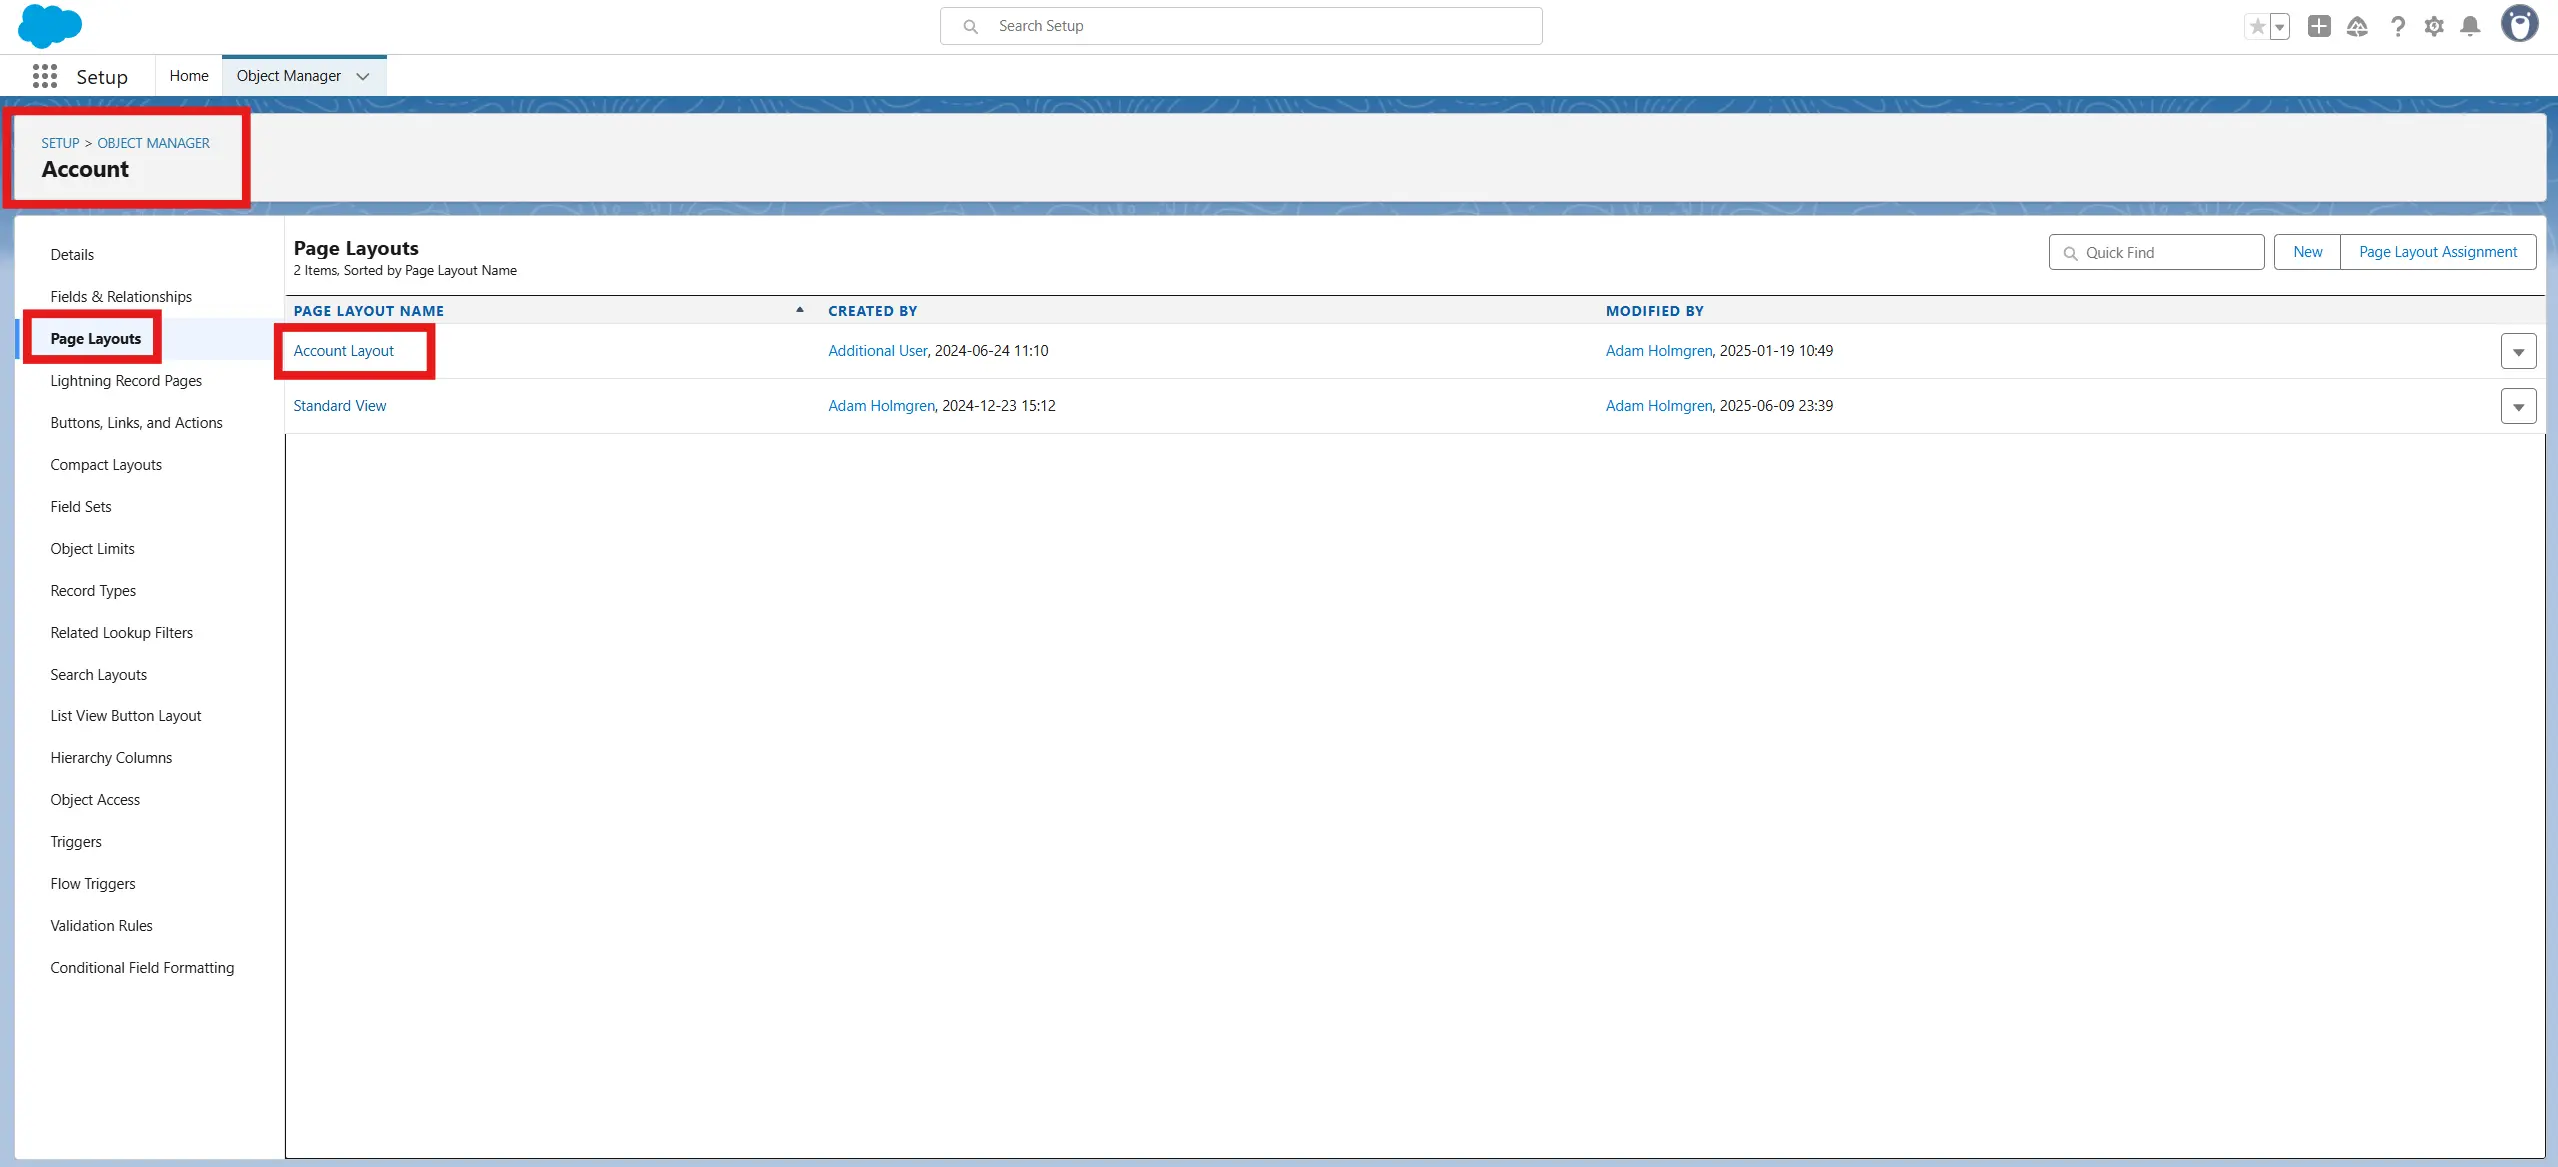
- Go to Setup > Object Manager > Account
- Click Page Layouts > Click on the layout your sales team uses (e.g., Account Layout)
- Find the LinkedIn fields in the layout and drag them off the page
- Click Save
Option 2: Use Field-Level Security to Restrict Visibility
If you want only certain profiles (like Marketing or Admins) to see the fields:
- Go to Setup > Object Manager > Account > Fields & Relationships
- Click on the field you want to hide (e.g., LinkedIn Impressions (7 Days))
- Click Set Field-Level Security
- Uncheck Visible for any profiles you do not want to see the field, and use Read-Only for any profiles that should see the field but not edit it.
- Click Save
- Repeat for each LinkedIn field
Outcome Step 2
You've created a set of custom fields where Fibbler can push LinkedIn ad metrics into Salesforce. These fields are now:
- Ready to receive data through the API
- Visible to your users (if permissions were set)
- Usable in reports, filters, and automation
Chapter 3: Verify Permissions
Goal and Importance:
In this step, you'll confirm that the Salesforce user Fibbler connects as has all the necessary permissions to:
- Log in via API
- Find and update Account records
- Write values to your LinkedIn ad metric fields.
Without the right permissions, Fibbler's data push will fail (or worse, succeed silently but skip certain fields).
Steps:
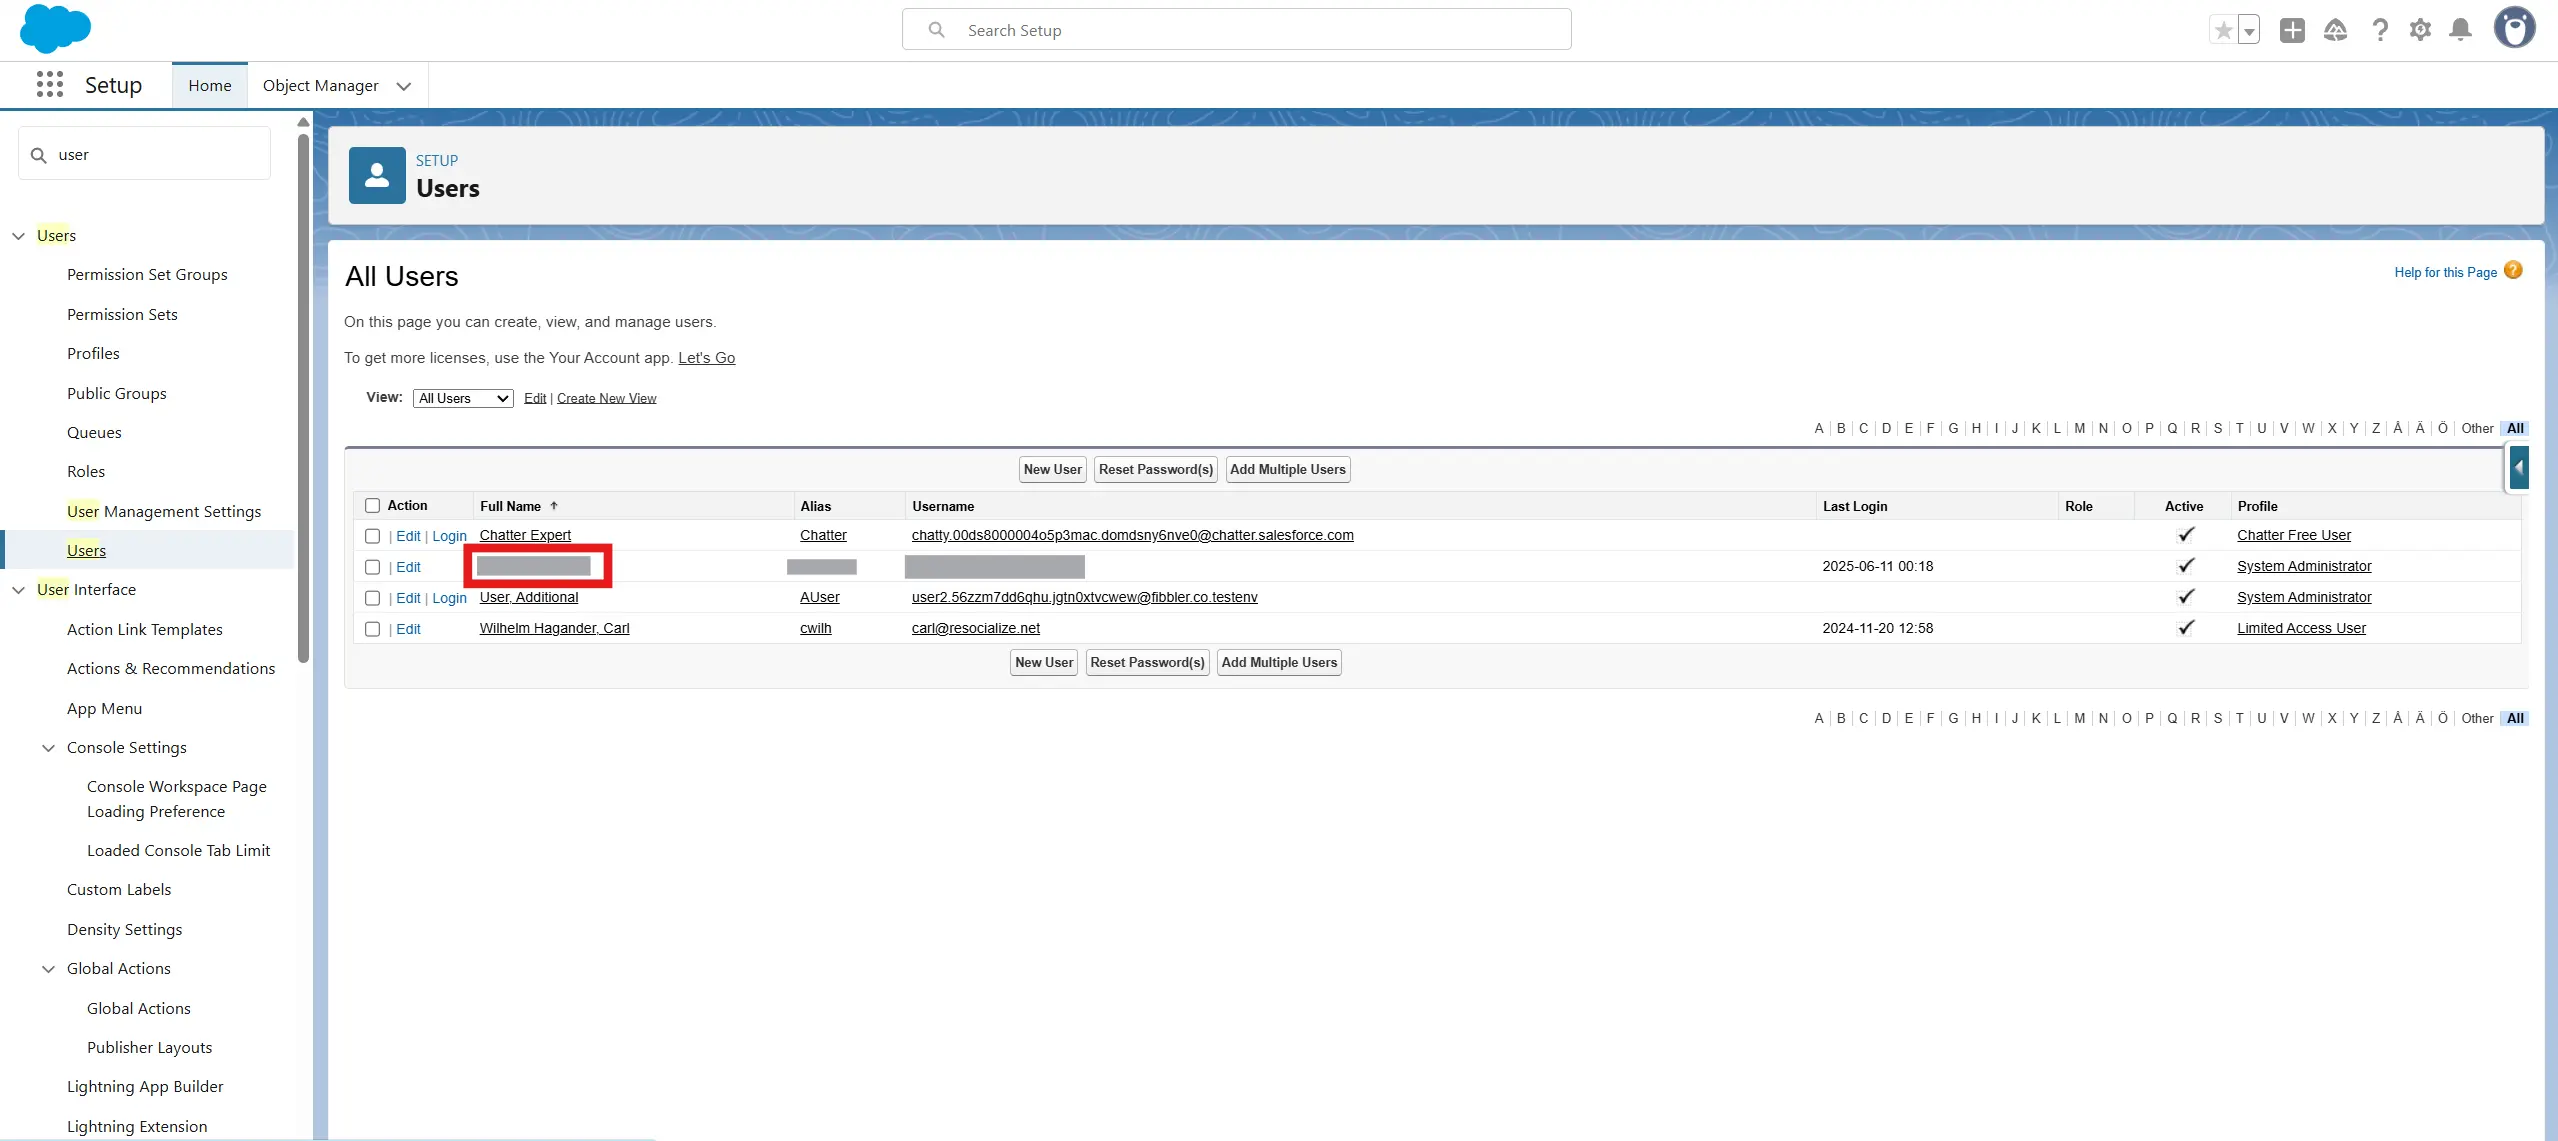
PART A - Confirm Which User Fibbler Will Connect As
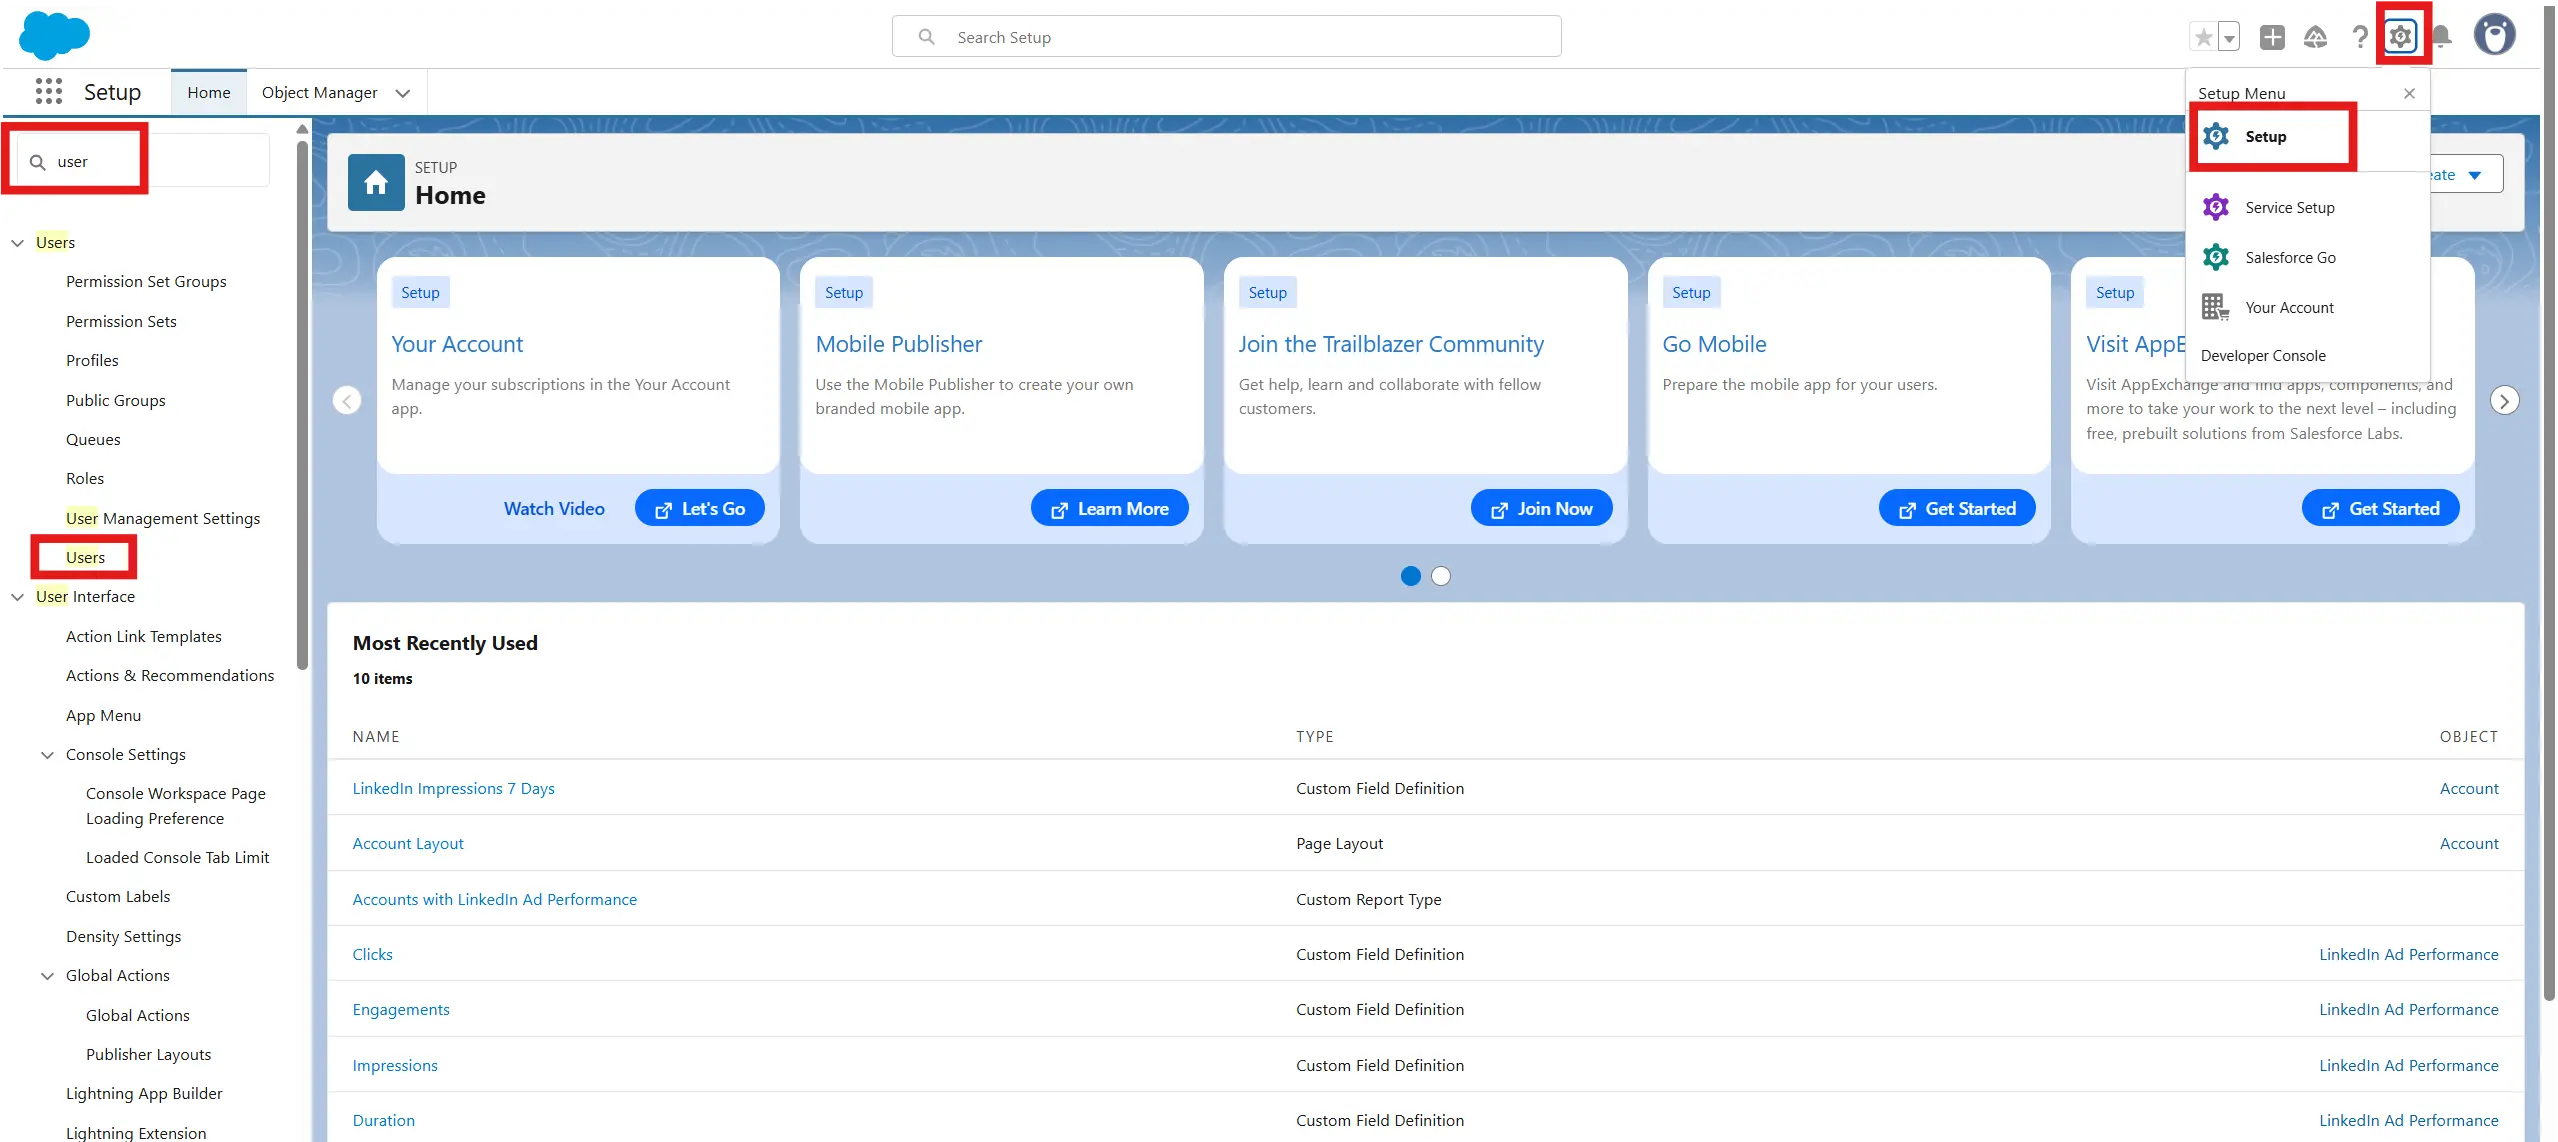
- Go to Setup > Users
- Find and click the user name of the integration user
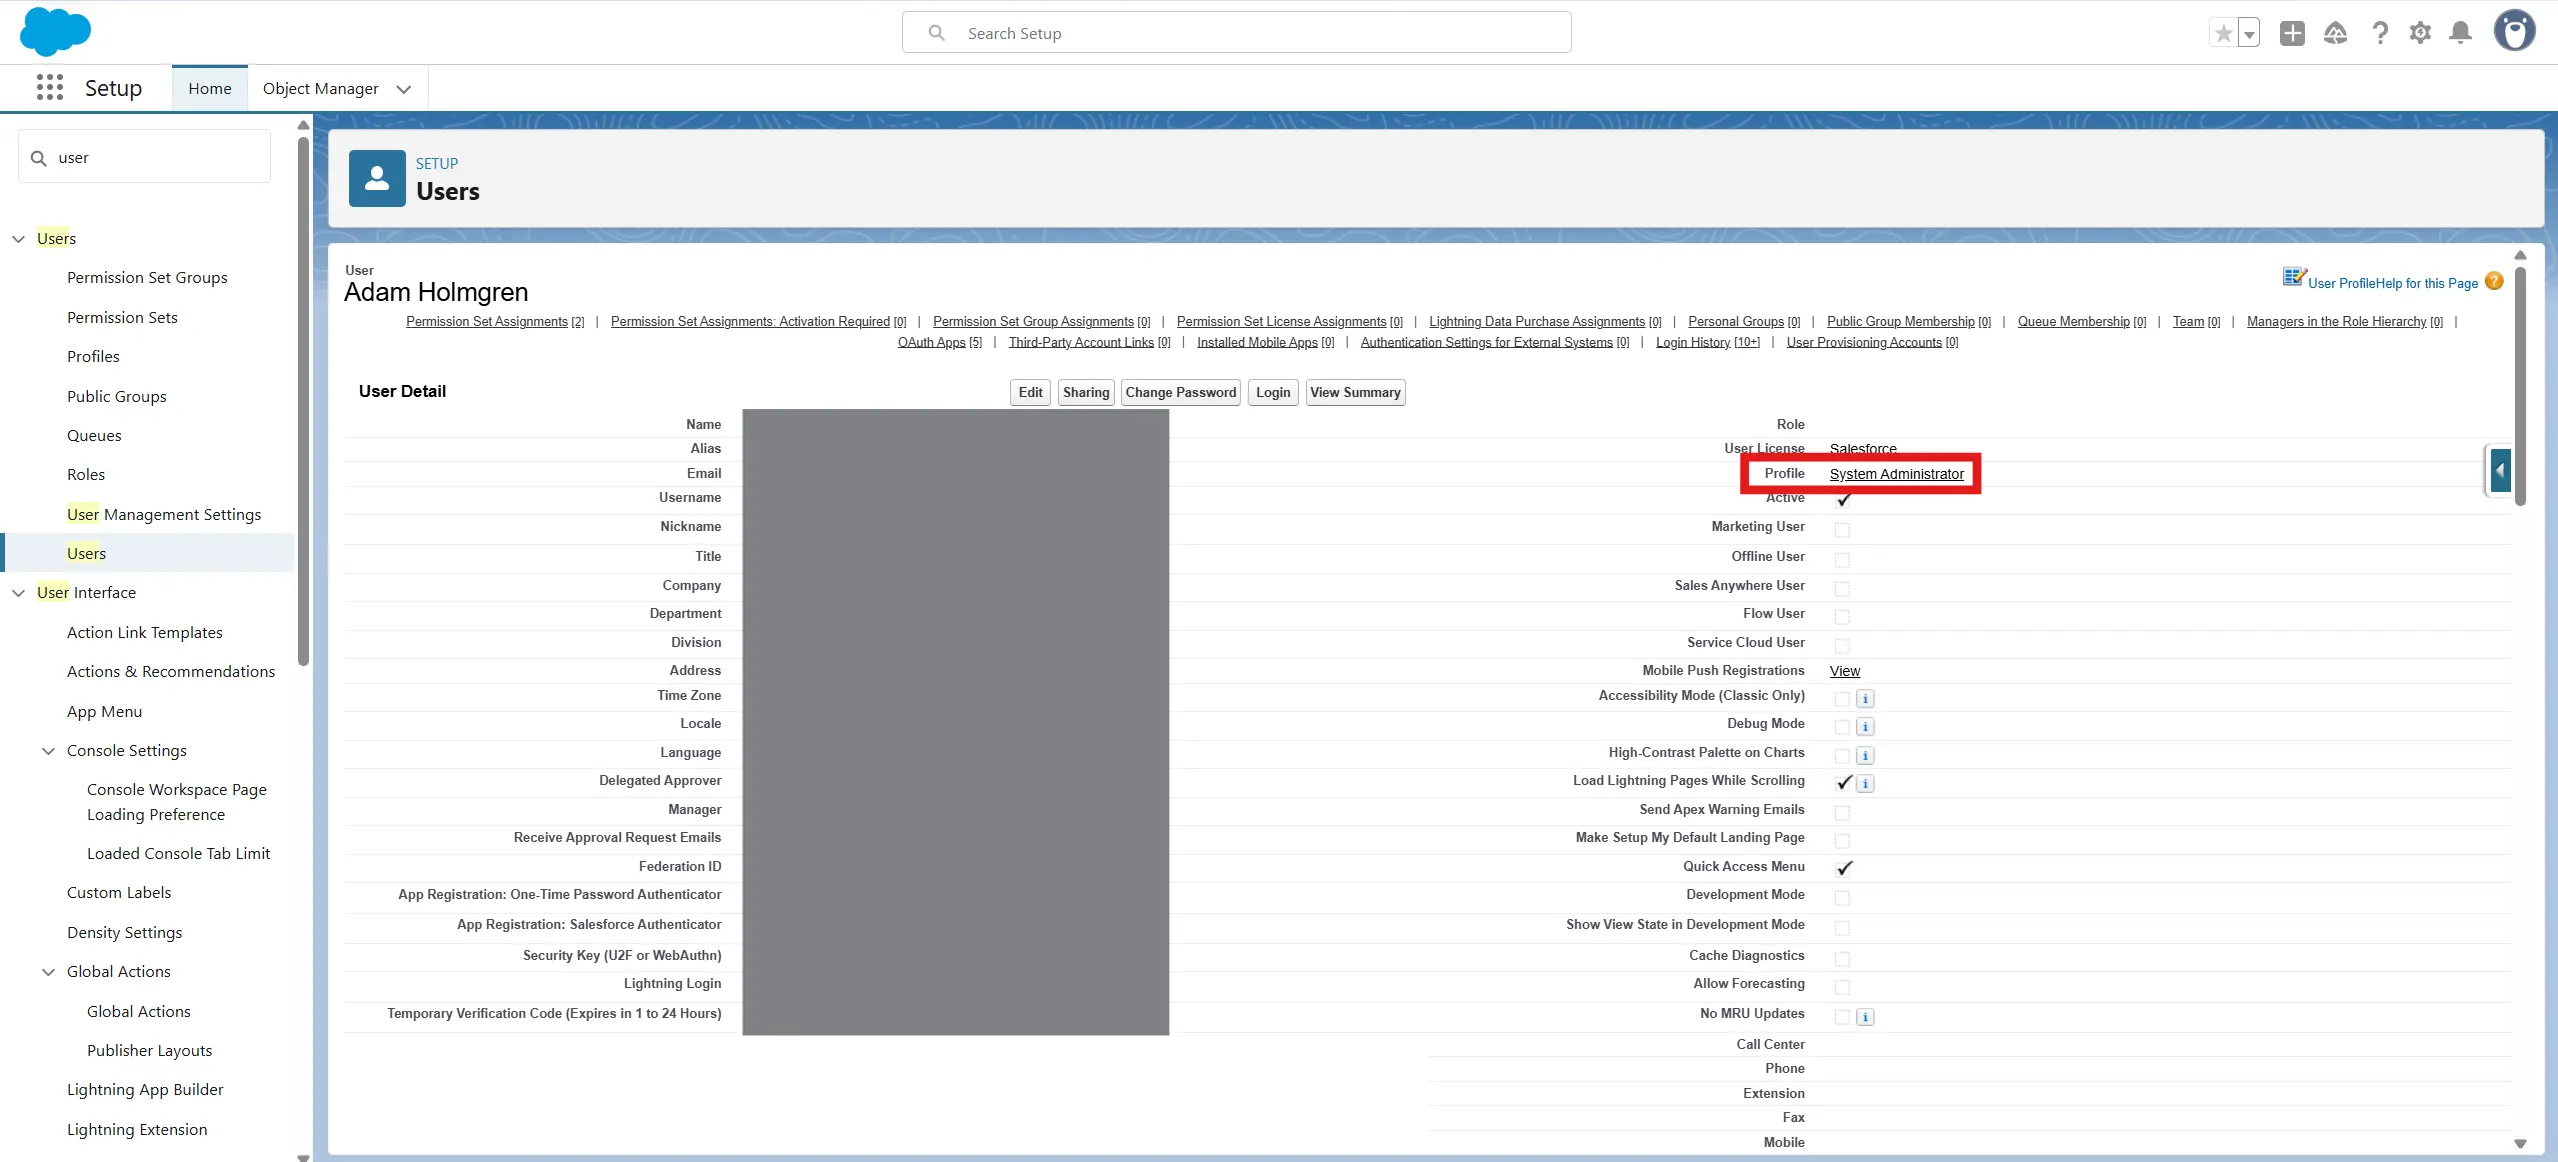
- Scroll down and check:
- Profile: Note what profile this user has (e.g., System Administrator, Integration User)
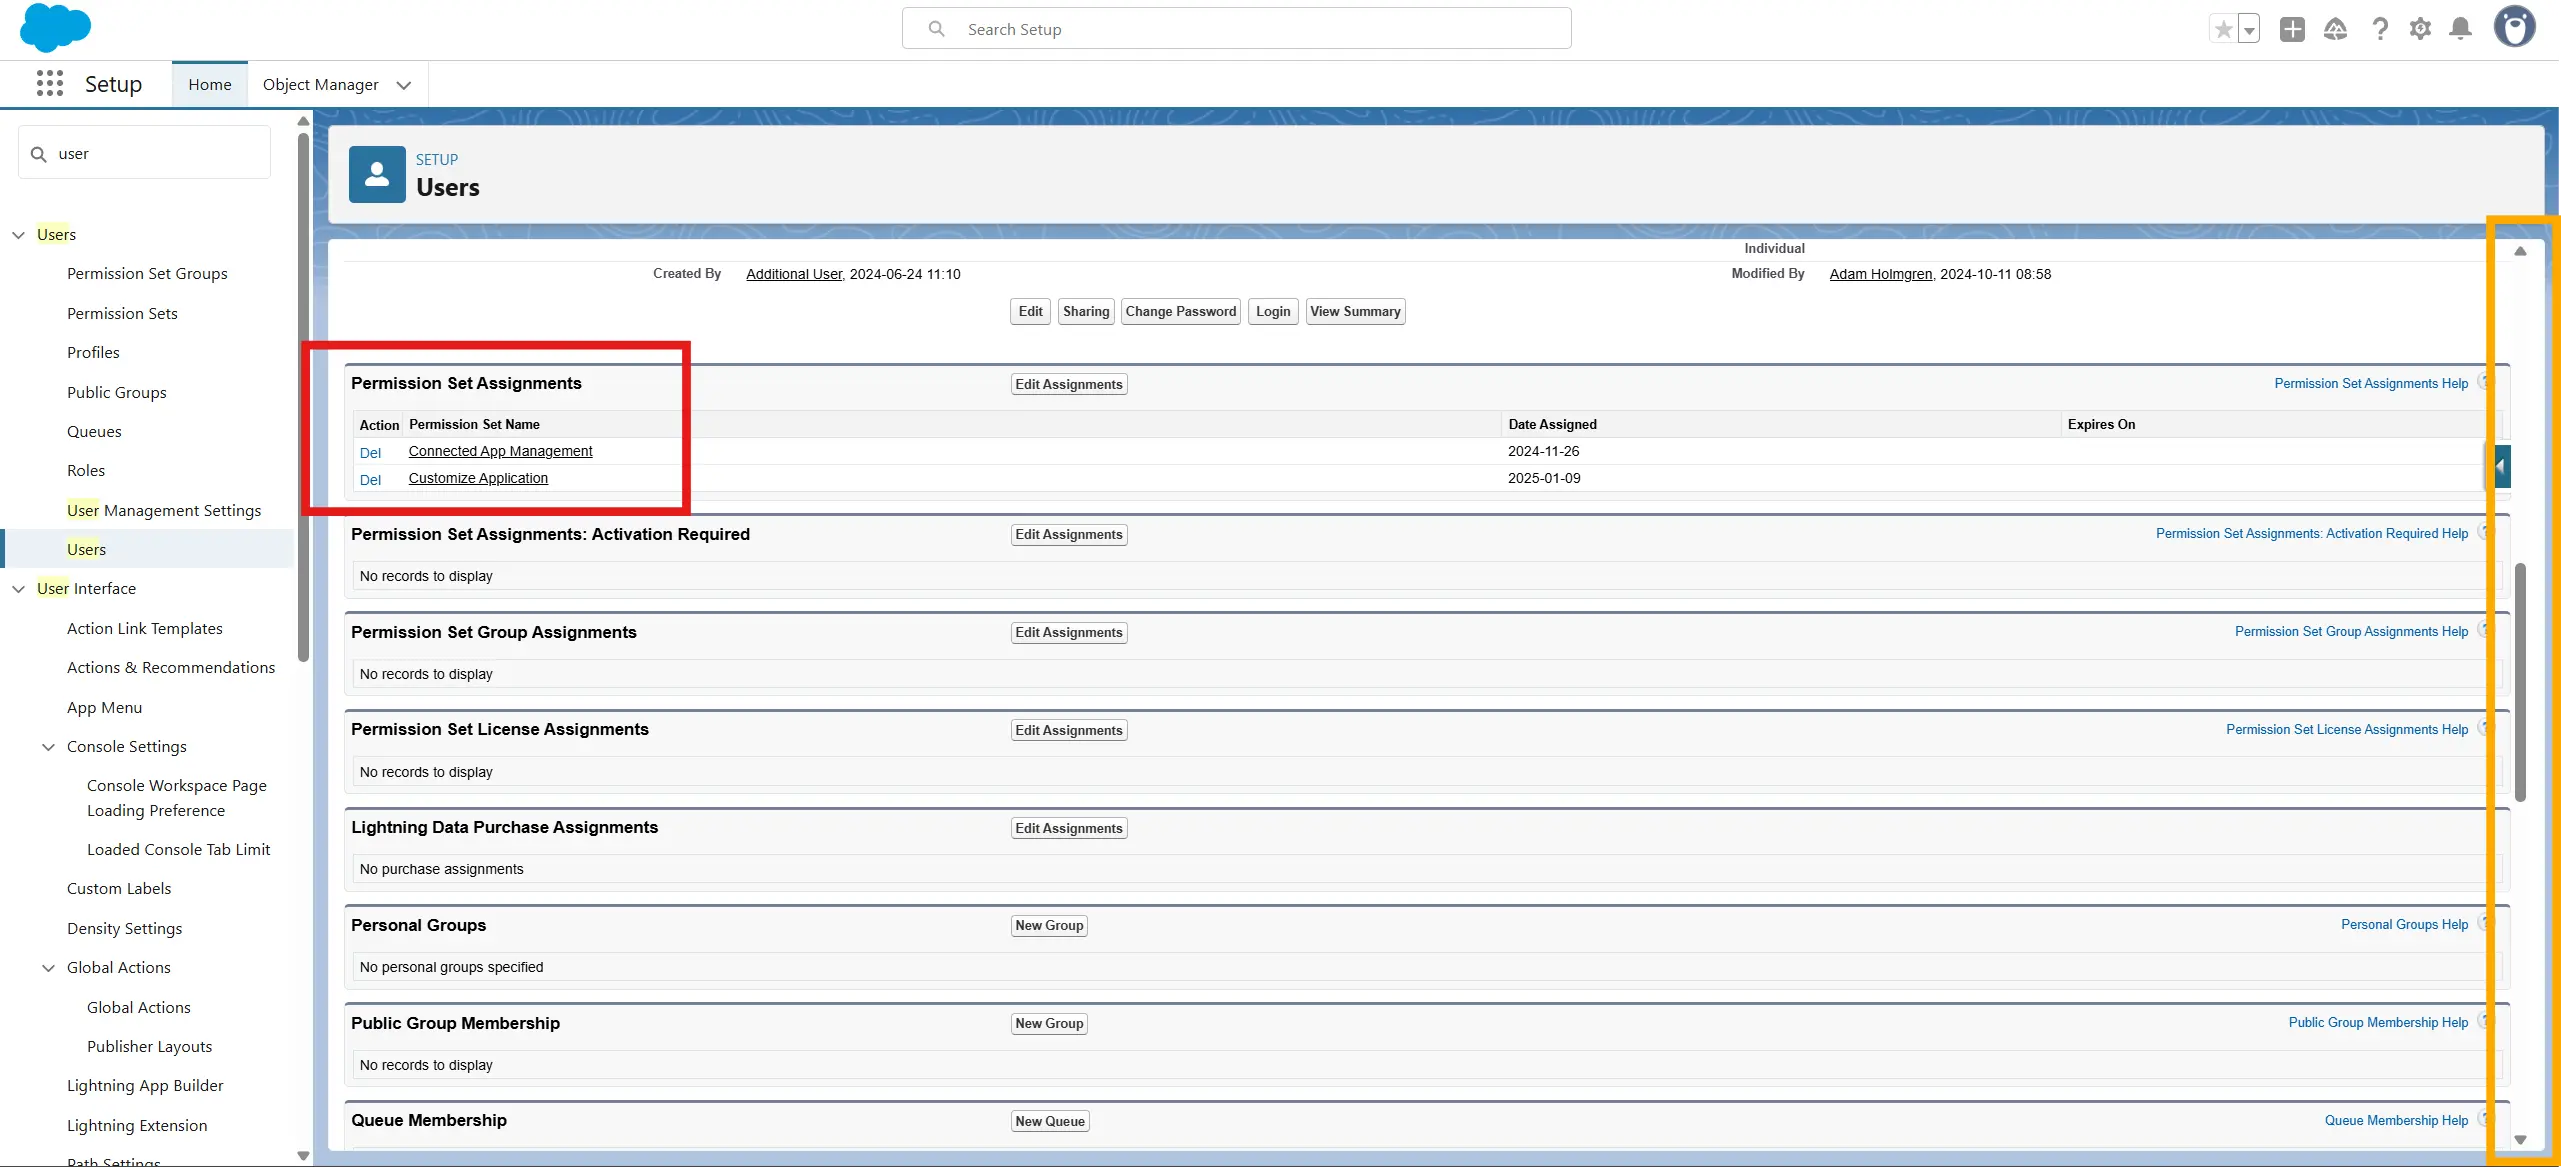
- Permission Sets: If any are assigned, note them too - you may need to scroll down further to check this.
Ideally, this user isn't a personal user account but something specifically created by your Salesforce Admin for this specific purpose. For security and long-term reliability, we recommend creating a dedicated Salesforce user account (e.g., fibbler.integration@yourcompany.com) to use for the Fibbler integration (OAuth connection).
Note: Salesforce is moving from Connected Apps to External Client Appsfor new integrations, and in Spring '26 the ability to create new connected apps is disabled by default. If your org shows the Fibbler entry as an External Client App, that's expected.
PART B - Setting Permissions
Option 1: If using Profiles
- Go to Setup > Profiles
- Click on the user's profile (NOTE that this is NOT the user name, but the profile we checked in Step 3, Part A, step 2 above.)
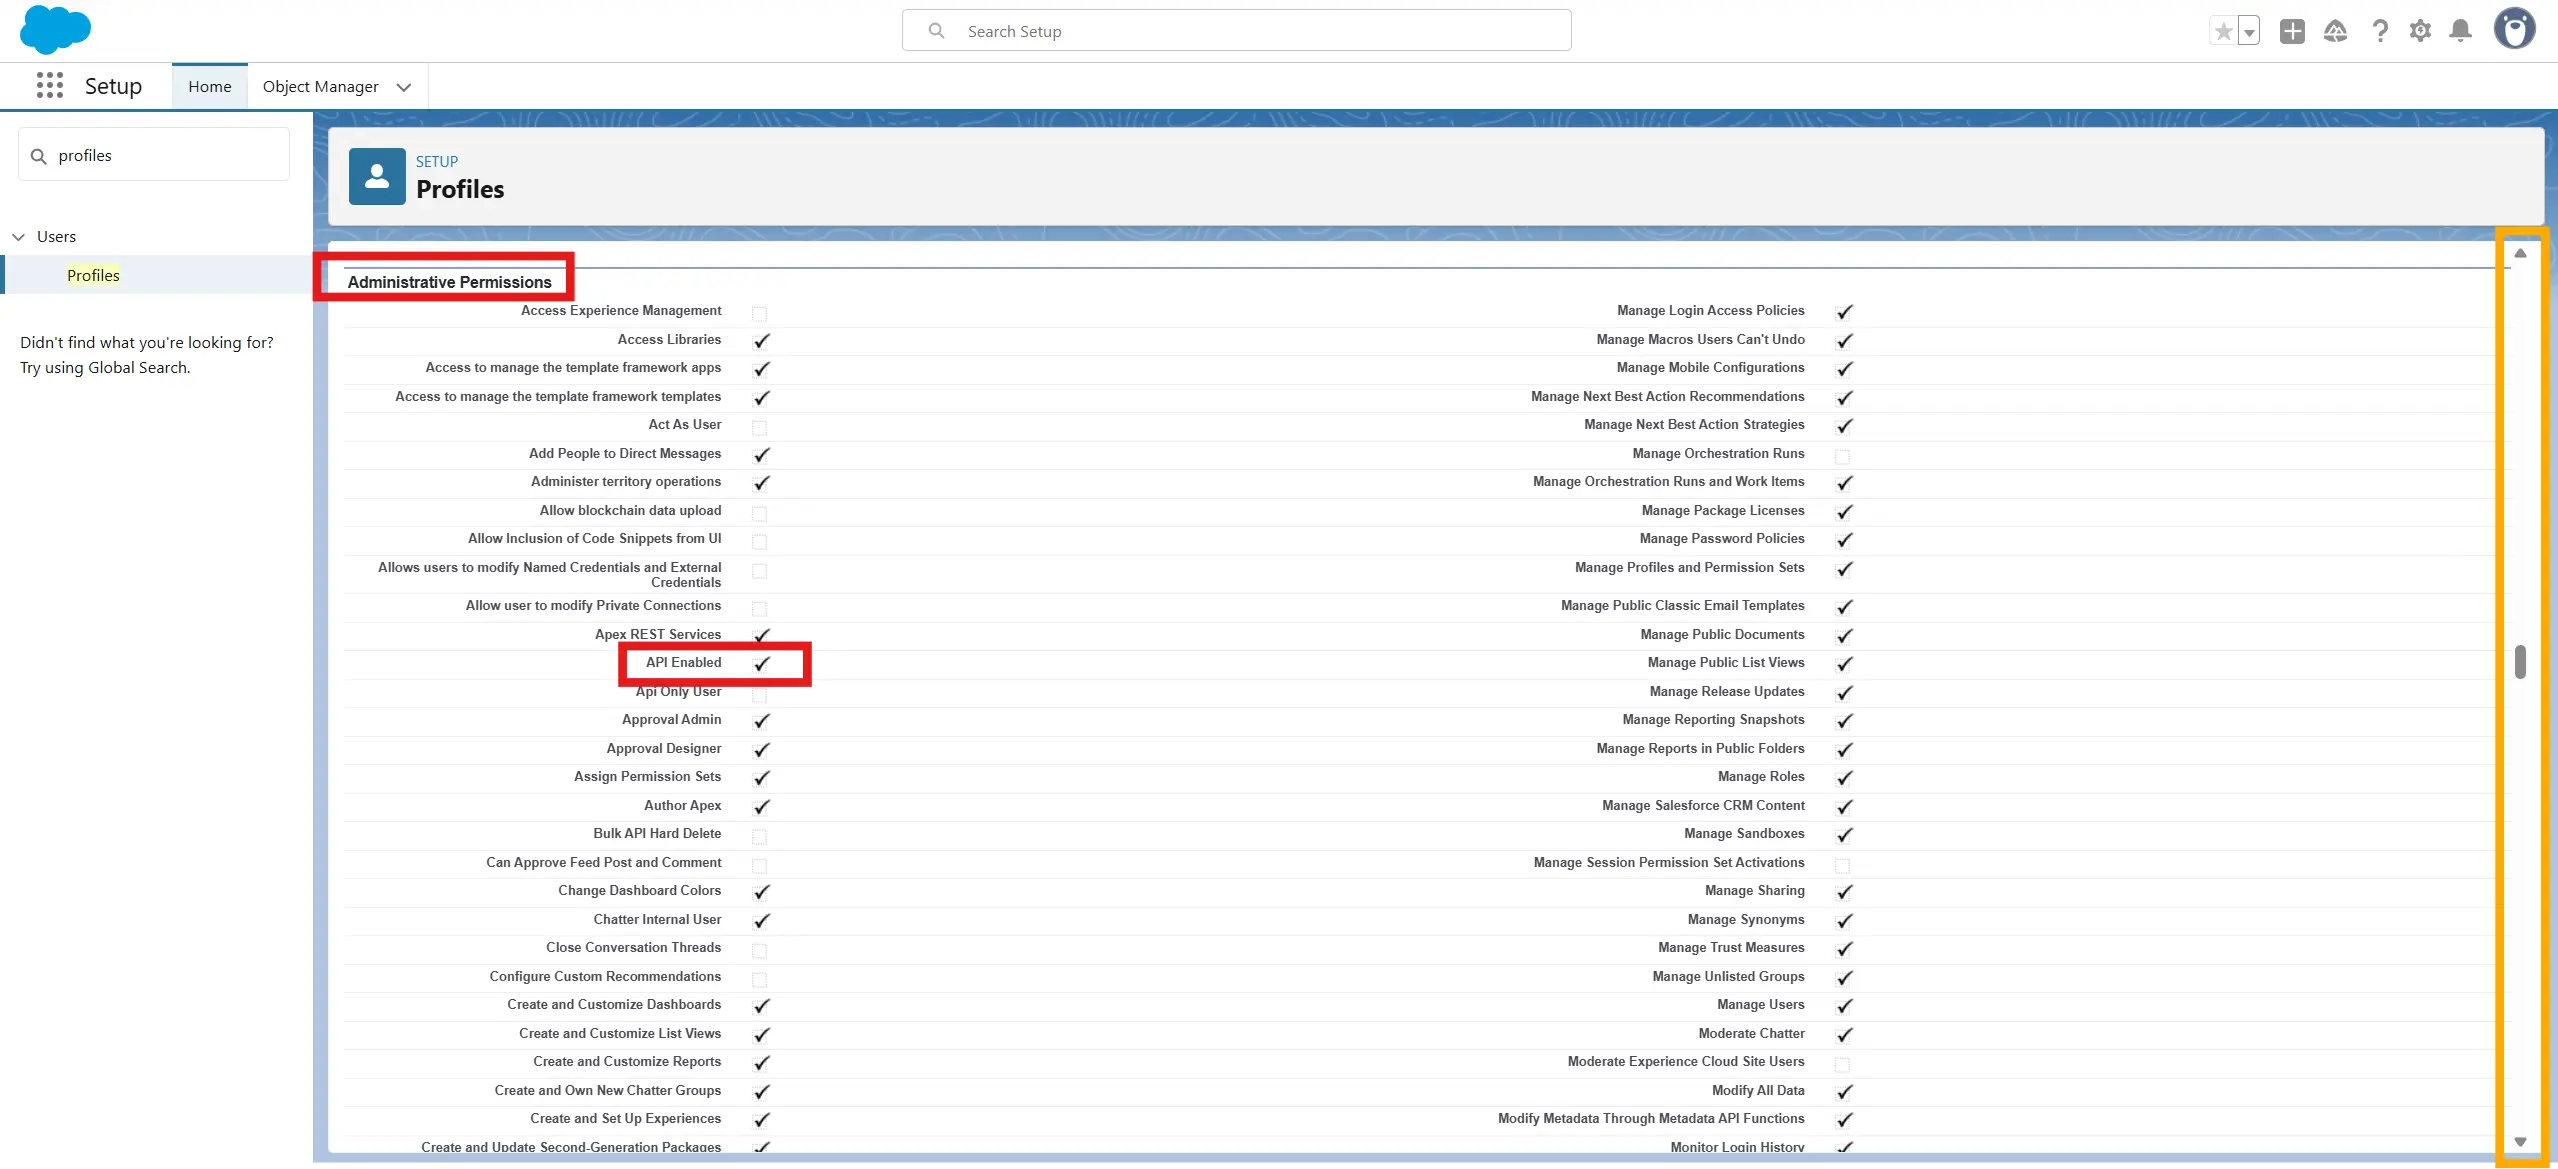
- Scroll to the section labeled Administrative Permissions
- Make sure the checkbox API Enabled is checked
Option 2: If using Permission Sets
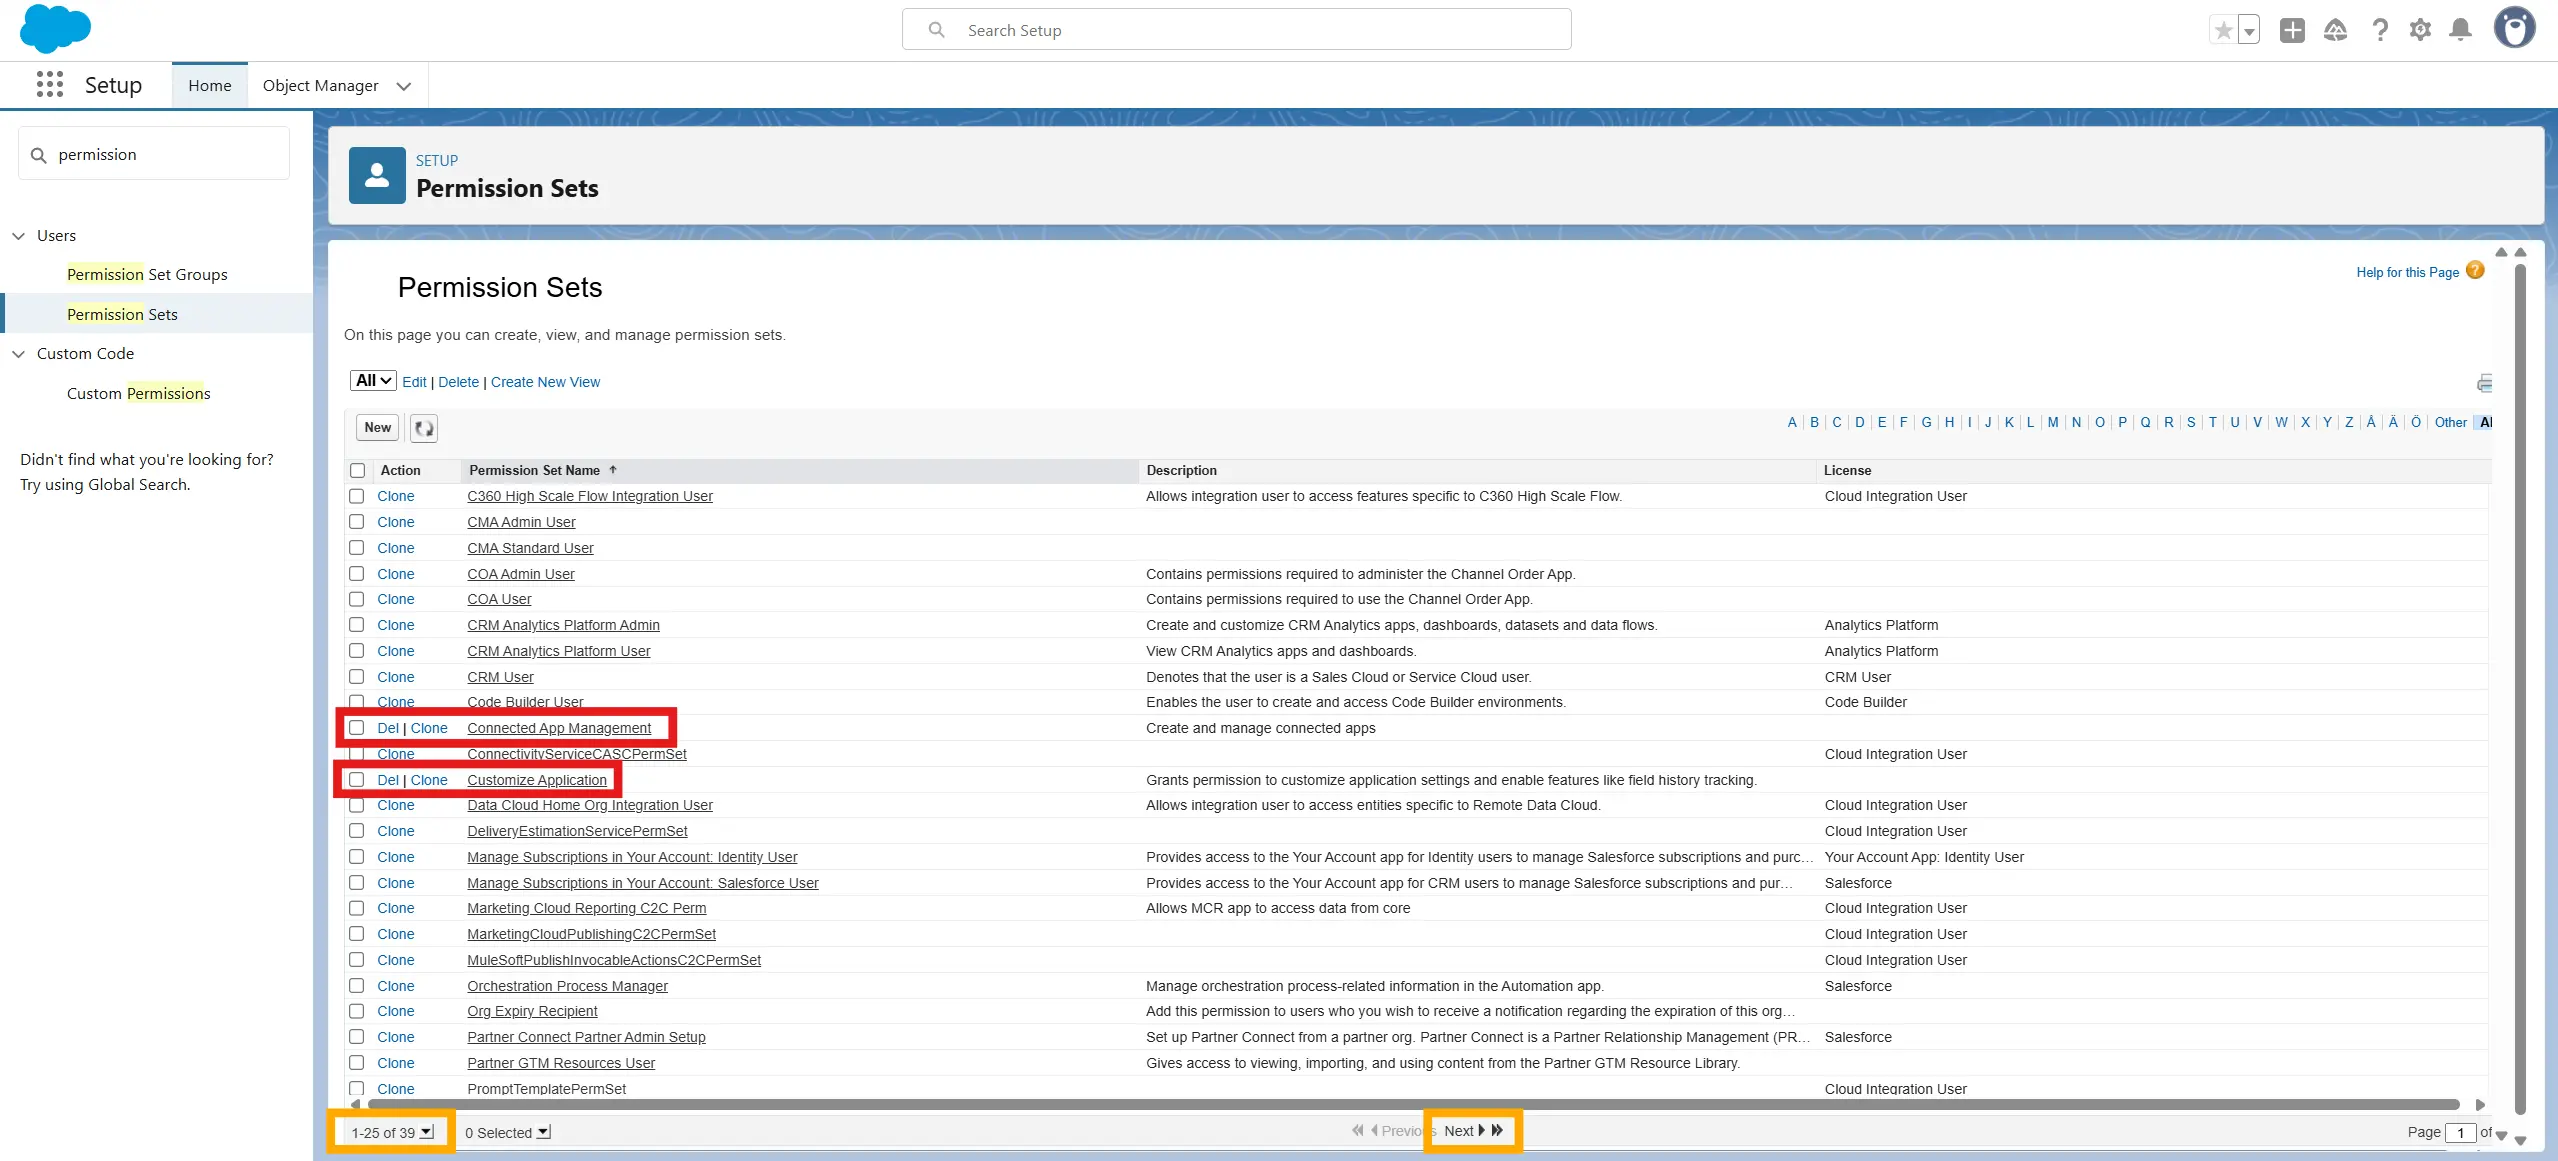
- Go to Setup > Permission Sets
- Click the relevant permission set (NOTE that you might need to scroll to further pages to find the correct permission sets. Also note that these are the permission sets we set up in step 2 above, your organization might be set up differently.)
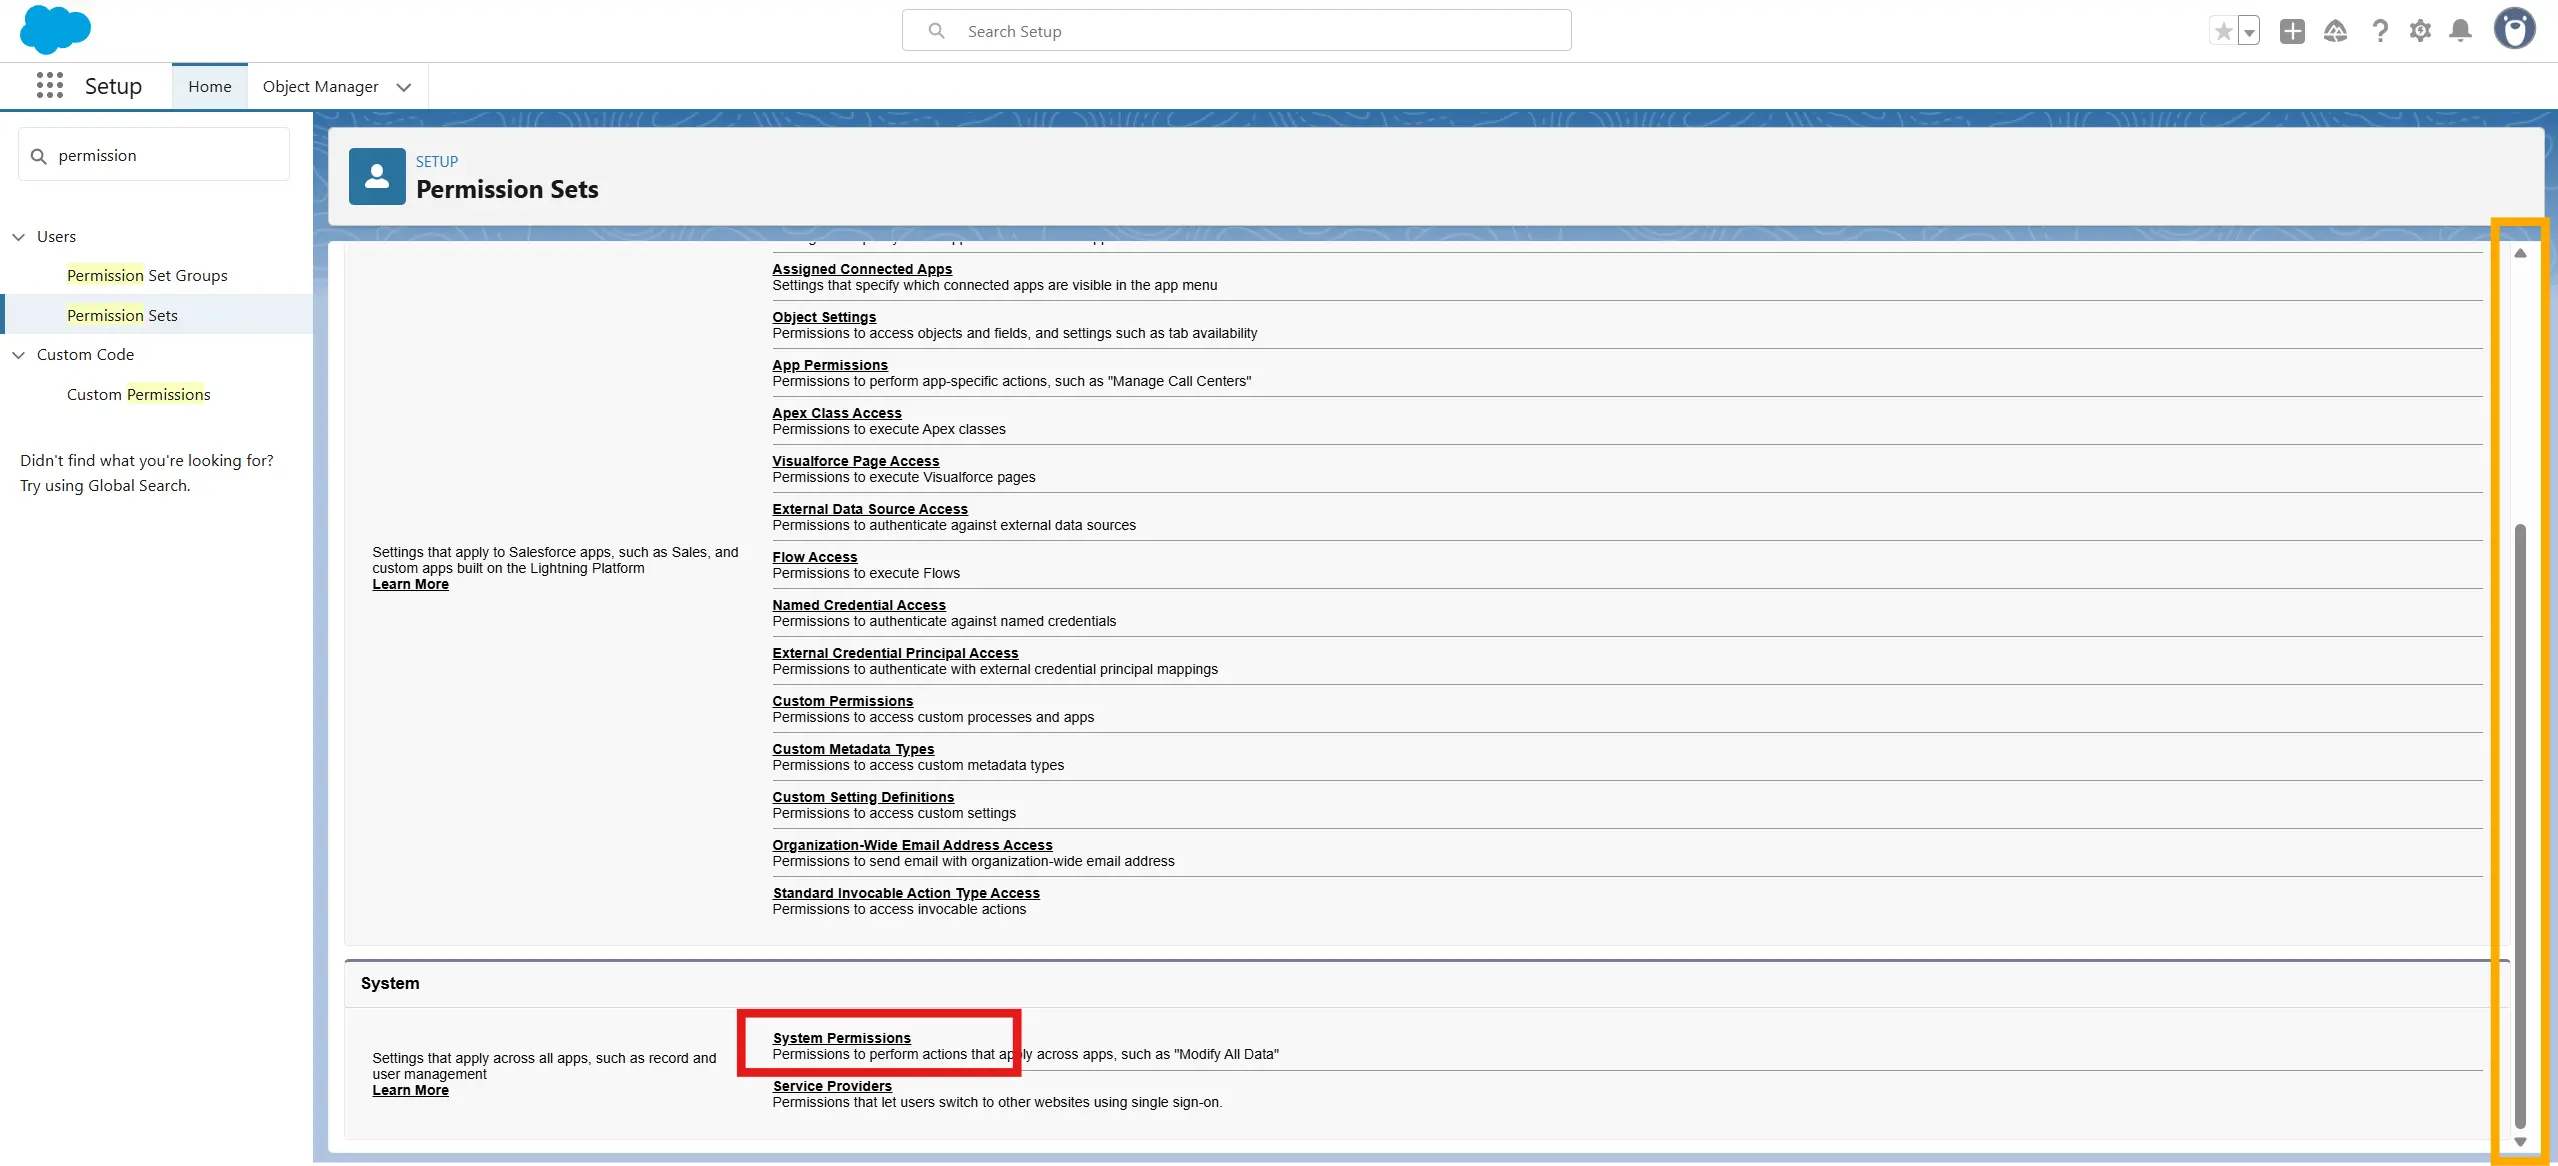
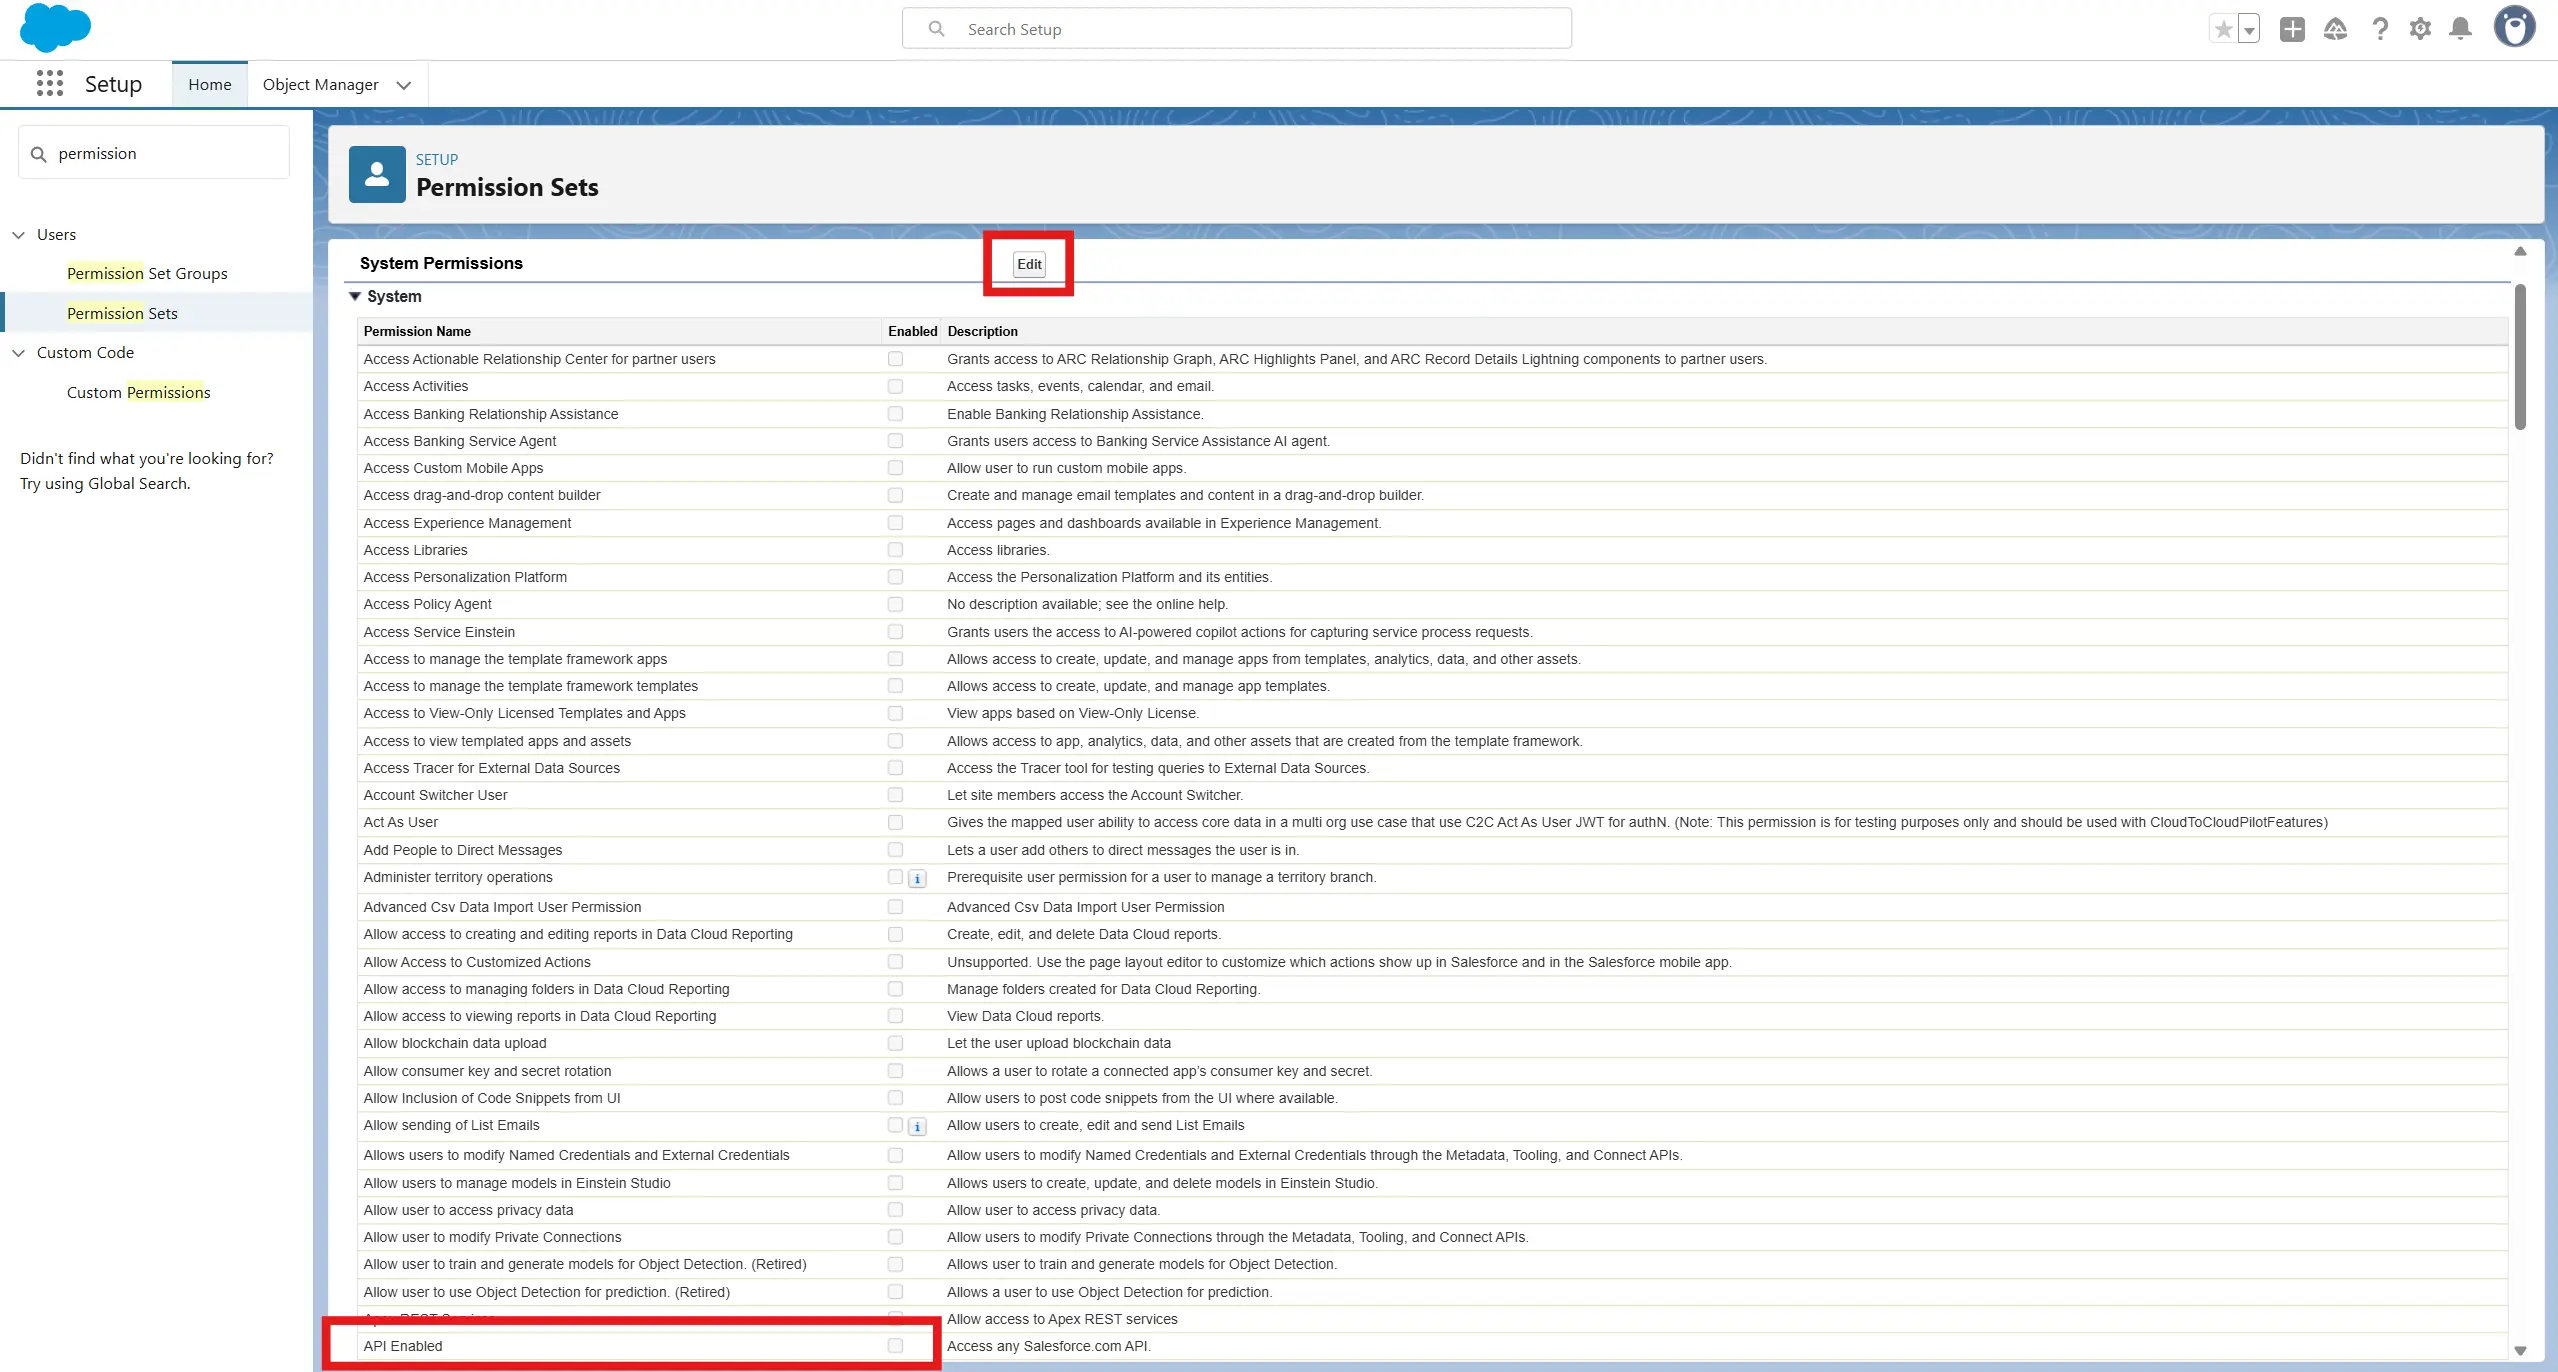
- Scroll to System Permissions and click it.
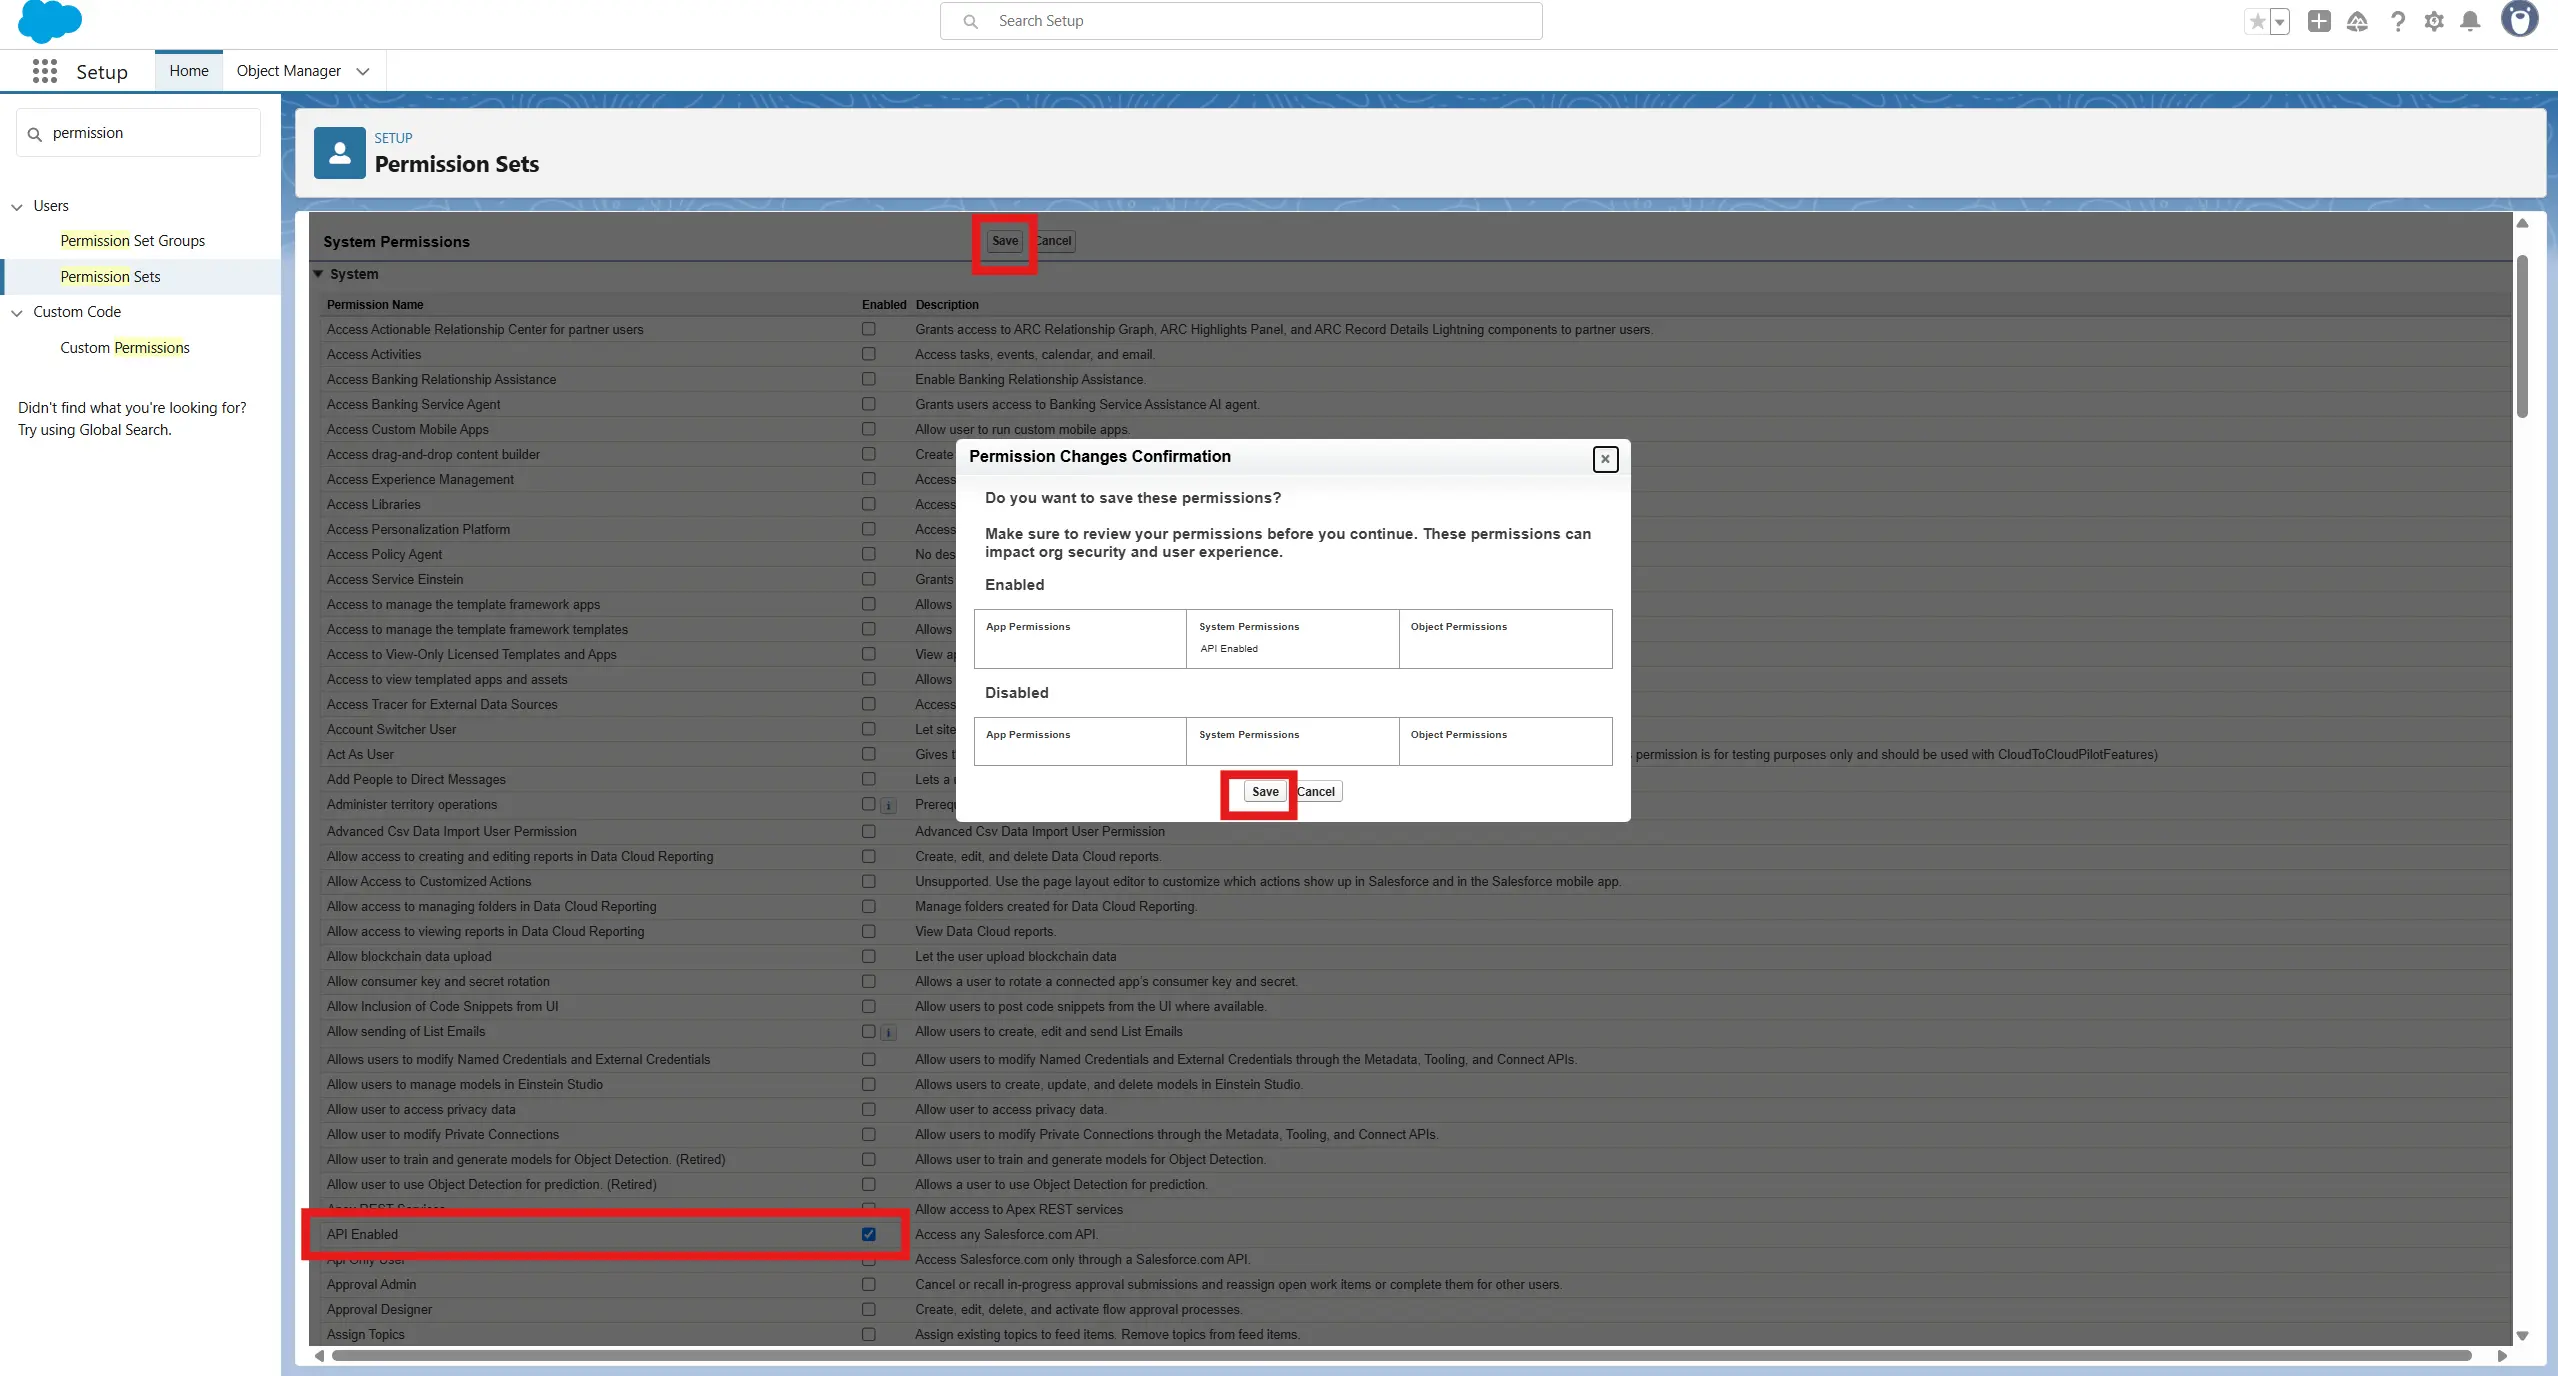
- When you've checked the box for API Enabled, click Save at the top of the list of permissions (where the edit button was previously). You will be given a prompt window showing the permision changes. Click Save again.
Open System Permissions (some orgs show this as "Administrative Permissions," depending on the profile page layout. You may need to scroll to find this.)
Click Edit, check API Enabled.
PART C - Checking Access
Check Access to the Account Object
While still in the Profile or Permission Set, open Object Settings(in many layouts, it's a left-side menu item; in others, you may need to scroll within the profile/permission set page to find it).
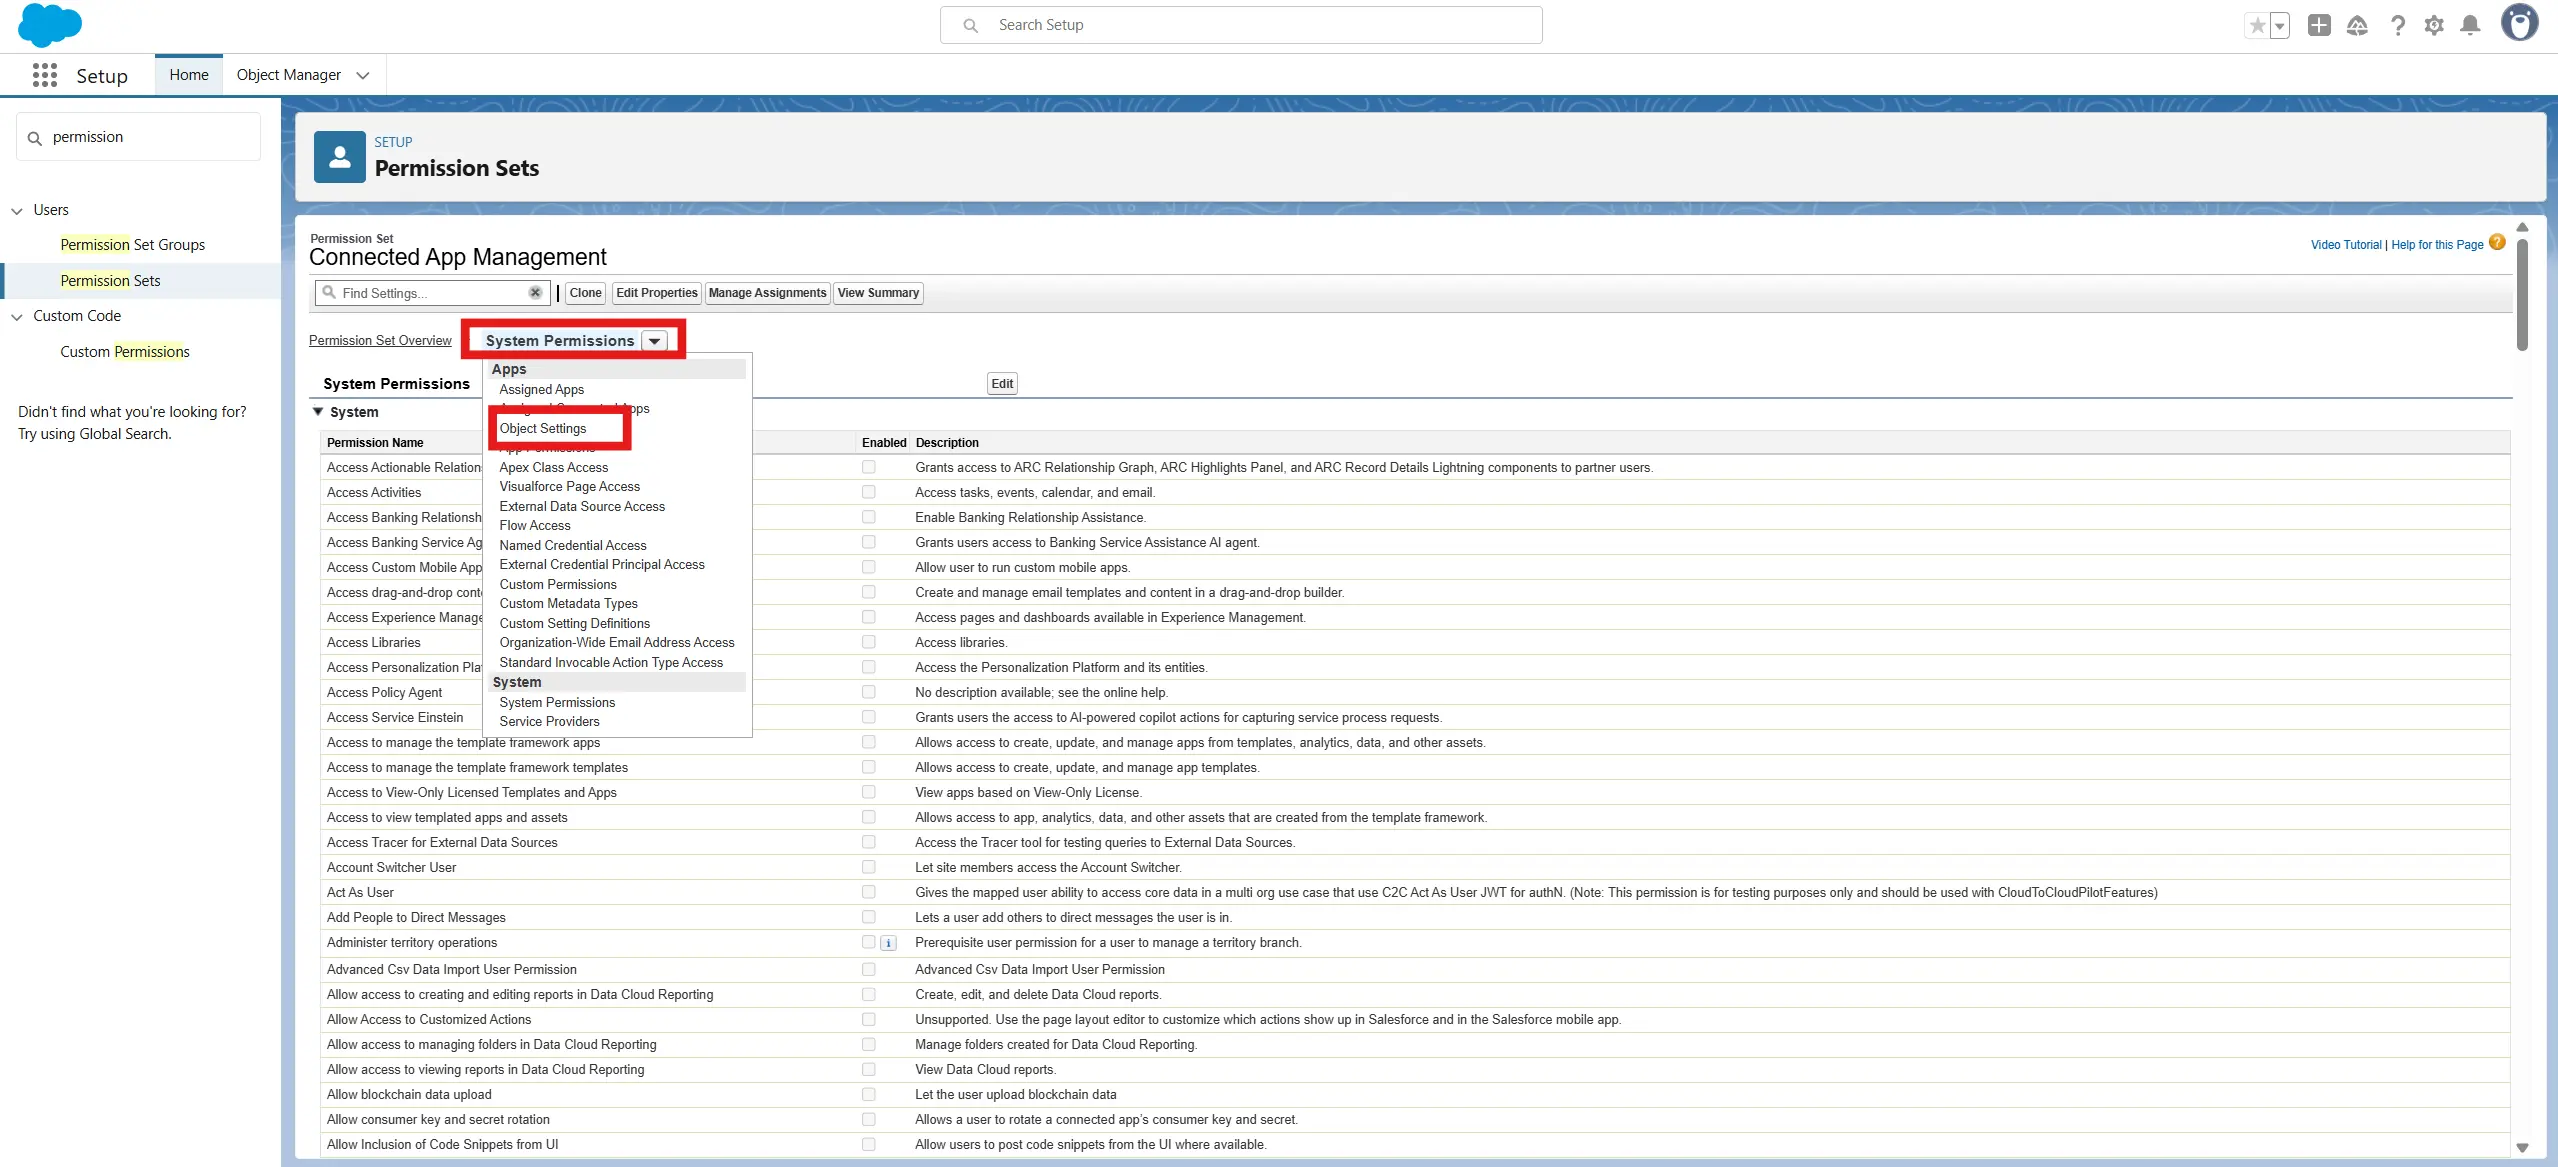
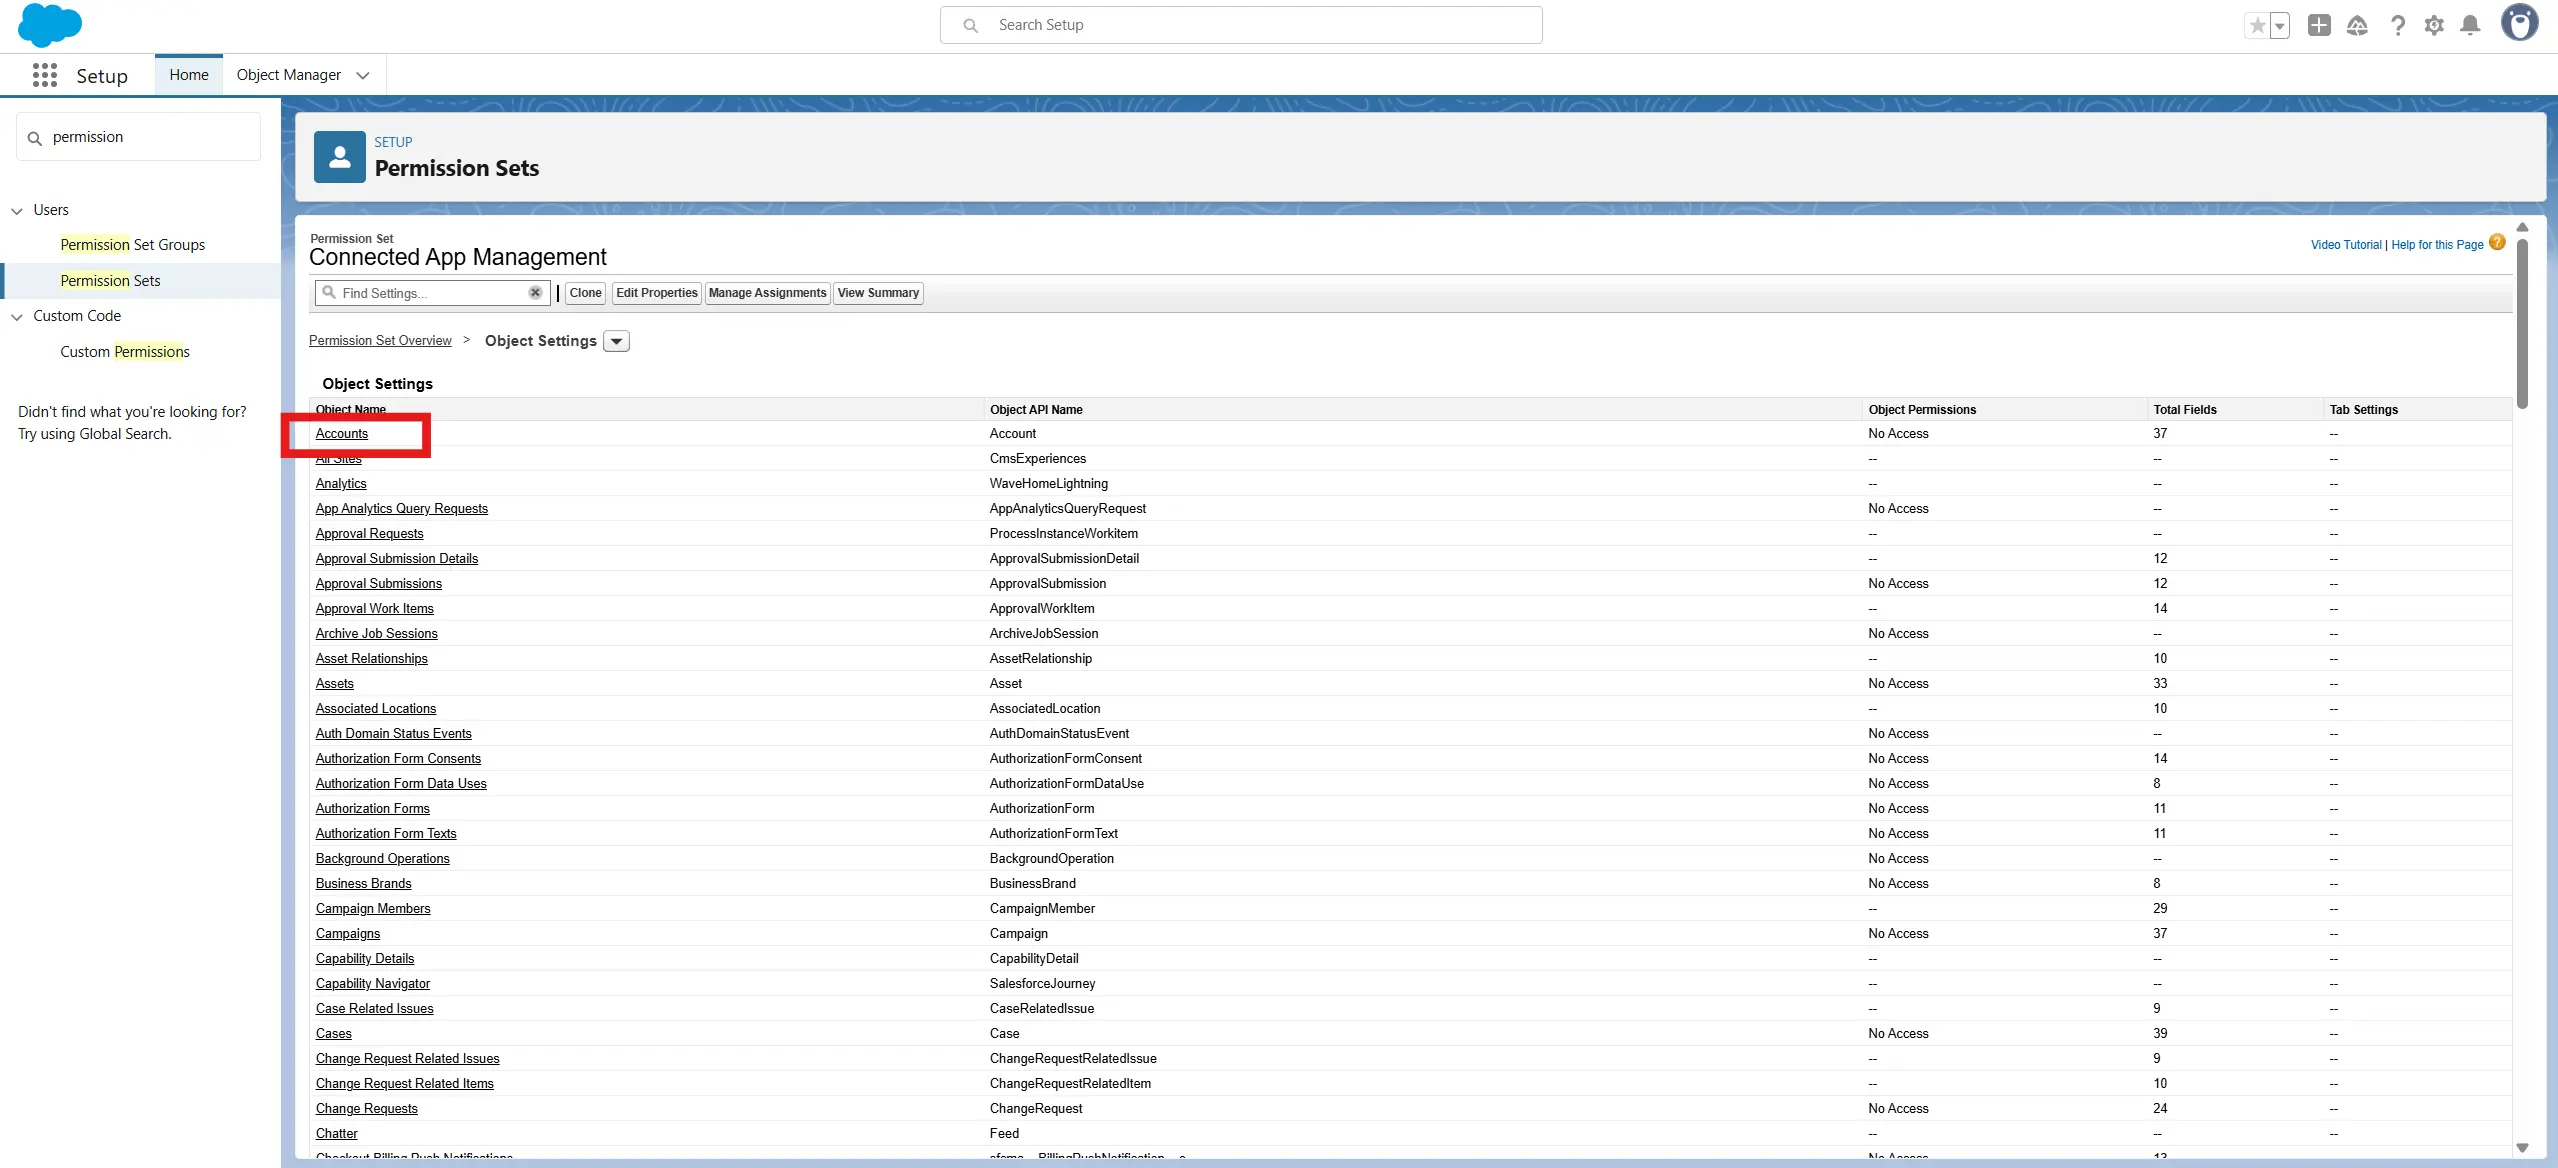
- Click Account
- Confirm the following are enabled:
- Read
- Edit
- (Optional but helpful: View All / Modify All)
- If the fields aren't enabled, click Editat the top of the list. When you've selected the fields you wish to enable (Read and Edit at the minimum), Click Save.

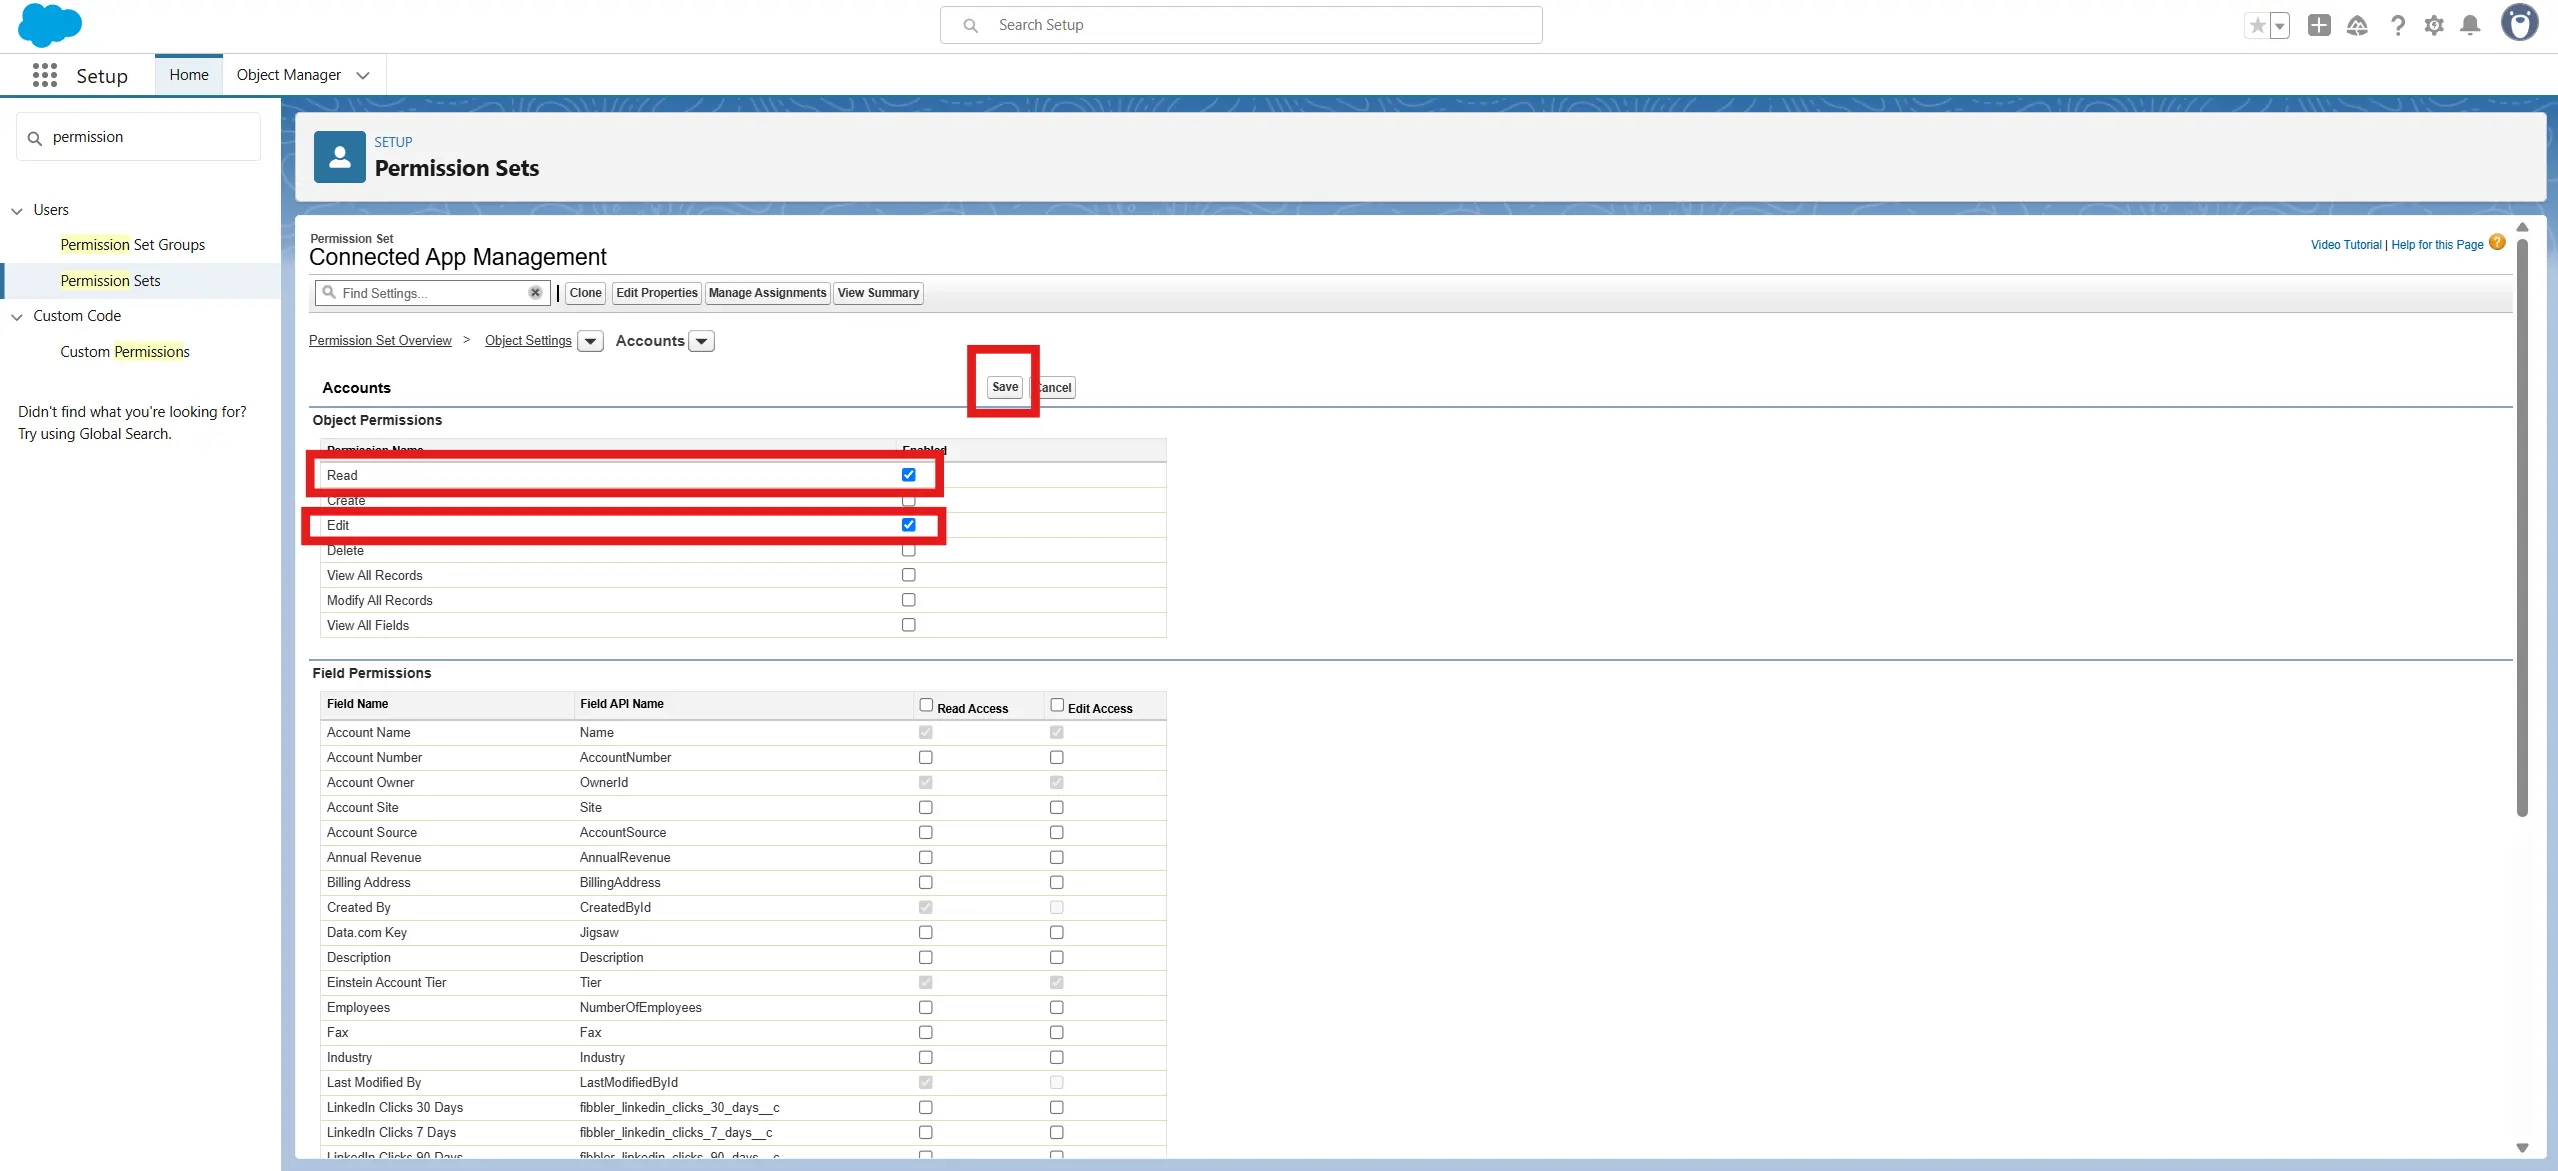
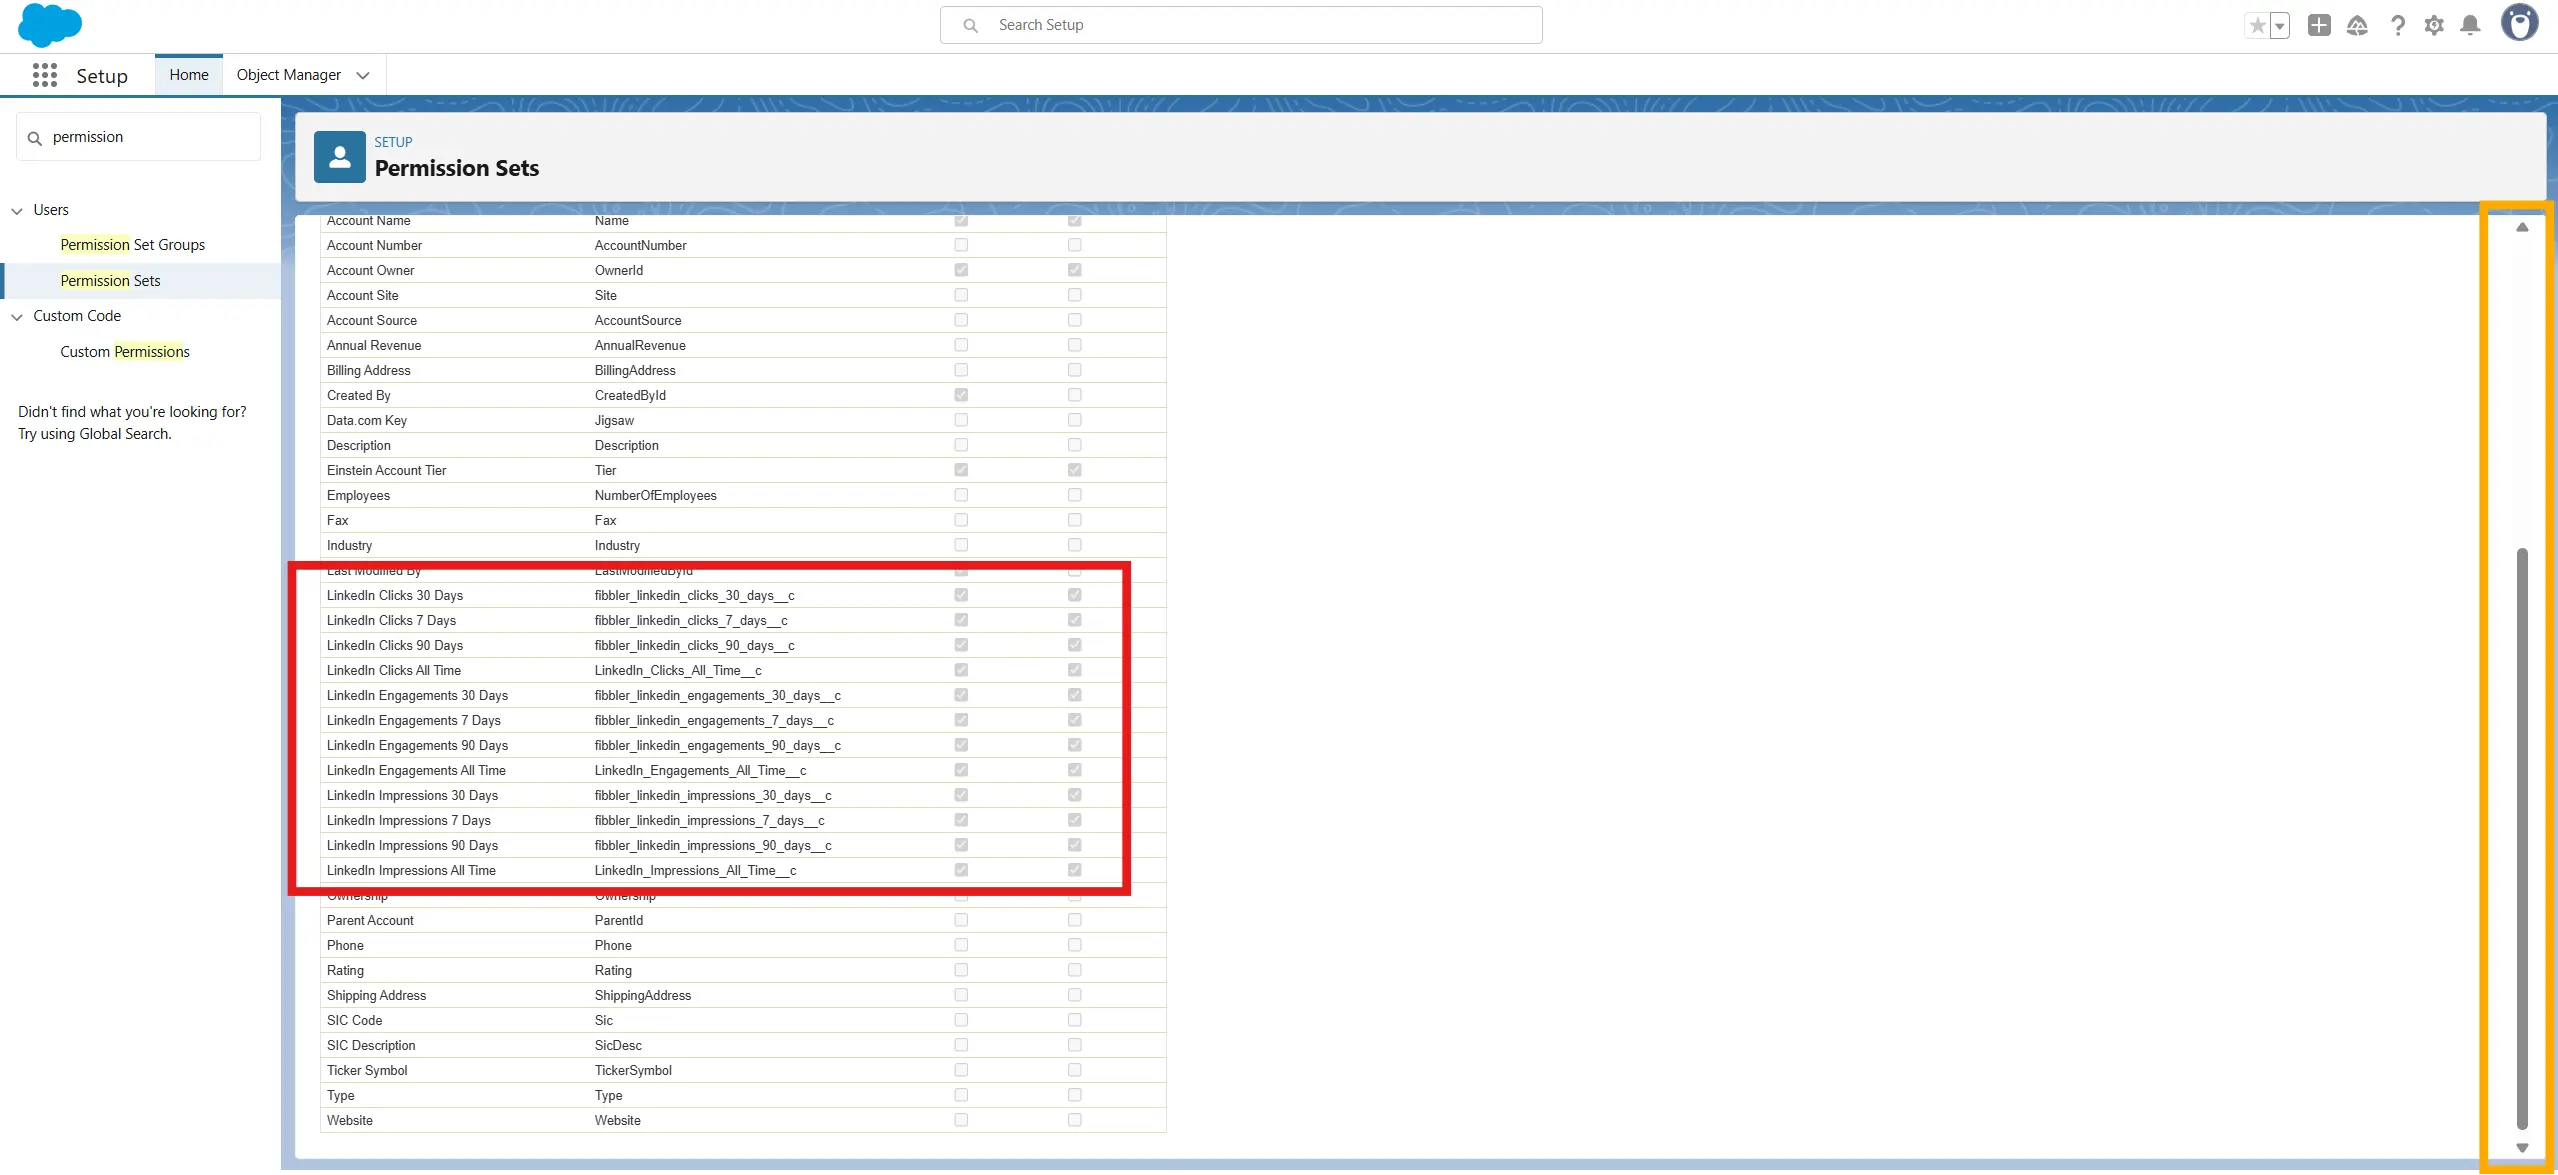
Check Field-Level Access for LinkedIn Fields
- Still in Object Settings > Account, scroll to Field Permissions
- Find each LinkedIn field (you can Ctrl+F to search for "fibbler")
- Make sure each one has:
- Read Access
- Edit Access
Repeat this for each of the 9 custom fields.
(Optional) Assign a Dedicated Permission Set
If you want to keep things clean:
- Create a new Permission Set just for Fibbler access
- Include:
- API Enabled
- Read/Edit access to Accounts
- Edit access to the 9 custom fields
- Assign this to the integration user
This avoids giving full admin rights and makes audits easier.
Outcome Step 3
You confirmed that the Salesforce user connected to Fibbler has the right permissions to access Accounts and update the custom LinkedIn ad fields via API. This ensures Fibbler can reliably sync data into Salesforce without hitting permission errors or silently skipping fields.
Chapter 4: (OPTIONAL) Tracking Field History with Field History Tracking (Mainly used for debugging and audits, NOT used for reports)
Goal and Importance:
This step enables Field History Tracking for the custom LinkedIn ad fields you created on the Account object.
With field history enabled, Salesforce automatically logs what changed, when, and by whom, and it works even if the changes were made via API (like from Fibbler). There are, however, some notable shortcomings with this method:
- Salesforce only stores the last 18 months of field history in standard reporting
- You can track up to 20 fields per object using standard field history tracking. If you are already tracking 20 fields, skip this step (as this step is not used for reports or critical to how you interact with Fibbler data).
- Salesforce stores historic data as text, making it impossible to plot graphs over time through historical field data.
If you need longer or more detailed history, or you wish to generate reports and dashboards showing data over time, consider using a custom object (like Ad Engagement History). This is covered in Step 5 below.
Note (Winter '26+): Salesforce introduced an enhanced Field History Tracking setup experience. You can access it from Setup > (Quick Find) Field History Tracking > Field History Tracking, which helps you prioritize tracked fields and shows data classification details.
Steps:
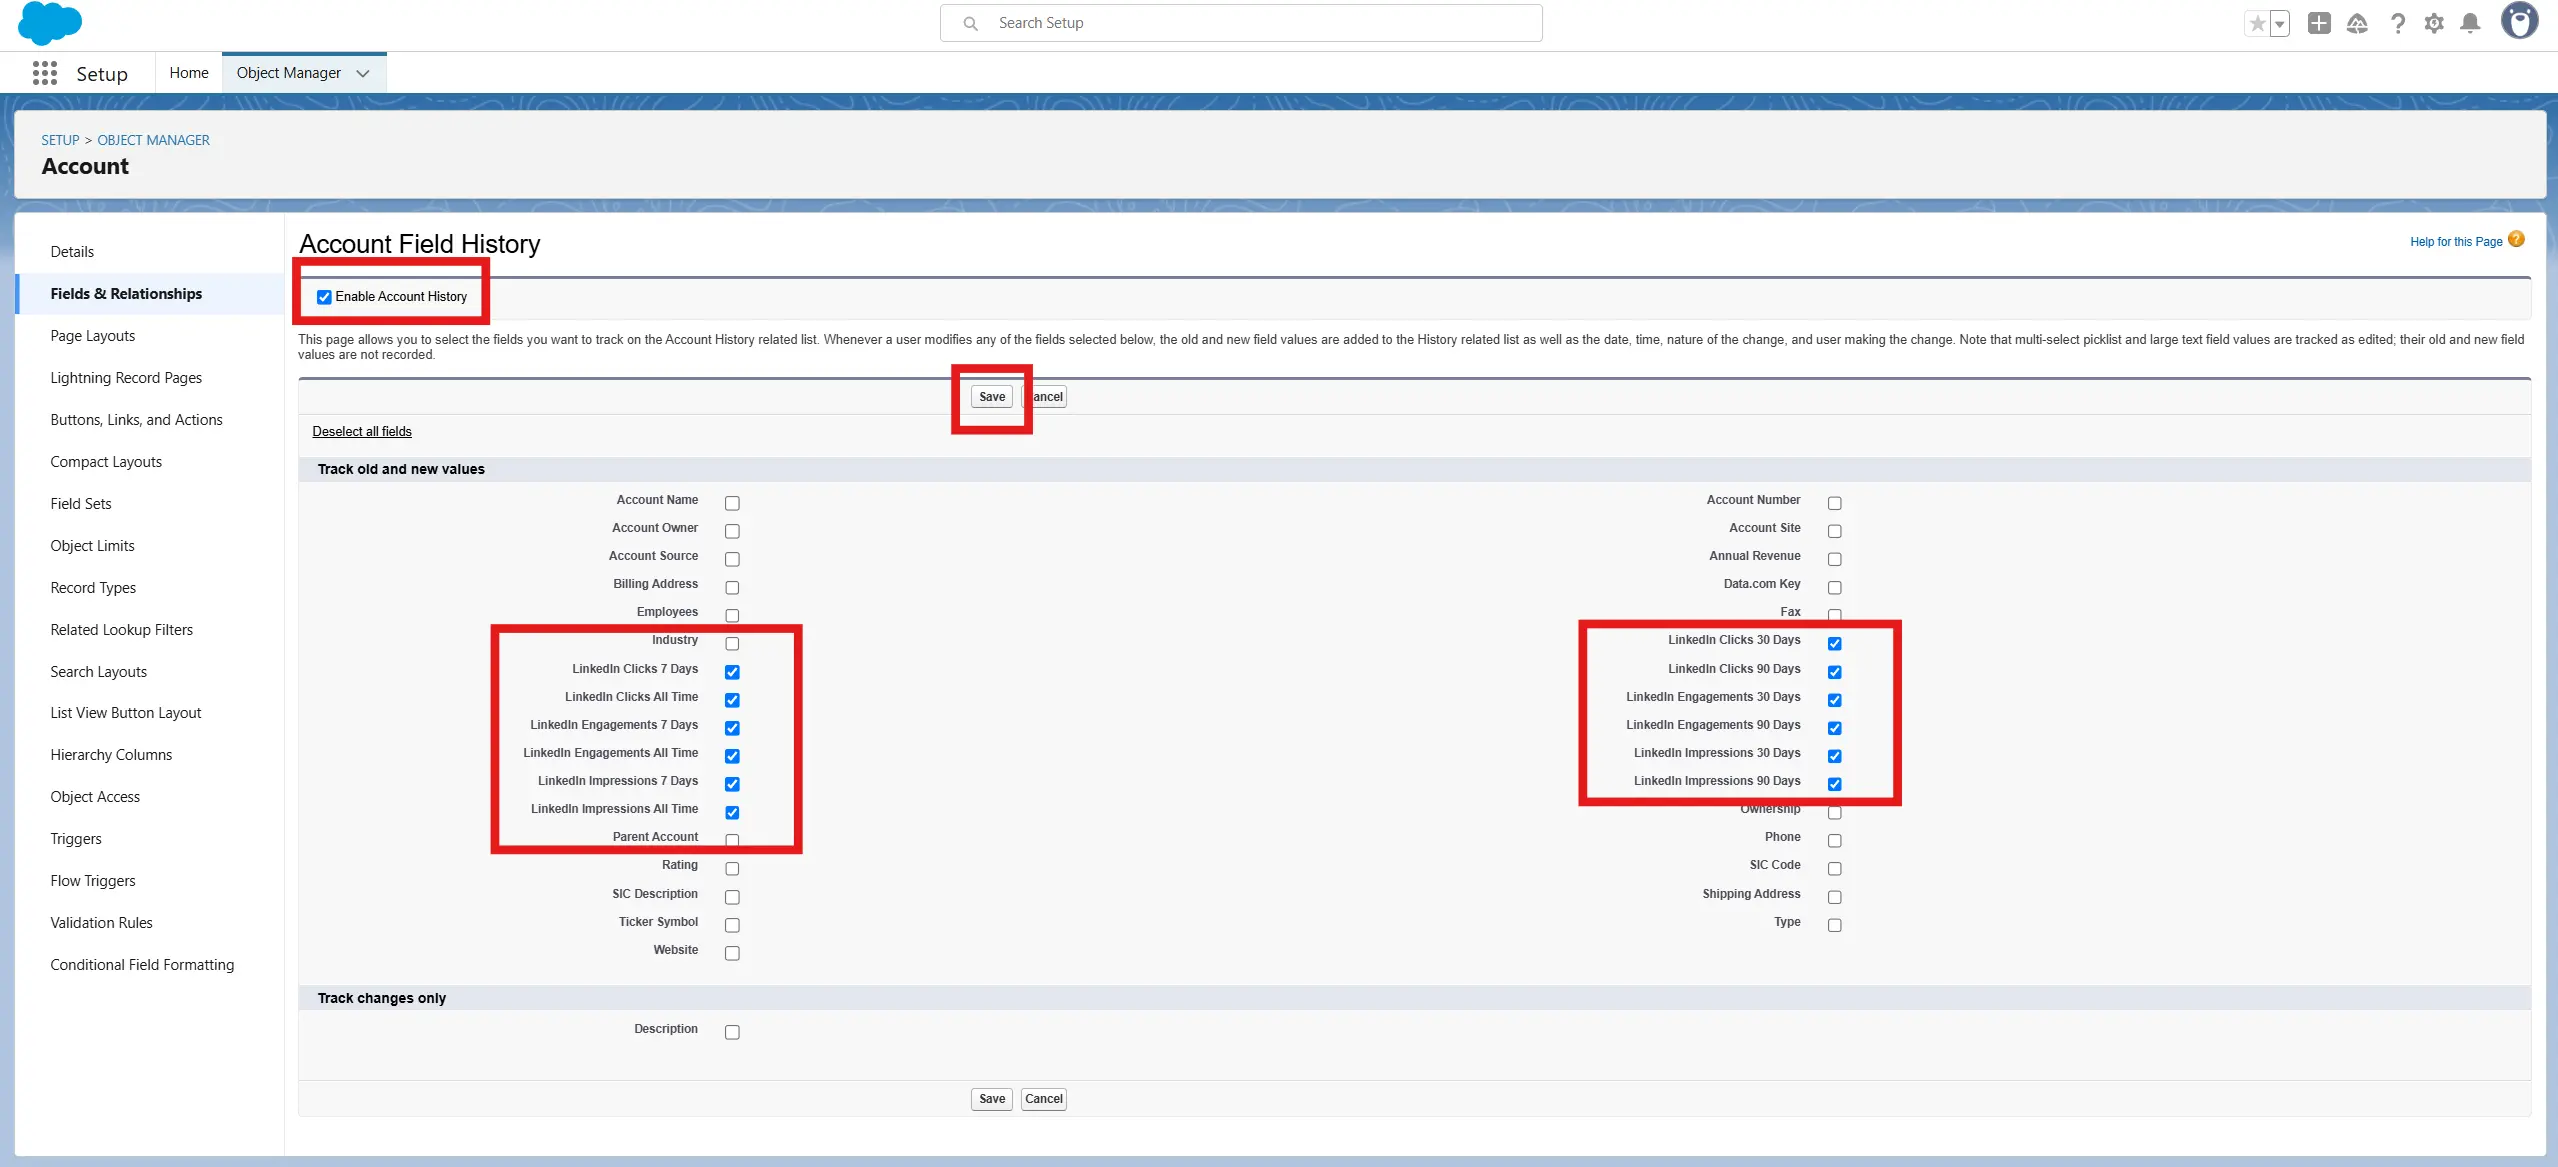
PART A - Activating Field History
- Go to the Setup > Object Manager
- Select the Account object
- Inside the Account object setup page, click Fields & Relationships on the left-hand menu
- Click Set History Tracking in the top-right corner
- Click the Enable Account Historycheckbox if it's not already enabled
- From the list of fields, check the boxes next to your LinkedIn ad metric fields, for example:
- LinkedIn Impressions (7 Days)
- LinkedIn Clicks (30 Days)
- … up to a maximum of 20 fields total (including all other fields you are tracking historic data on for the Account object)
- Click Save
PART B - Verifying Field History Is Working
To test that field history tracking is active:
- Go to any Account record in Salesforce
- Click the Related tab
- Look for a related list called Weekly LinkedIn Impression Histories or what you have named your fields.
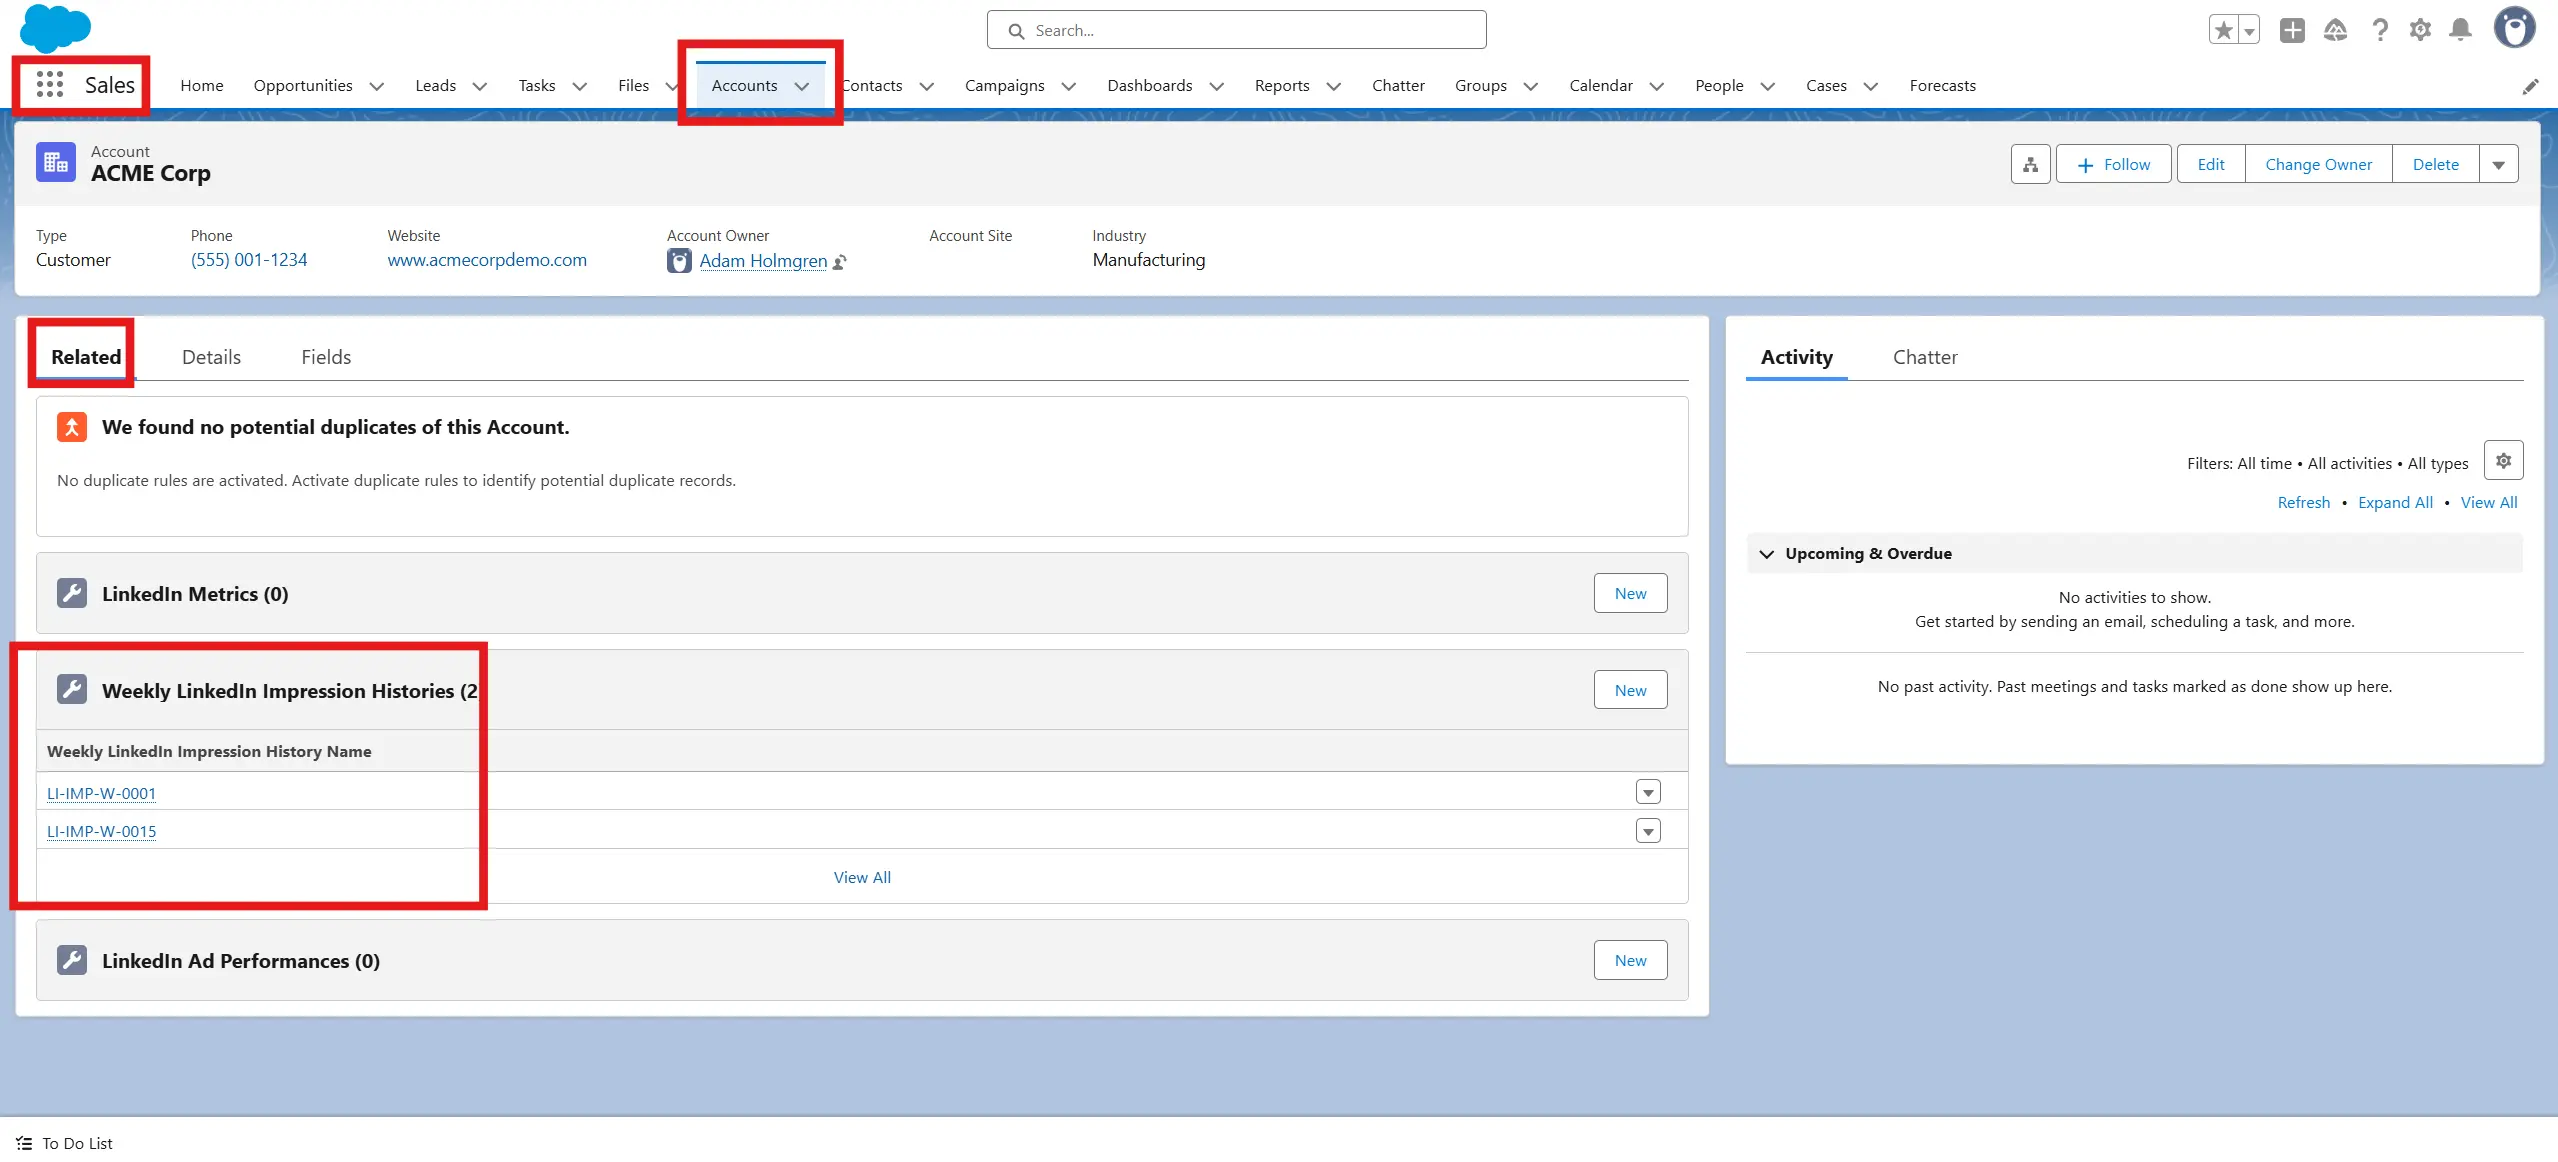
If it's not visible, try the following fixes:
- Edit the Account page layout
- Add the Account History related list
- Save and return to the Account record
You'll now be able to see a running log of:
- Old value → new value
- Date/time of change
- Who made the change (even if it's "Fibbler Integration" via API)
Outcome Step 4
You've enabled field history tracking on the custom LinkedIn ad metric fields for the Account object. This lets you see exactly when ad data changes, what changed, and who made the change, giving you an audit trail for Fibbler updates and confidence in your data.
Chapter 5: Tracking Field History with a Custom Object (Using Flow)
Goal and Importance:
While Field History Tracking (Step 4) gives you a basic audit log, it has limits:
- It tracks only the last change
- It can't be used for dashboards or grouped reports
- It doesn't store values consistently over time
A custom object solves this by storing one record per Account per time period (e.g., each week), with all the metrics included.
This is ideal if your team wants:
- Trend reporting (e.g., Impressions by Week)
- Time-based dashboards
- To preserve history for more than 18 months
- Work around the Salesforce limit of 20 tracked fields per account
Steps:
PART A - Creating the Custom Object
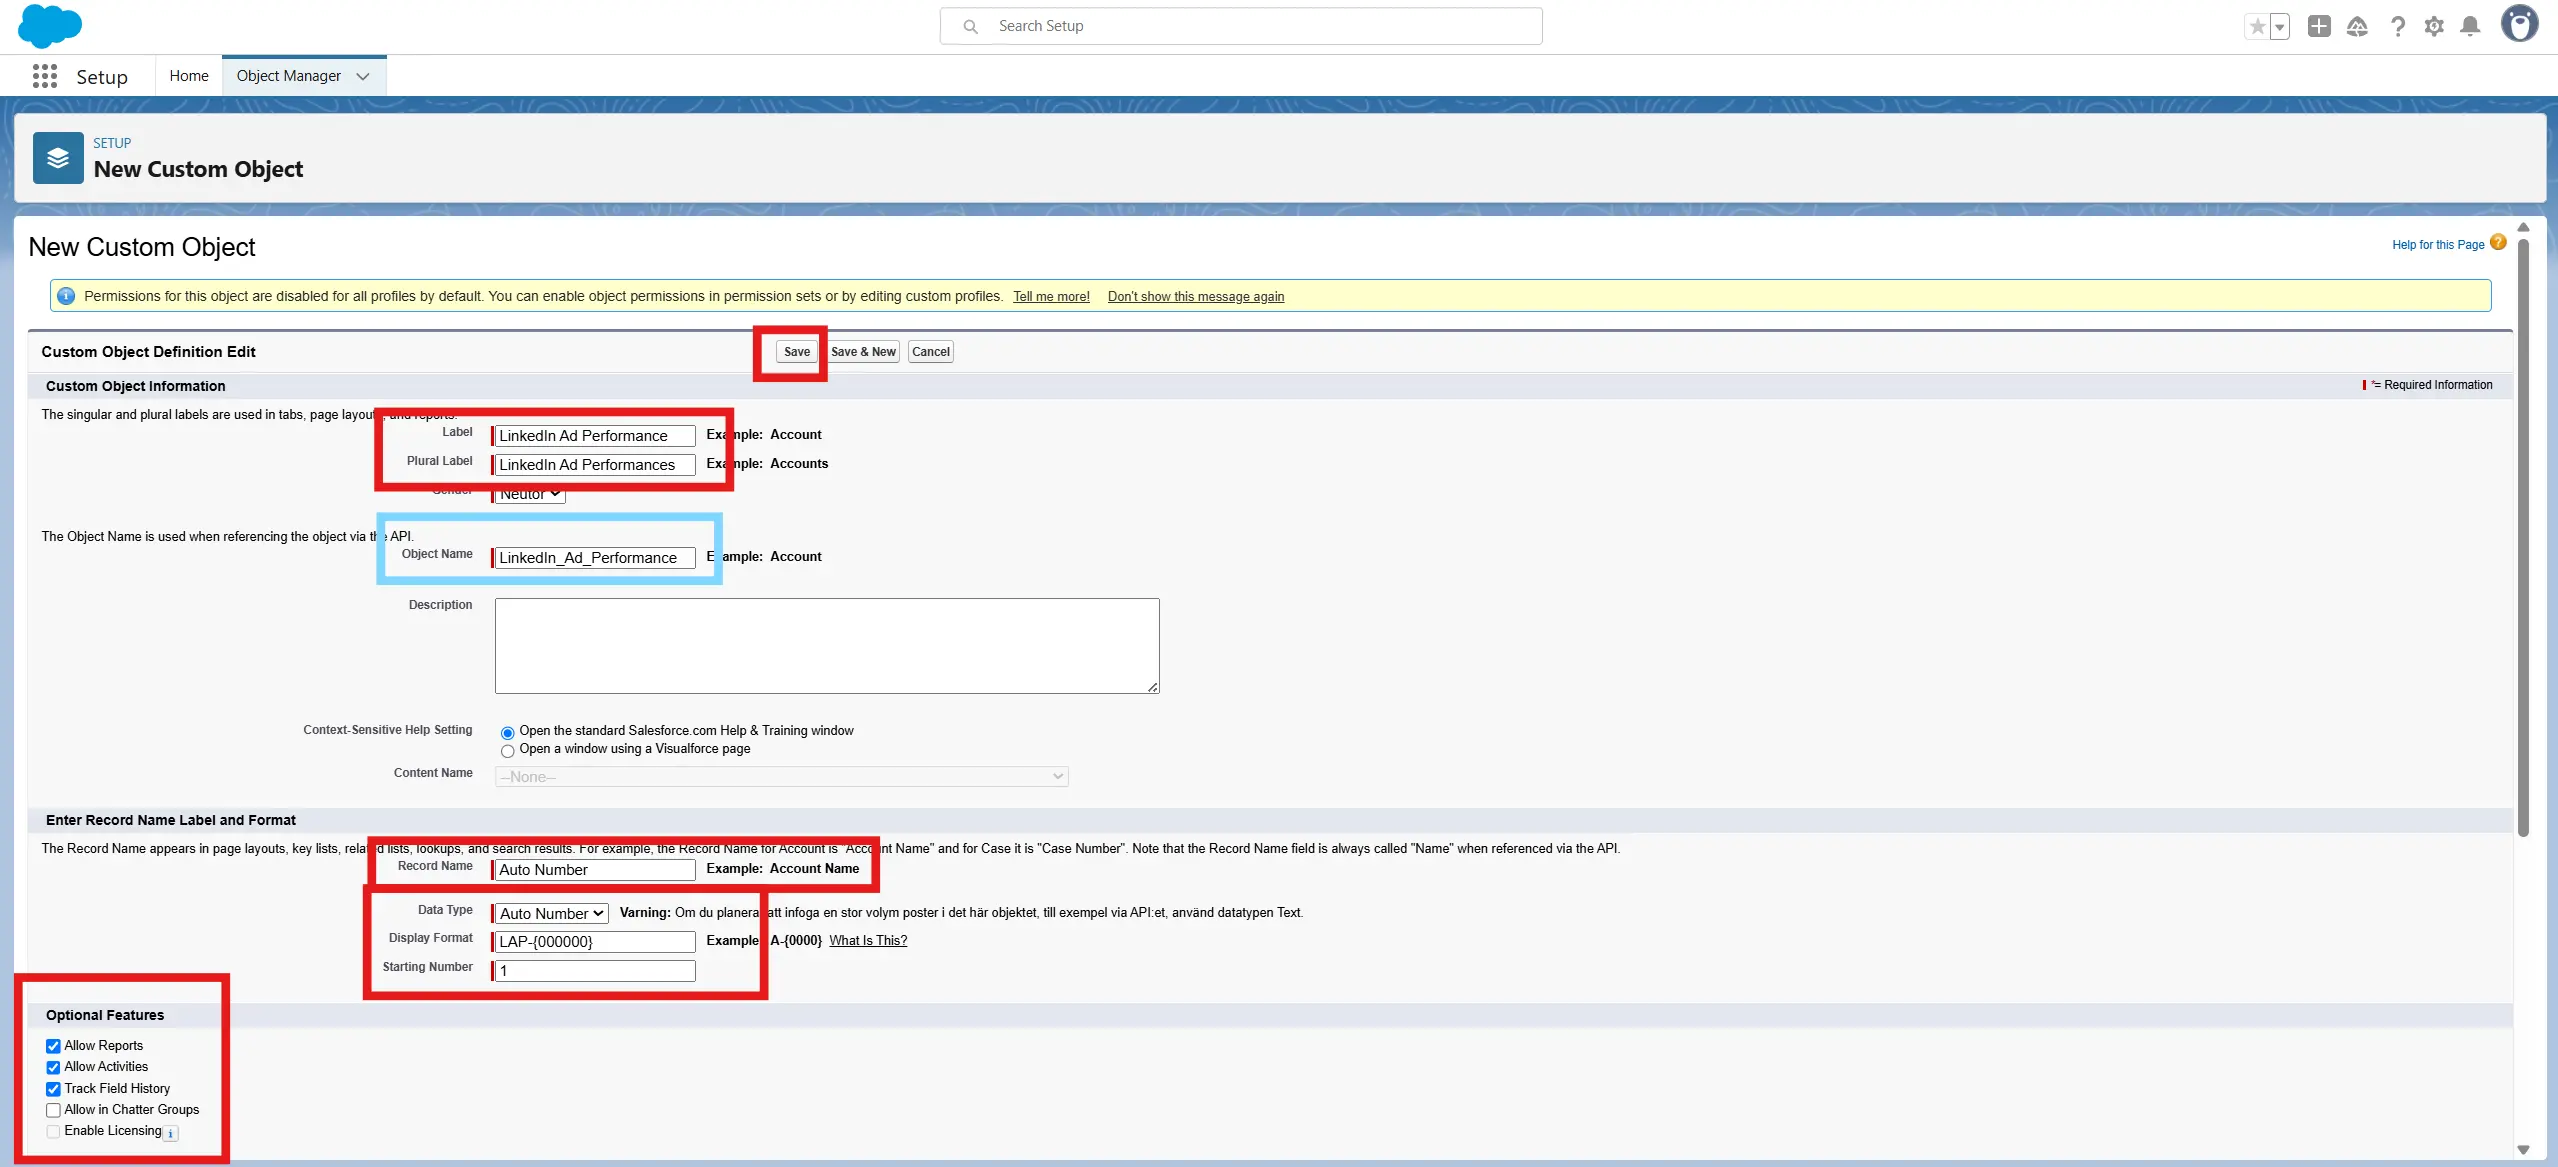
Create the Custom Object
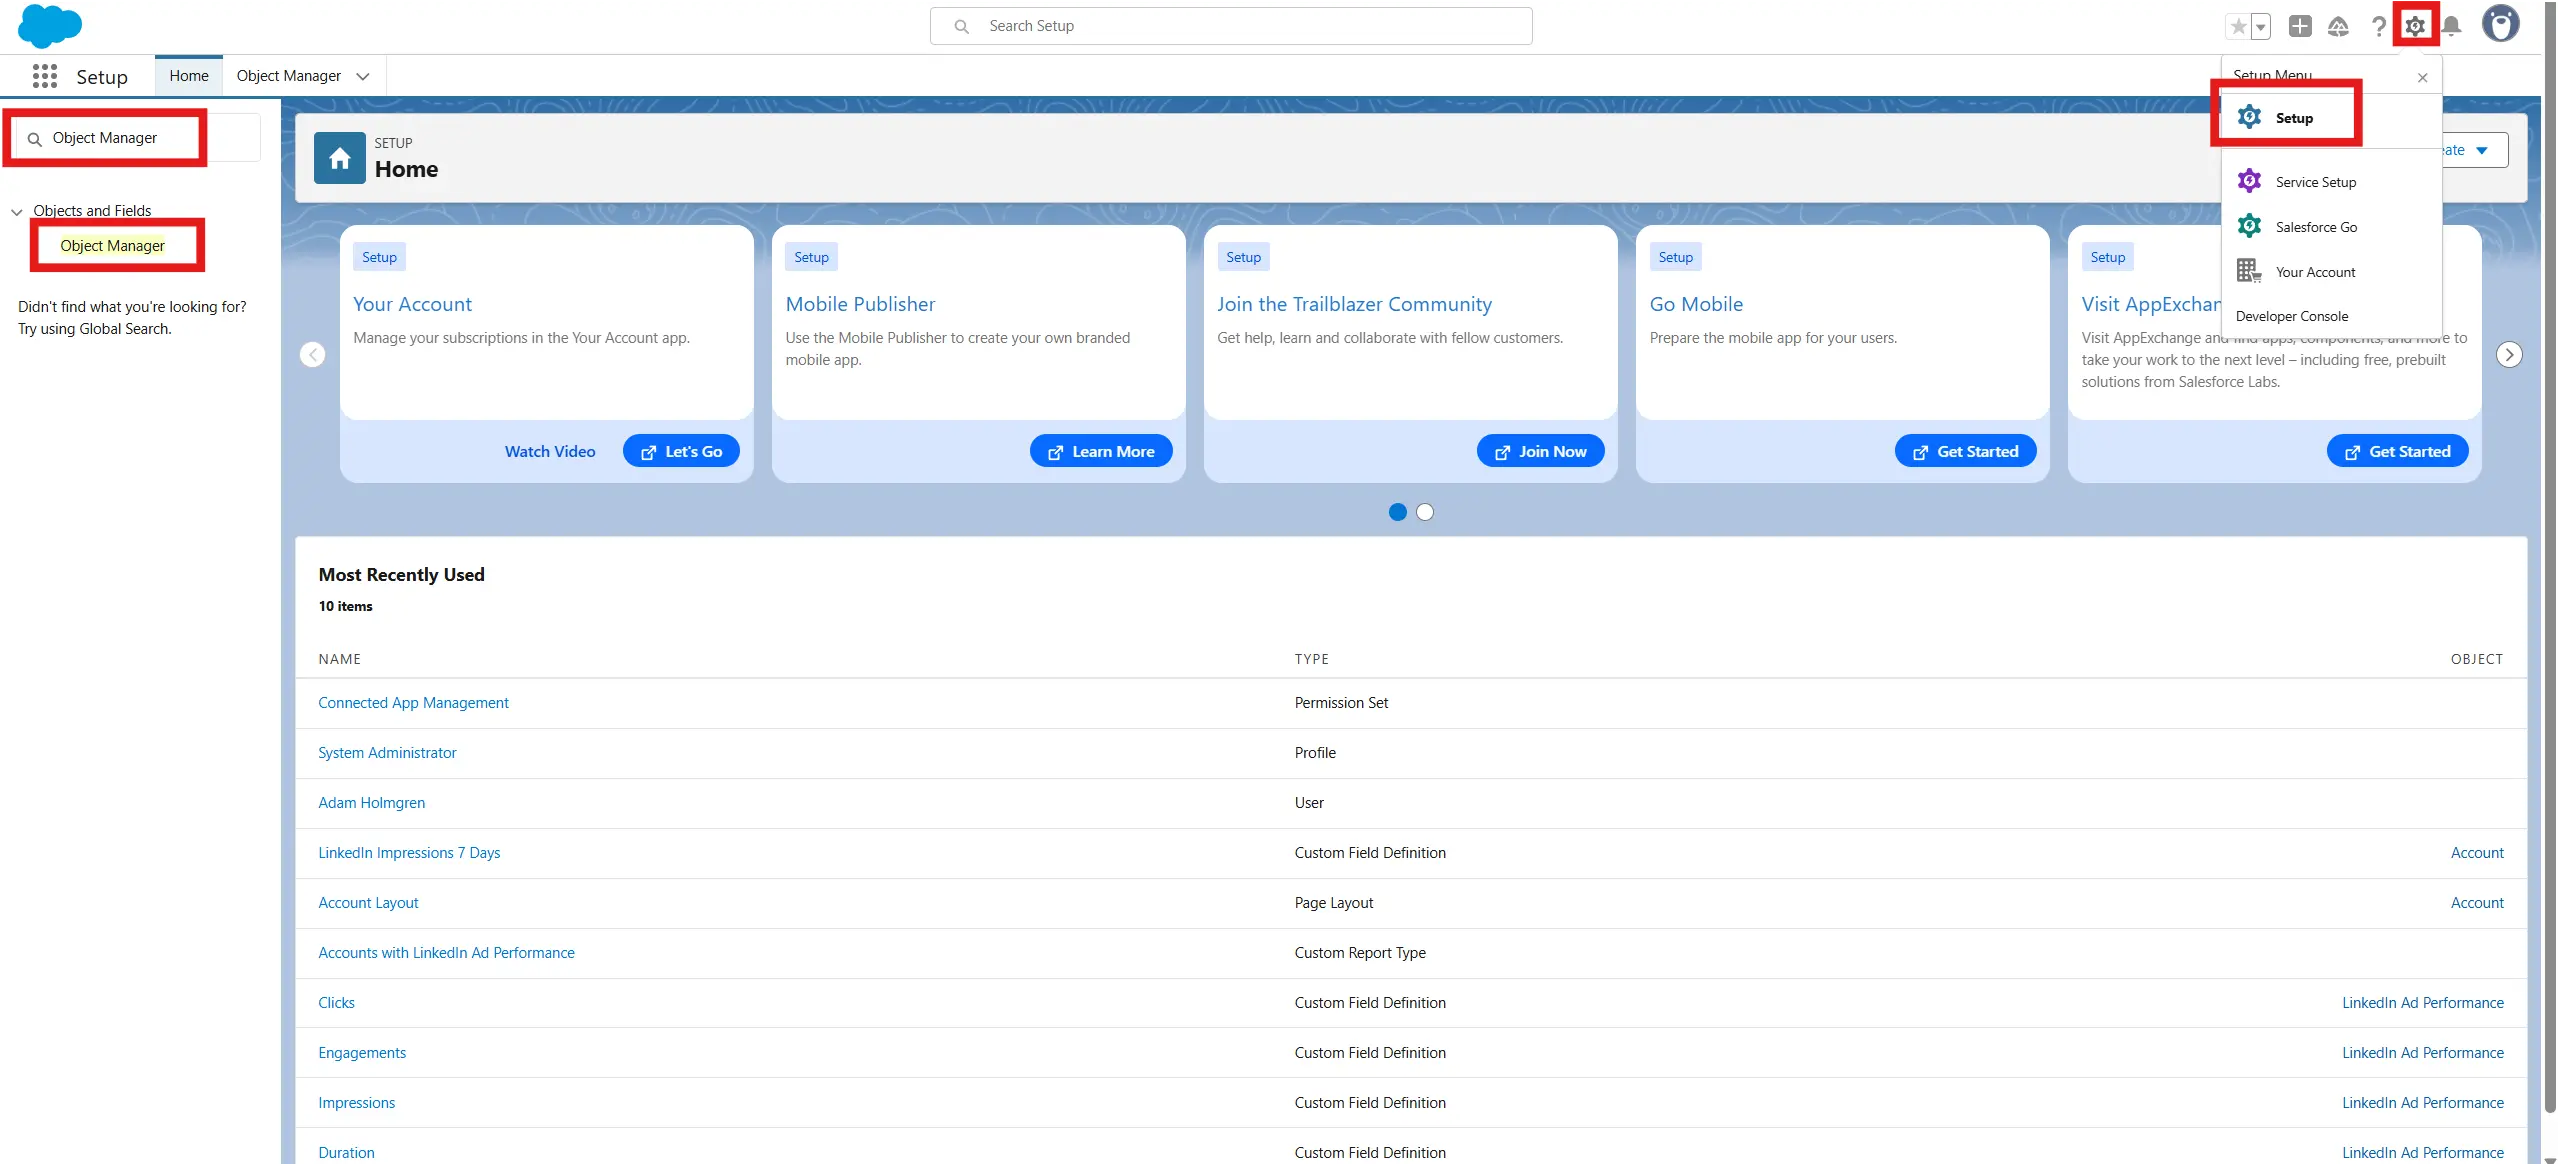
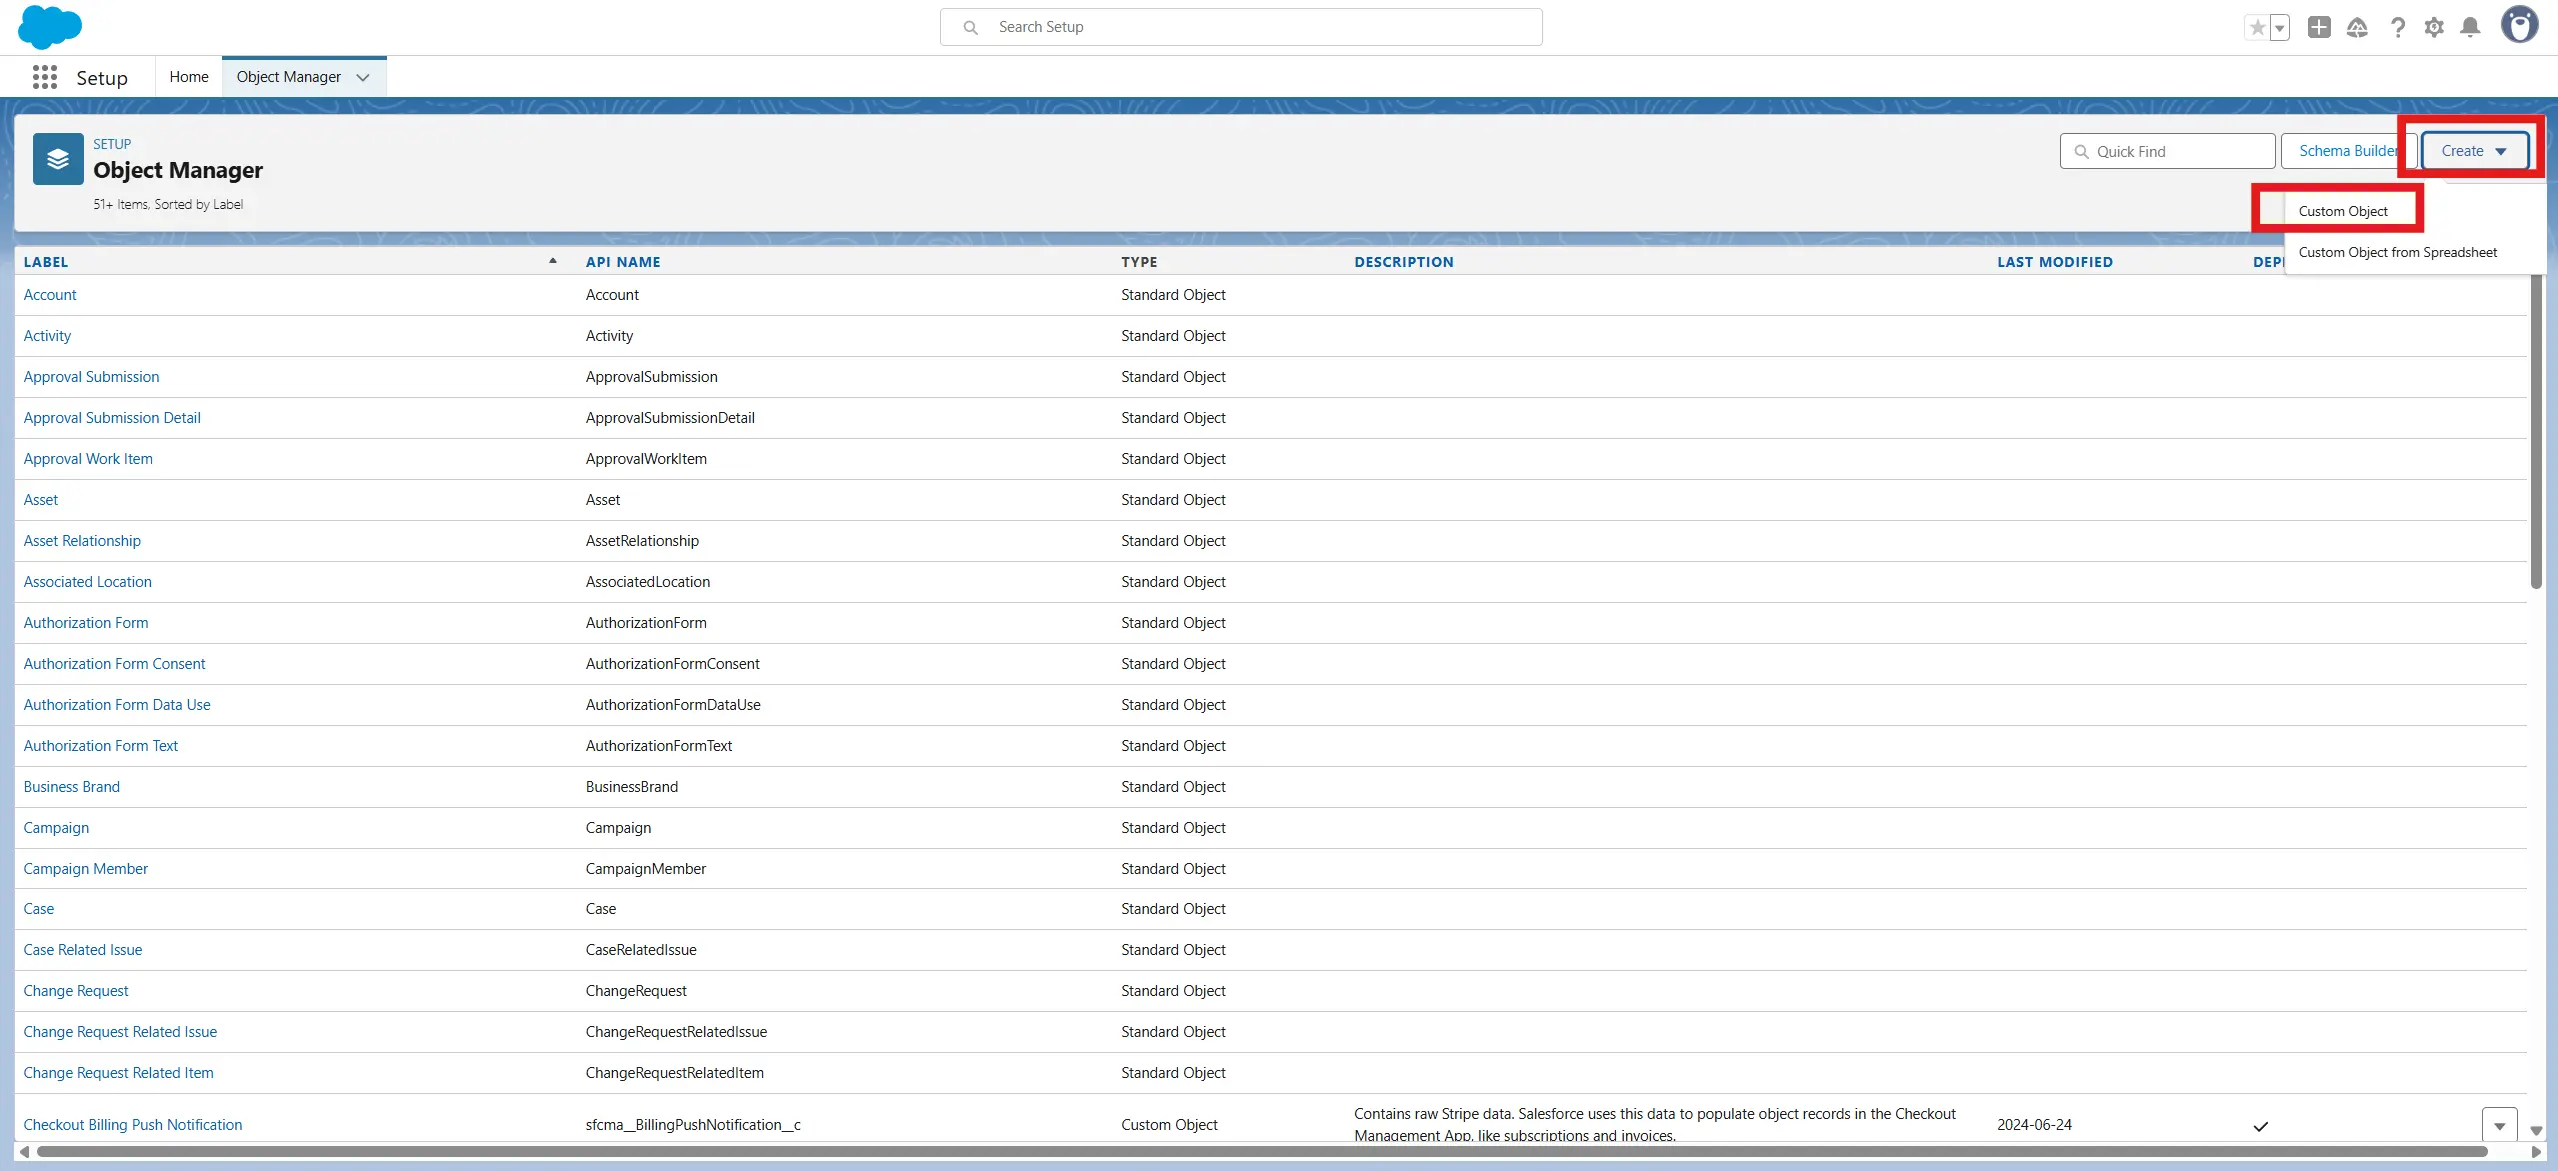
- Go to Setup > Object Manager
- Click Create > Custom Object
- Fill in the following details:
- Label - LinkedIn Ad Performance
- Plural Label - LinkedIn Ad Performances
- Object Name - LinkedIn_Ad_Performance(Autofilled)
- Record Name - Auto Number (e.g., LAP-{000000})
- Data Type - Auto Number
- Optional Features - Select the following:
- Allow Reports
- Track Field History
- Allow Activities
- Deployment Status - Deployed
- Click Save
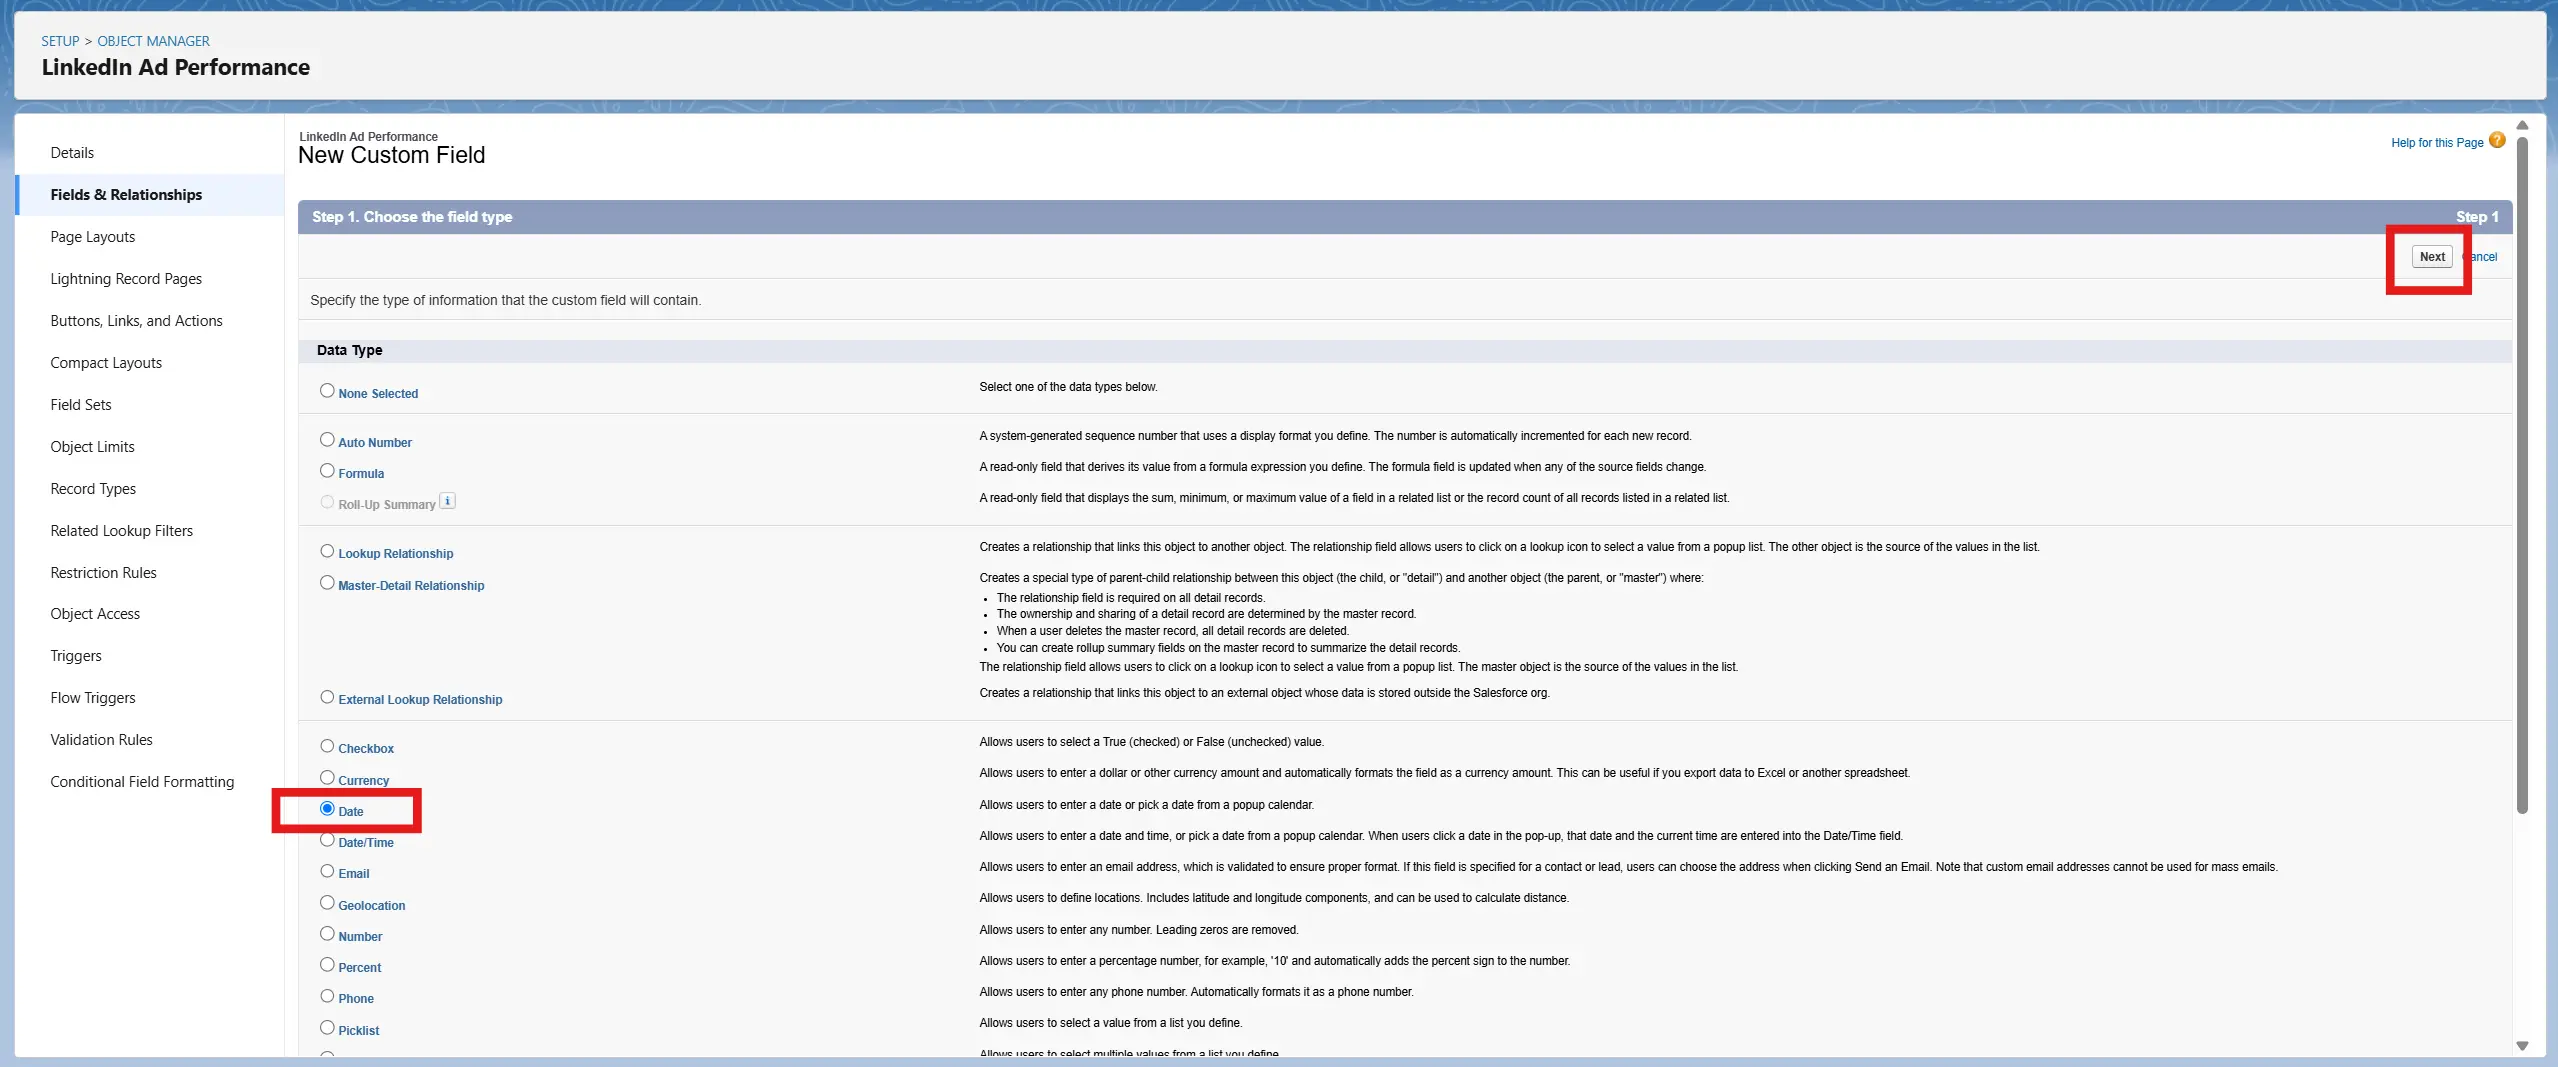
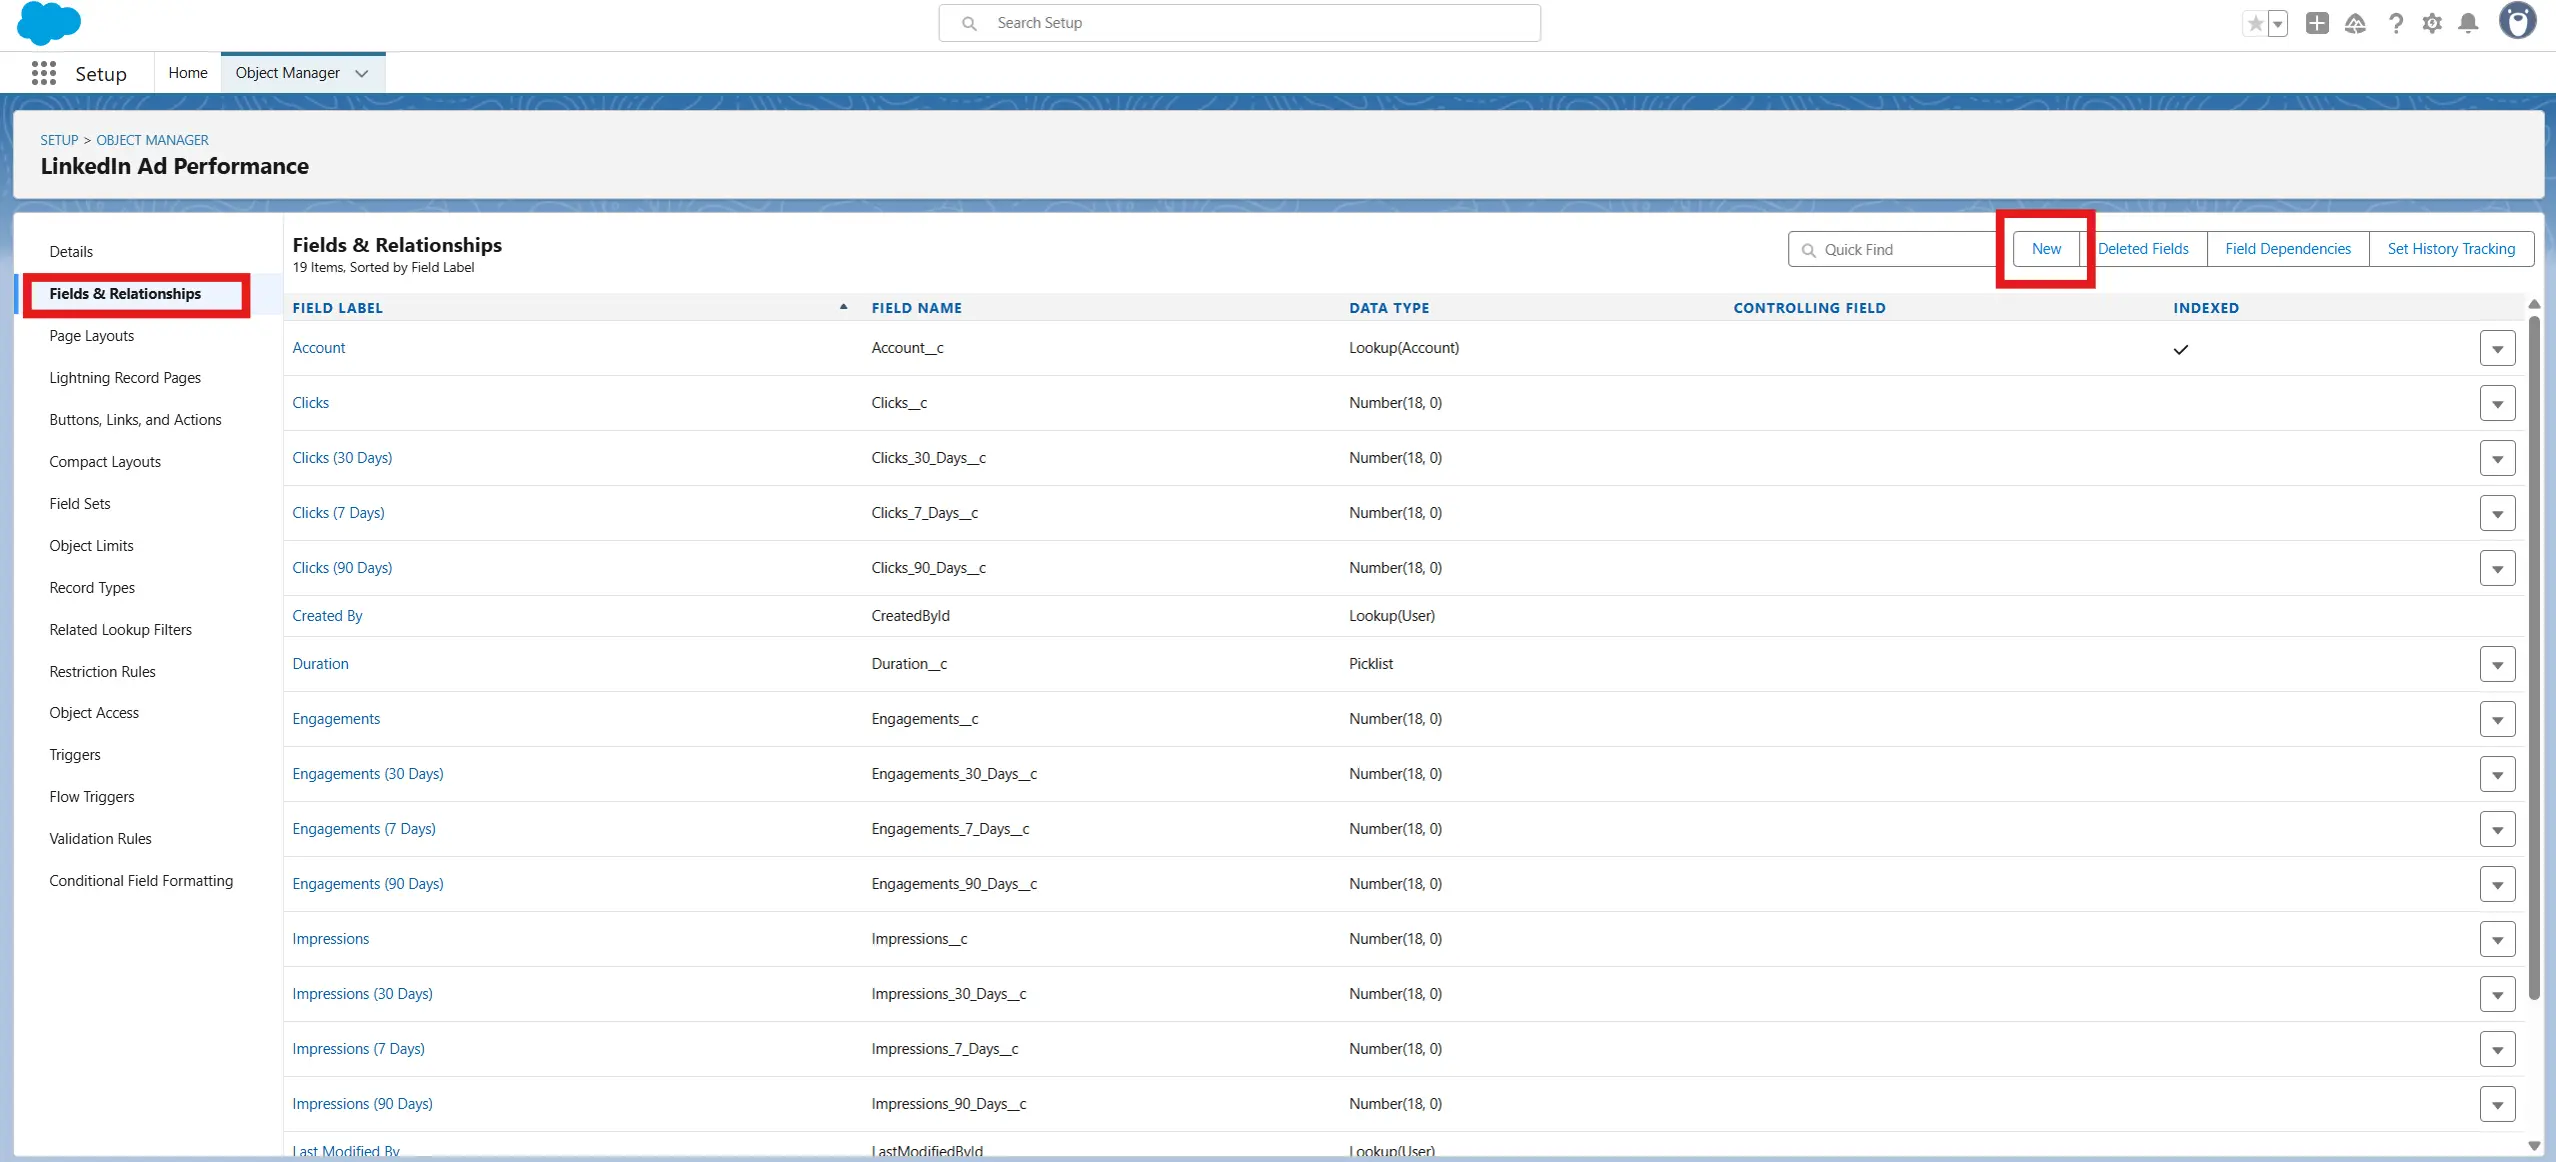
Add Fields to Store Metrics
- From the object's page, click Fields & Relationships, then click New.
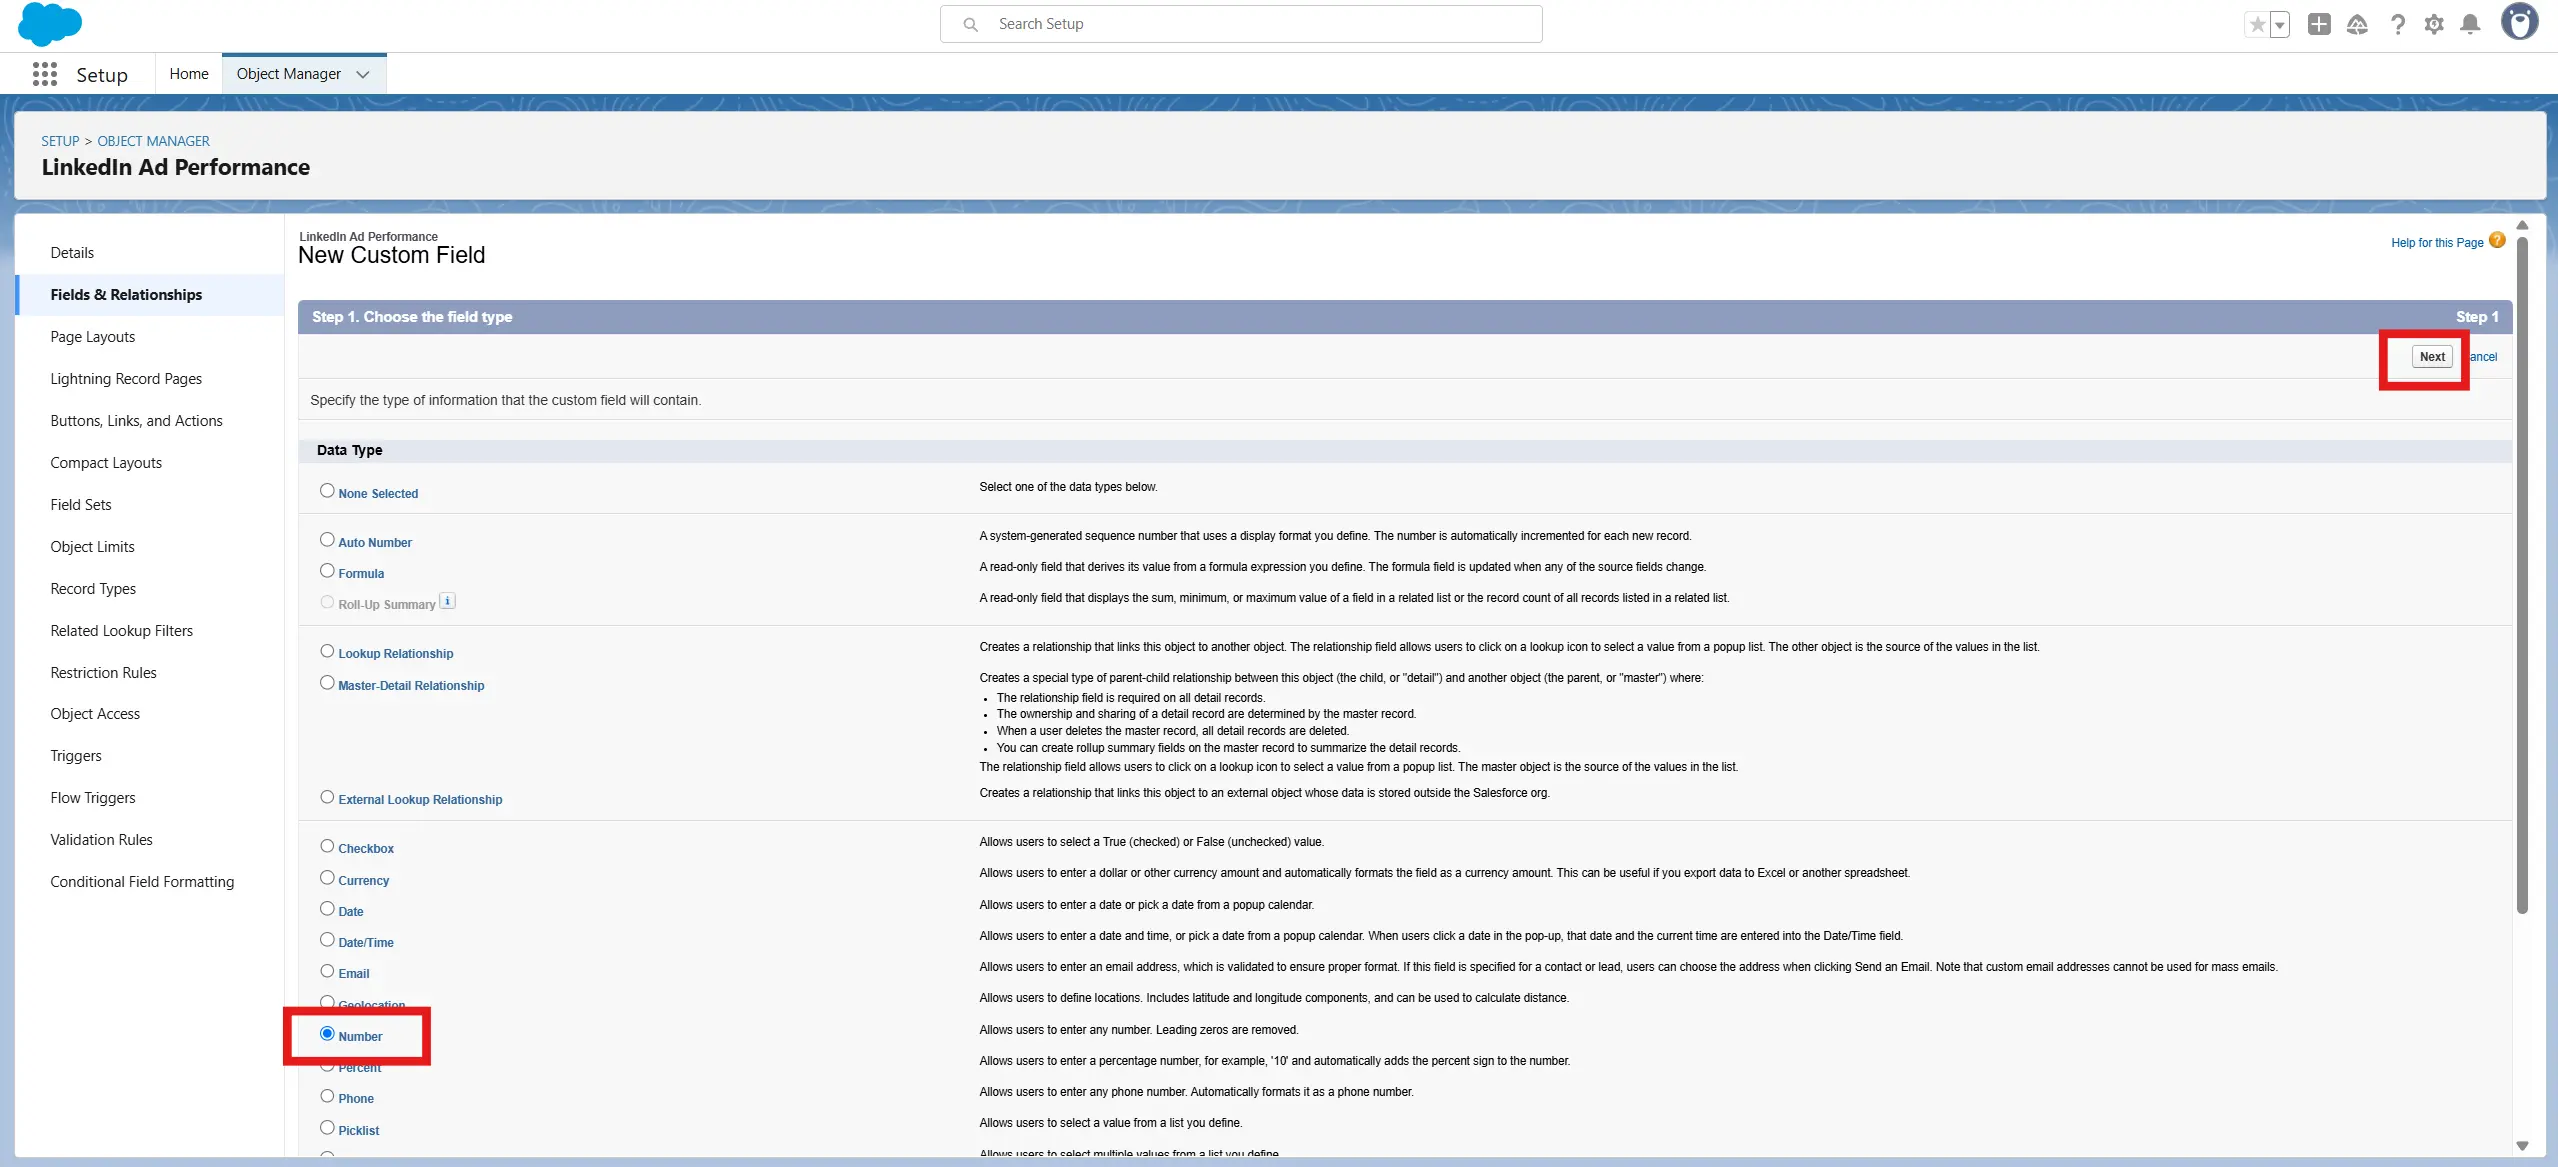
- Add the following custom fields (all as Number):
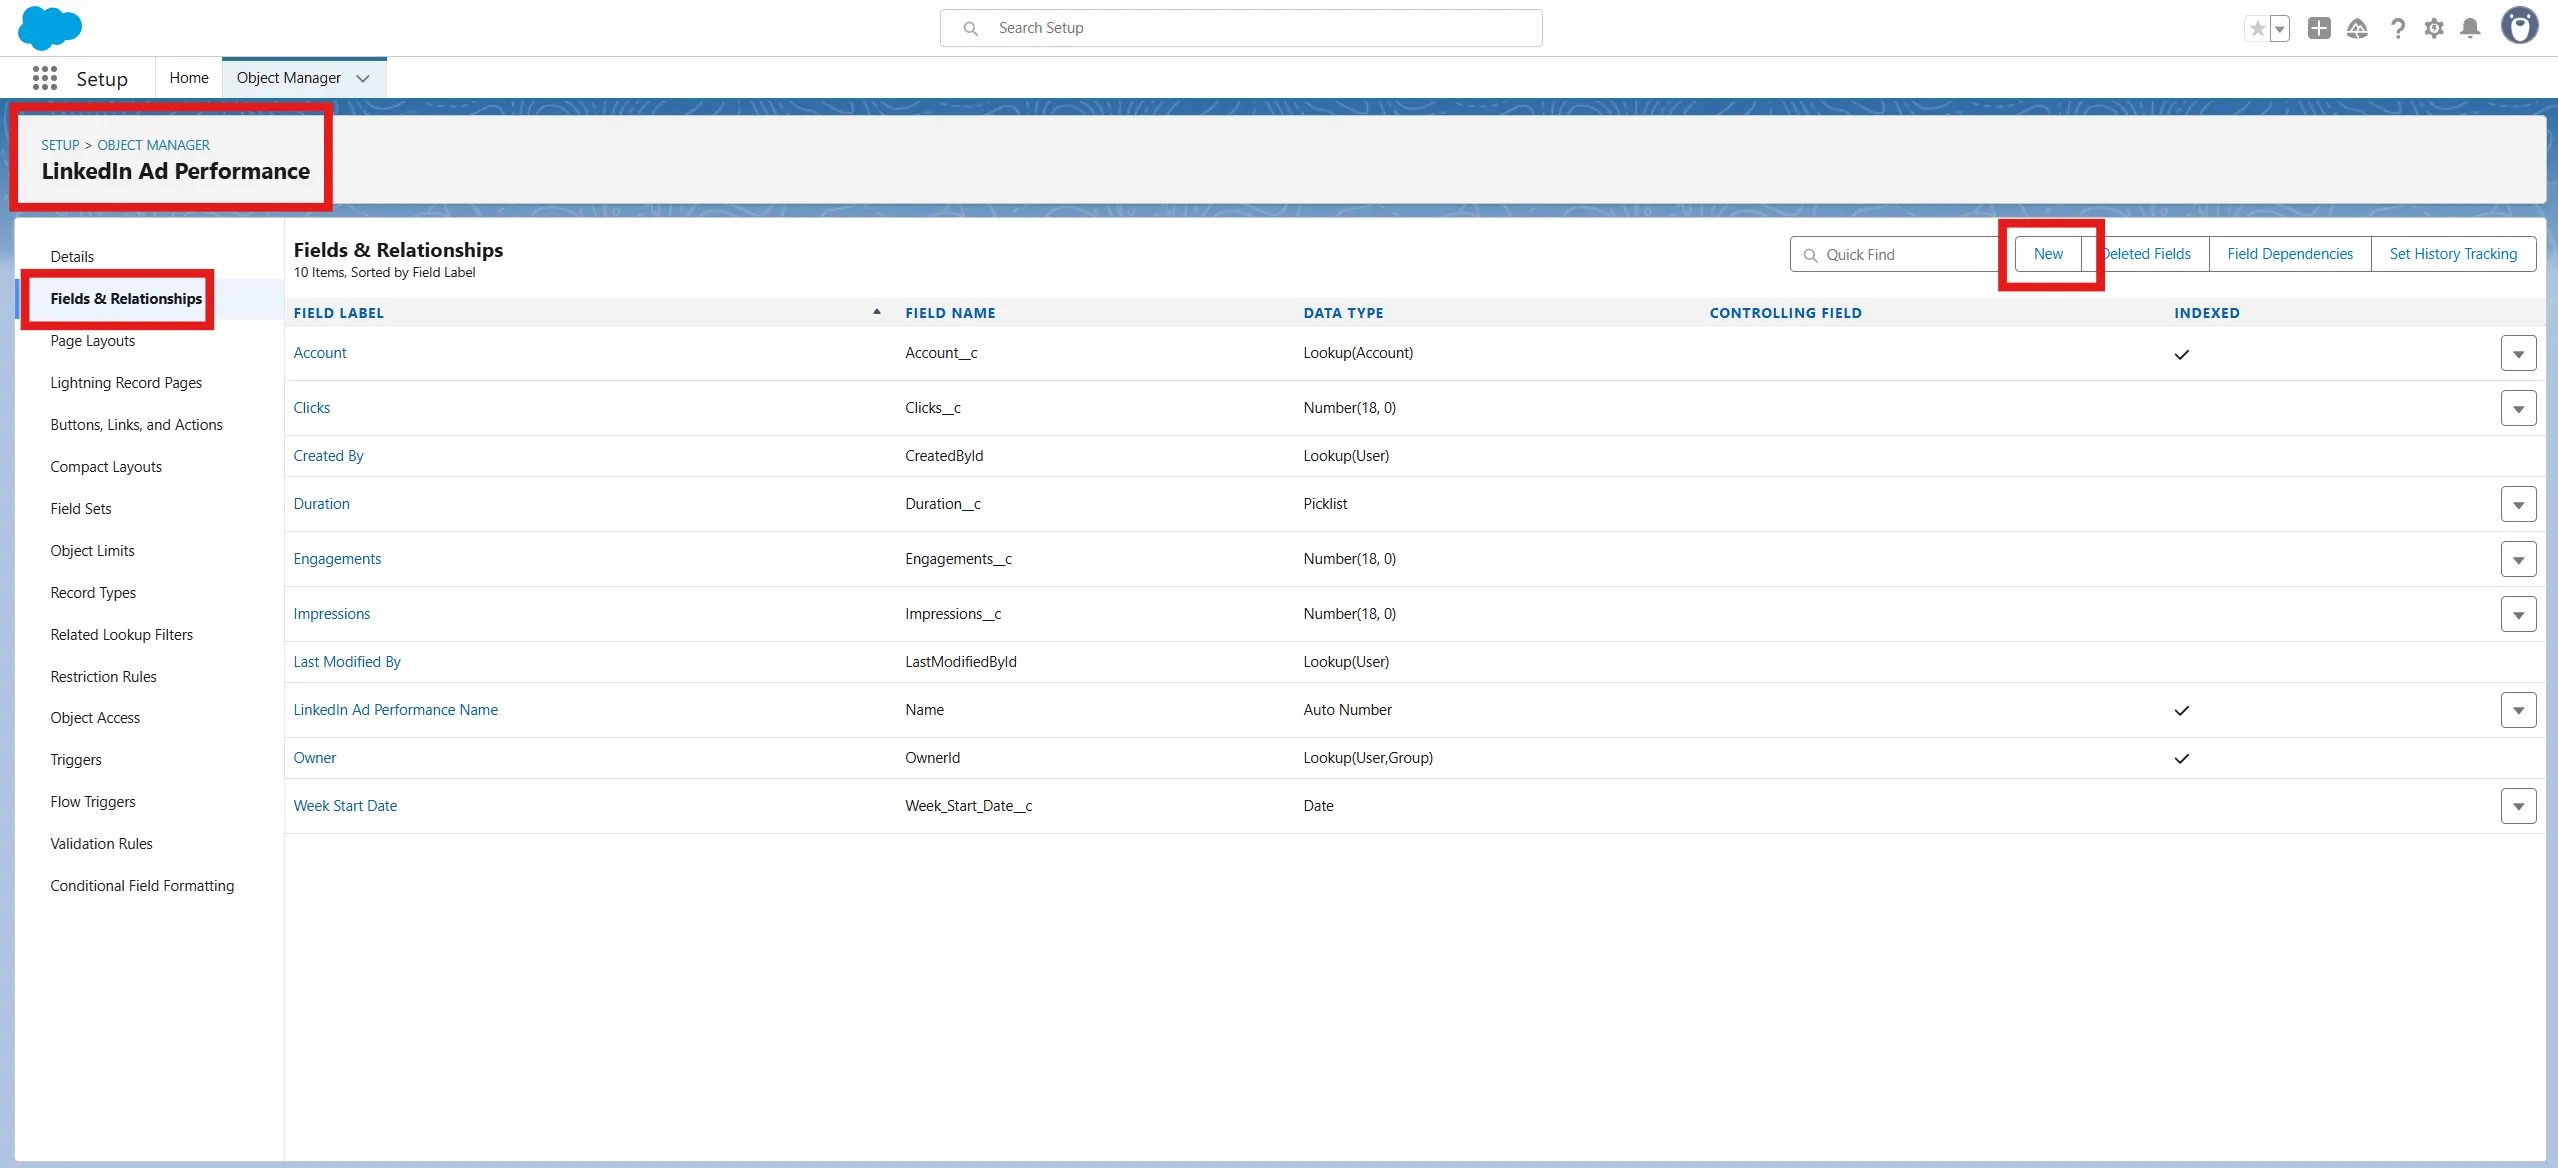
Example Custom Fields Table
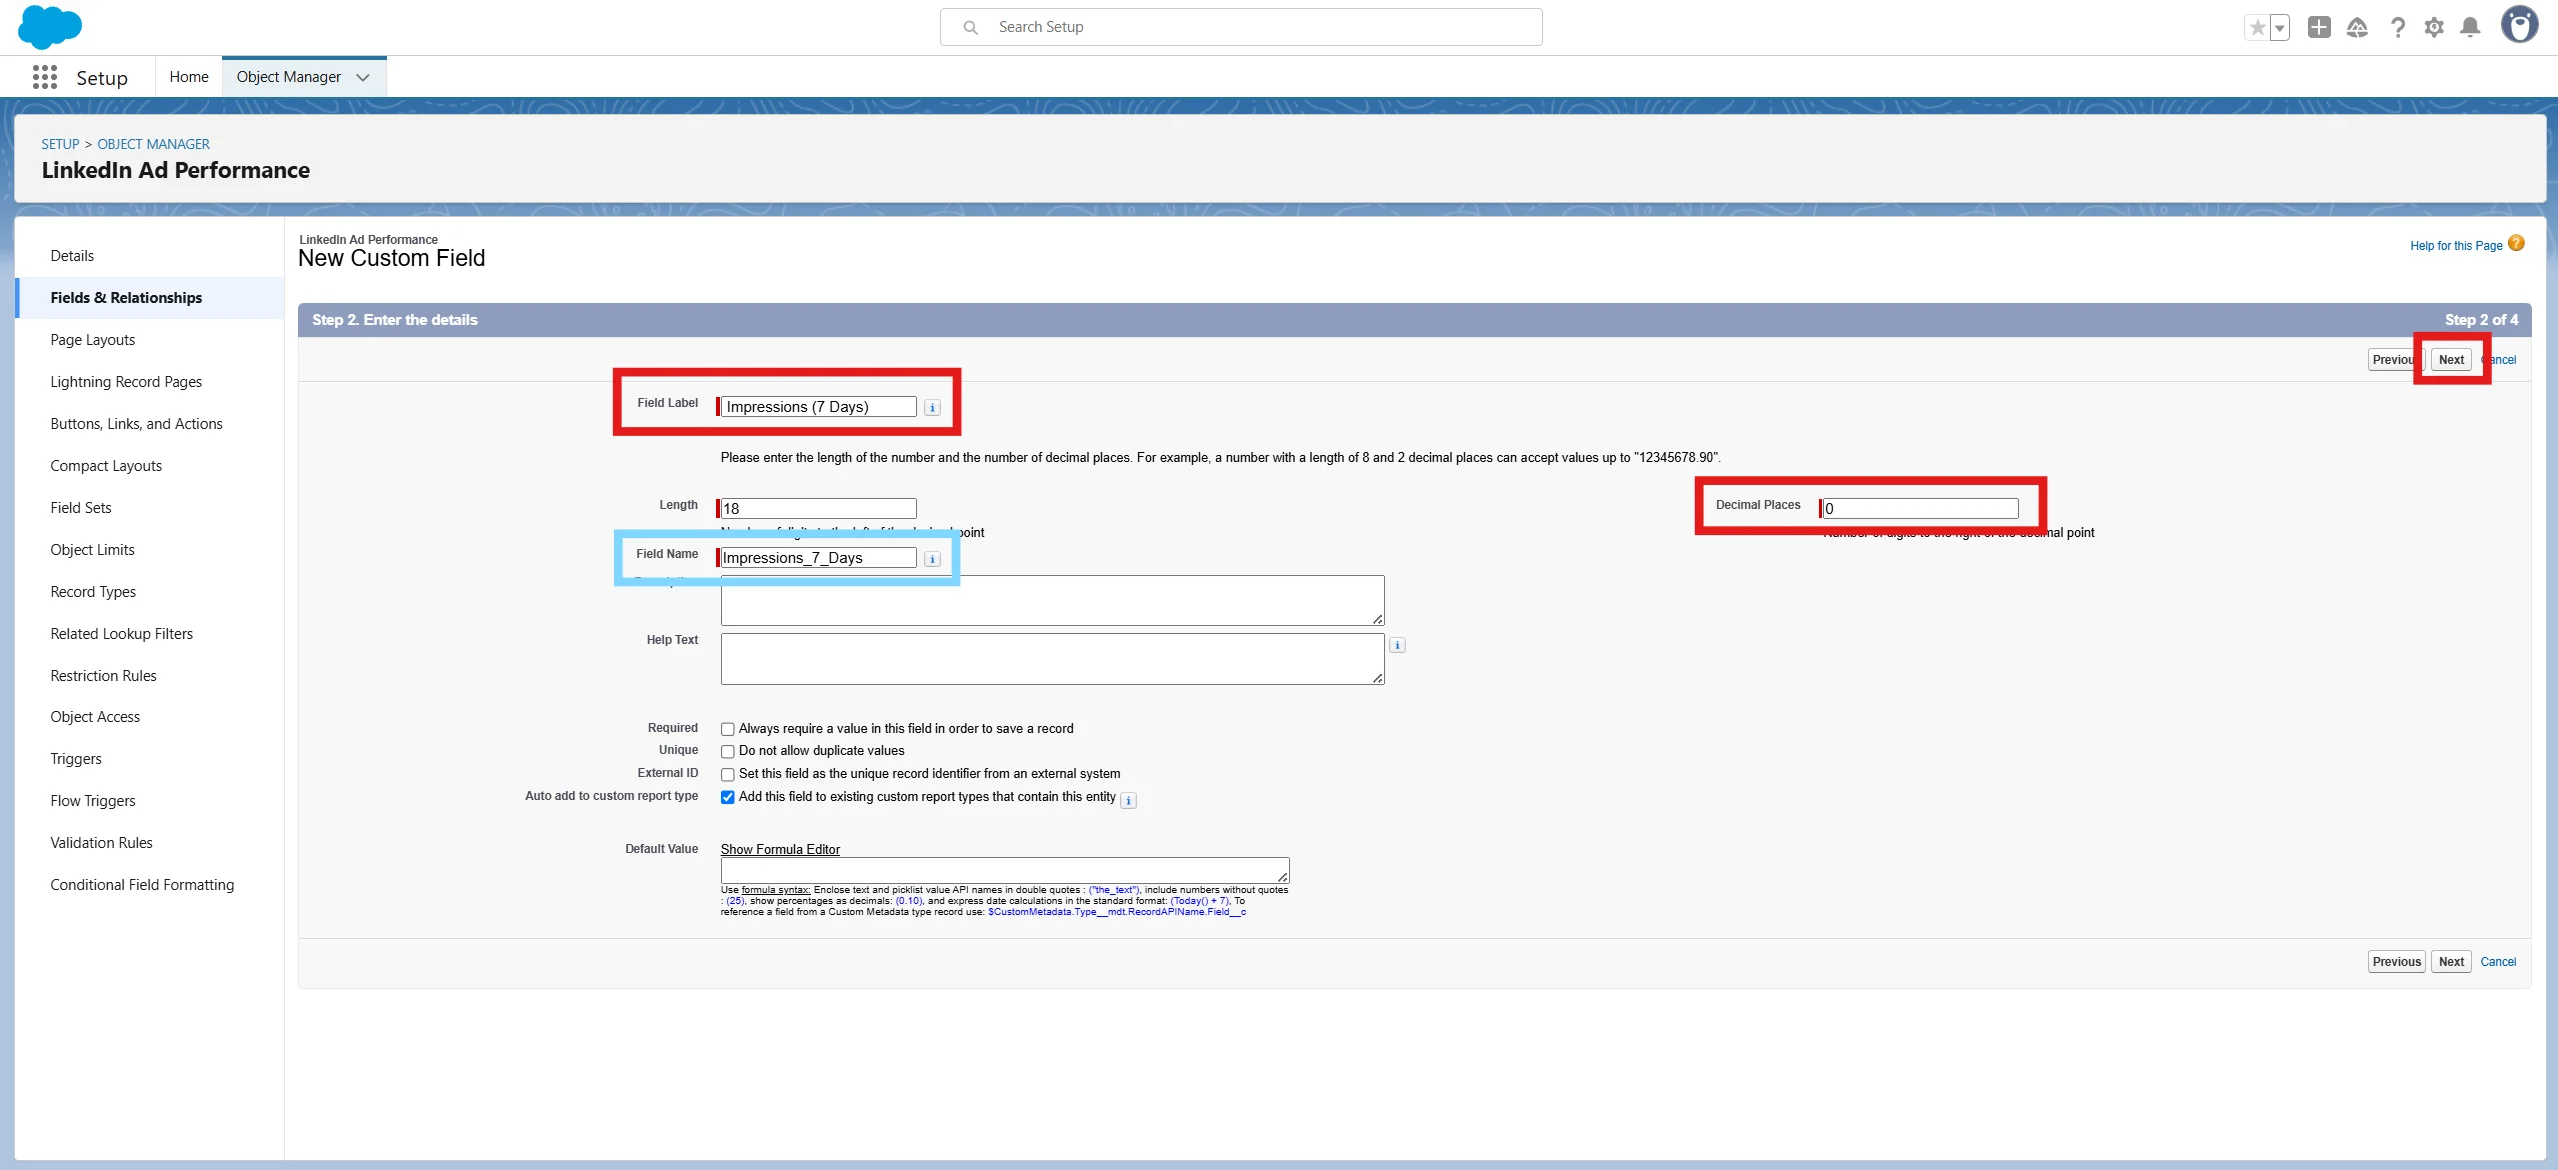
| Field Label | API Name (Autofills) | Decimal Places |
|---|---|---|
| Impressions (7 Days) | Impressions_7_Days__c | 0 |
| Clicks (7 Days) | Clicks_7_Days__c | 0 |
| Engagements (7 Days) | Engagements_7_Days__c | 0 |
| Impressions (30 Days) | Impressions_30_Days__c | 0 |
| Clicks (30 Days) | Clicks_30_Days__c | 0 |
| Engagements (30 Days) | Engagements_30_Days__c | 0 |
| Impressions (90 Days) | Impressions_90_Days__c | 0 |
| Clicks (90 Days) | Clicks_90_Days__c | 0 |
| Engagements (90 Days) | Engagements_90_Days__c | 0 |
TIP:Use "Save & New" when creating this list of custom fields to breeze through the process efficiently.
Also create:
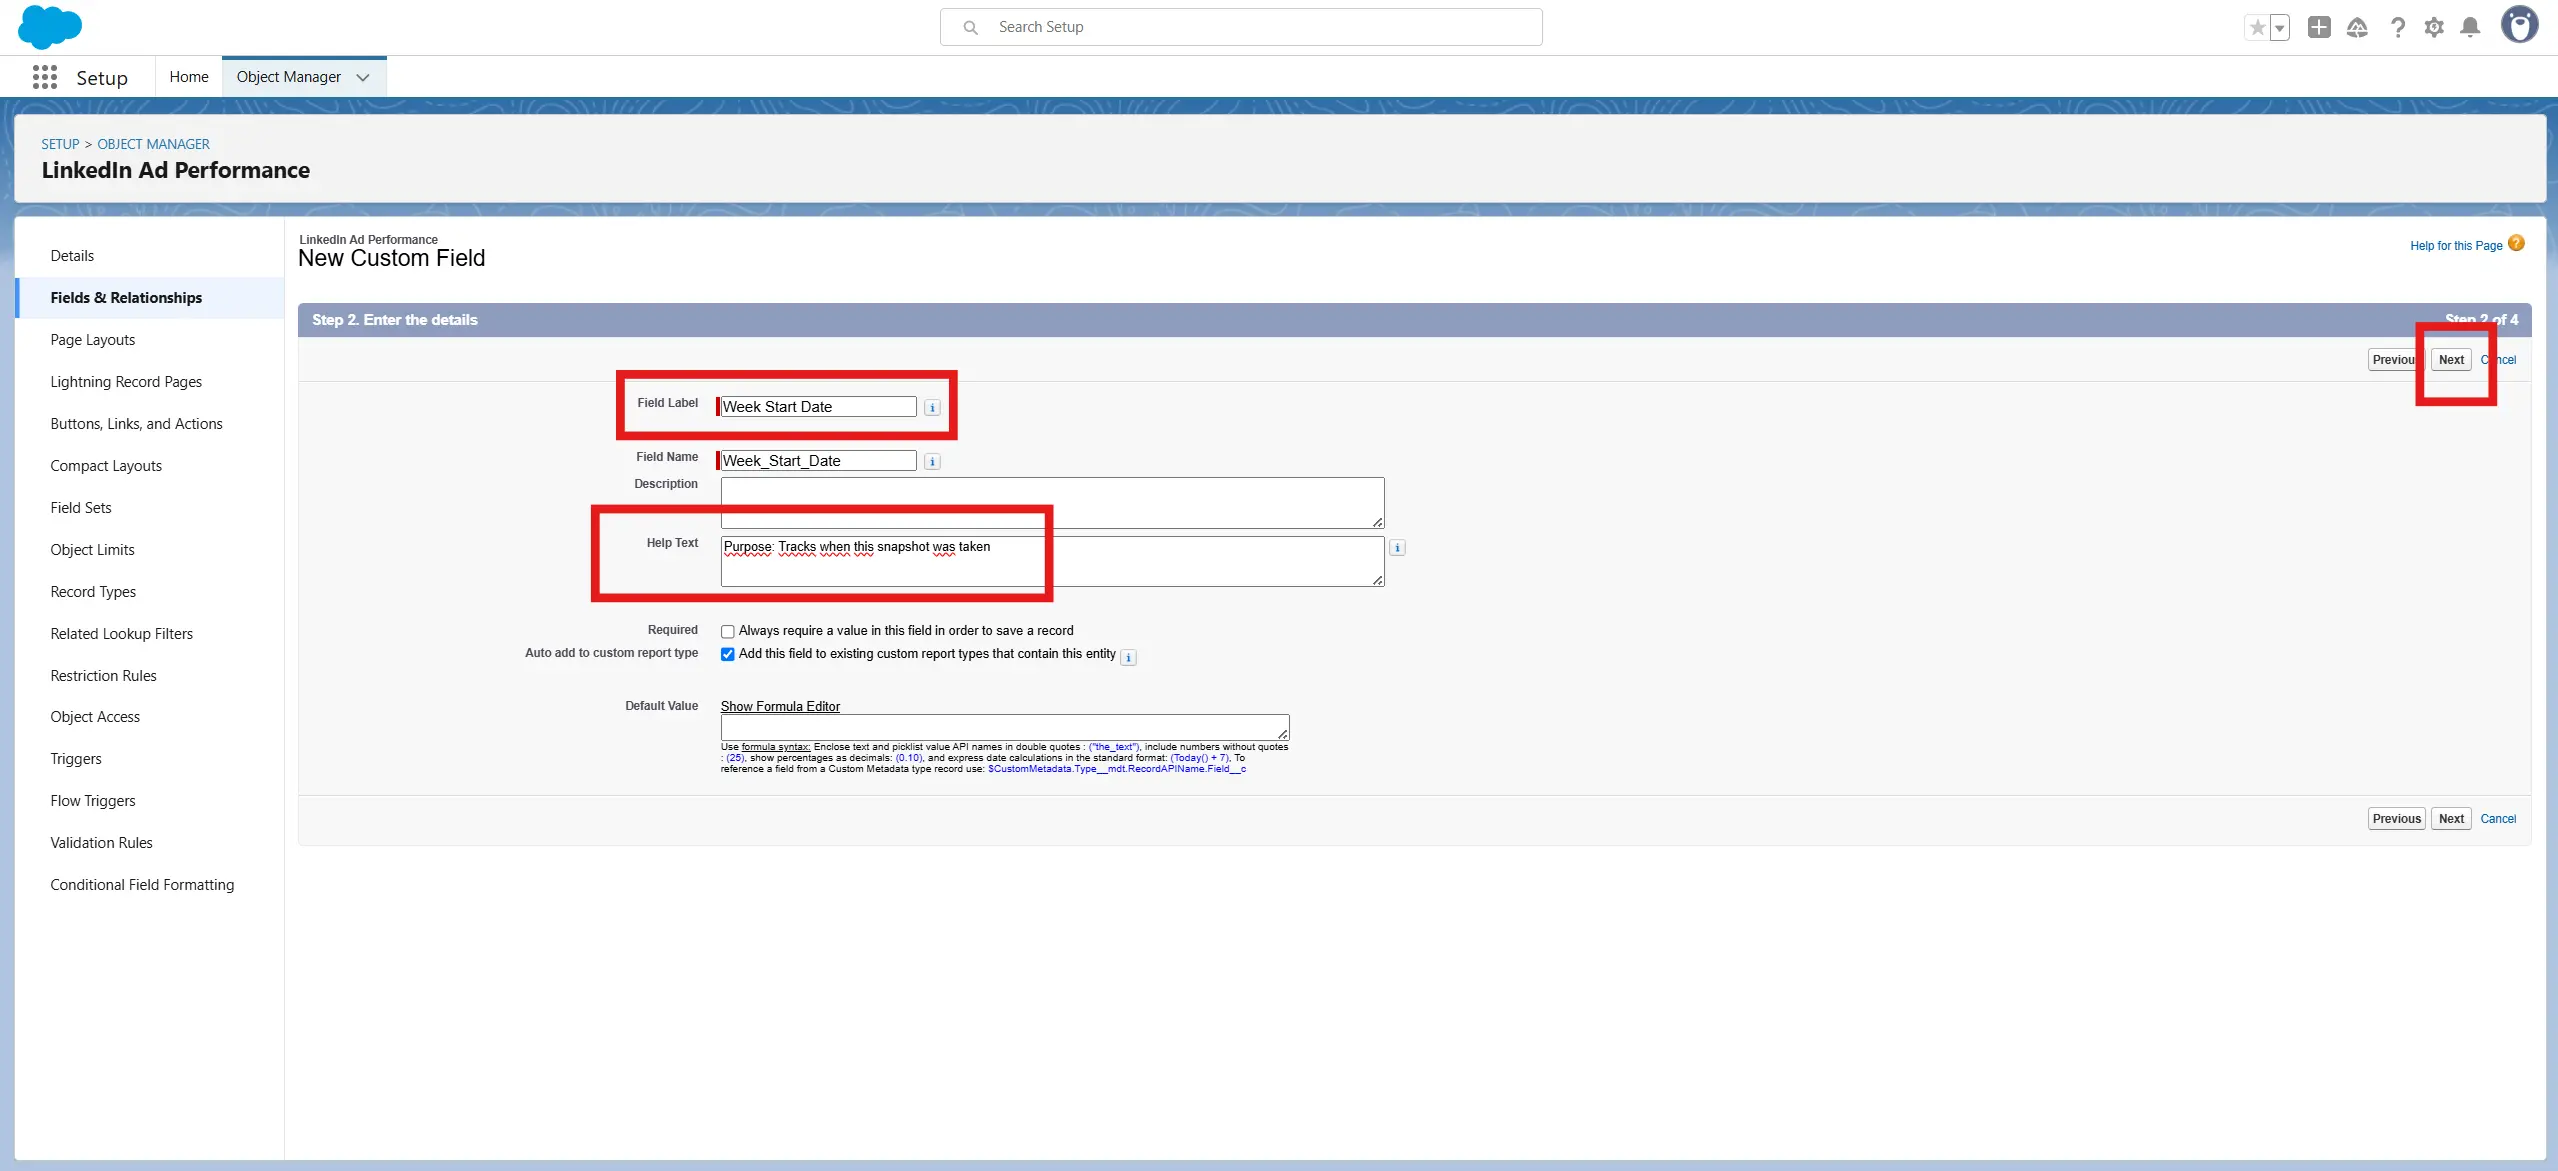
Date Field:
- Label: Week Start Date
- API Name:Week_Start_Date__c (Note the autofill is missing "__c". That's OK. Leave it as is.)
- Type: Date
- Purpose: Tracks when this snapshot was taken
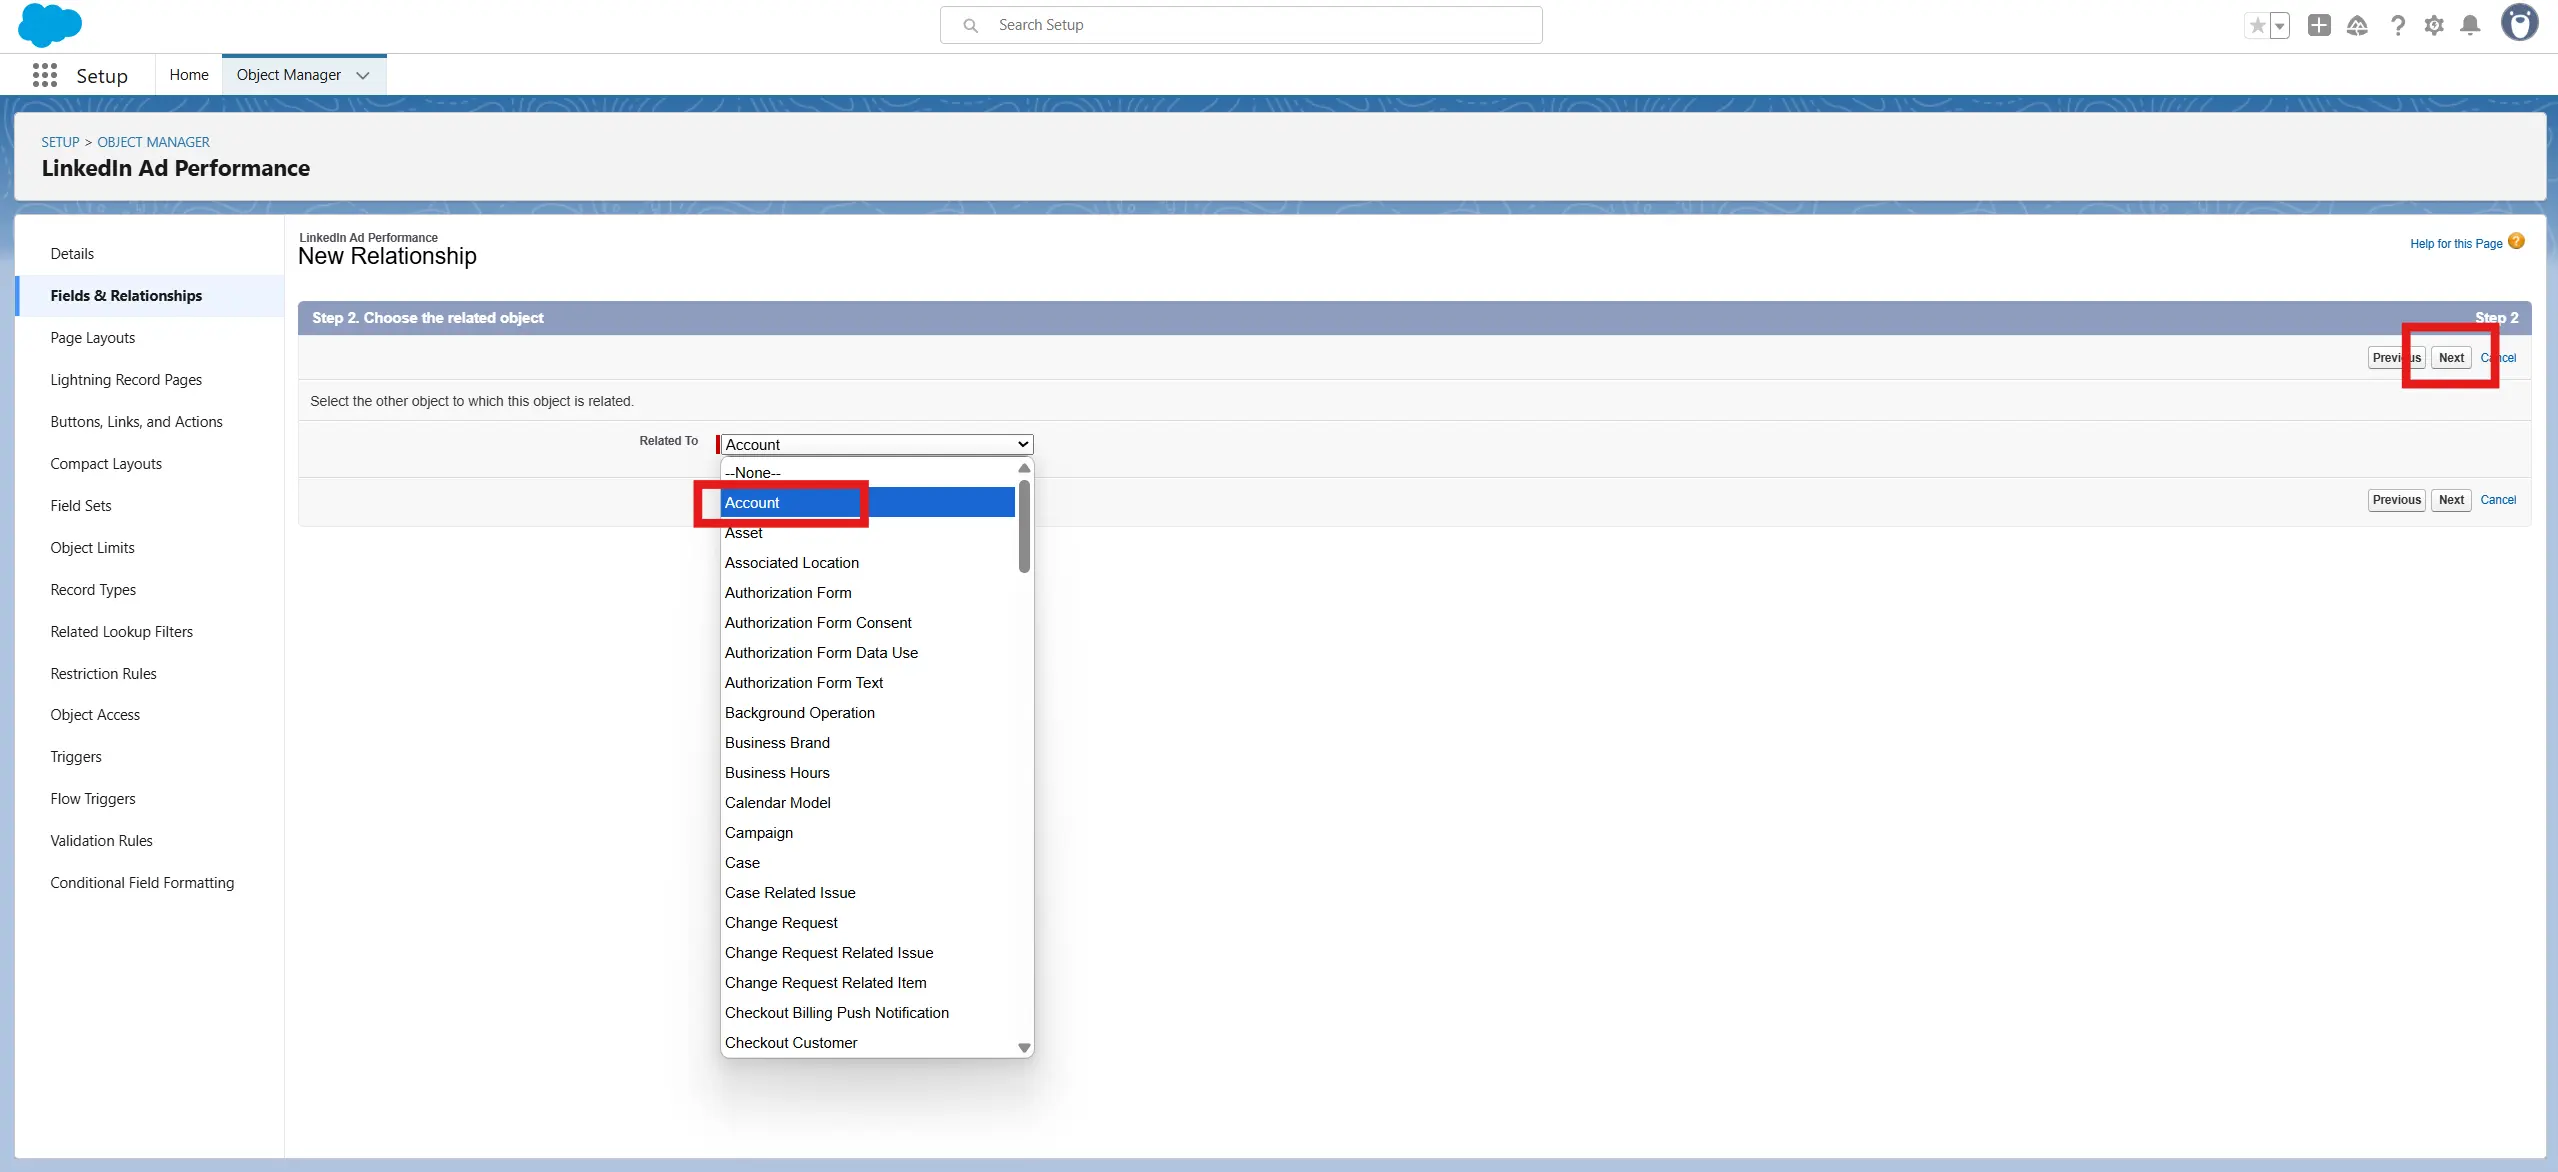
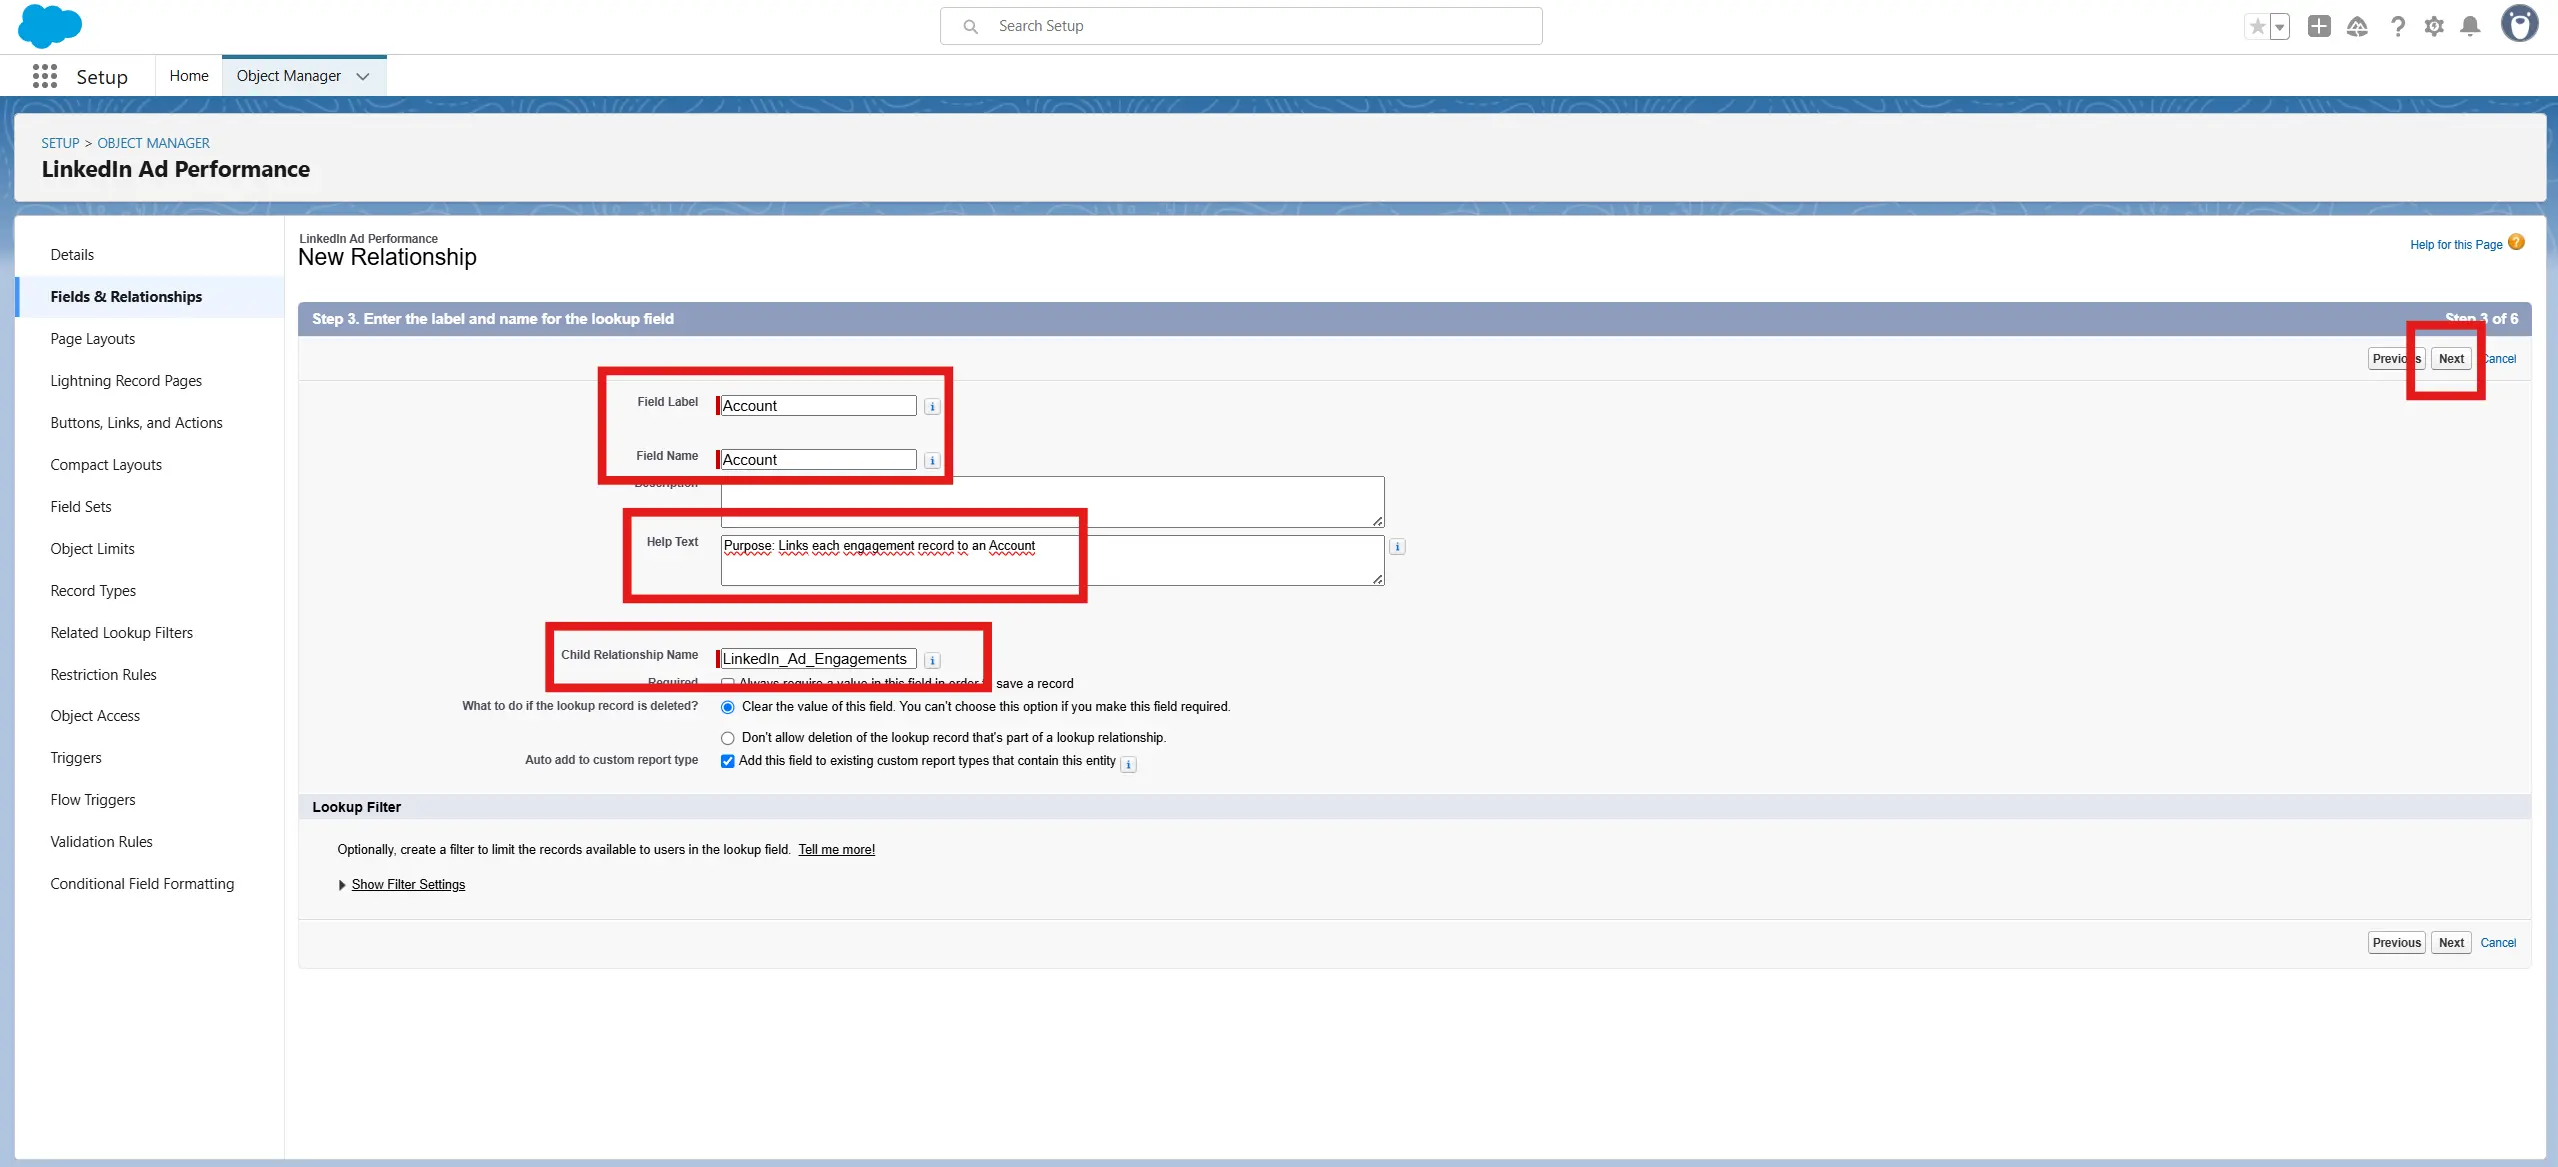
Lookup Relationship Field (to Account):
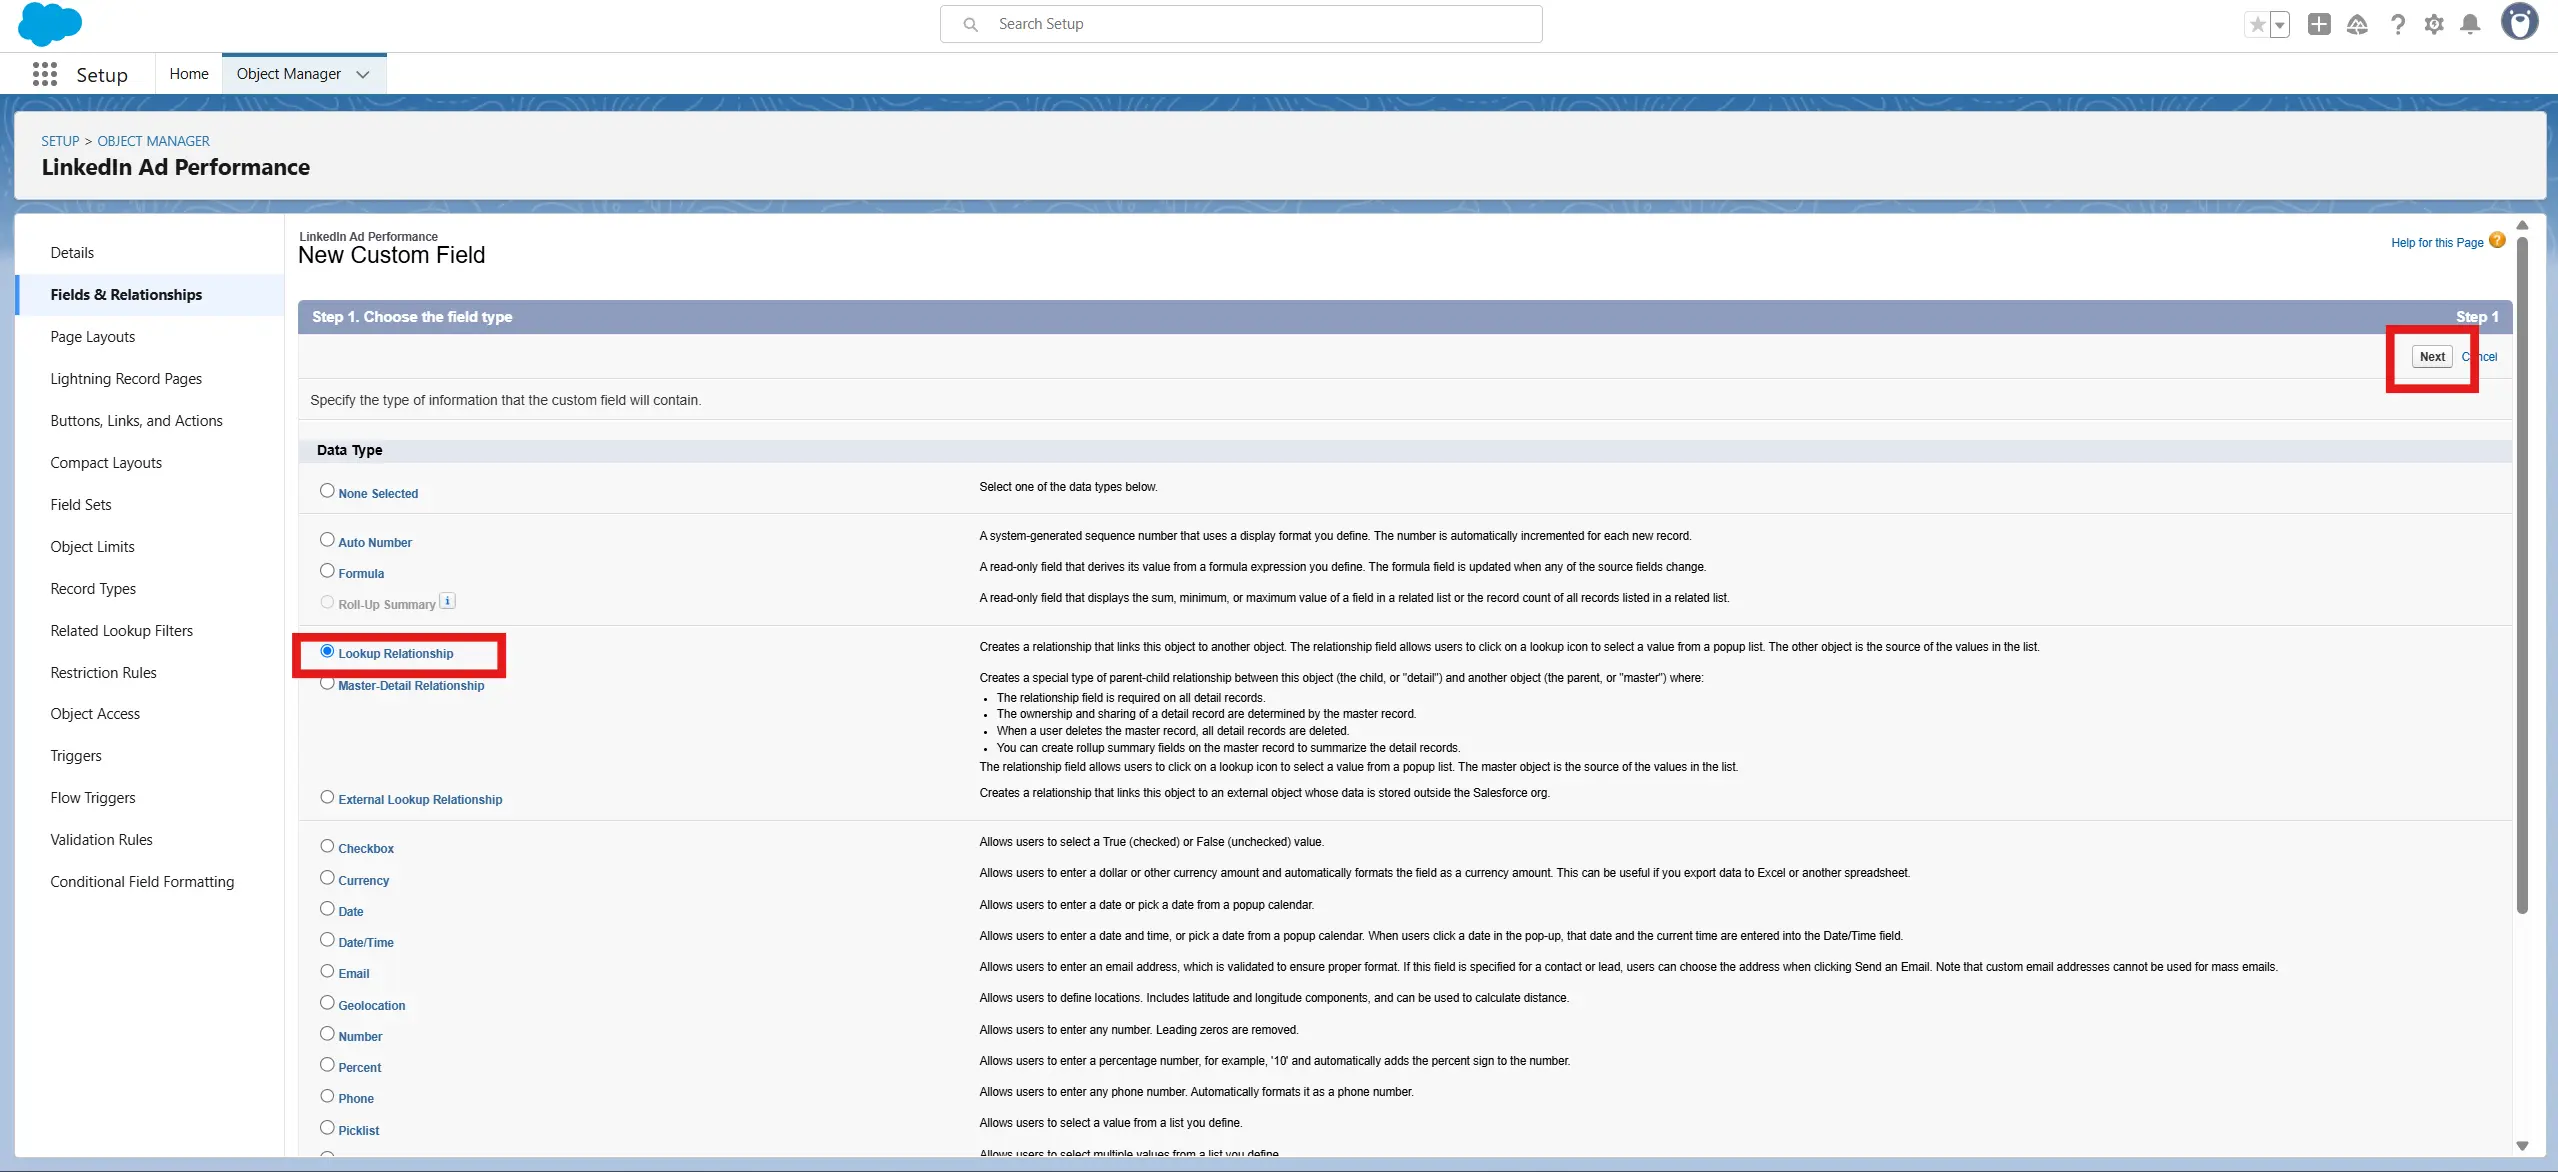
- Type: Lookup > Account
- Label: Account
- API Name:Account__c (Note the autofill is missing "__c". That's OK. Leave it as is.)
- Purpose: Links each engagement record to an Account
Add the Related List to the Account Page (If you want this information visible on the account page)
- Go to Setup -> Object Manager
- Go to Account -> Page Layouts -> Click your layout (e.g., Account Layout)
- In the layout editor:
- Drag the LinkedIn Ad Engagementsrelated list onto the page (usually under "Related Lists")
- Click Save
PART B - Make your Custom Object visible in the App Launcher (OPTIONAL)
This is mainly used to ensure the flow (created later) is working properly and fields update as new data is added through Fibbler.
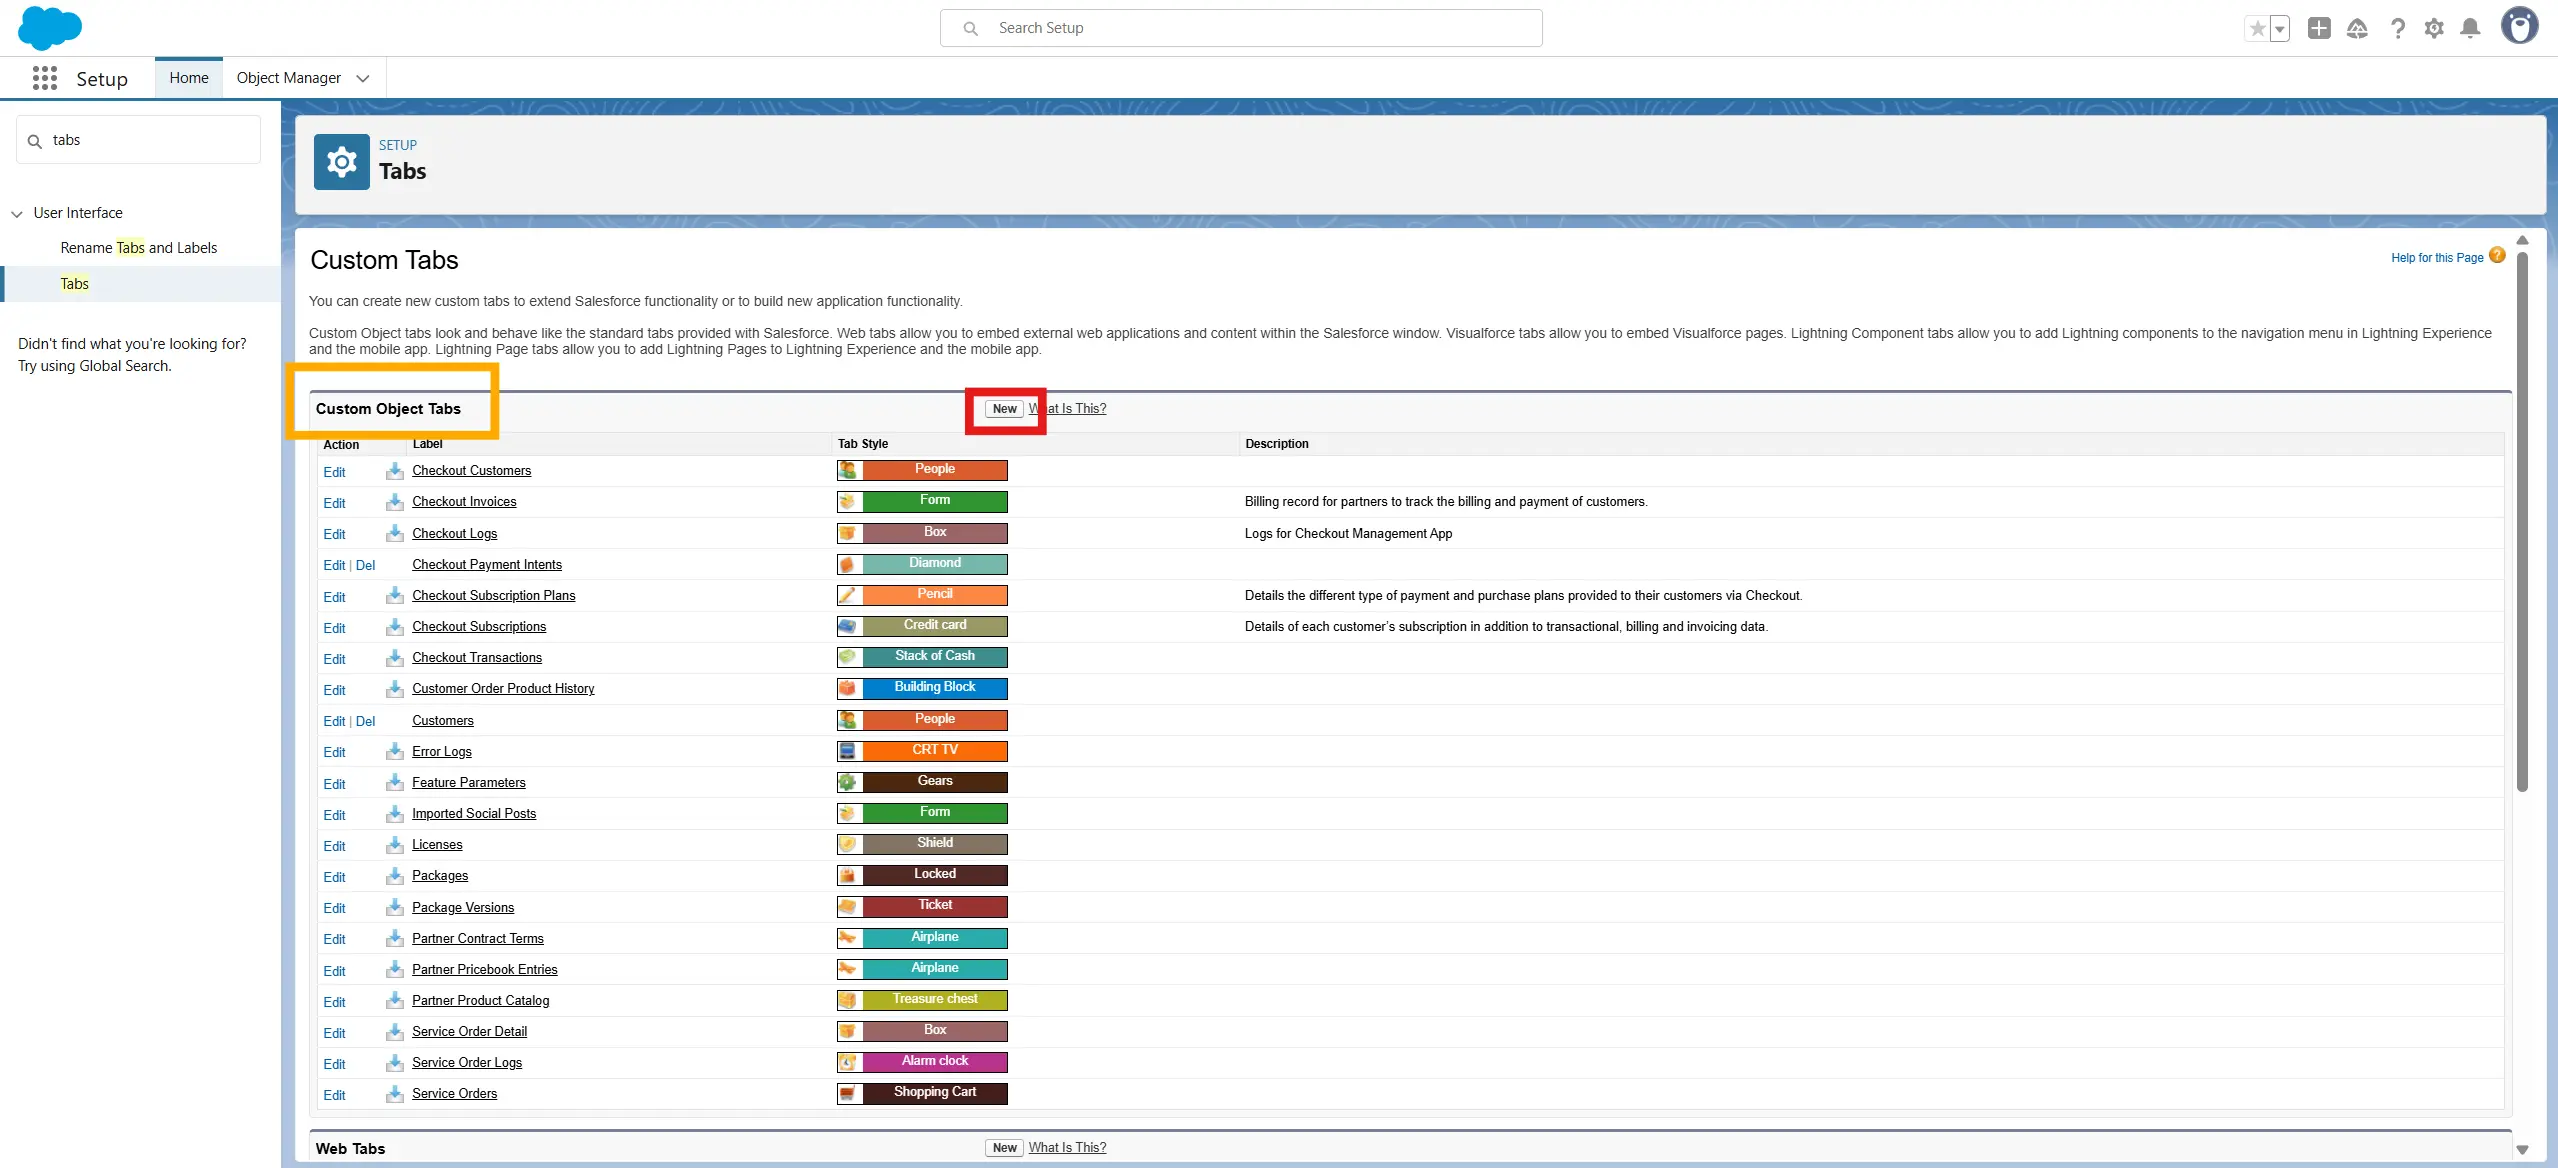
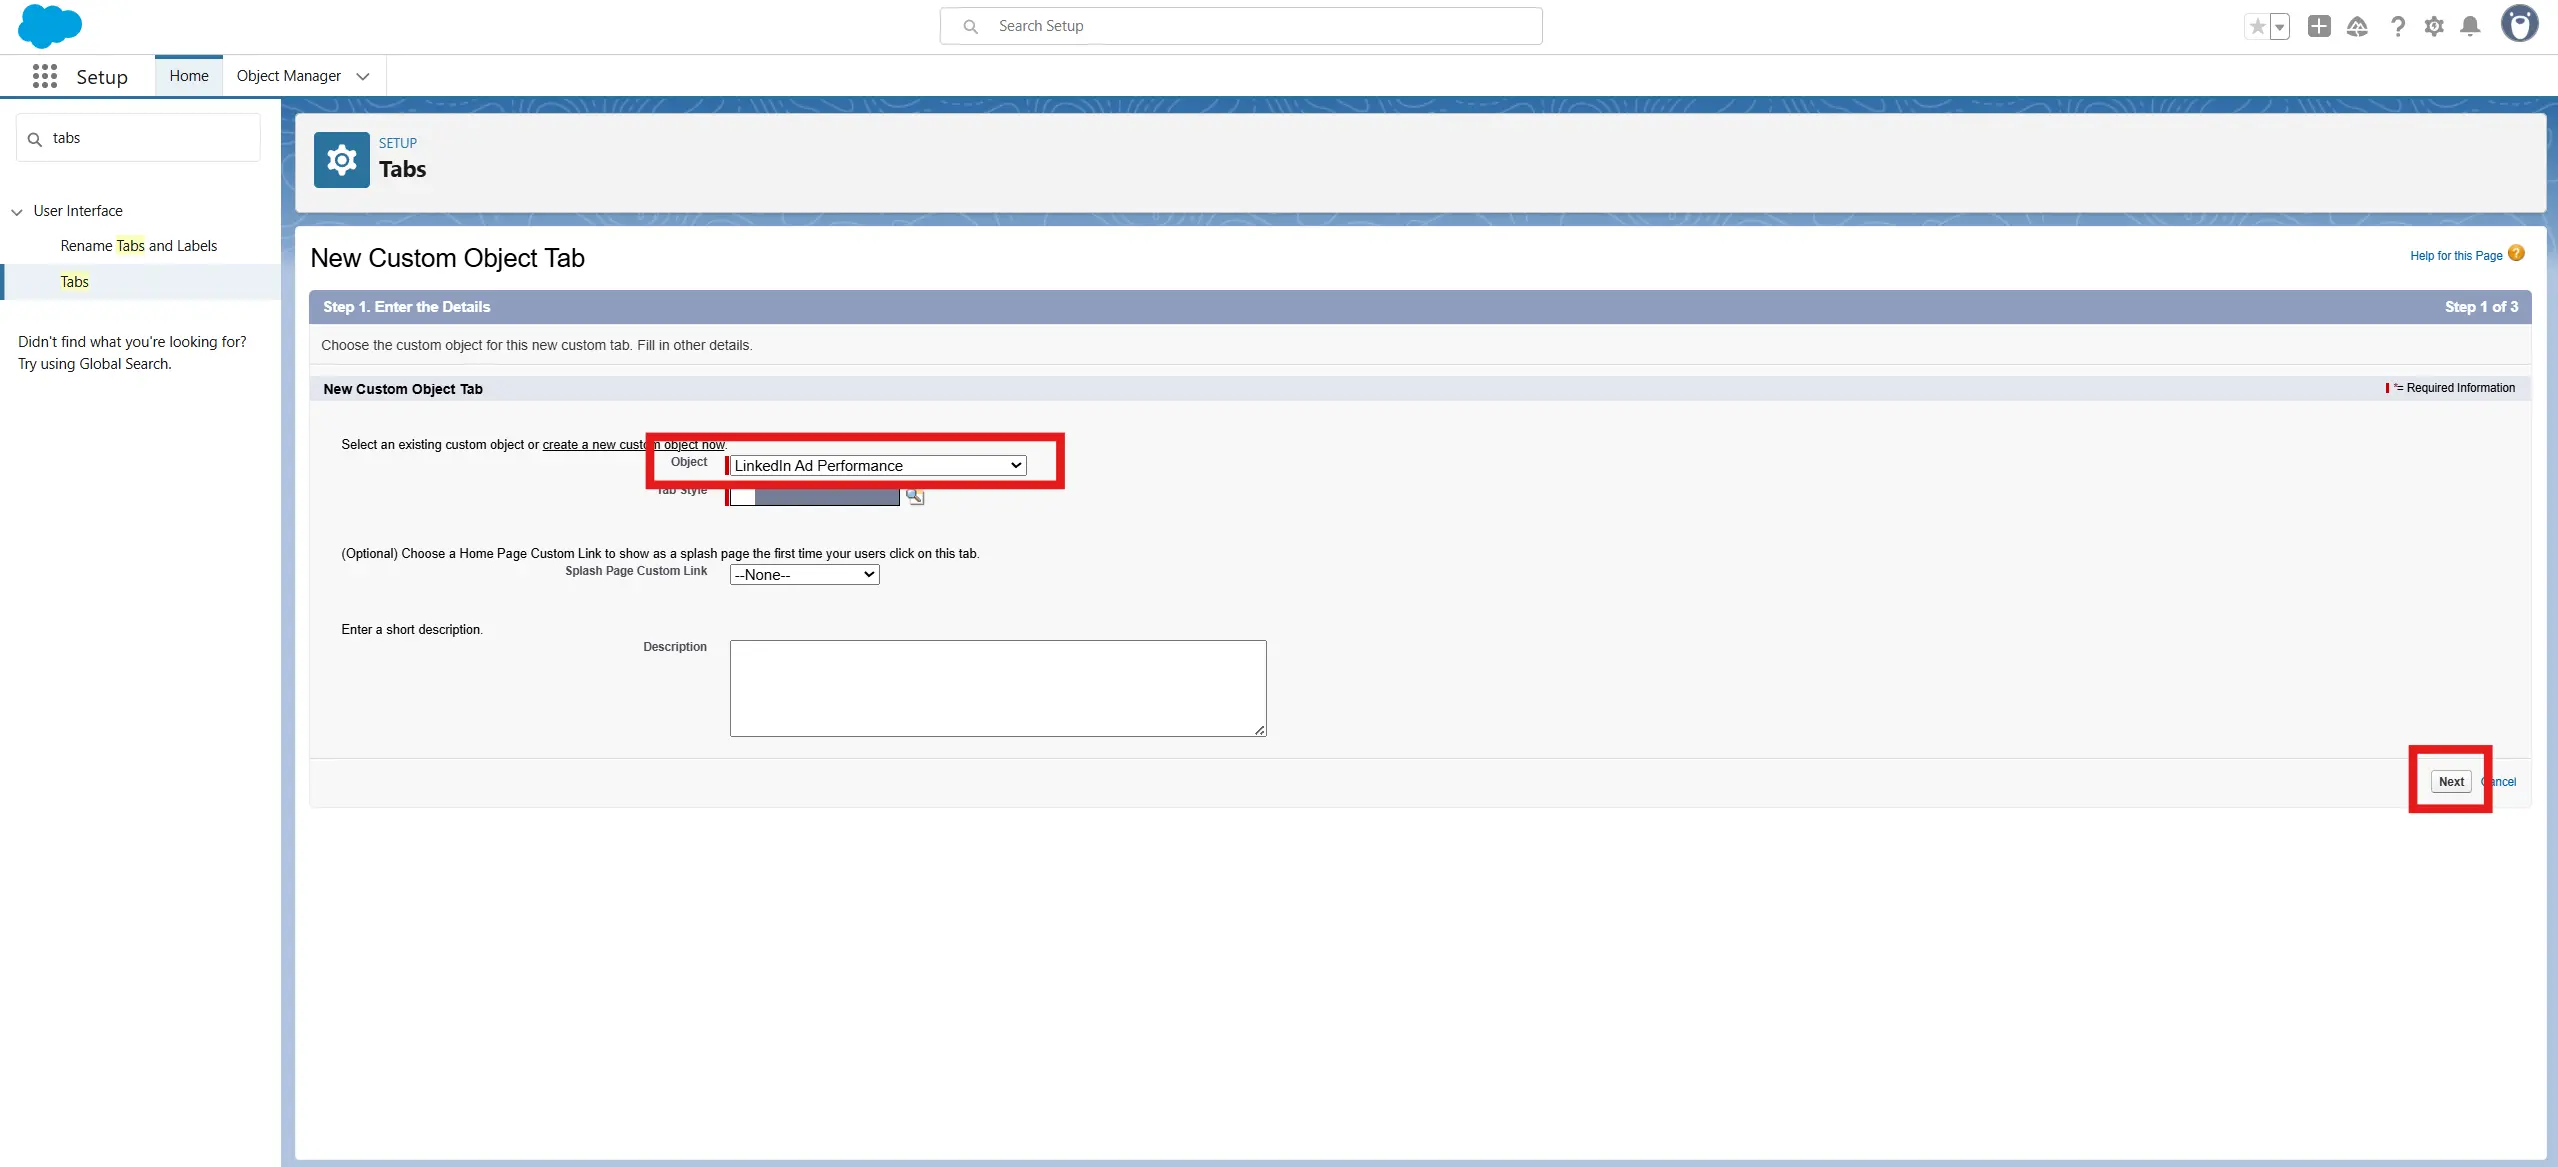
- Go to Setup -> Tabs
- Under Custom Object Tabs click New
- In the Object drop down list, select the object you created above (LinkedIn Ad Performance). Select any Tab style andIcon that you wish. Click Next
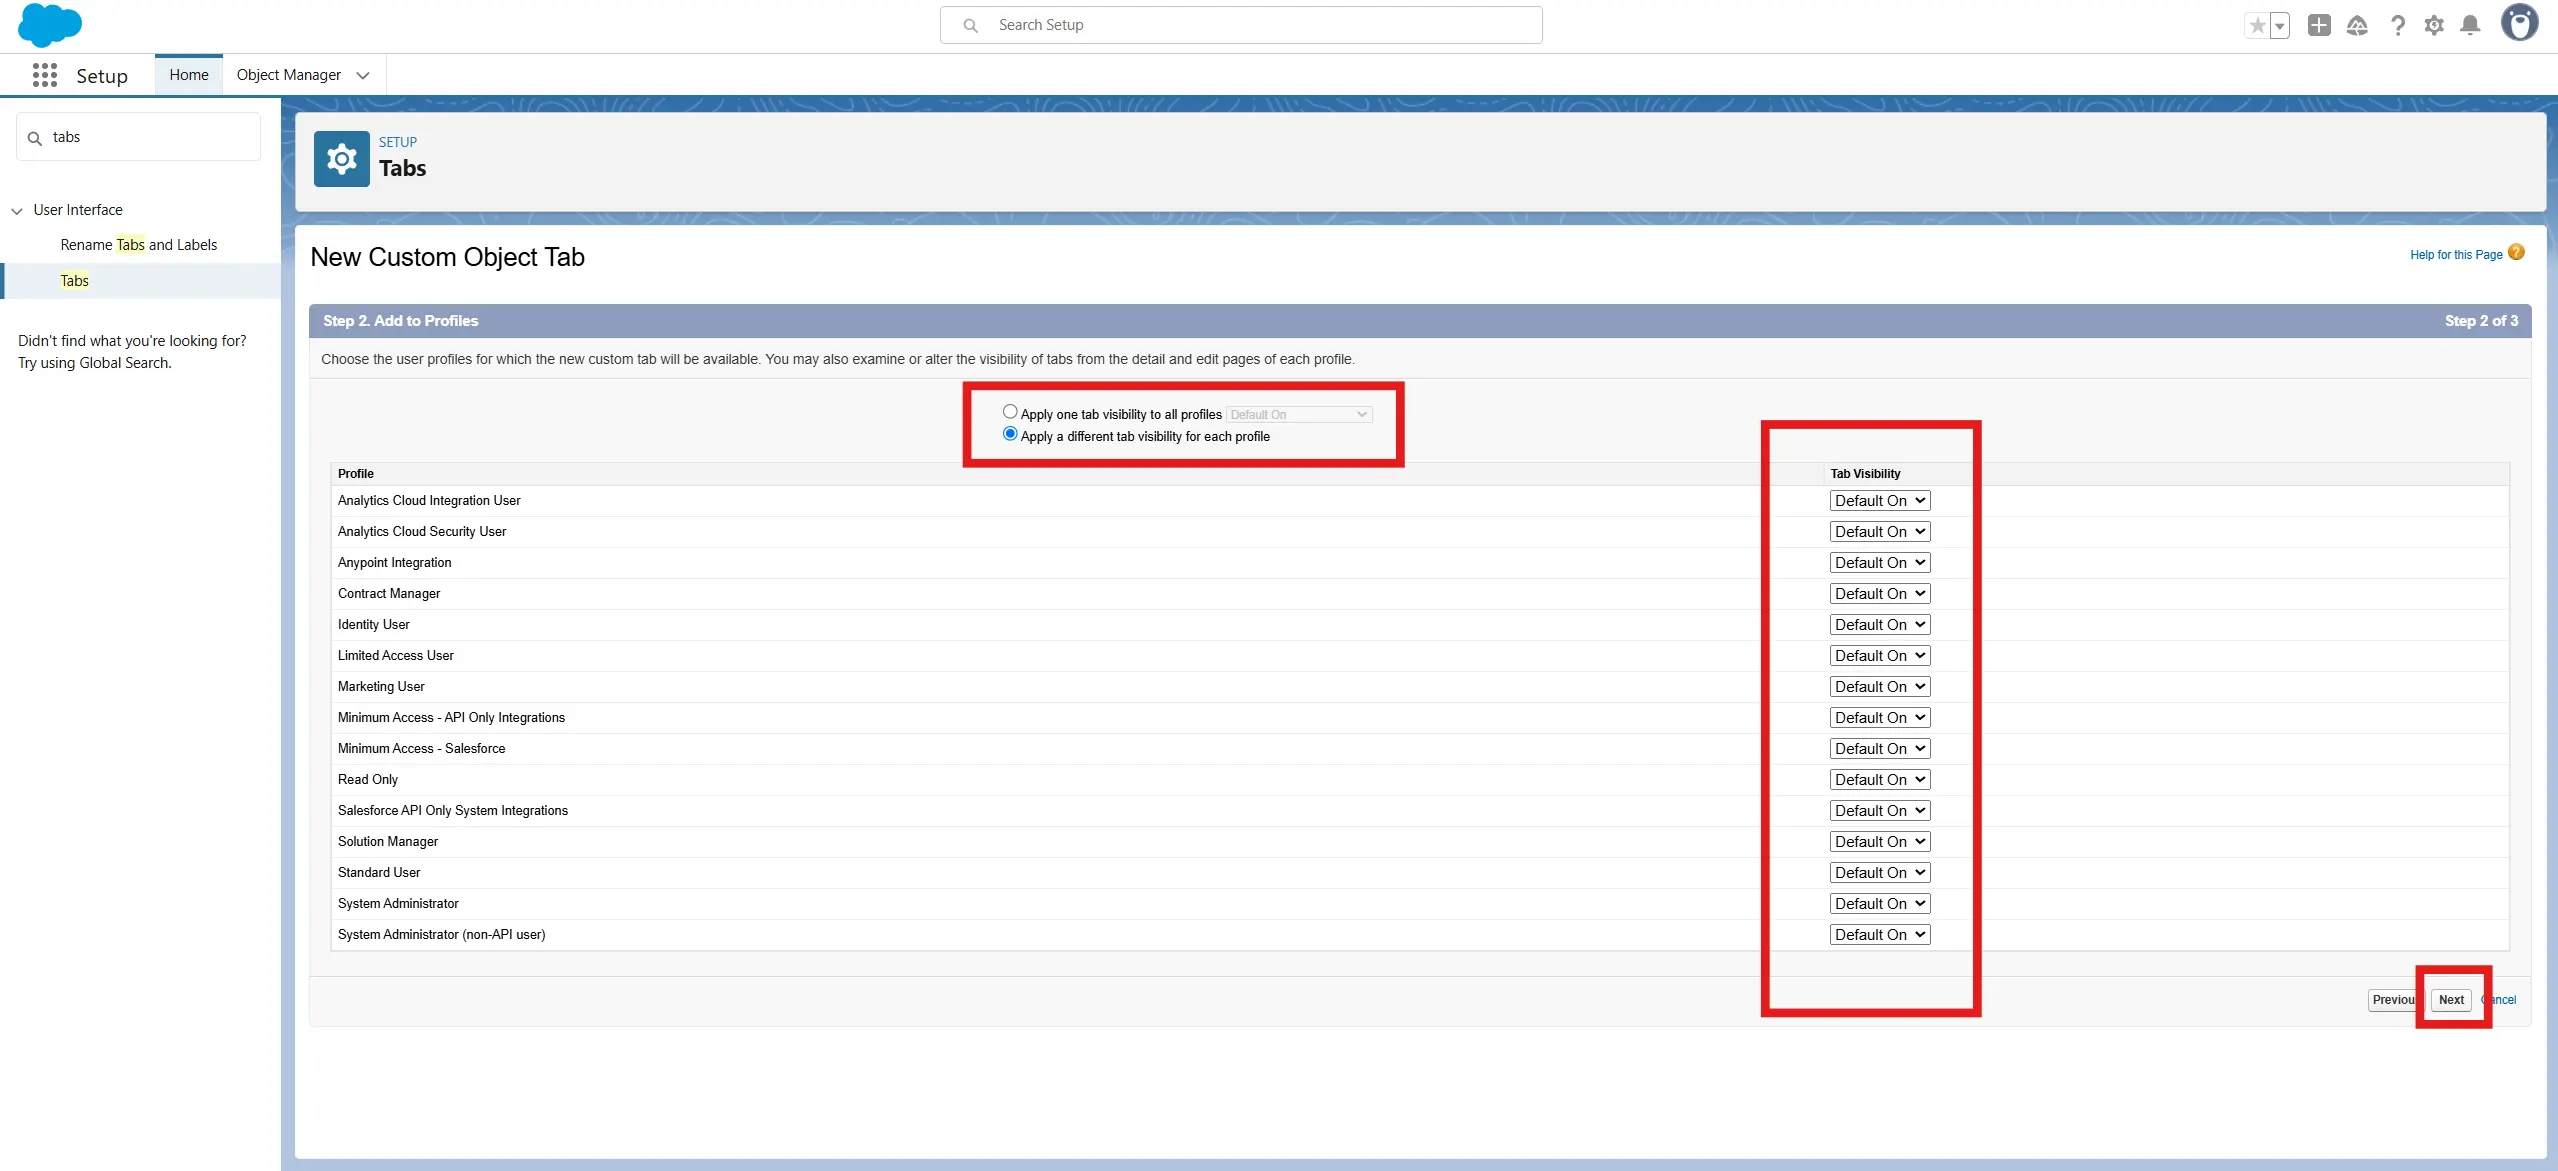
- Select for which users this tab will be visible by default. Click Next
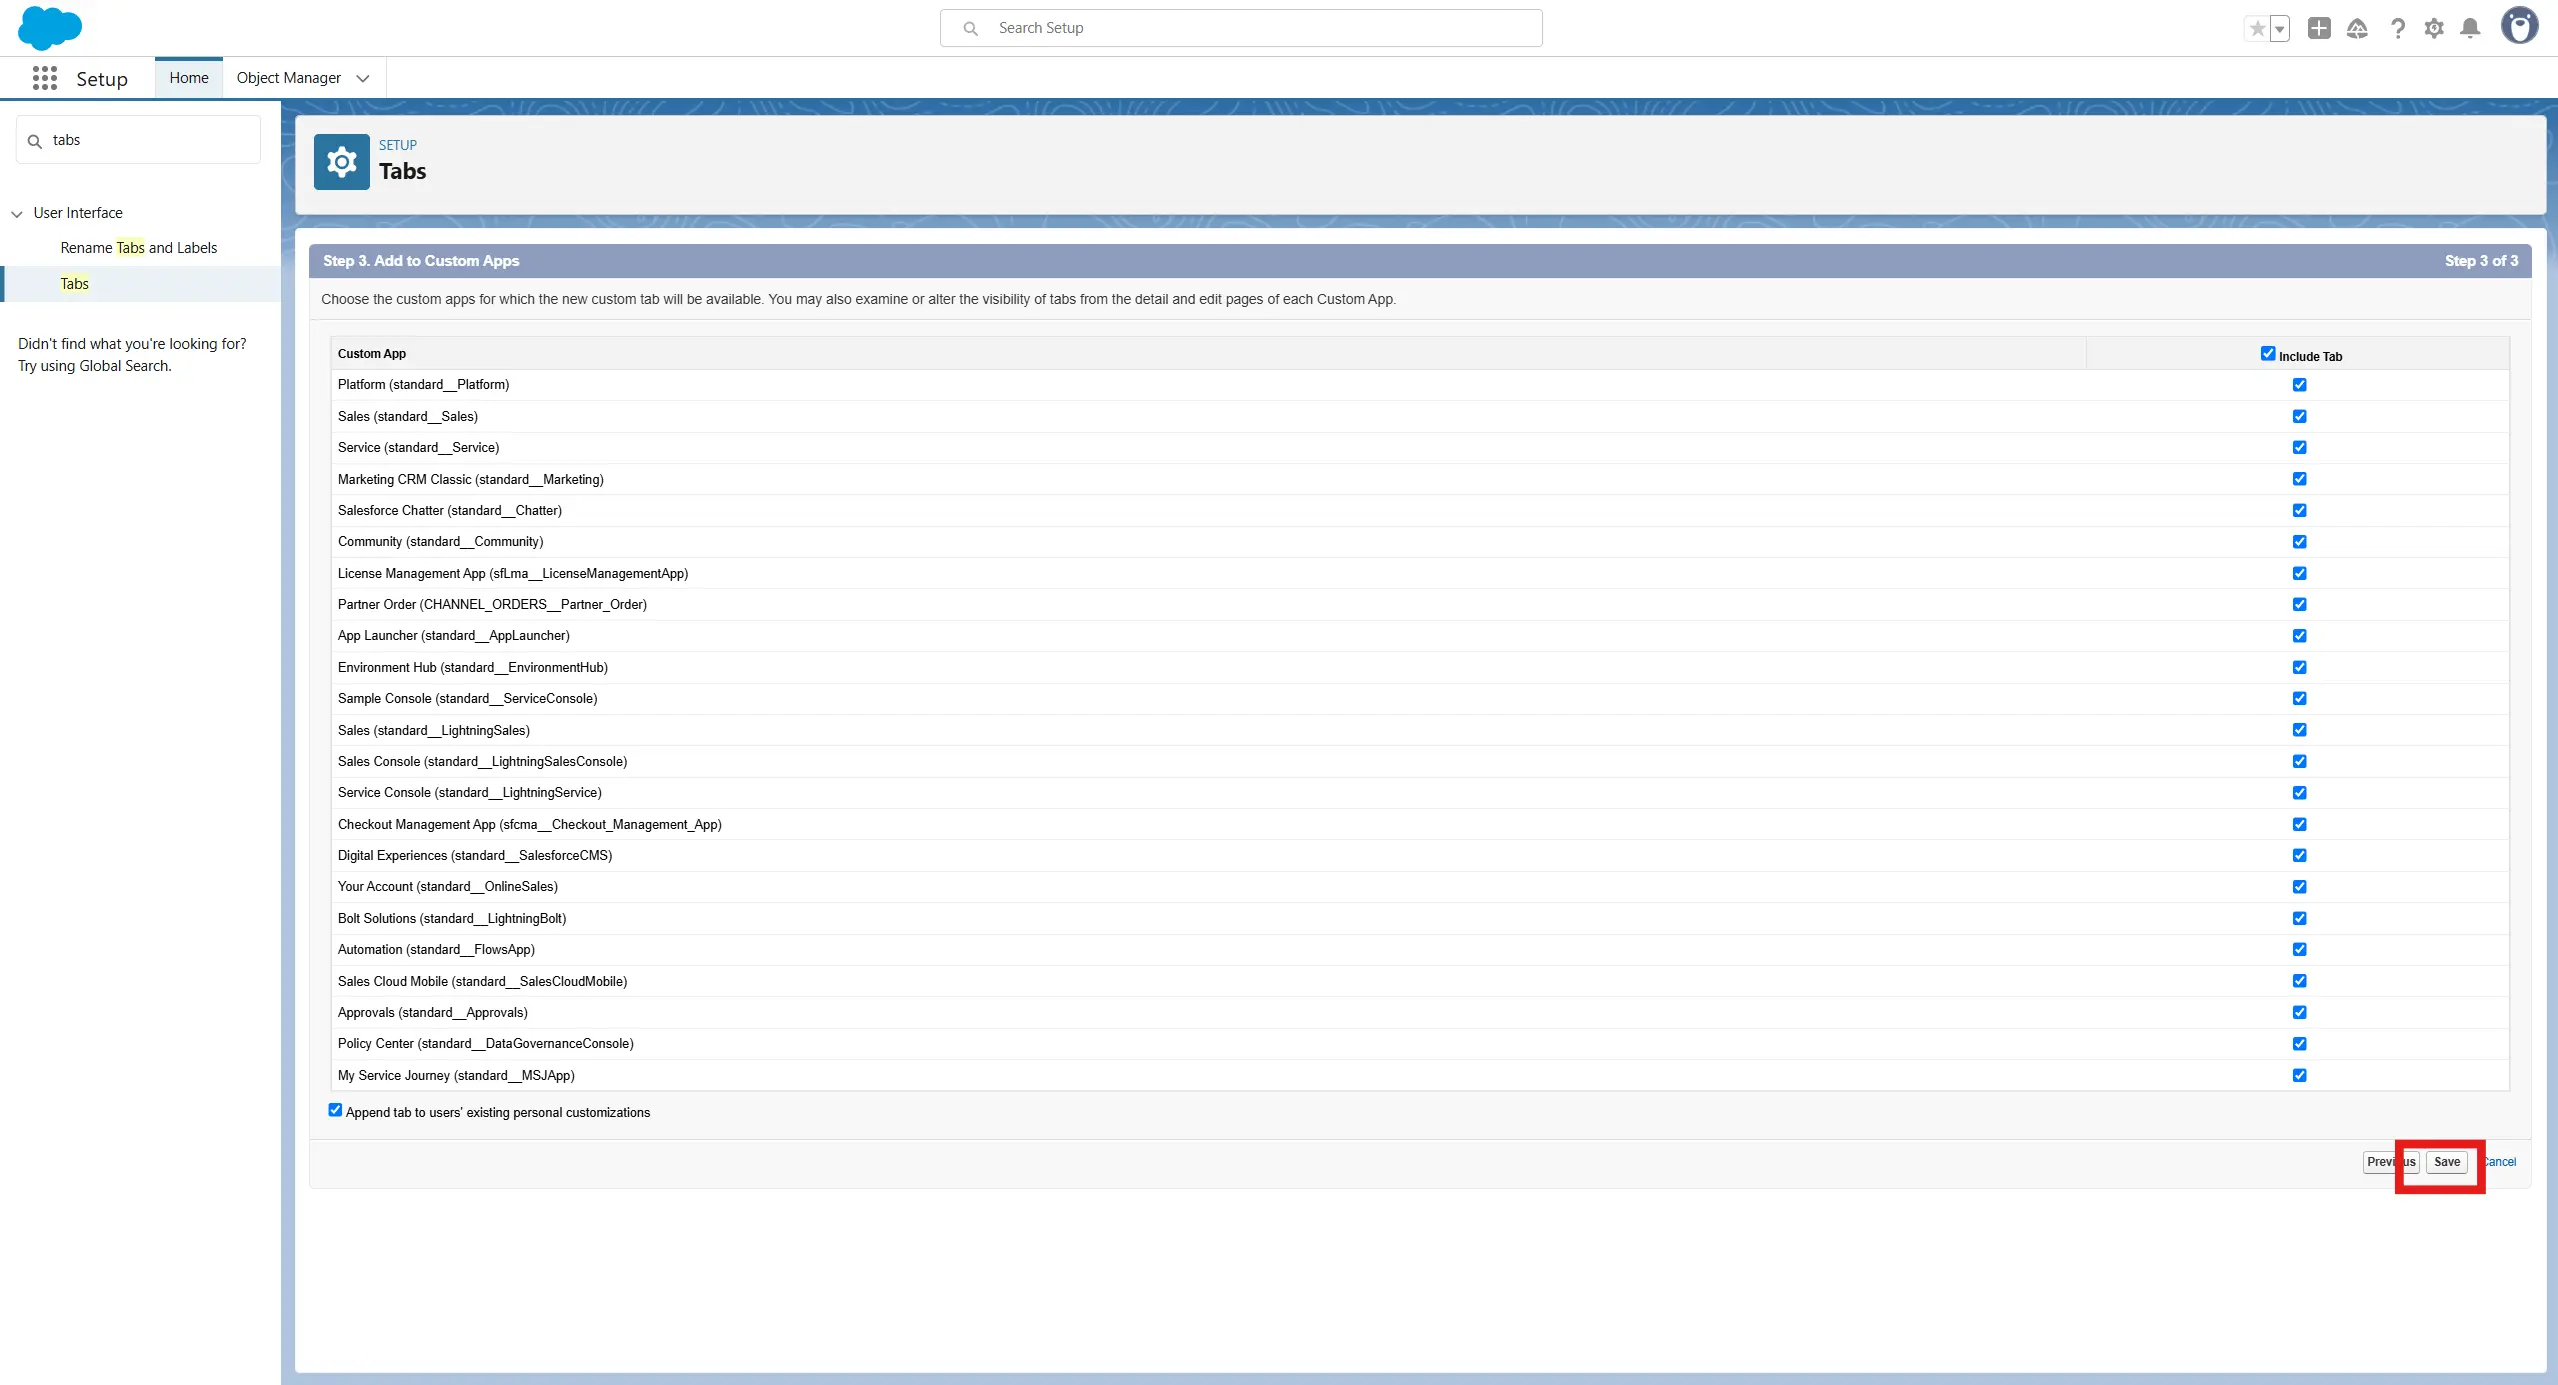
- Leave these check boxes as-is, unless you have specific reasons to hide the custom object from certain connected apps. Click Save.
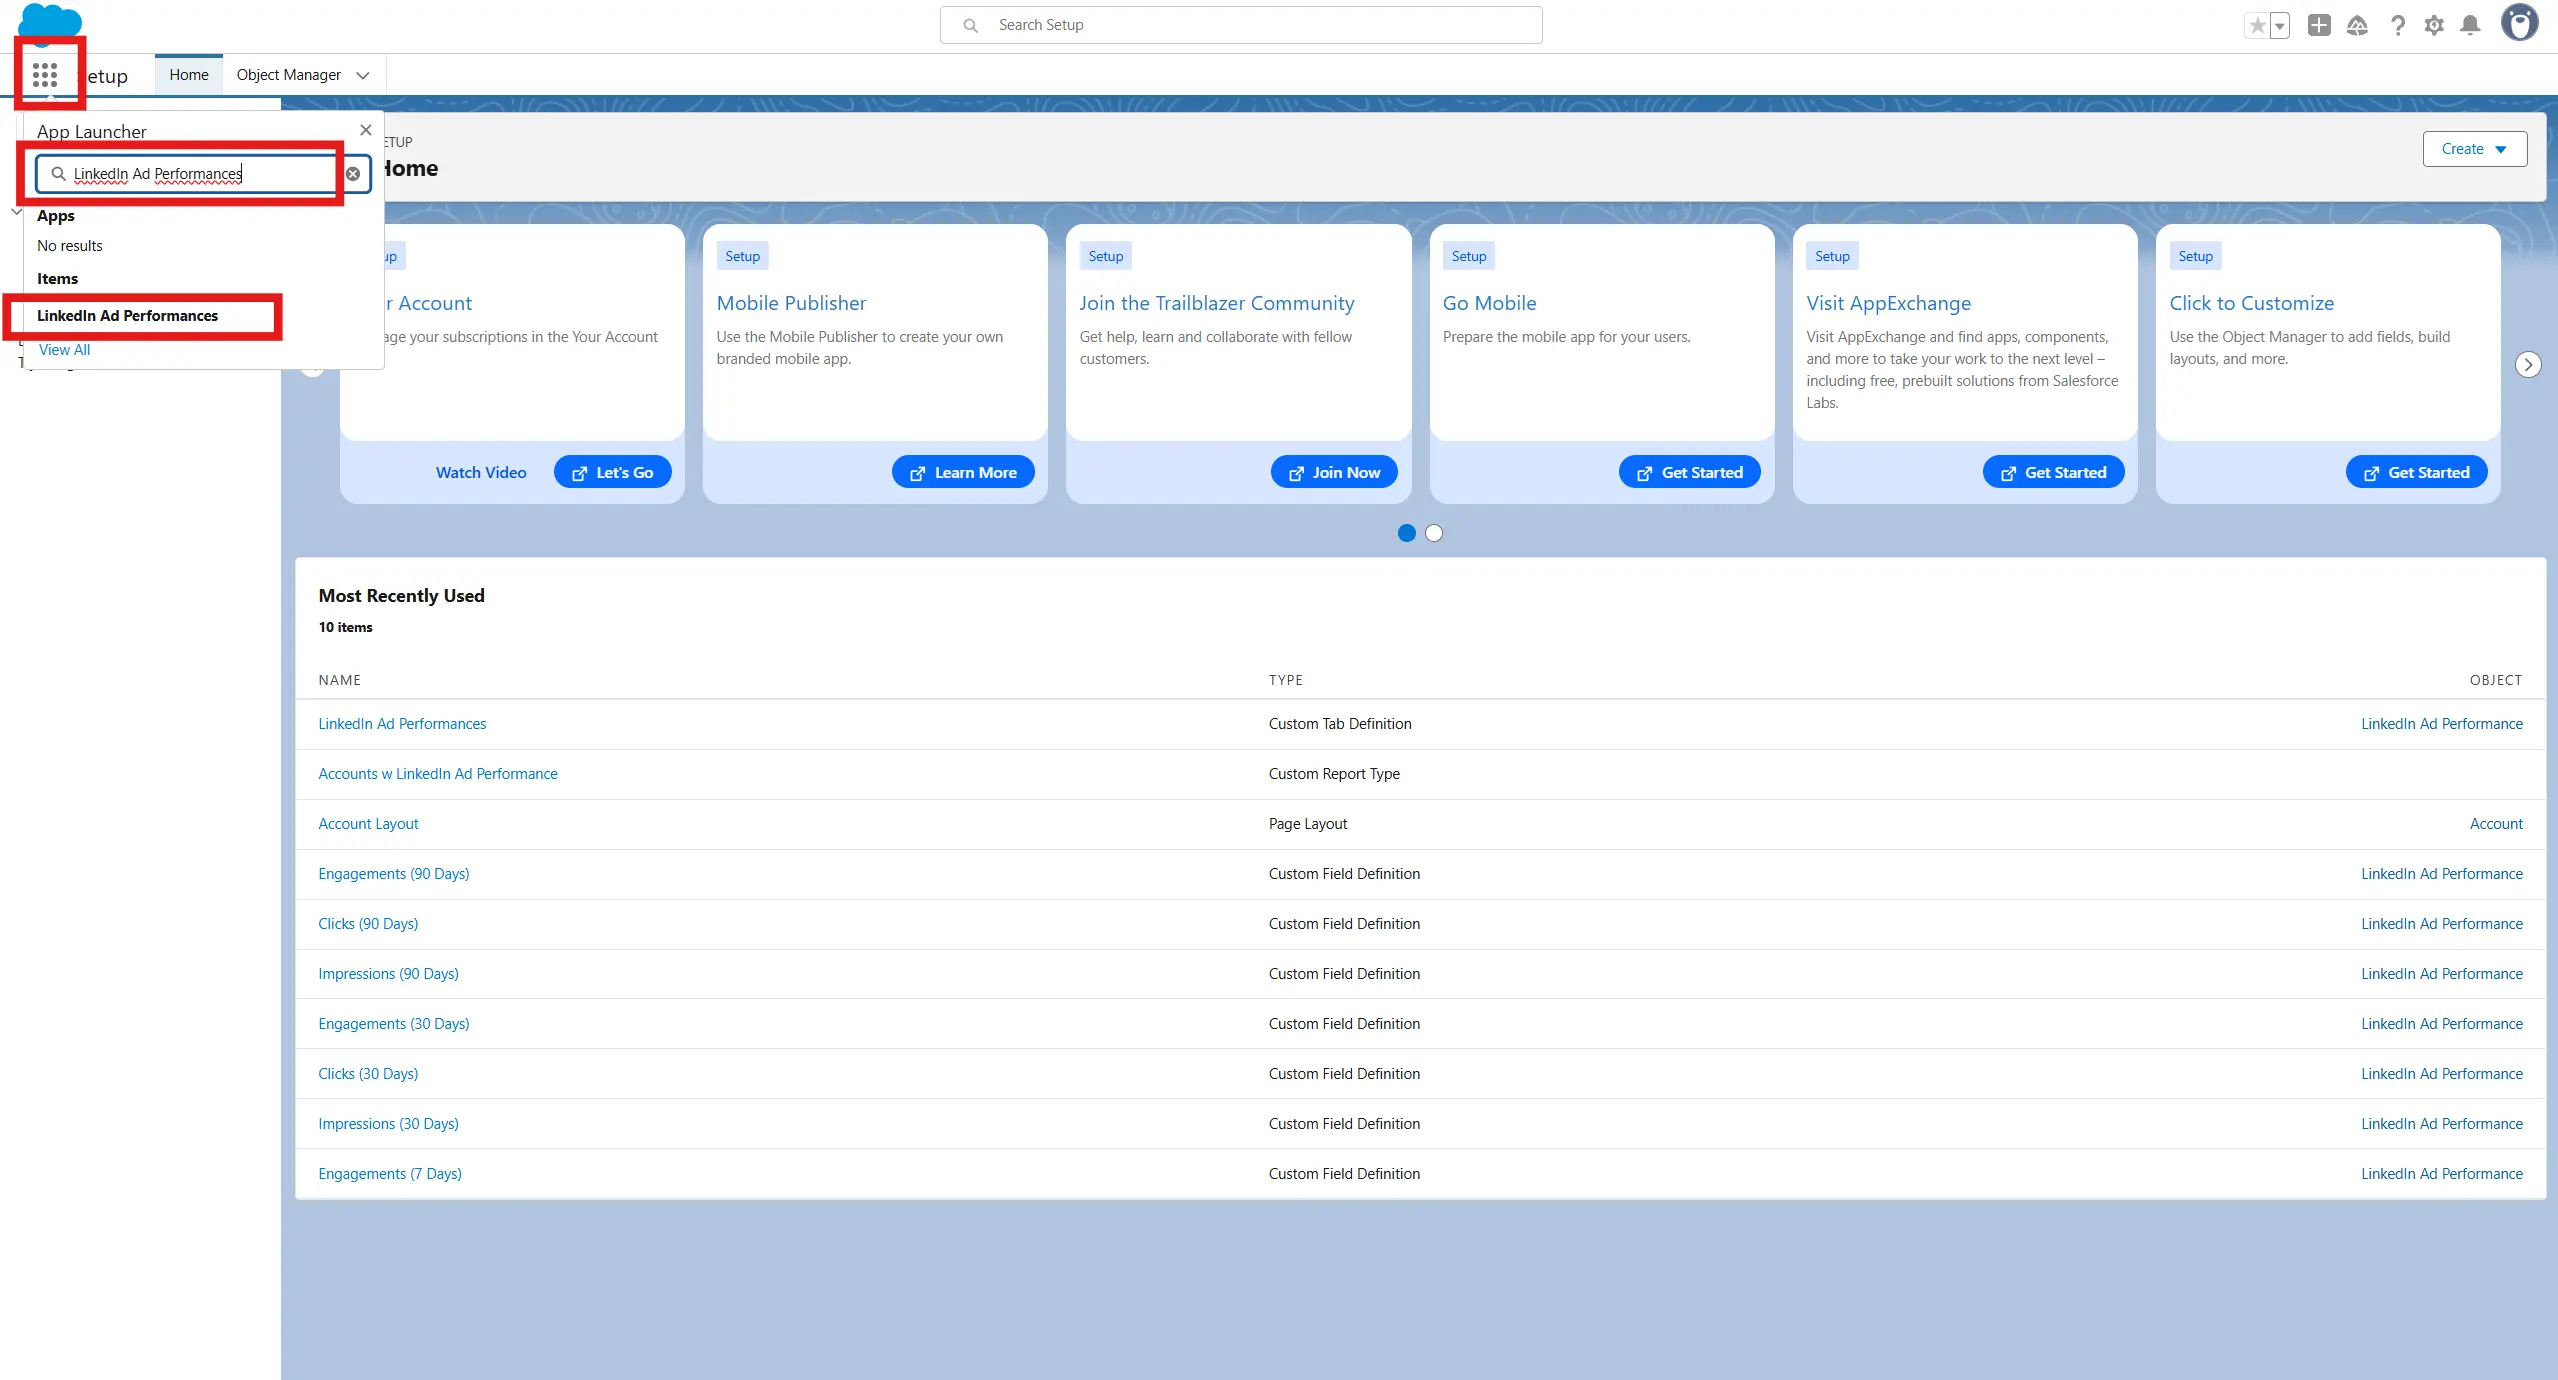
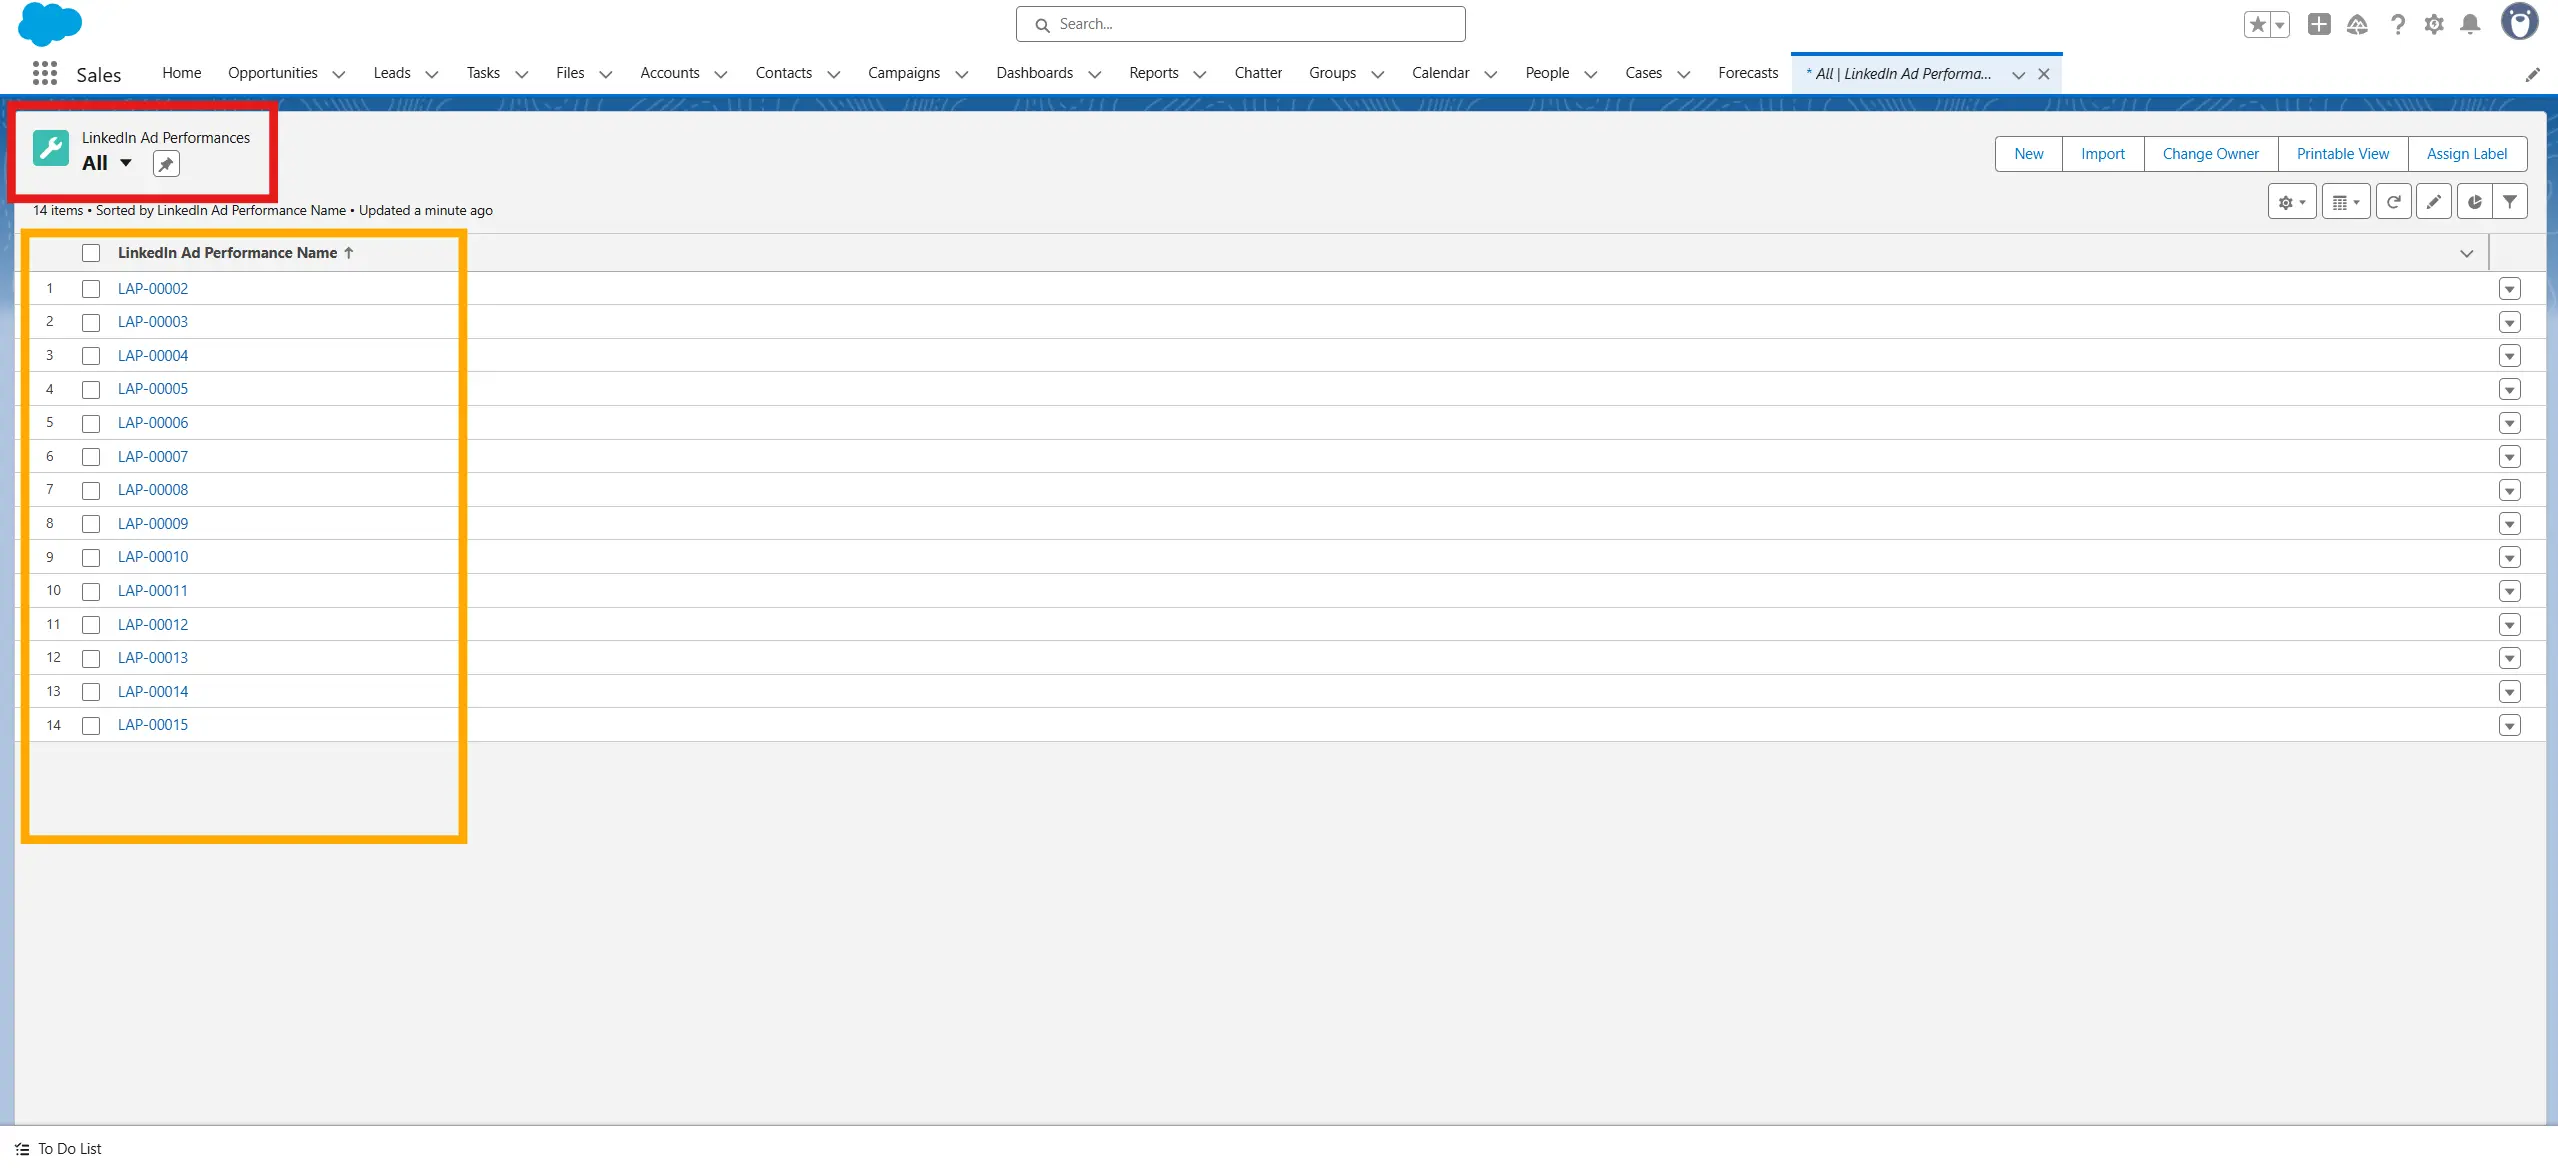
- Verify the tab is created. Go to App Launcher (9 dots in the top left corner). Search for the name of the item you just created (LinkedIn Ad Performances). Click it.
- Verify that a number of records have been created after Fibbler has pushed new datato your accounts. Each change is made as it's own record, as shown in the screenshot. If you are pressed for time, you can also manually change the value on one of the accounts and see if the object is updated accordingly.

PART C - Setting up the Flow to push data
- Go to Flow Builder
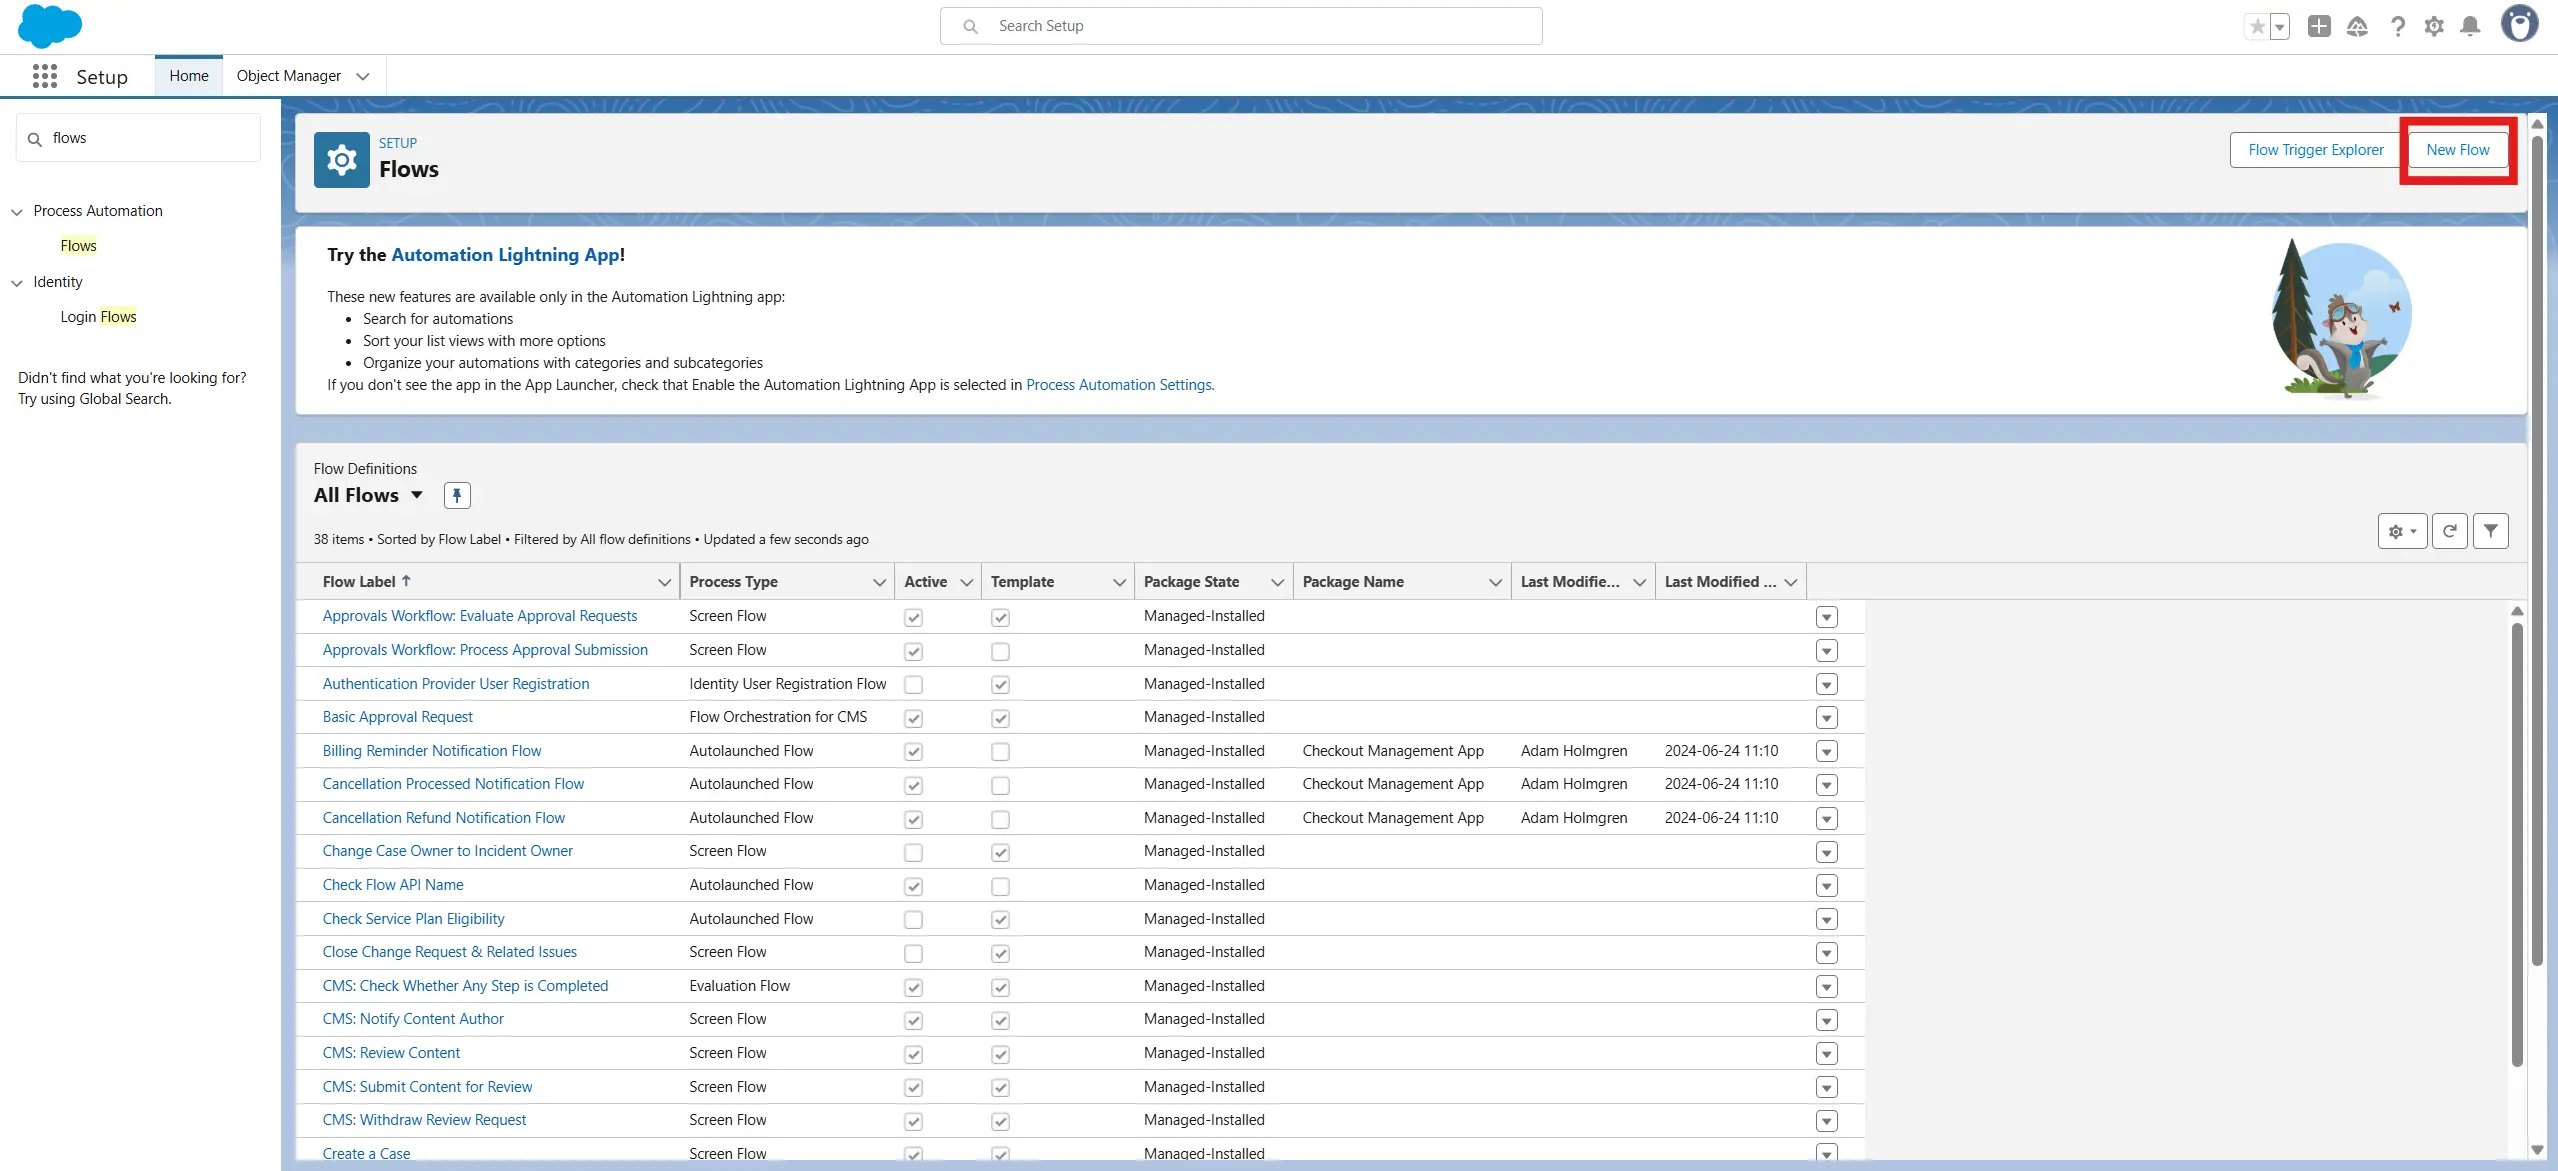
- Go to Setup -> Flows
- Click New Flow
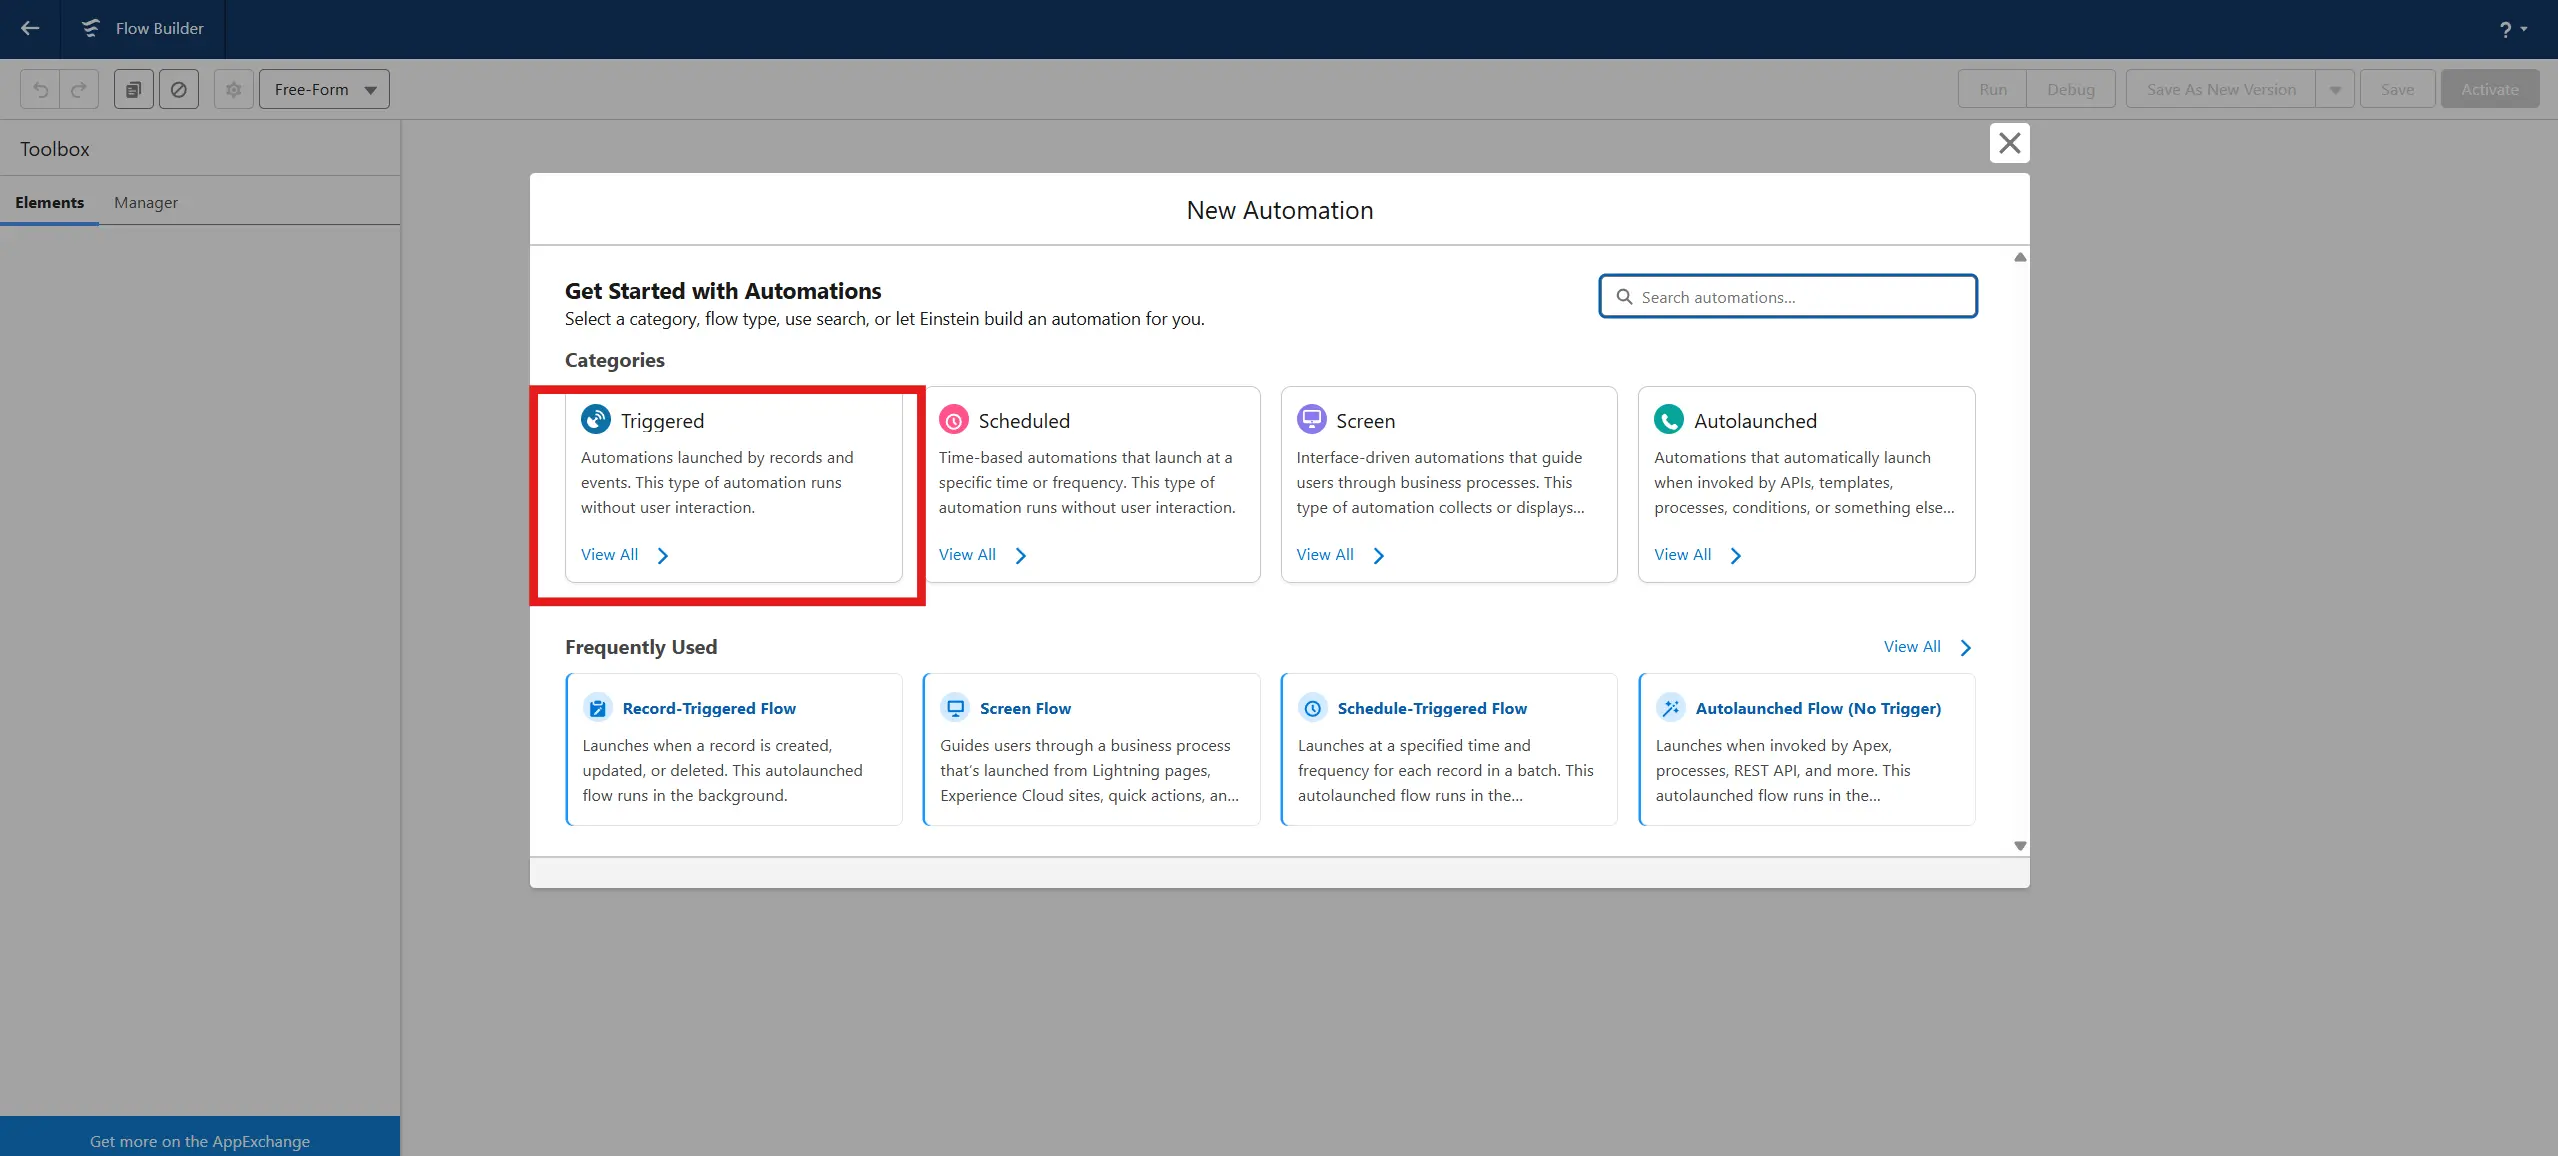
- Click the Triggered Flow box
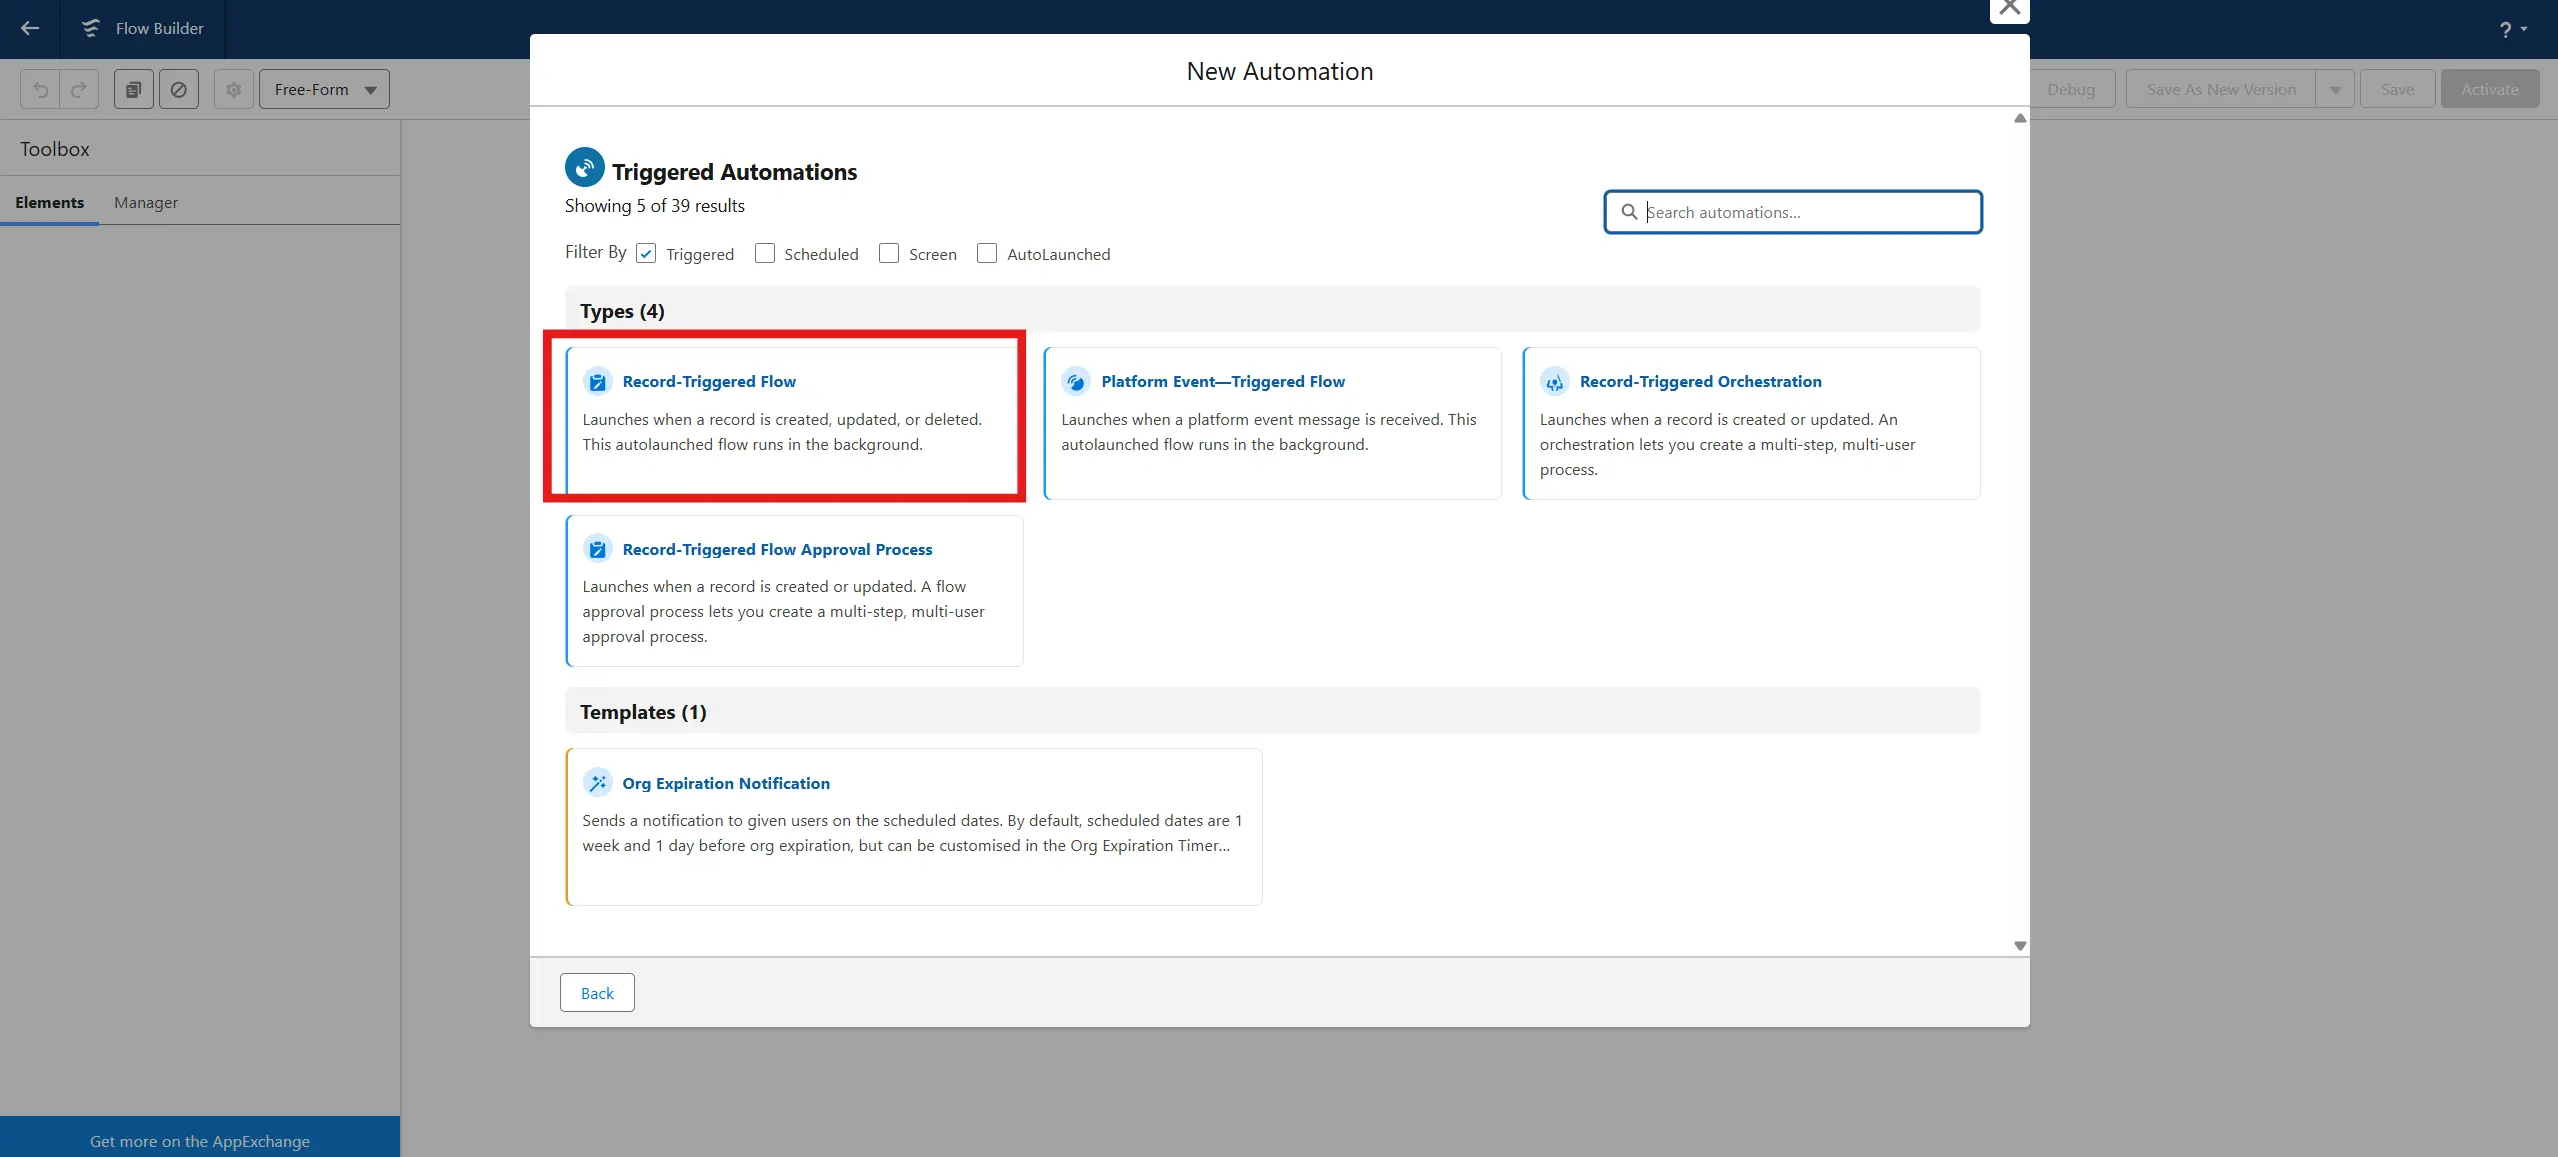
- Choose Record-Triggered Flow.

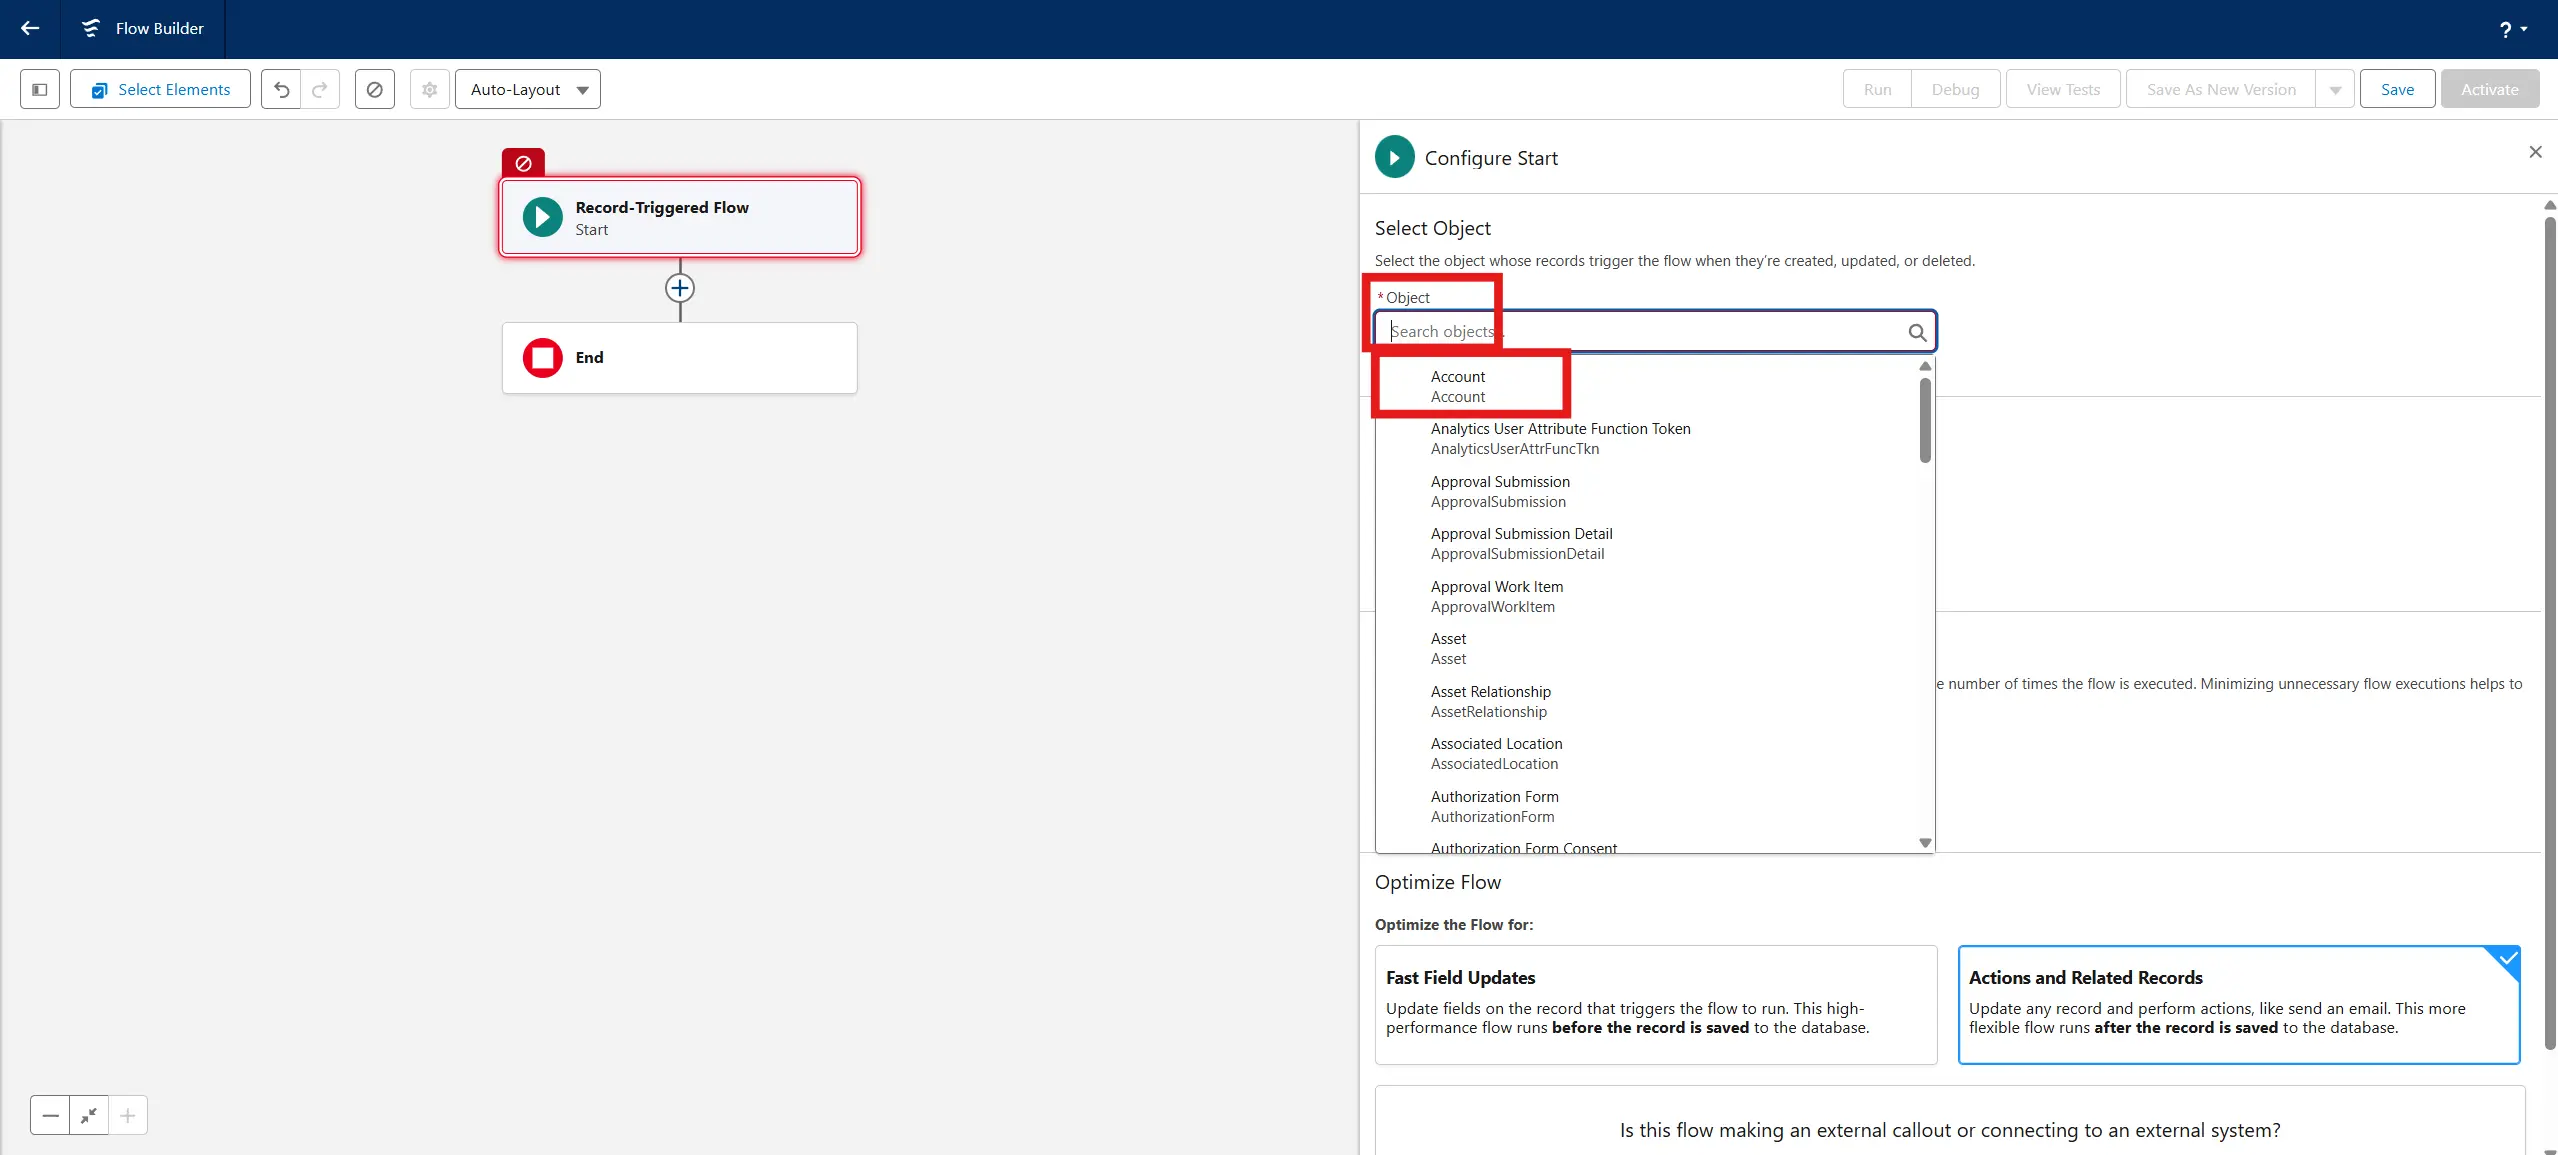
Configure the Flow Trigger
- Object: Select Account
- Trigger the Flow When: A record is created or updated
- Condition Requirements:
- Set Any of the conditions are met (OR).
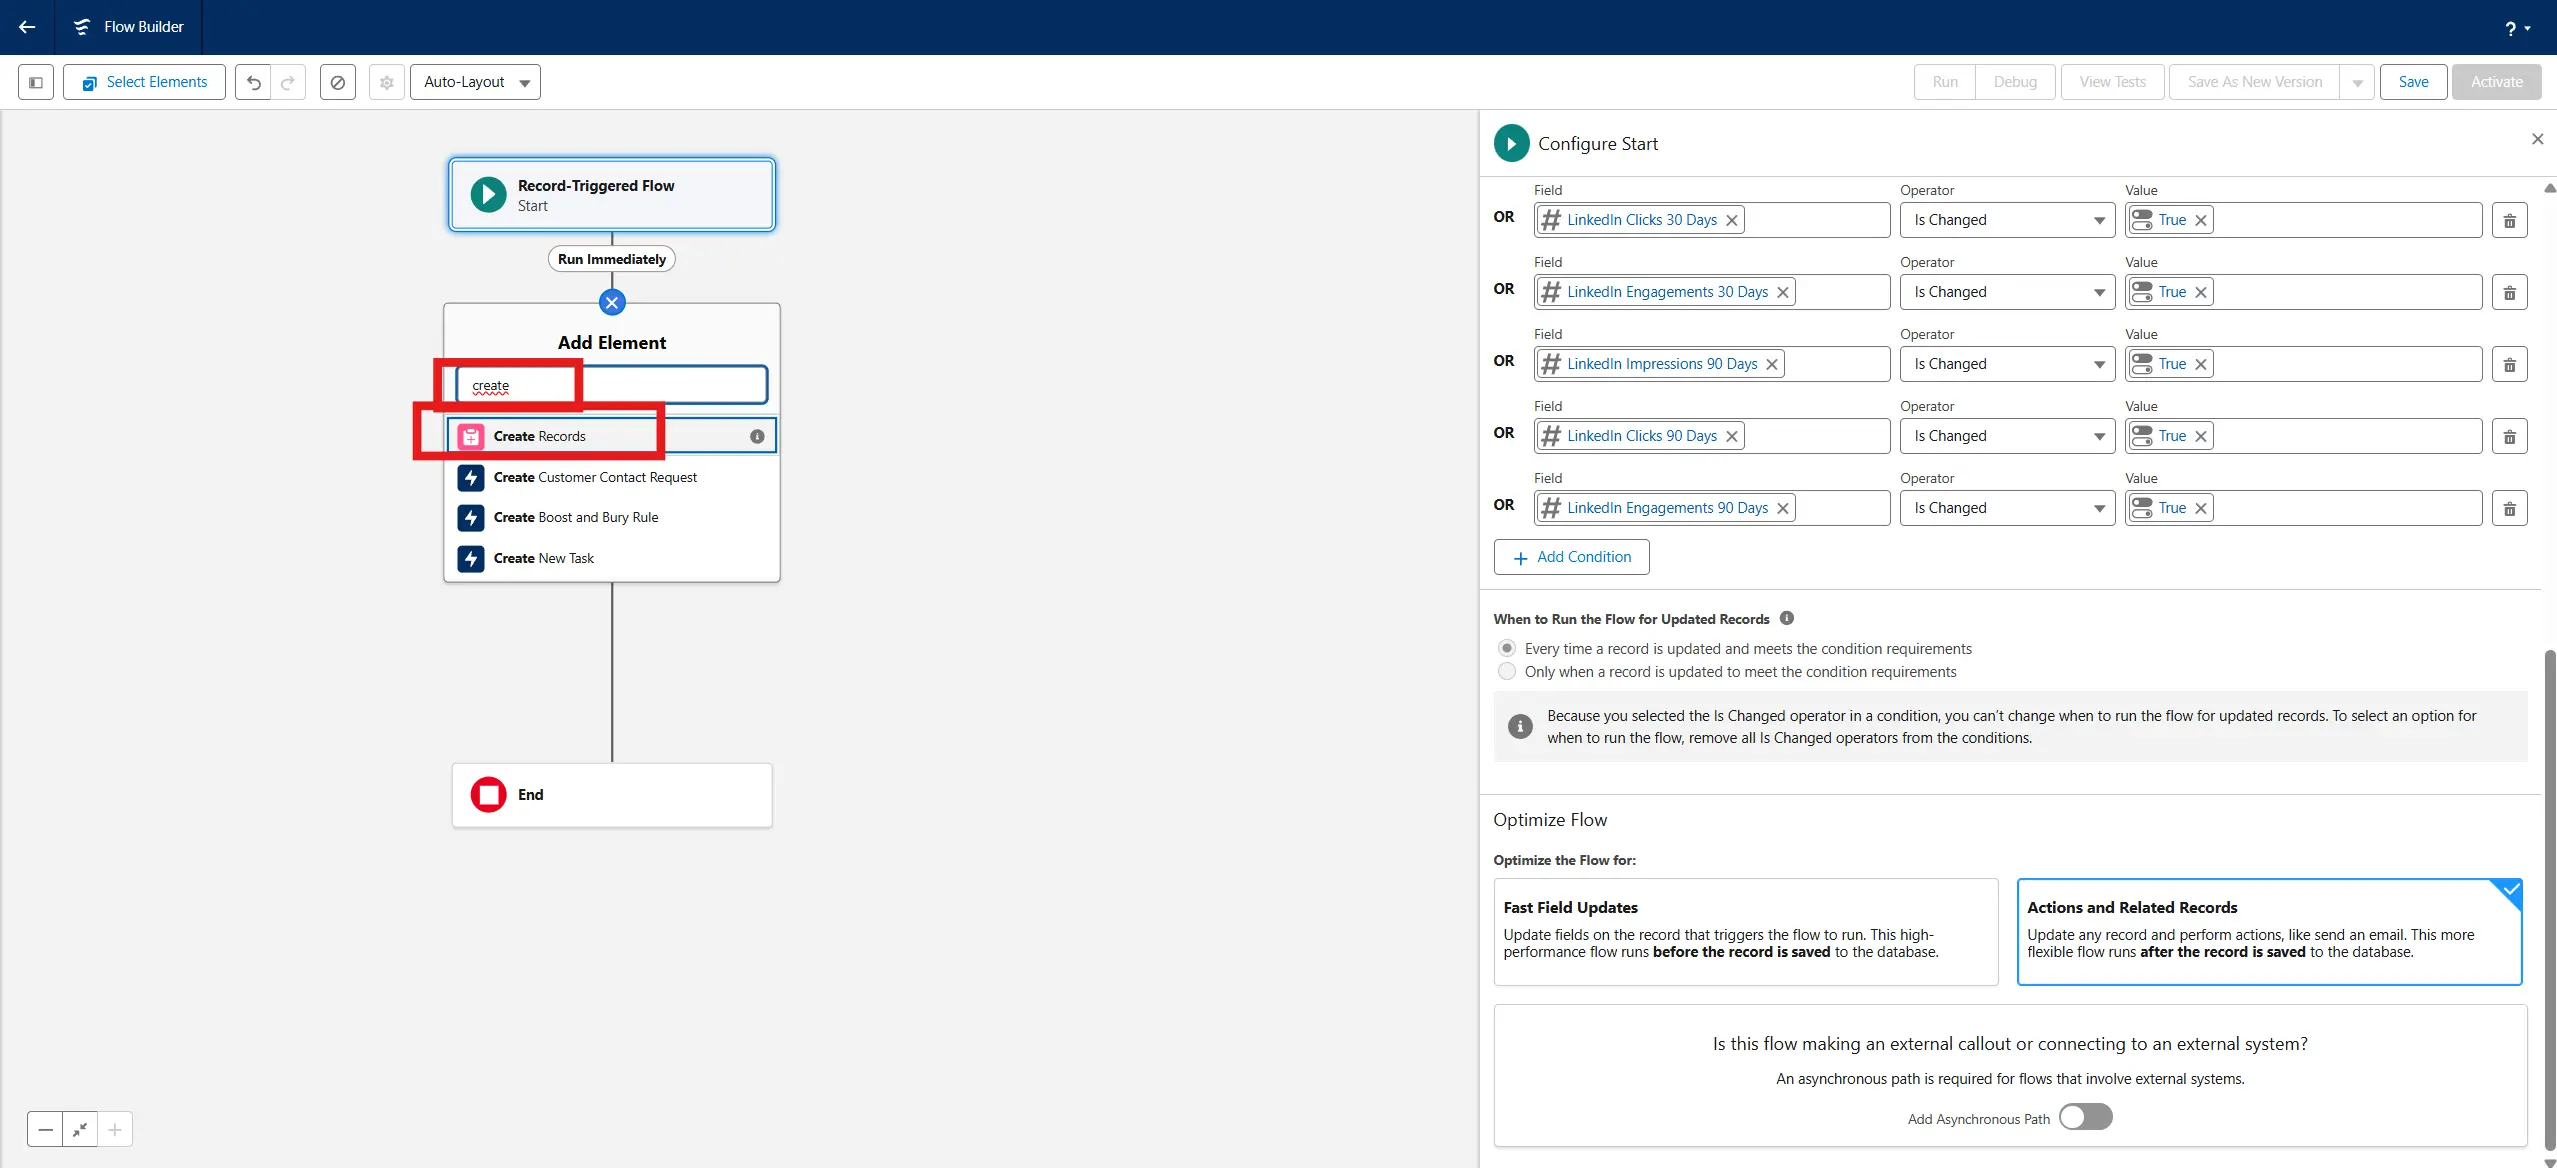
- Add the following conditions:
- fibbler_linkedin_clicks_7_days__c Is Changed = True
- fibbler_linkedin_impressions_7_days__c Is Changed = True
- fibbler_linkedin_engagements_7_days__c Is Changed = True
- fibbler_linkedin_impressions_30_days__c Is Changed = True
- fibbler_linkedin_clicks_30_days__c Is Changed = True
- fibbler_linkedin_engagements_30_days__c Is Changed = True
- fibbler_linkedin_impressions_90_days__c Is Changed = True
- fibbler_linkedin_clicks_90_days__c Is Changed = True
- fibbler_linkedin_engagements_90_days__c Is Changed = True
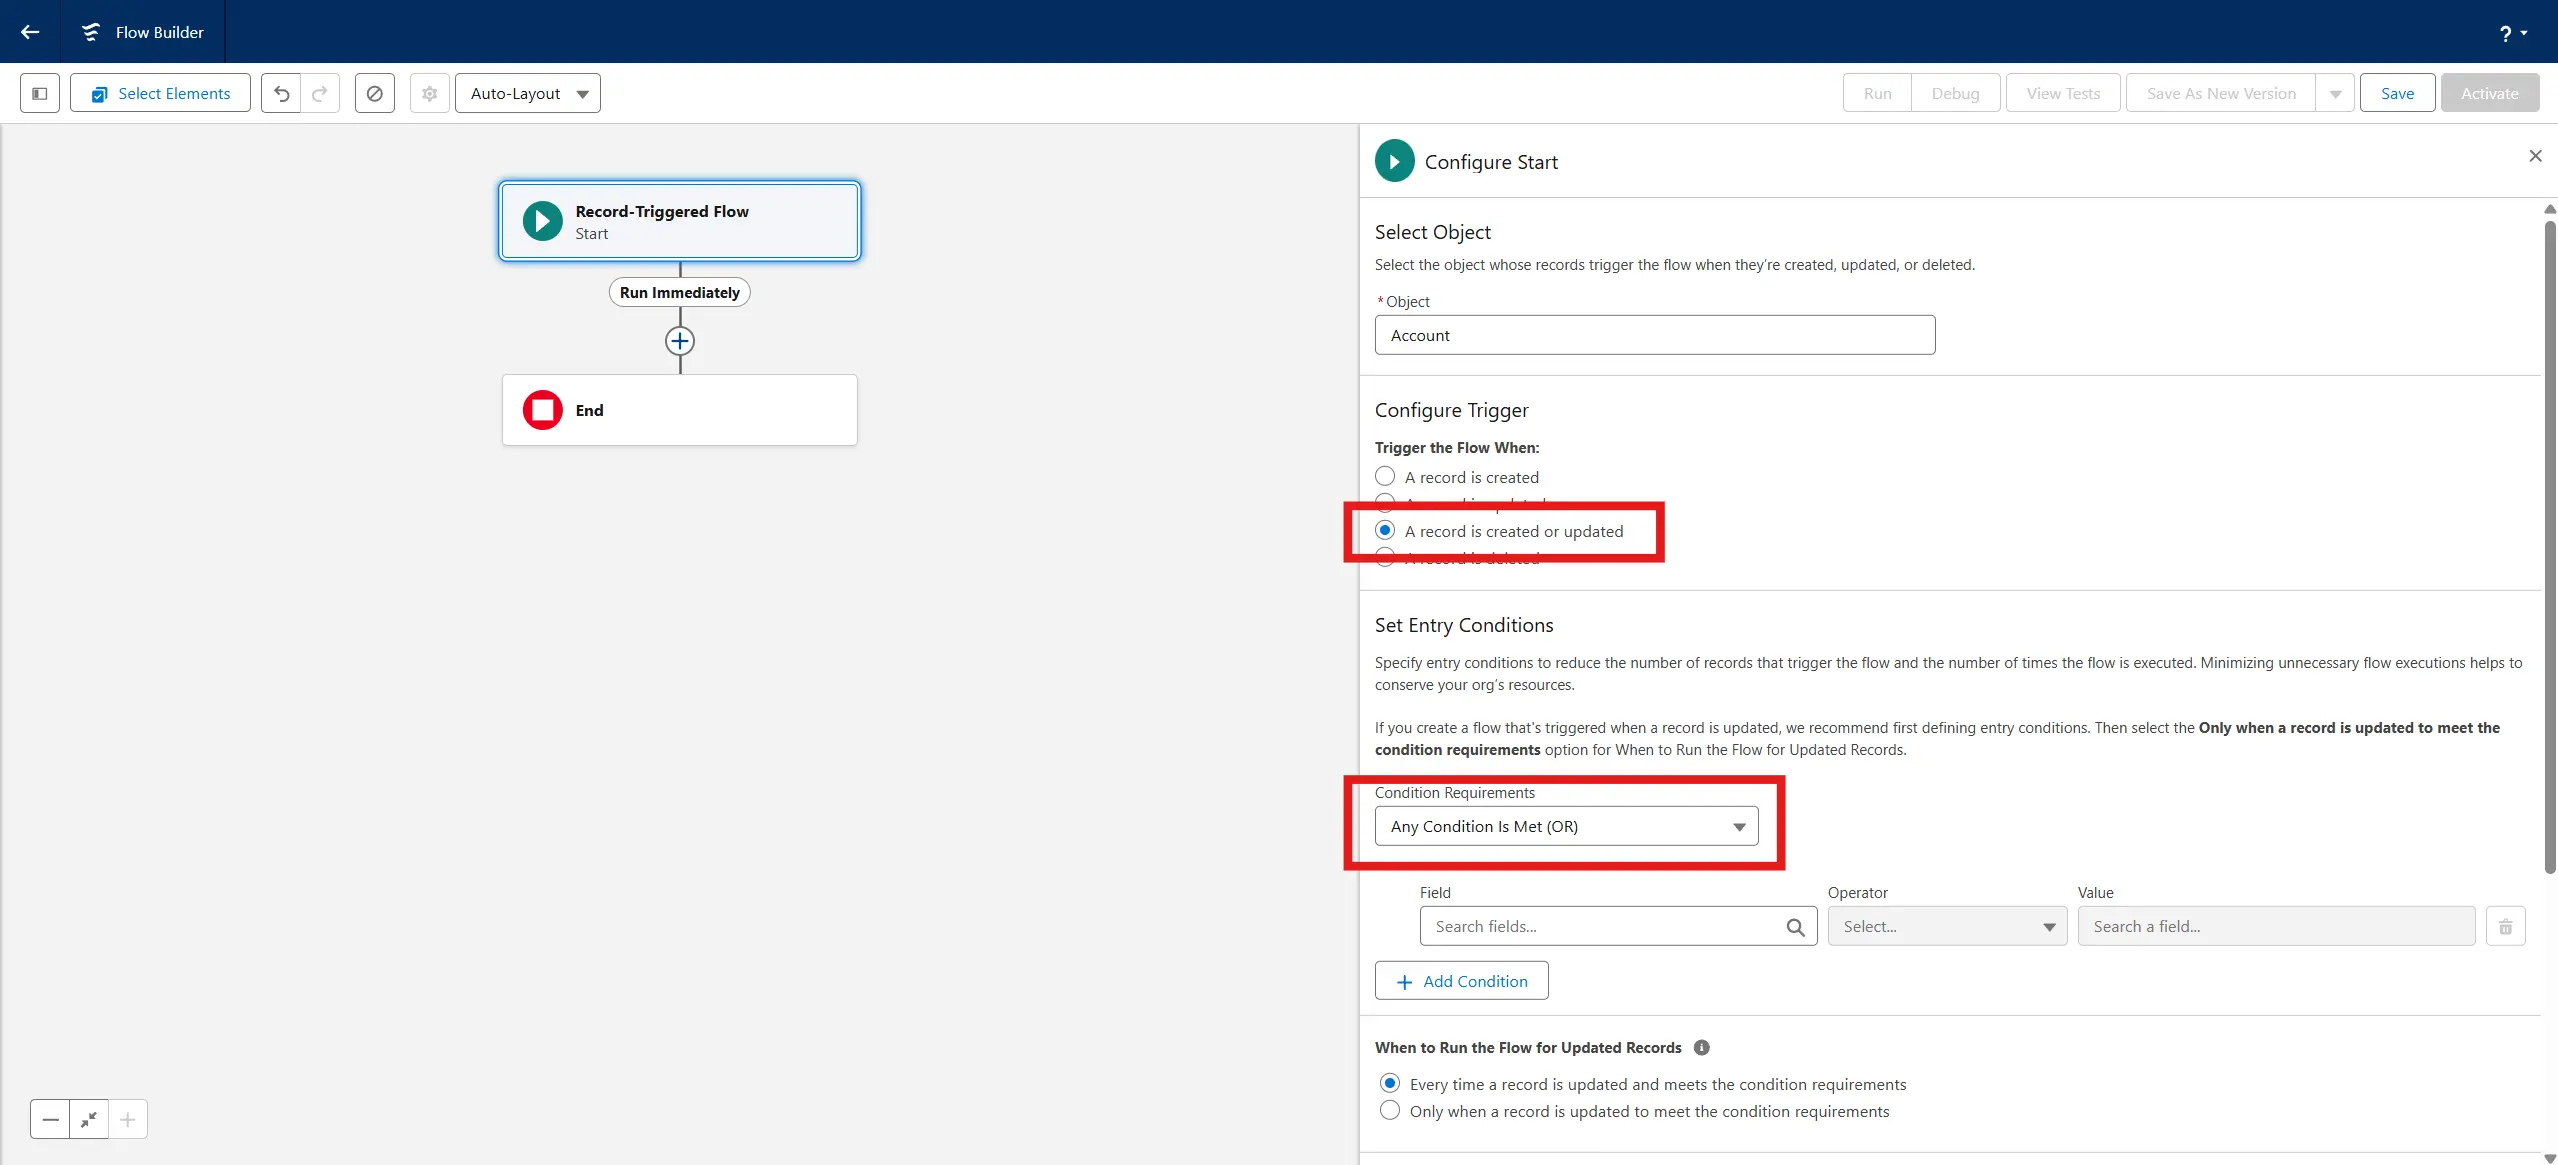
- Optimize the Flow For: Actions and Related Records

Add a Create Records Element
- After setting up the trigger, click the + icon to add an element (highlighted in screenshot above)
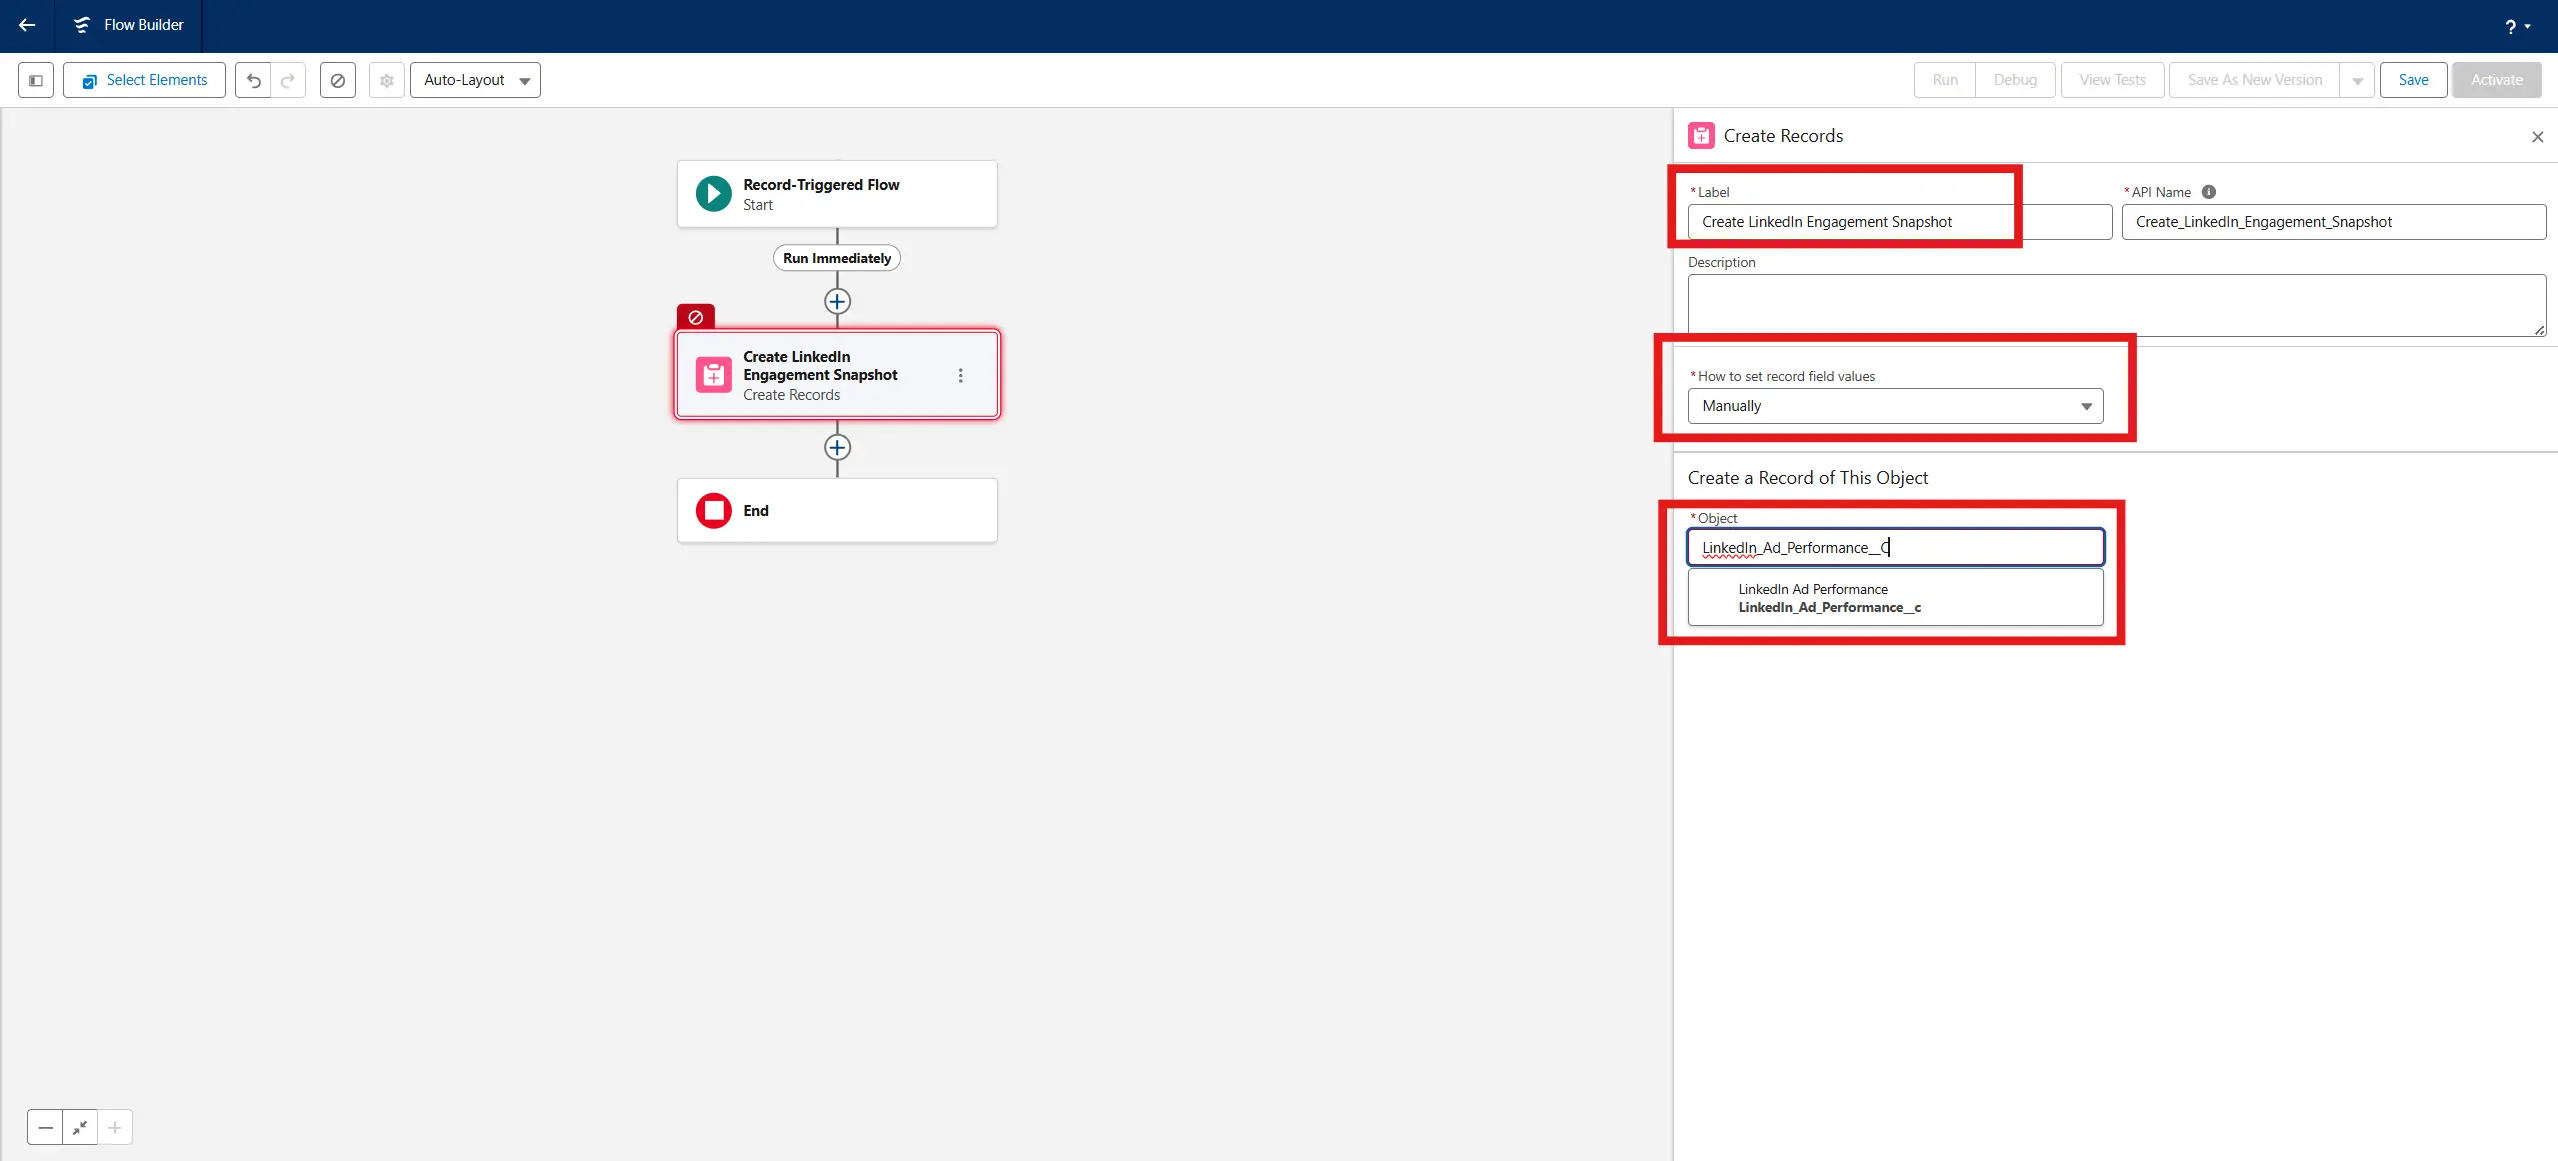
- Choose Create Records
- Label it: Create LinkedIn Engagement Snapshot
- Set it to Create One Record
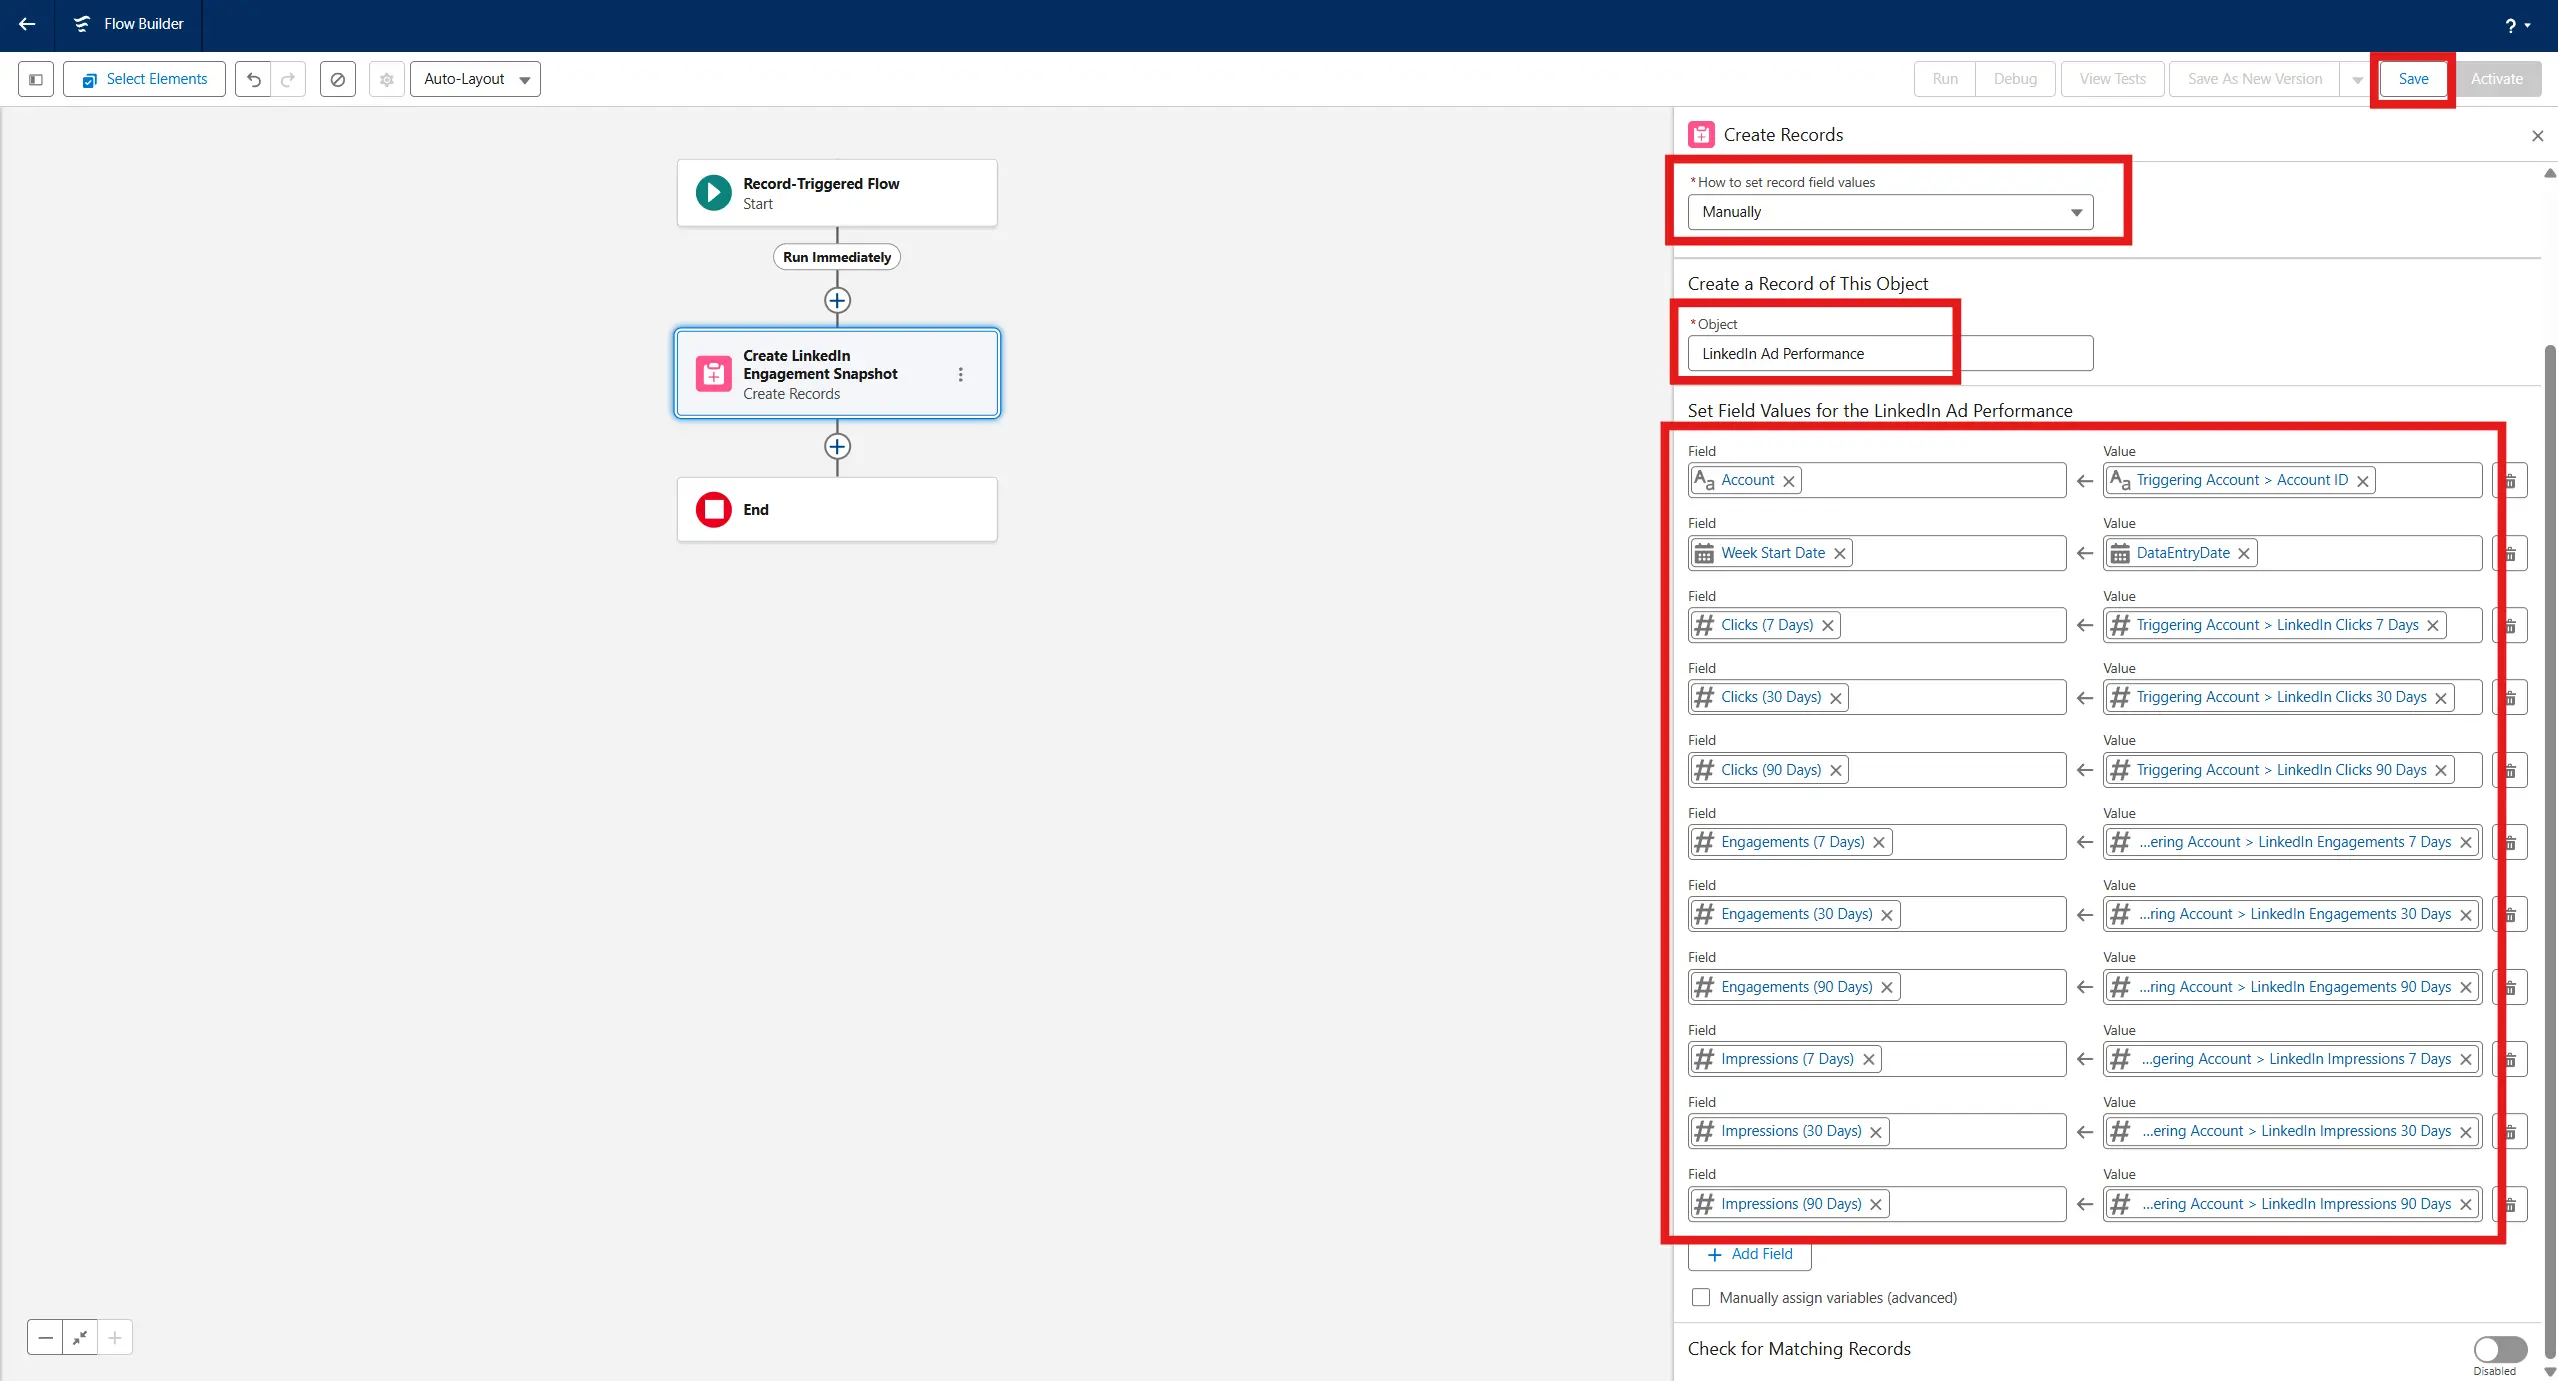
- Set it to Manually set record field values
- Choose the object: LinkedIn_Ad_Engagement__c
- Set Field Values (This is what you populate):
| Field in Custom Object | Value (from Account) |
|---|---|
Account__c | Account.Id |
Week_Start_Date__c | TODAY() (you can use a Flow Formula. More info on this in Step 4 below) |
Impressions_7_Days__c | Account.fibbler_linkedin_impressions_7_days__c |
Clicks_7_Days__c | Account.fibbler_linkedin_clicks_7_days__c |
Engagements_7_Days__c | Account.fibbler_linkedin_engagements_7_days__c |
Impressions_30_Days__c | Account.fibbler_linkedin_impressions_30_days__c |
Clicks_30_Days__c | Account.fibbler_linkedin_clicks_30_days__c |
Engagements_30_Days__c | Account.fibbler_linkedin_engagements_30_days__c |
Impressions_90_Days__c | Account.fibbler_linkedin_impressions_90_days__c |
Clicks_90_Days__c | Account.fibbler_linkedin_clicks_90_days__c |
Engagements_90_Days__c | Account.fibbler_linkedin_engagements_90_days__c |
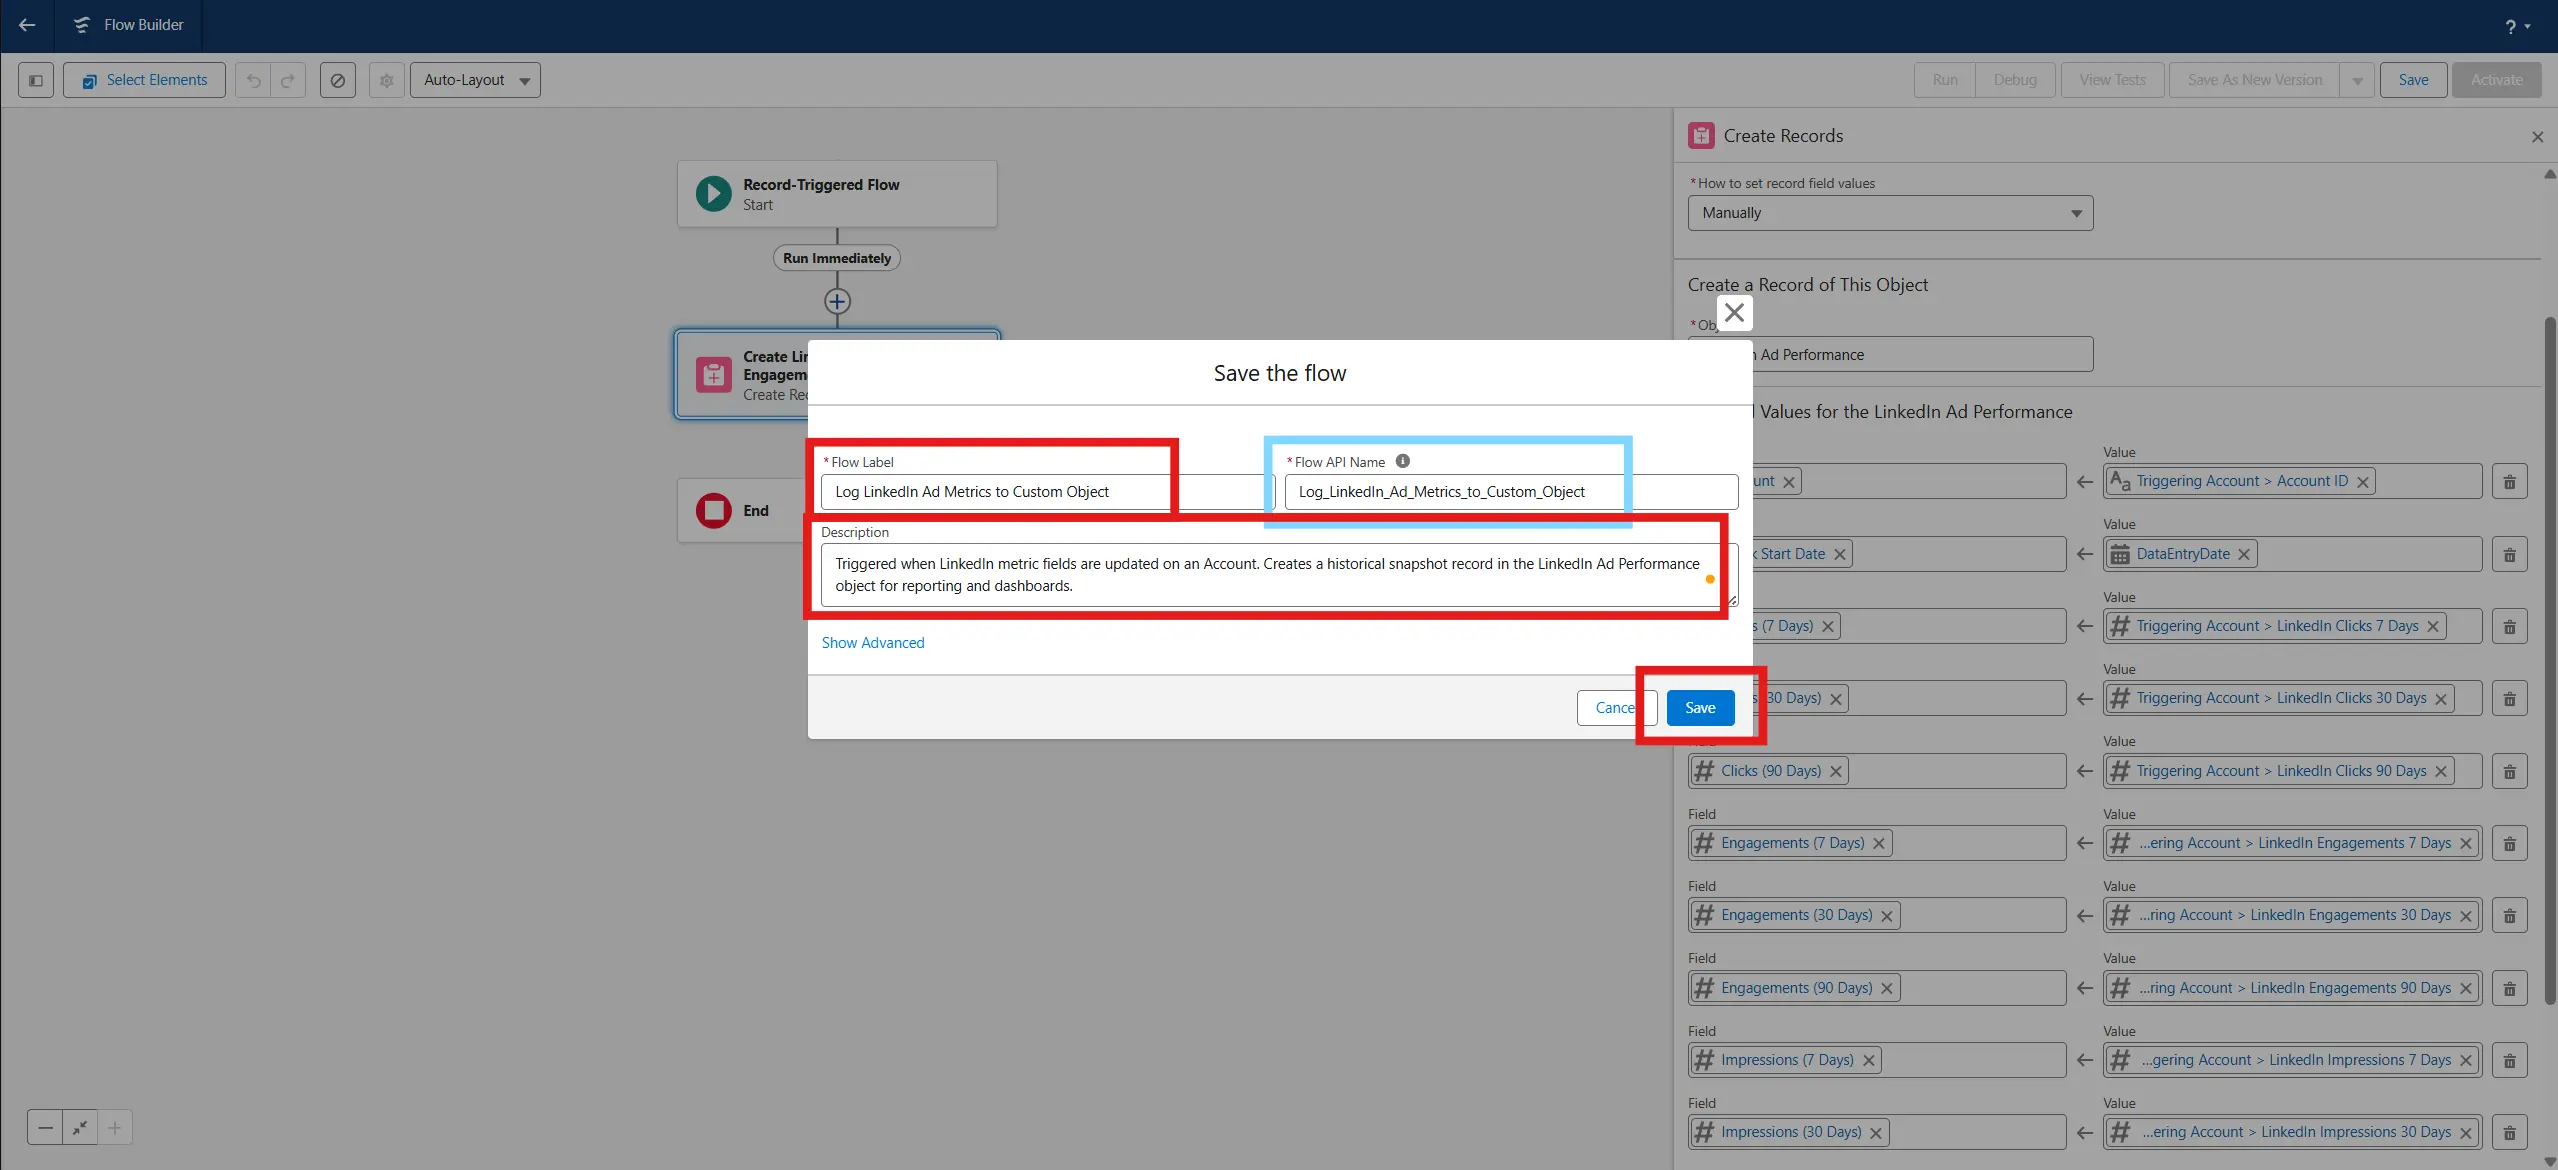
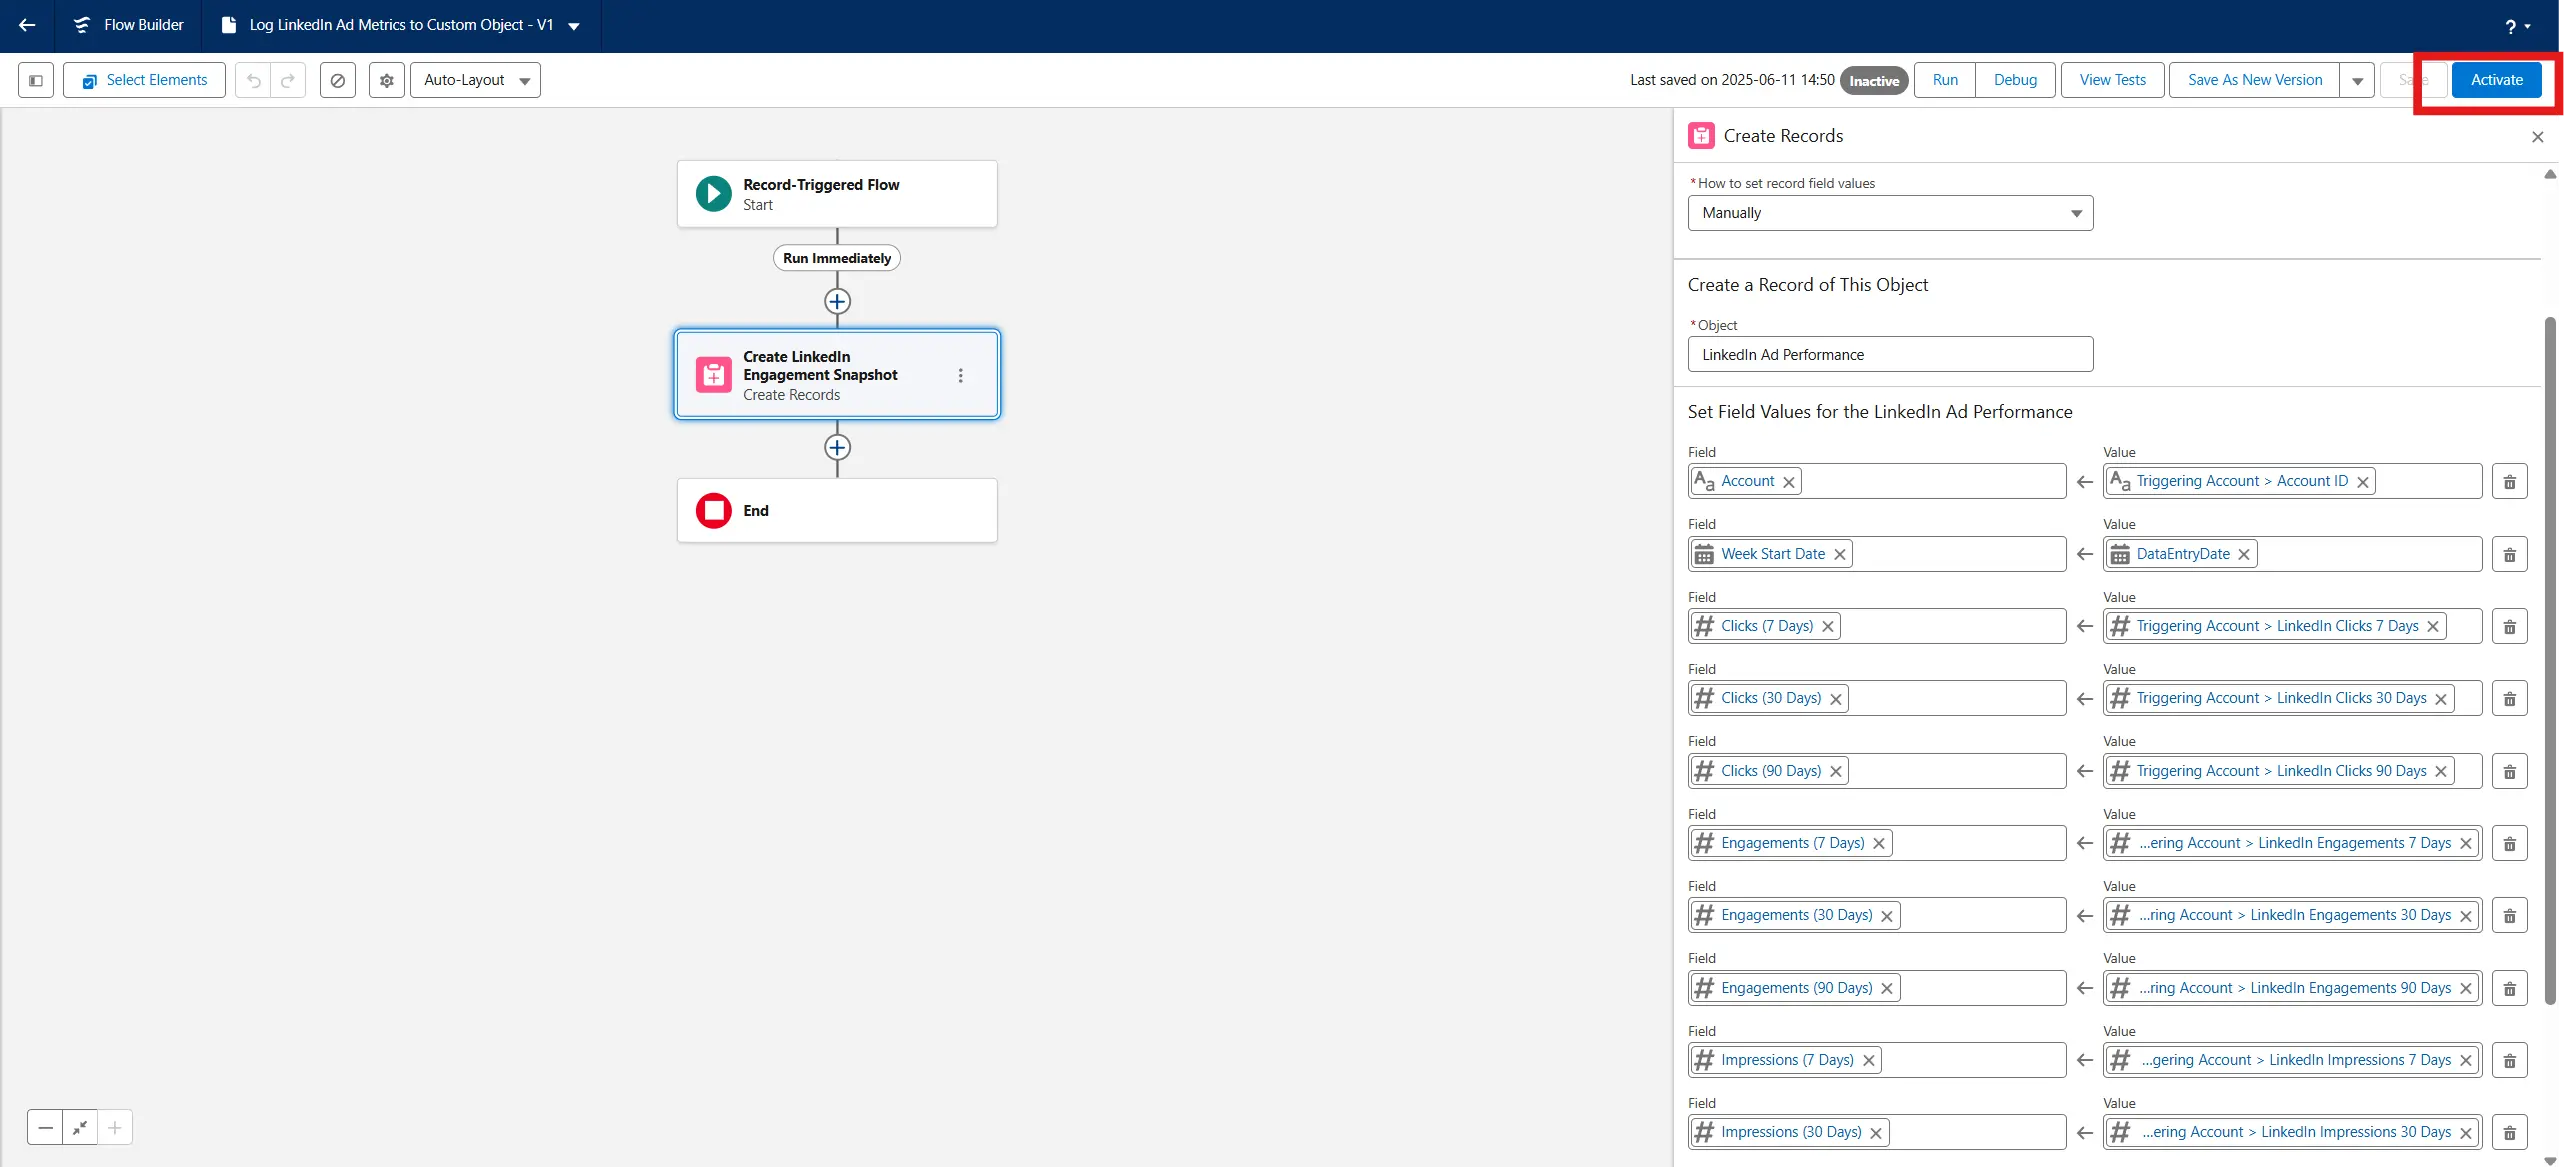
Save and Activate the Flow
- Click Save
- You'll be asked to save the flow. Enter the following:
- Flow Label: Log LinkedIn Ad Metrics to Custom Object
- Flow API Name: Log_LinkedIn_Ad_Metrics_to_Custom_Object (auto-fills based on label)
- Description: Triggered when LinkedIn metric fields are updated on an Account. Creates a historical snapshot record in the LinkedIn Ad Performance object for reporting and dashboards.
- Click Save
- Click Activate in the top right corner to activate the flow
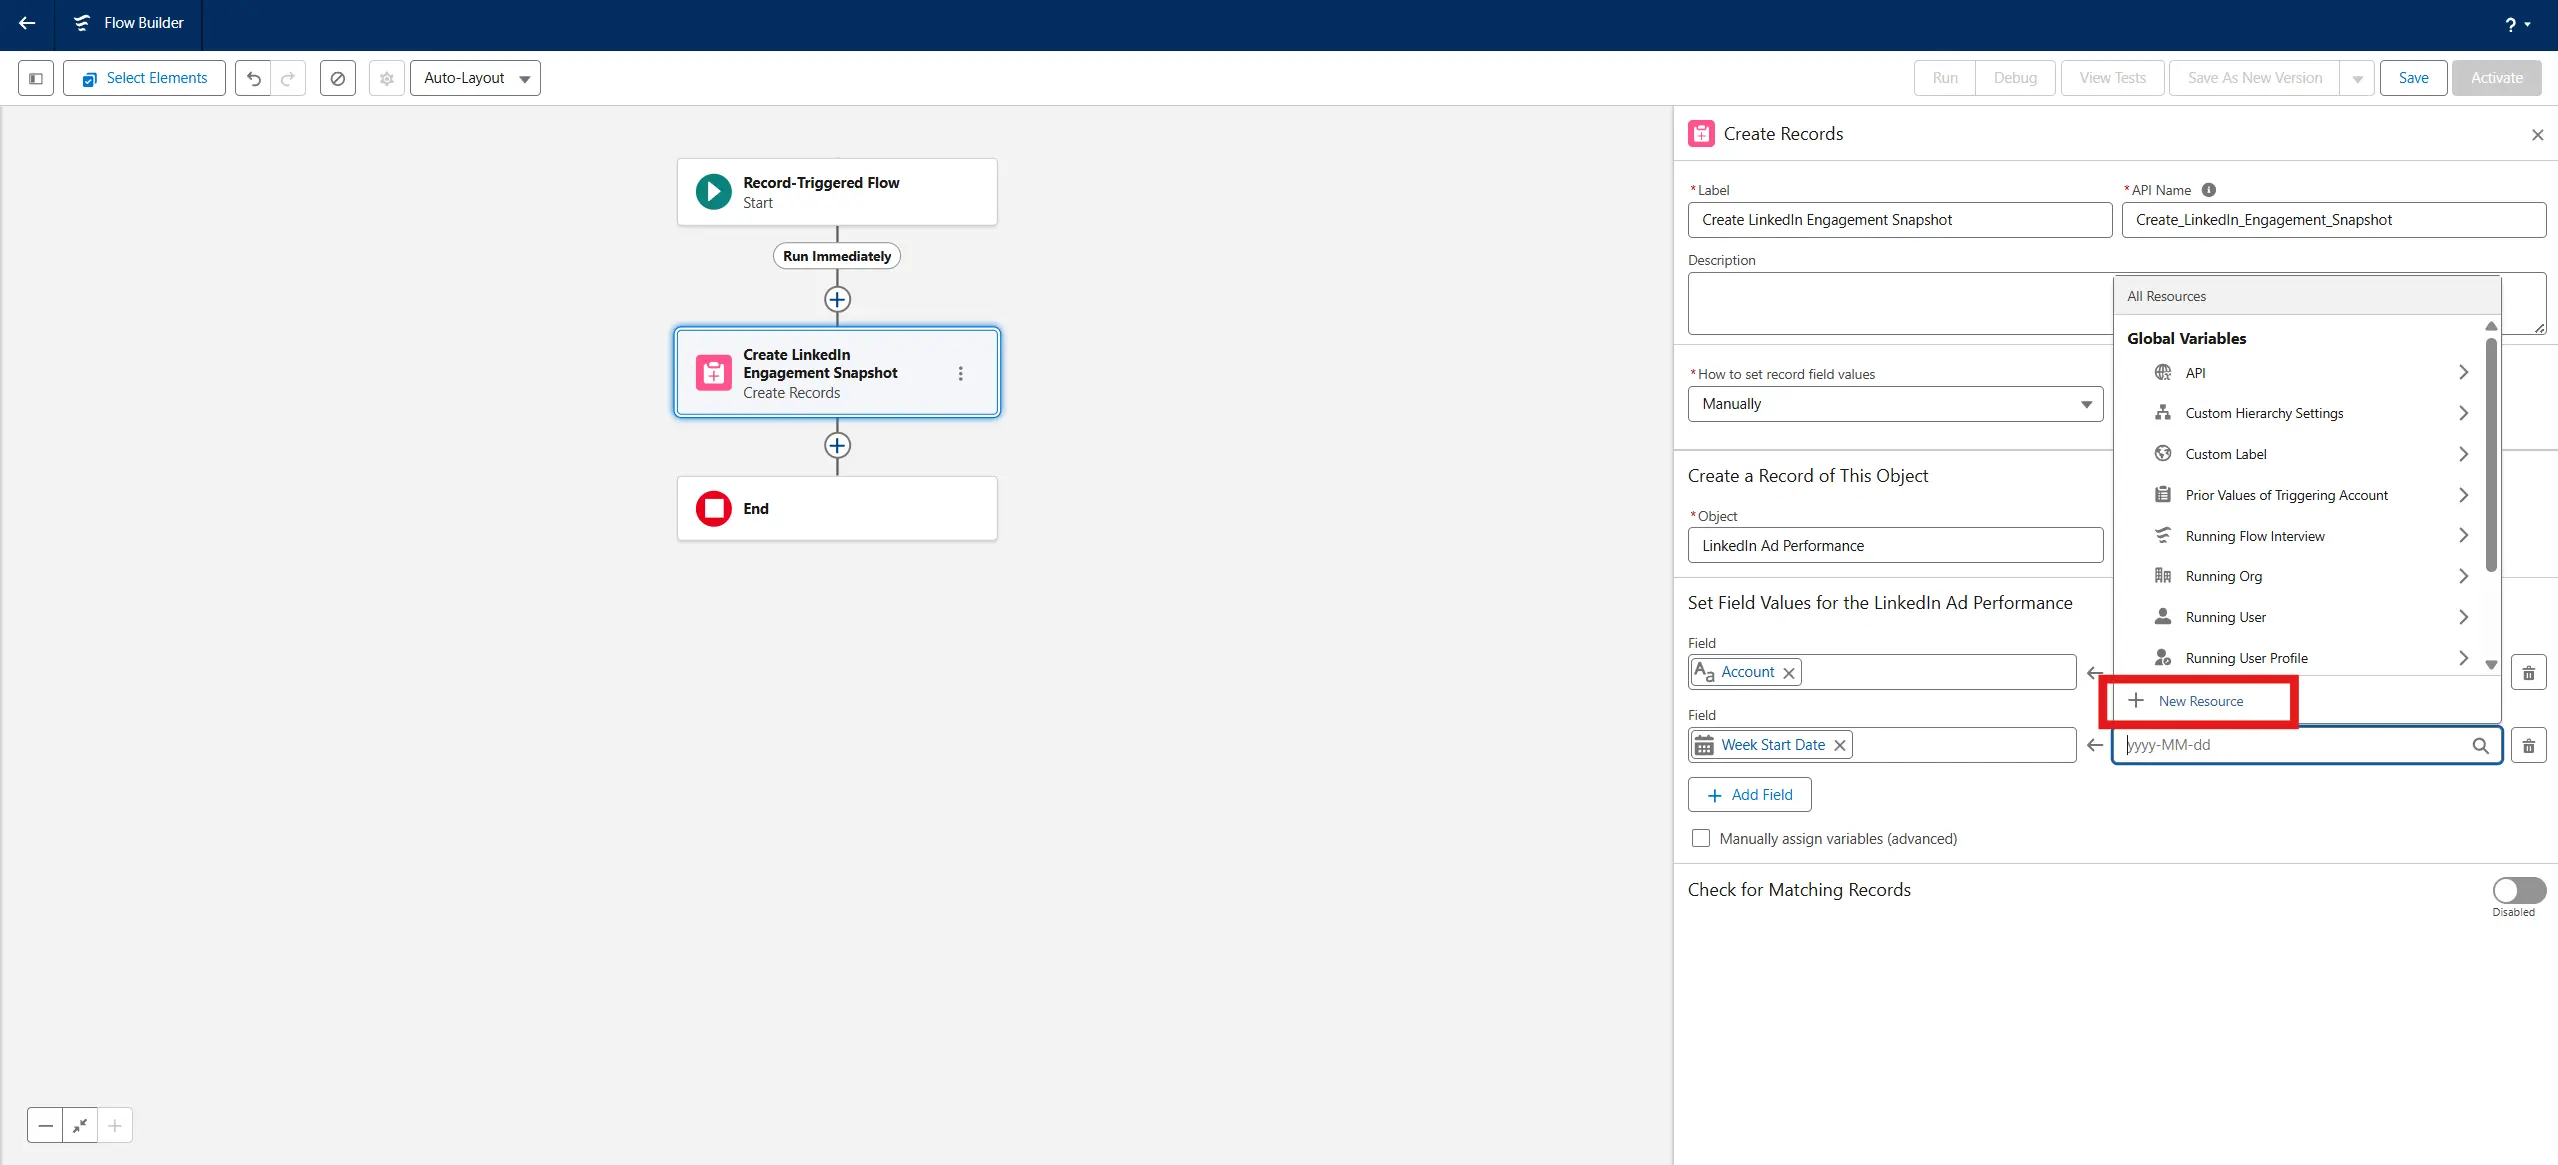
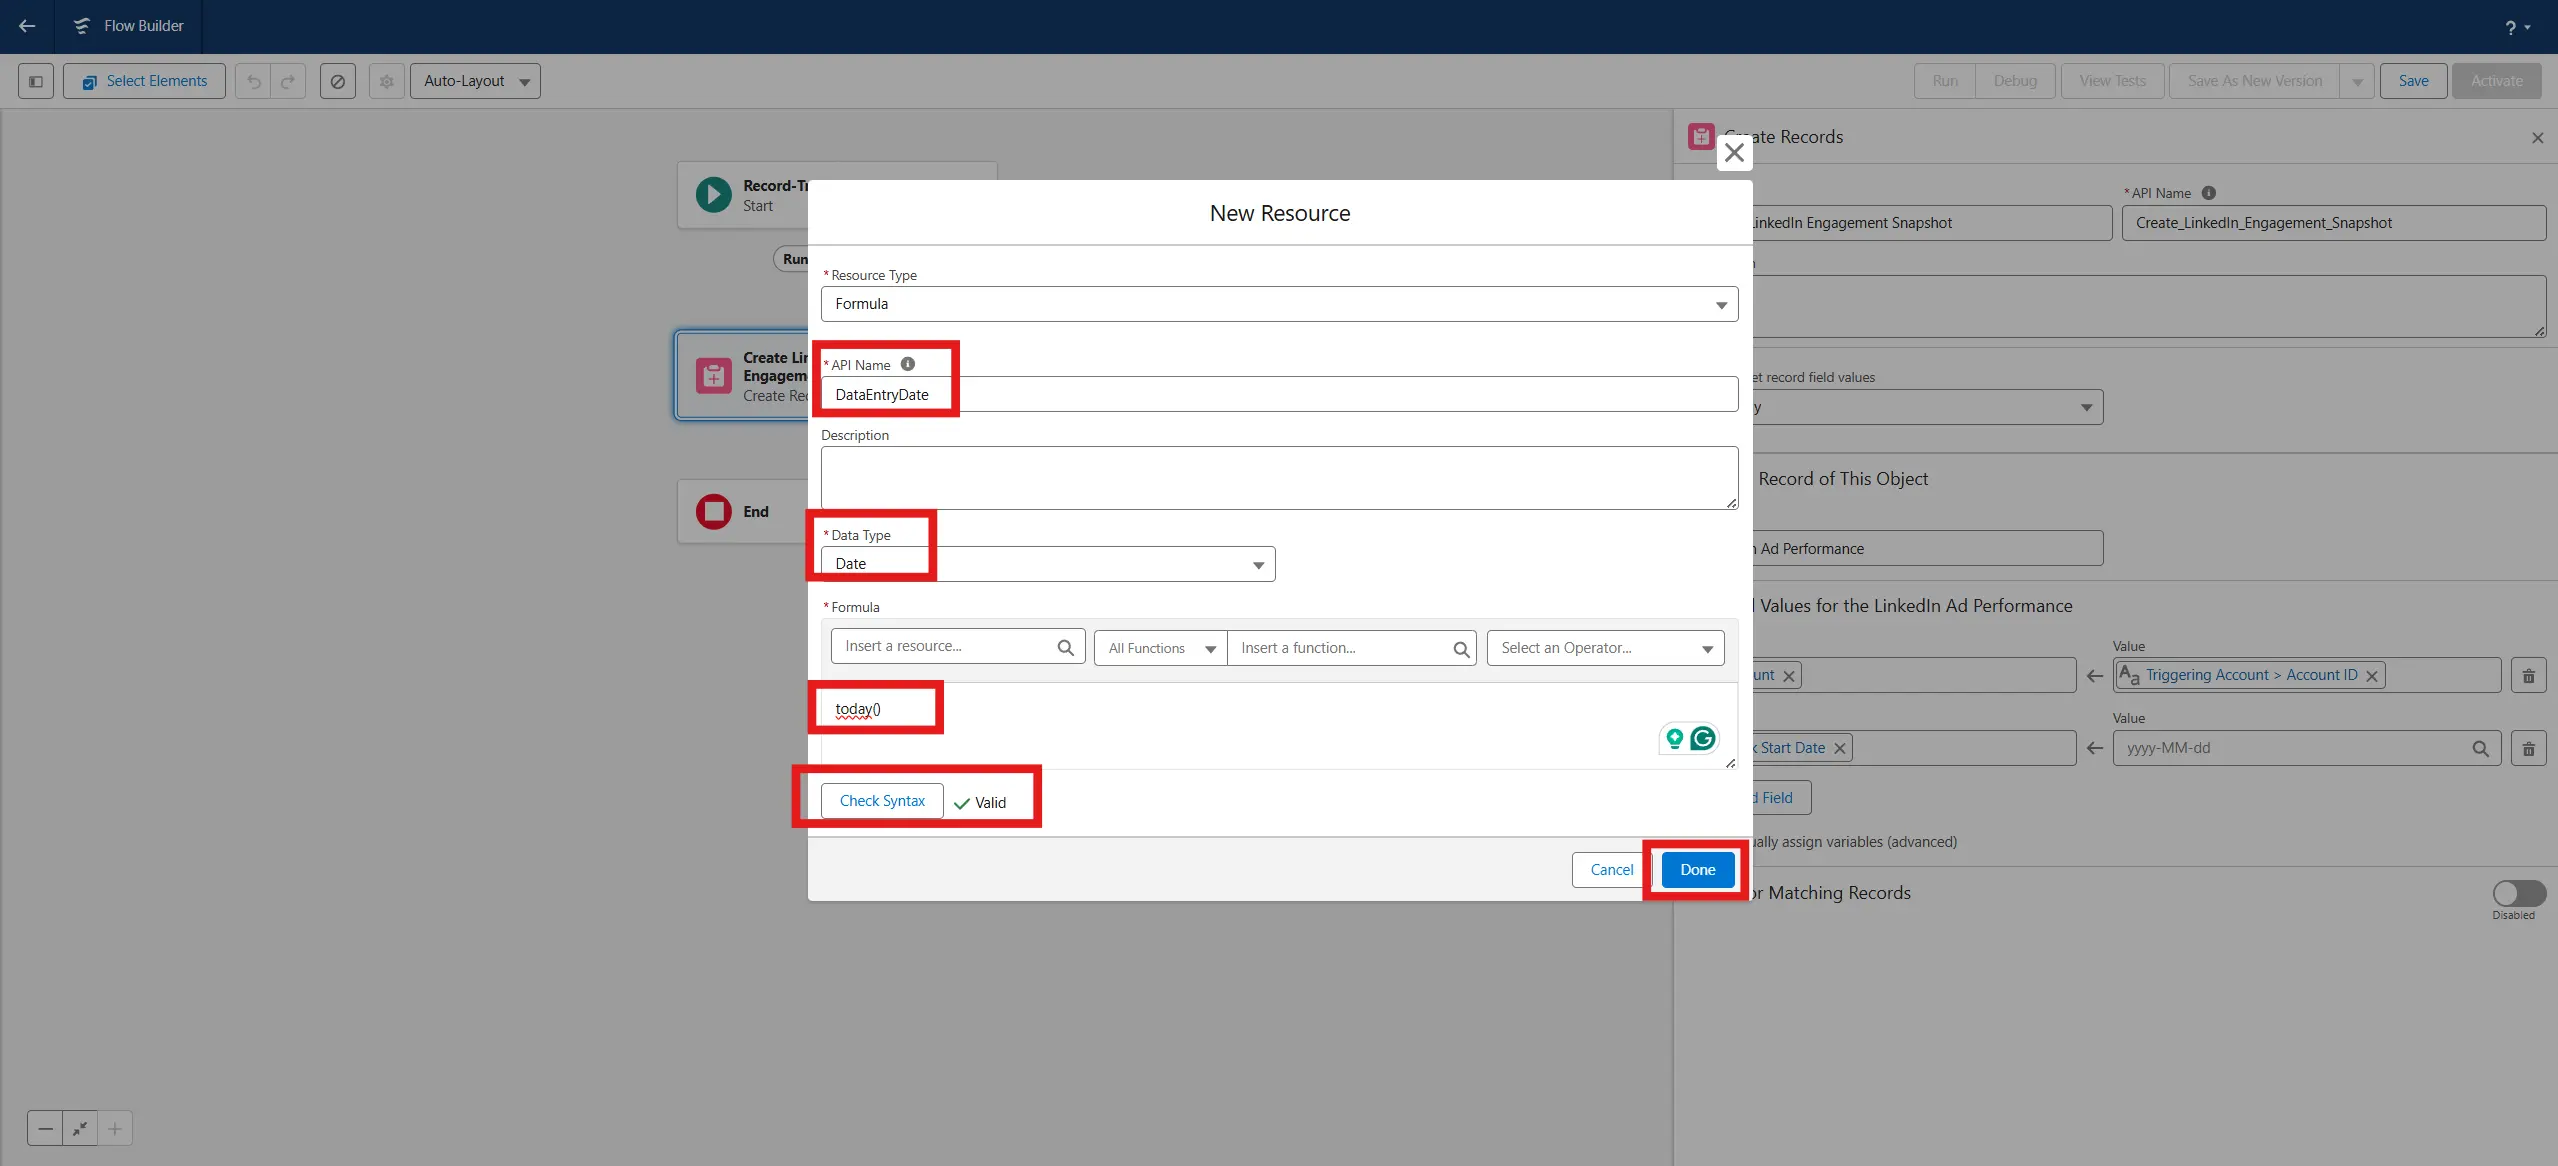
How to create a New Resource with a Custom Formula (e.g. Today())
- Click New Resource
- Set Resource Type to Formula
- Enter the following details:
- API Name: DataEntryDate
- Data Type: Date
- Formula:
today() - Check Syntax to ensure formula is correct.
- Click Done

PART D – Ensuring Historical Records Are Not Overwritten
To make sure you store one unique LinkedIn Ad Performance record per Account, per Week, per Duration (7/30/90 days). These records should never accidentally overwrite previous records. To avoid this you'll now create a composite key.
This is important for making your reports effective at showing trends over time.
We'll do this by creating a formula field that combines three things:
- The Account ID
- The Week Start Date
- The Duration (7, 30, or 90 days)
Then we'll make this field unique and searchable, so Salesforce knows when to update an existing record and when to create a new one.
IF THIS IS NOT SET UP, YOUR REPORT WILL SHOW FLAT LINES OF THE MOST RECENT VALUE ACROSS ALL DATA ENTRIES.
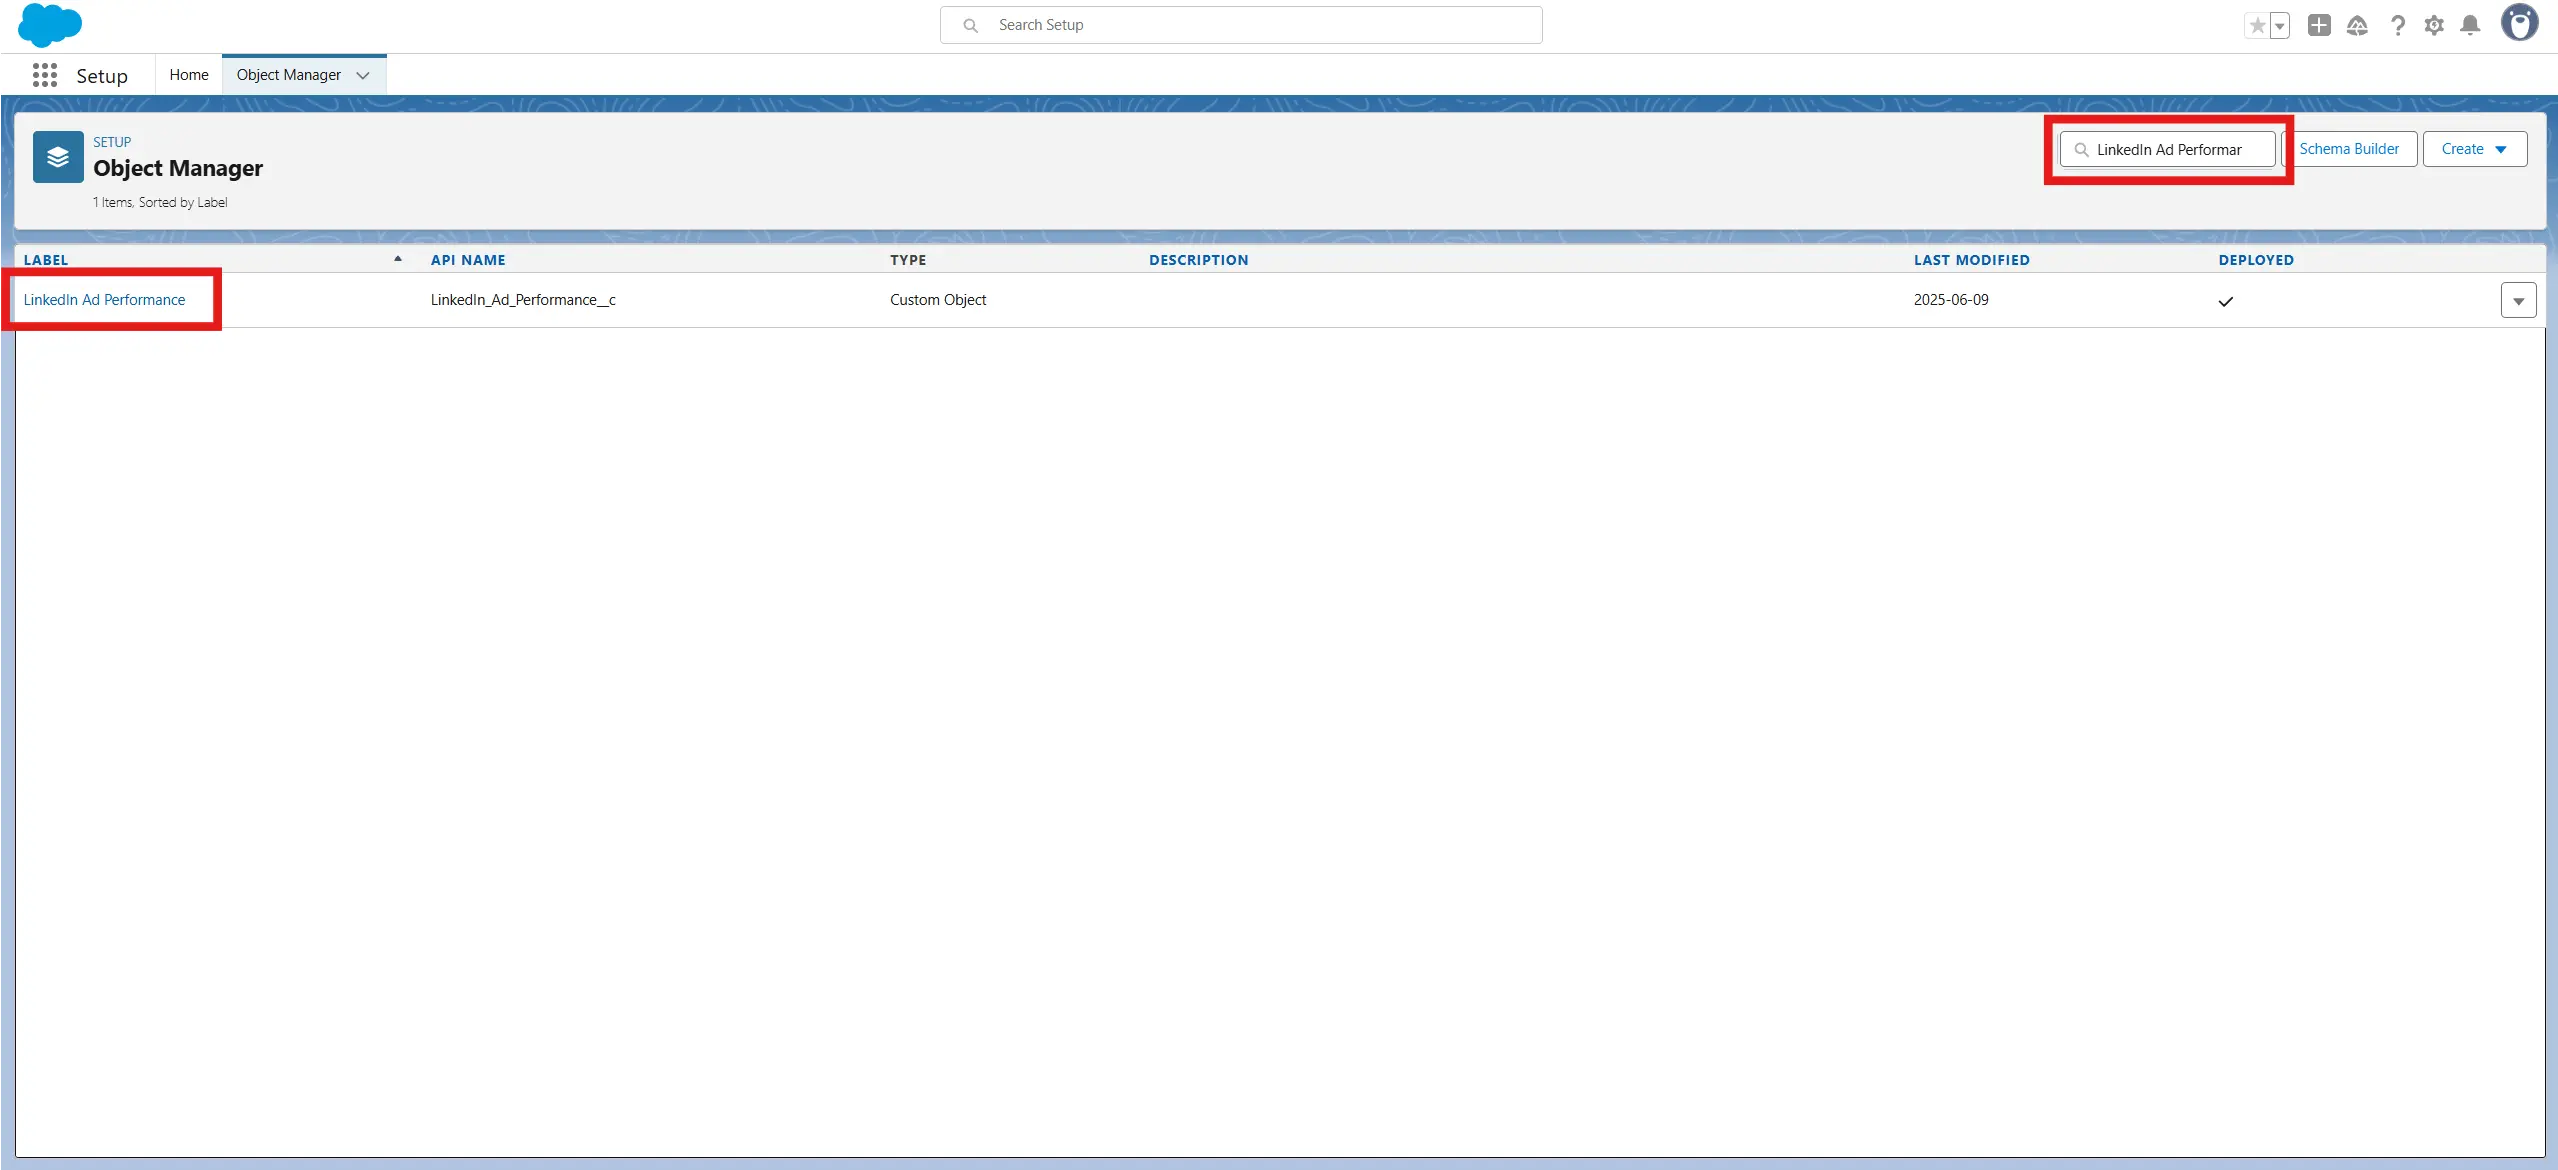
- Go to Setup -> Object Manager
- Search for your custom object (LinkedIn Ad Performance) and click it.
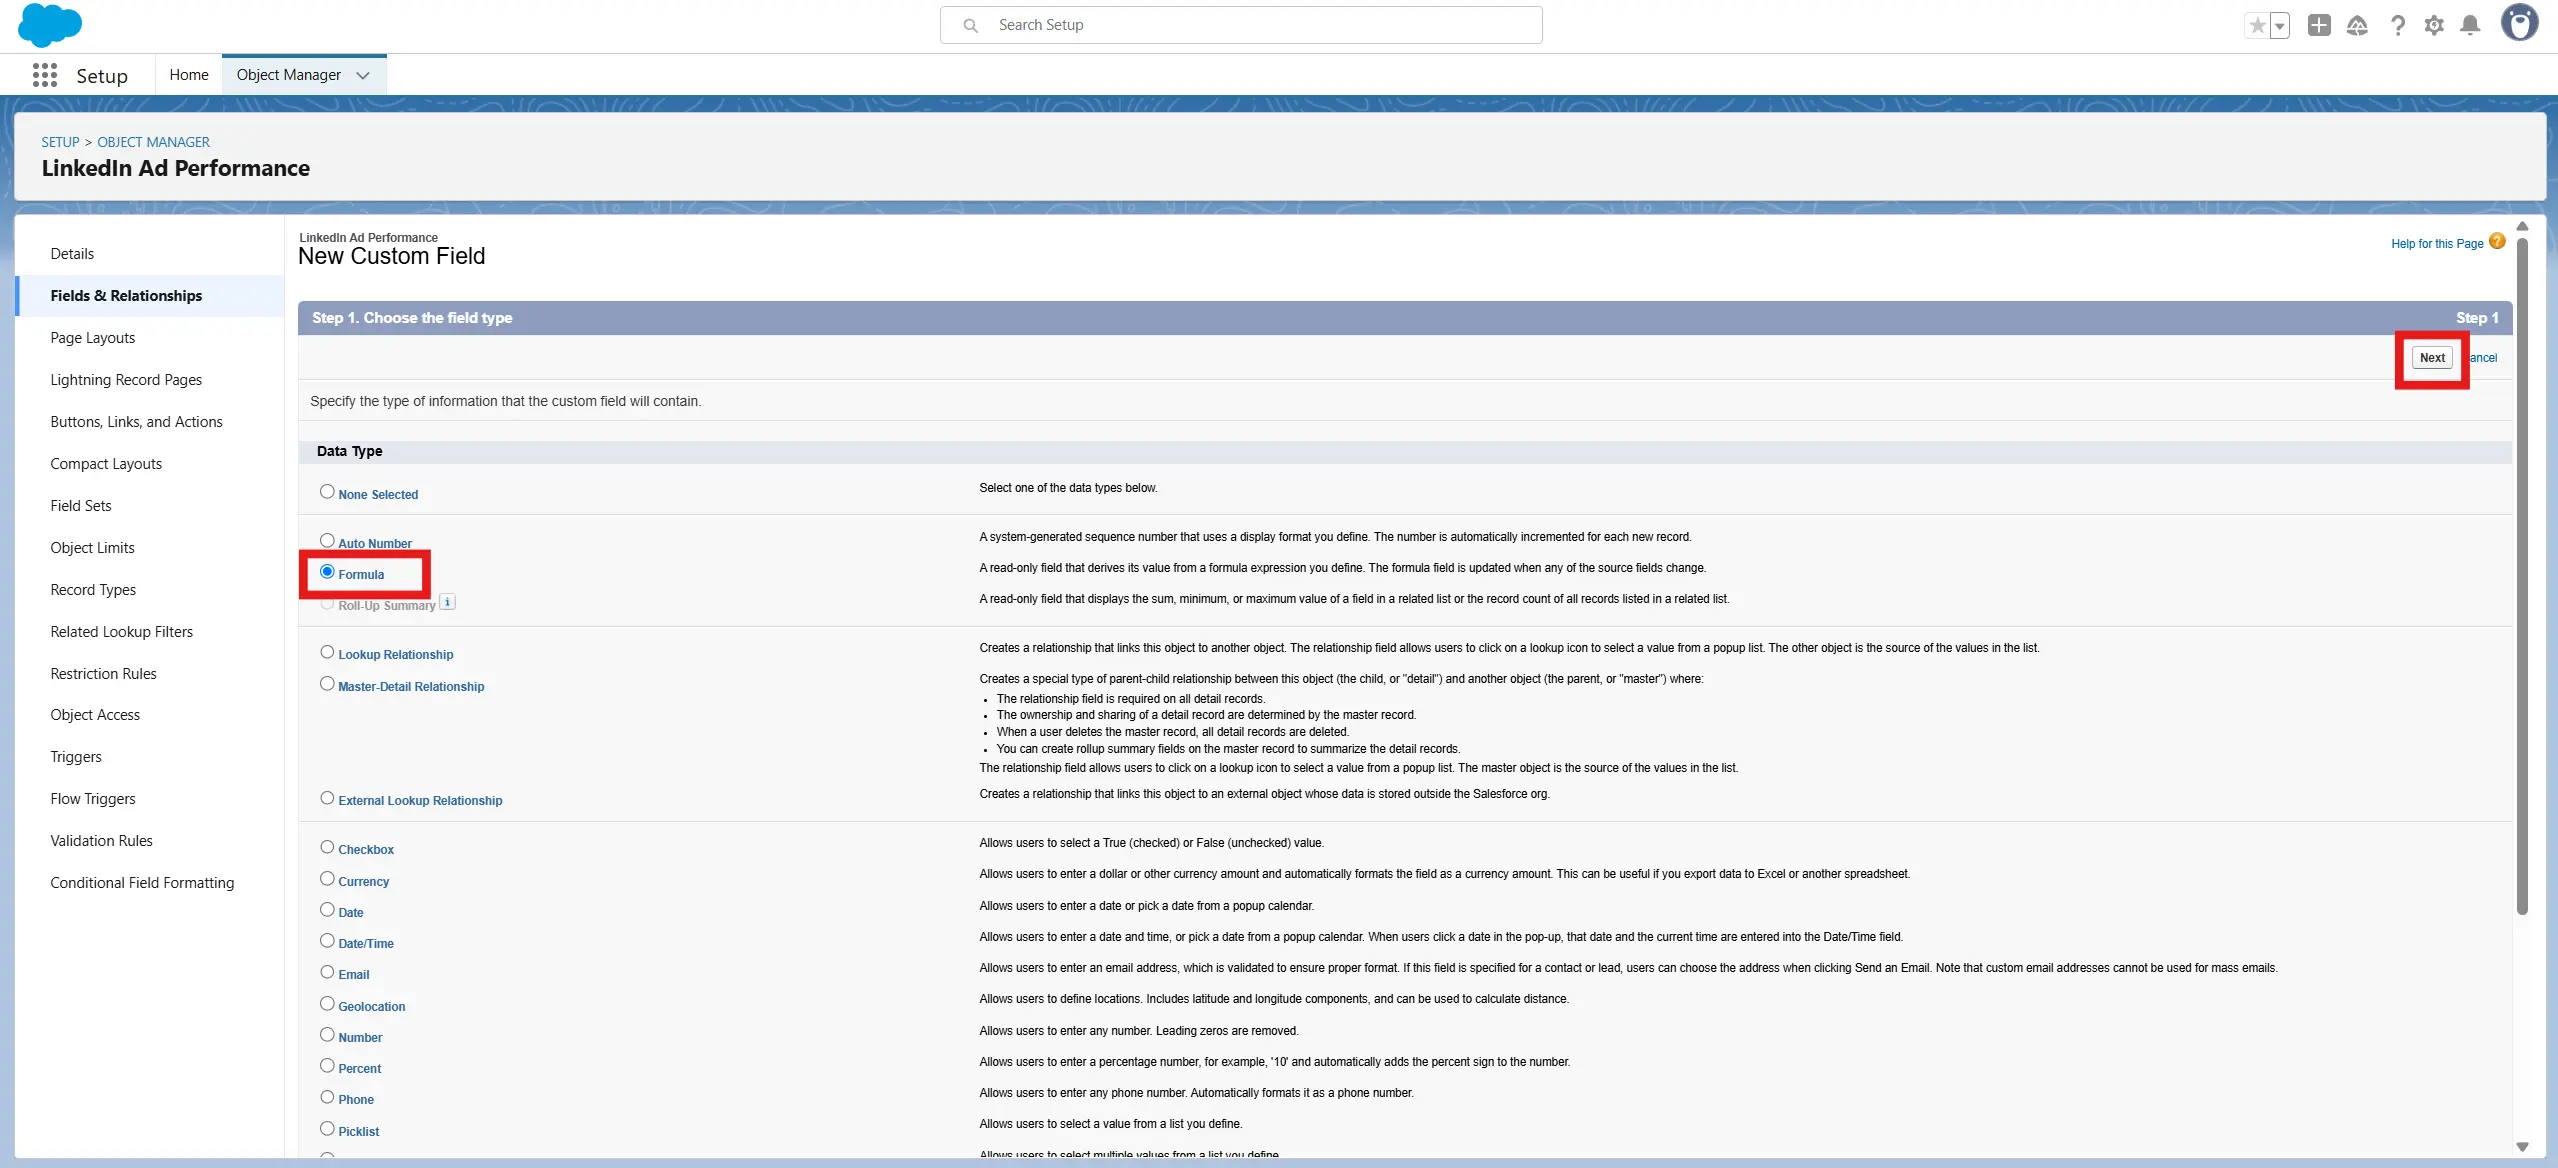
- Go to Fields & Relationships and click New
- Choose Formula and click Next
- Enter the following details:
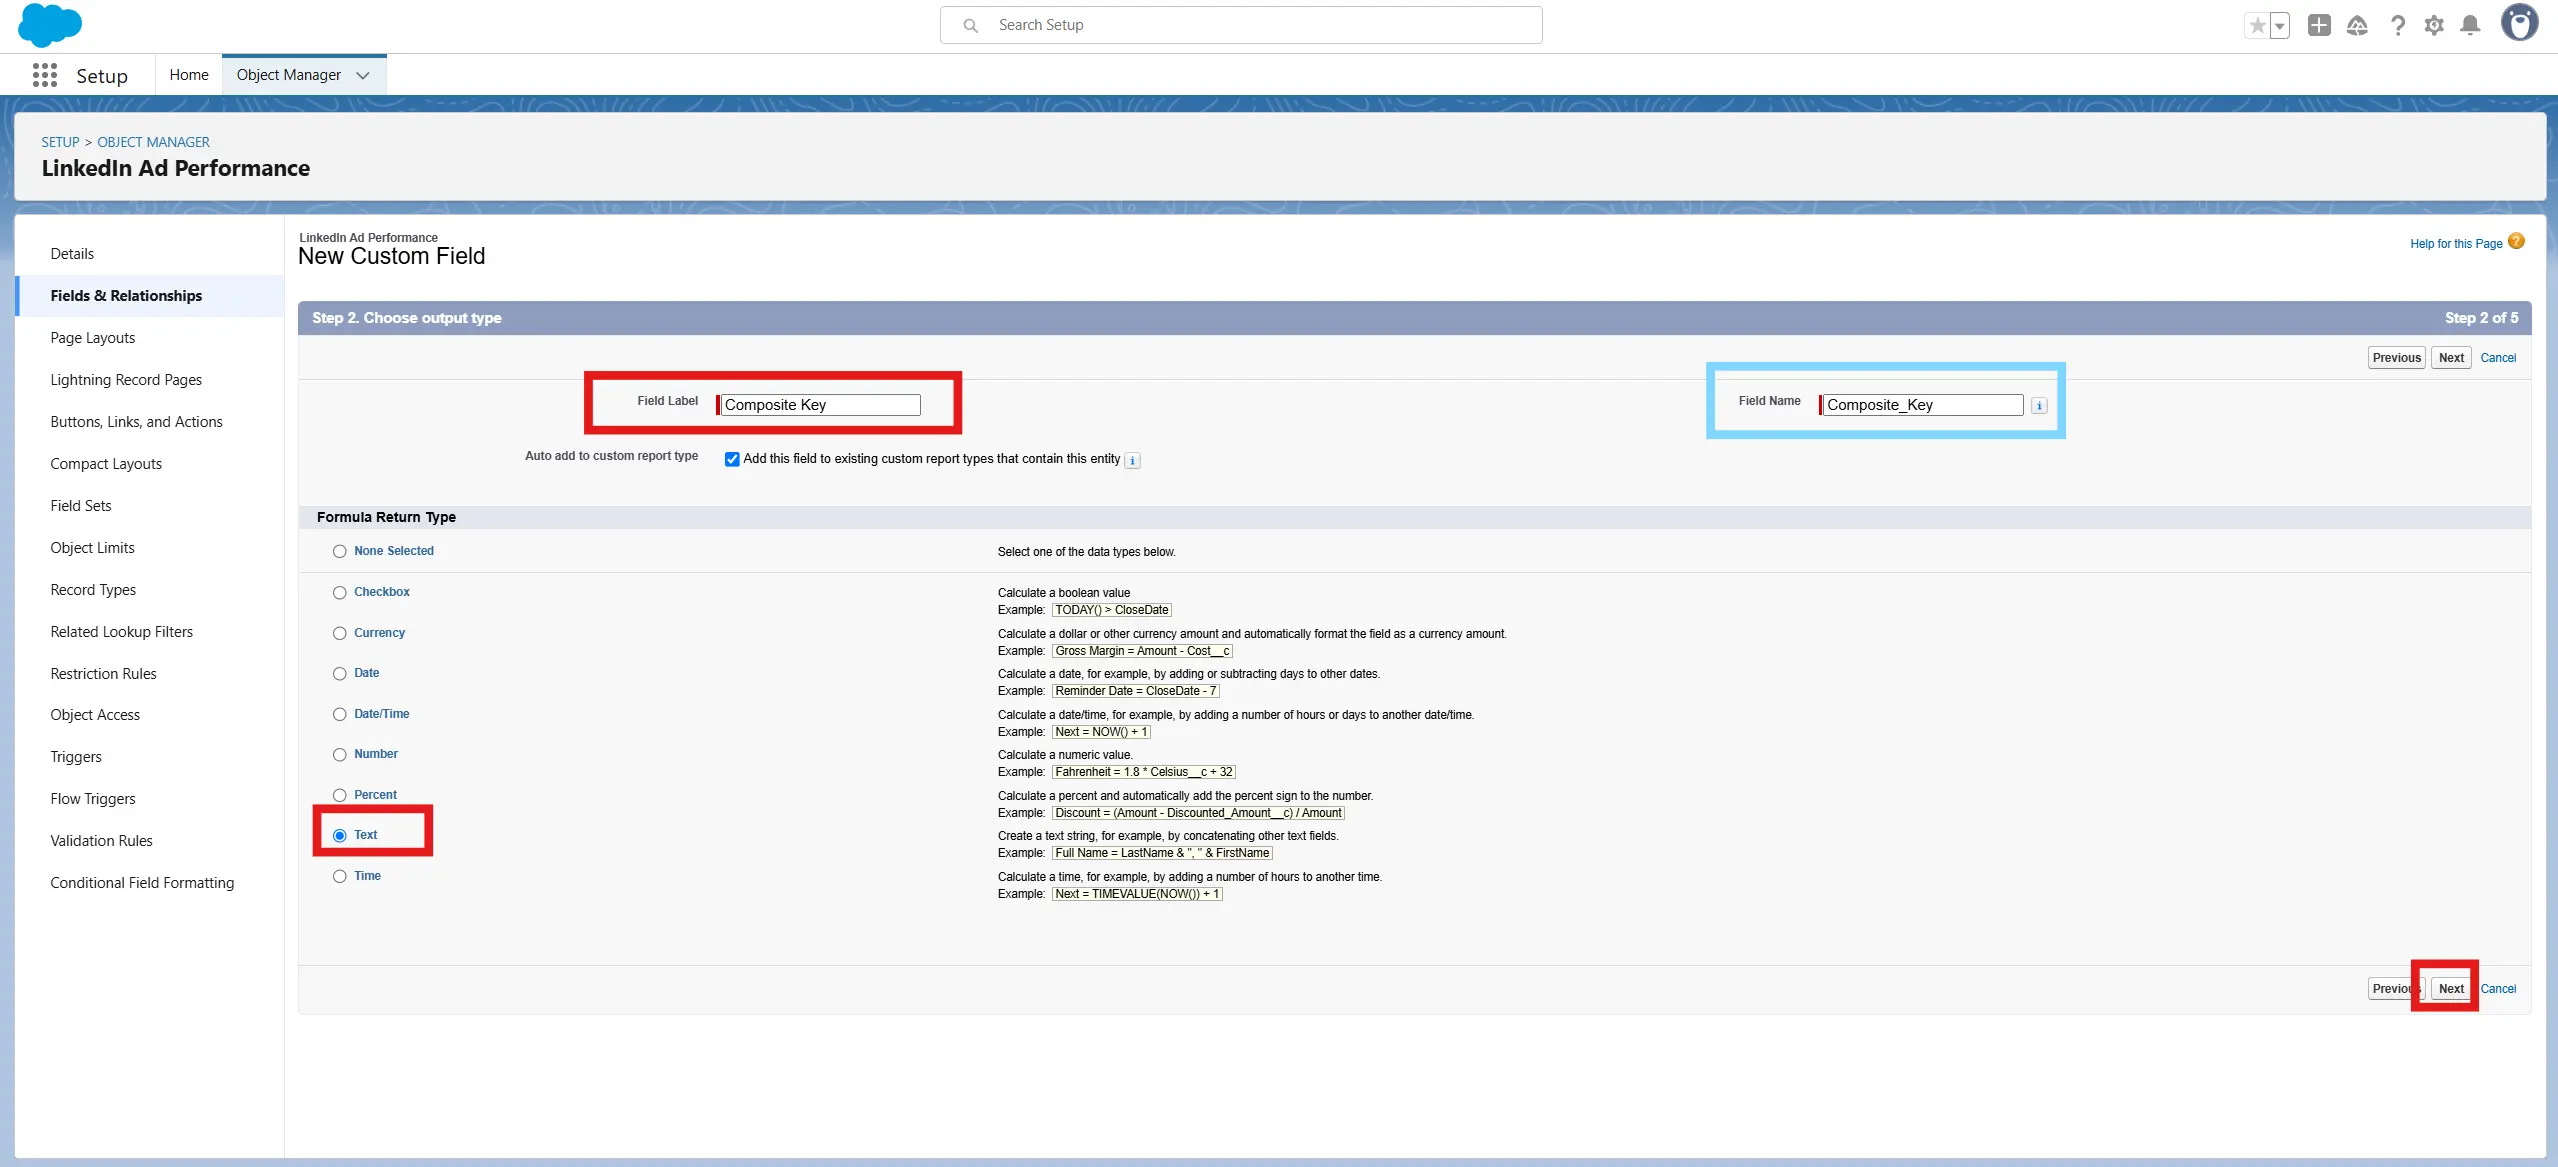
- Field Label: Composite Key
- Field Name: Composite_Key (autofills)
- Formula Return Type: Text
- Click Next
- Enter the following formula:
- Click Check Syntax and ensure you get the green No syntax errors in merge fields or functions
- Click Next
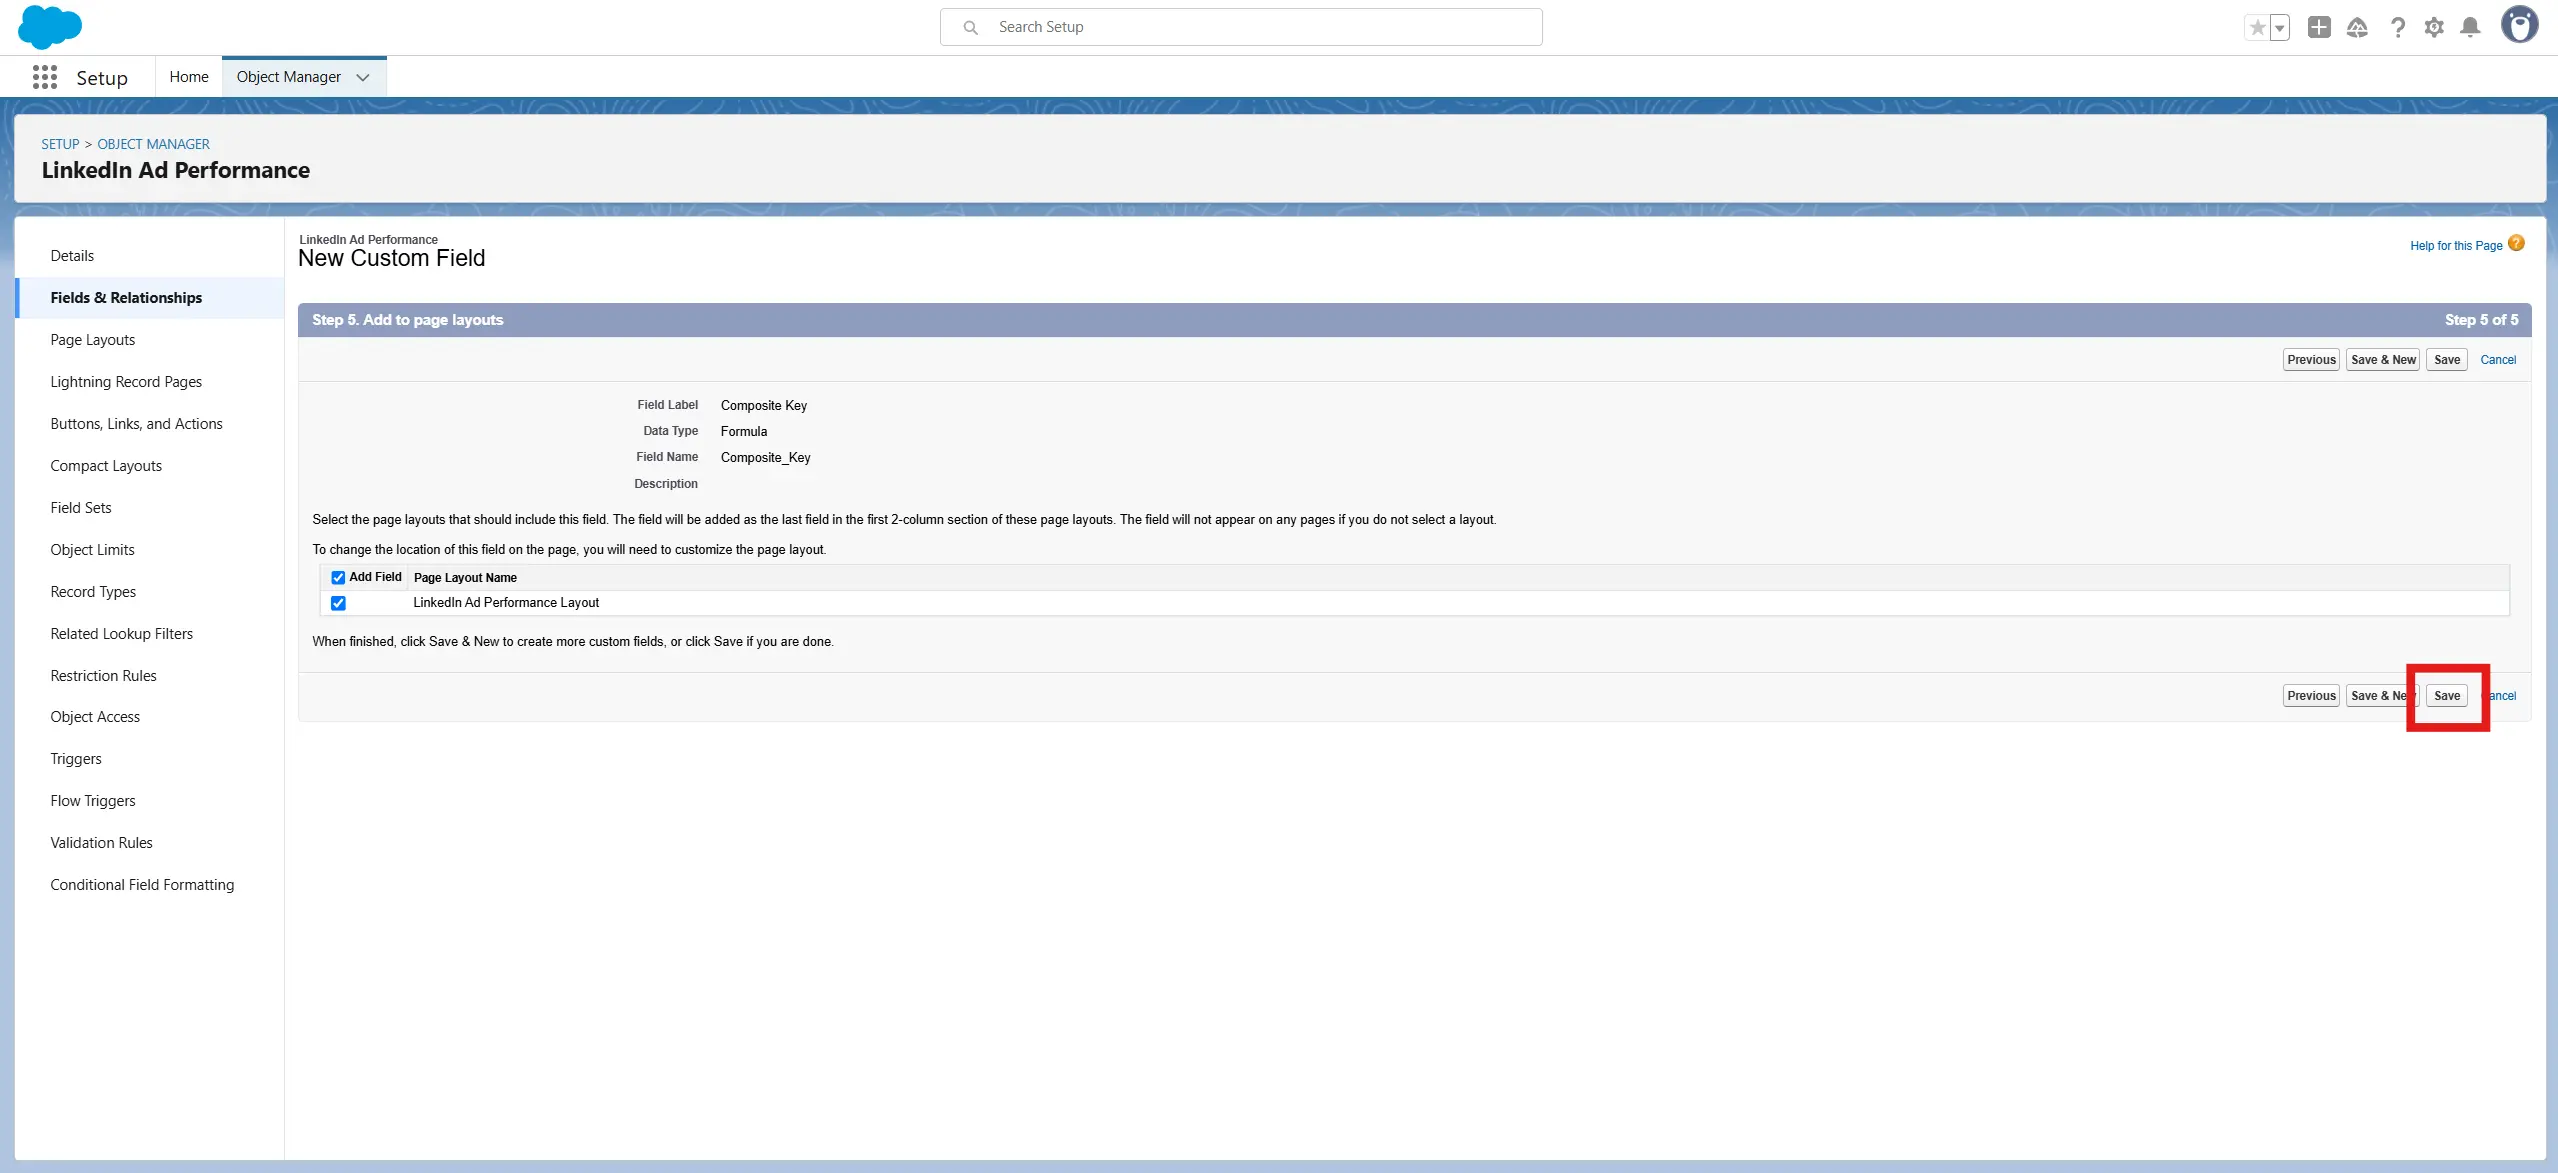
- Set the proper field level security and press Next. Add field to the proper page layouts. Click Save
Account__r.Id & "|" & TEXT(Week_Start_Date__c)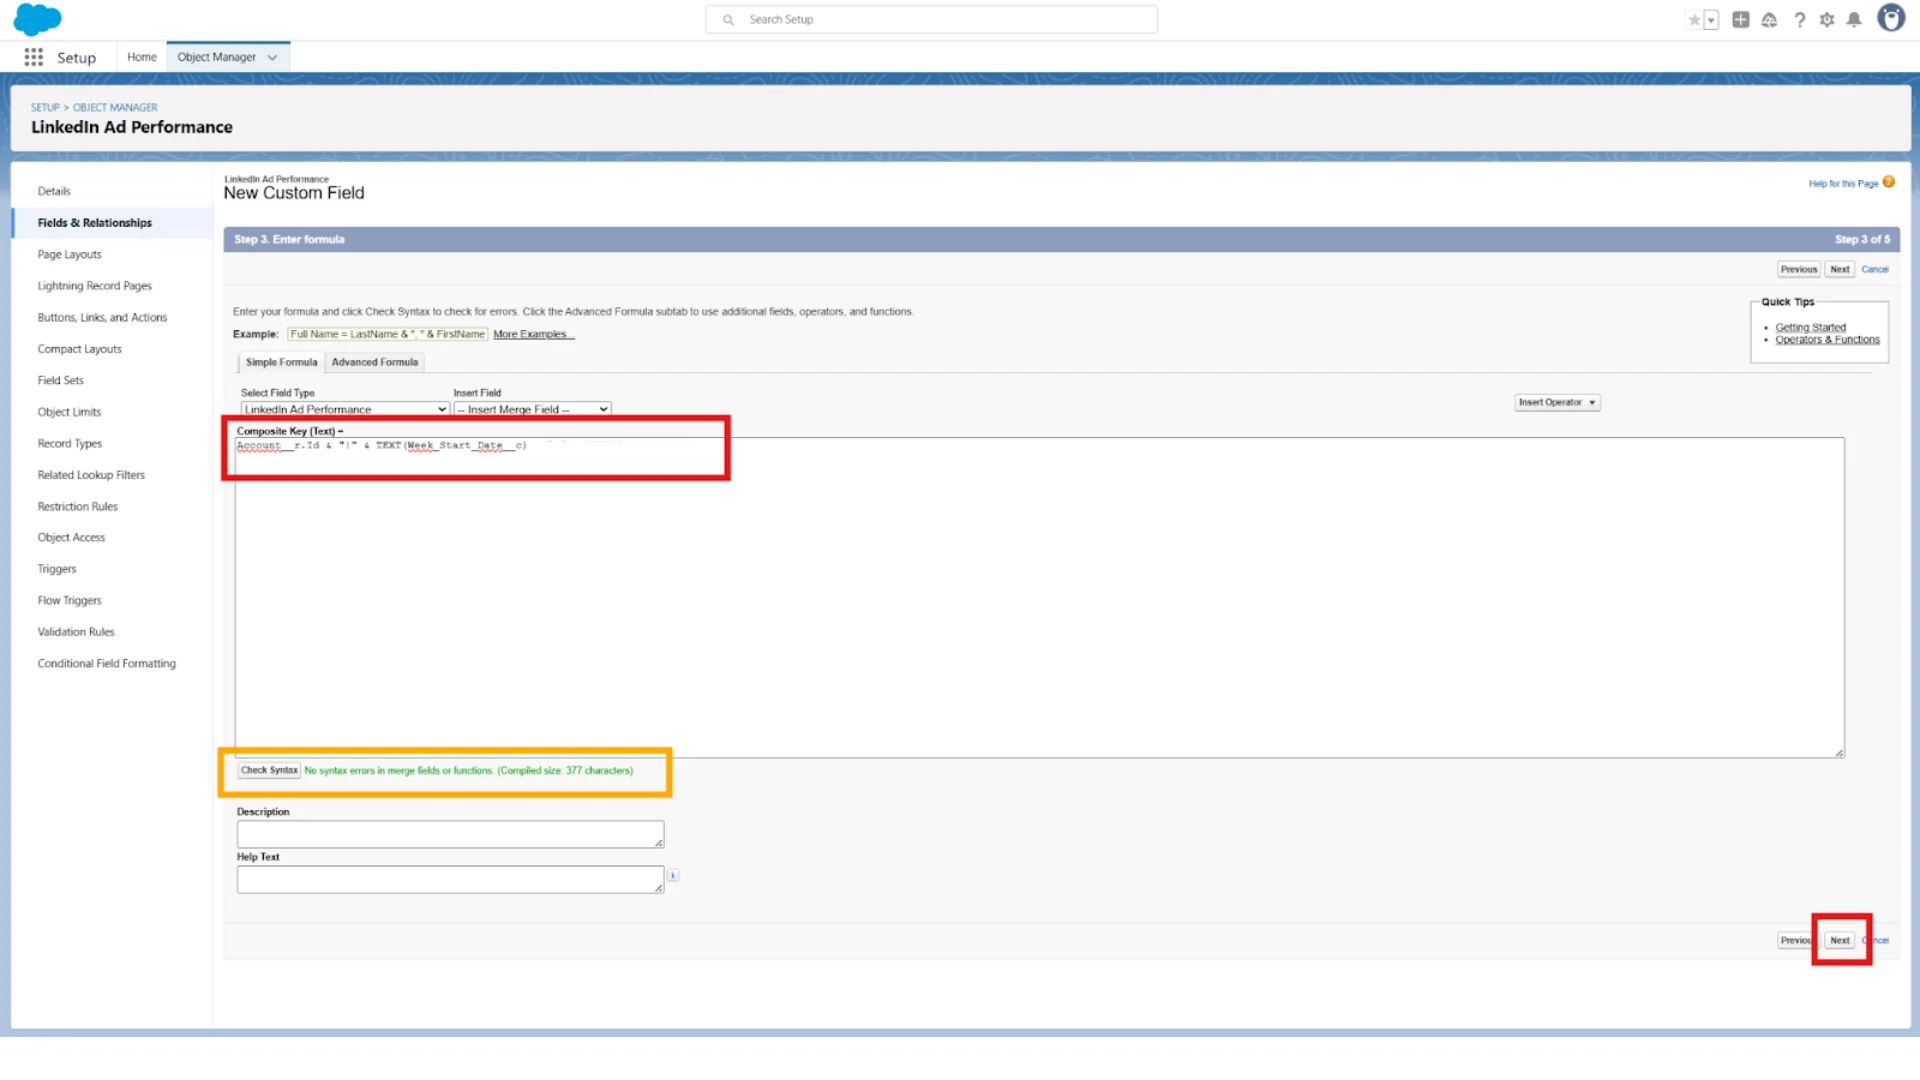
Outcome Step 5
You've created a custom object and built a Flow that logs a snapshot of Fibbler's LinkedIn ad metrics each time the Account record is updated. This gives you a reliable history of ad performance over time, enabling clear trend analysis and dashboards without overwriting past data.
Chapter 6: Creating a Report Type & Chart To Visualize LinkedIn Ad Results over Time
Goal and Importance:
Now that you're logging metric snapshots into a custom object (LinkedIn Ad Performance), you should set up a report type to visualize data over time. This allows you to:
- Join Account records with their related LinkedIn Ad Performance snapshots
- Group and filter by time (e.g., Week Start Date)
- Visualize trends like impressions and clicks over time
Steps:
PART A - Create the Report Type
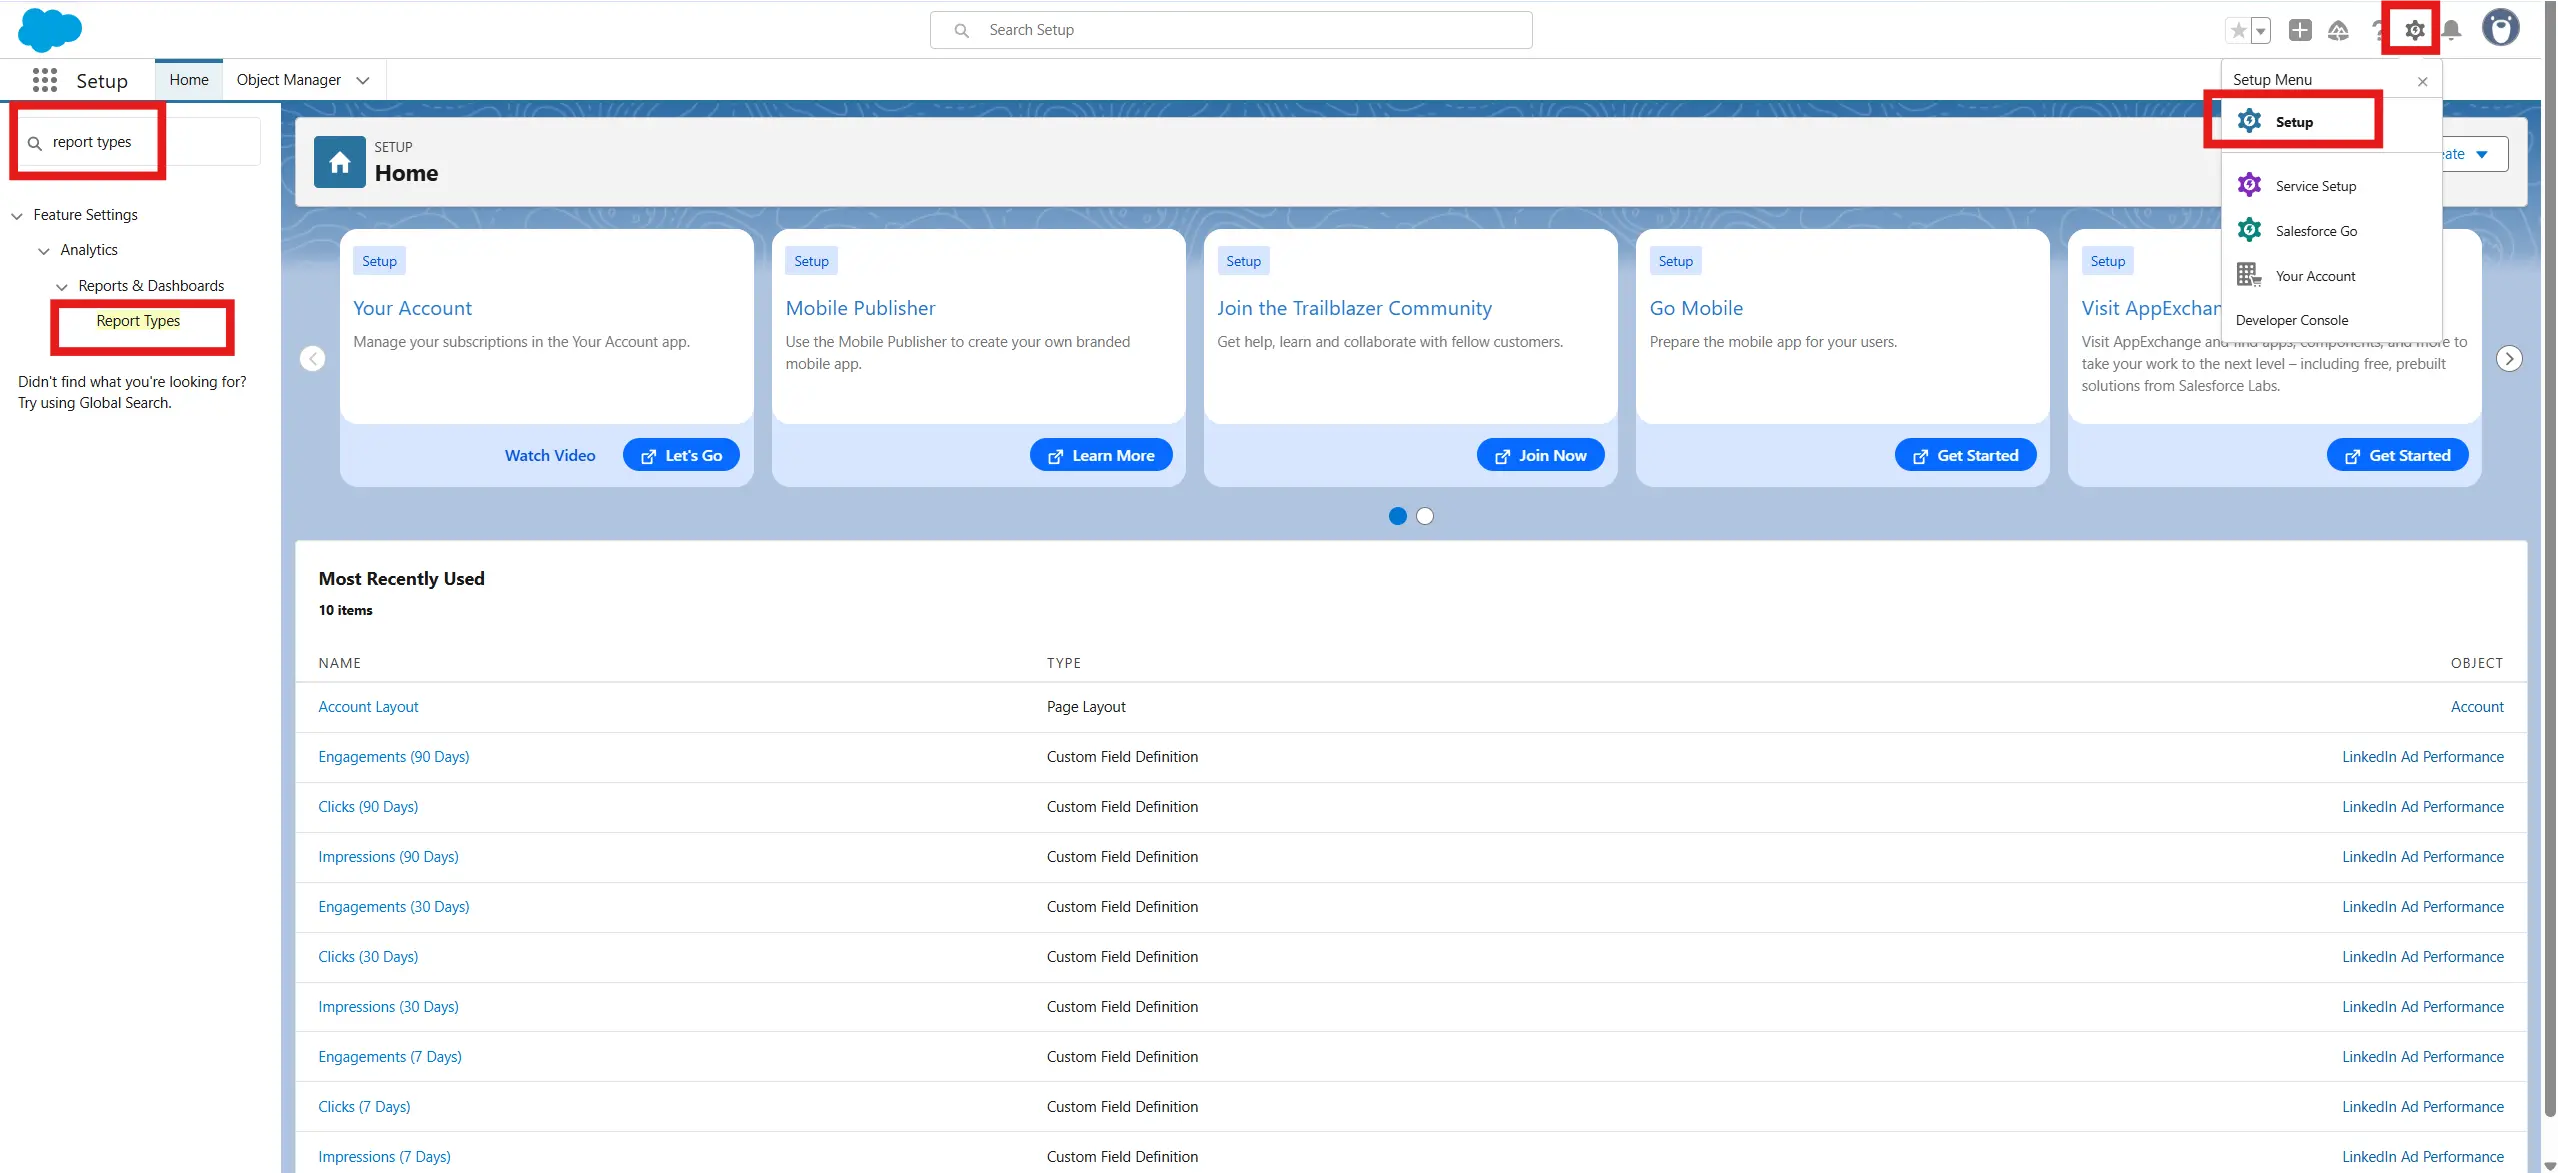
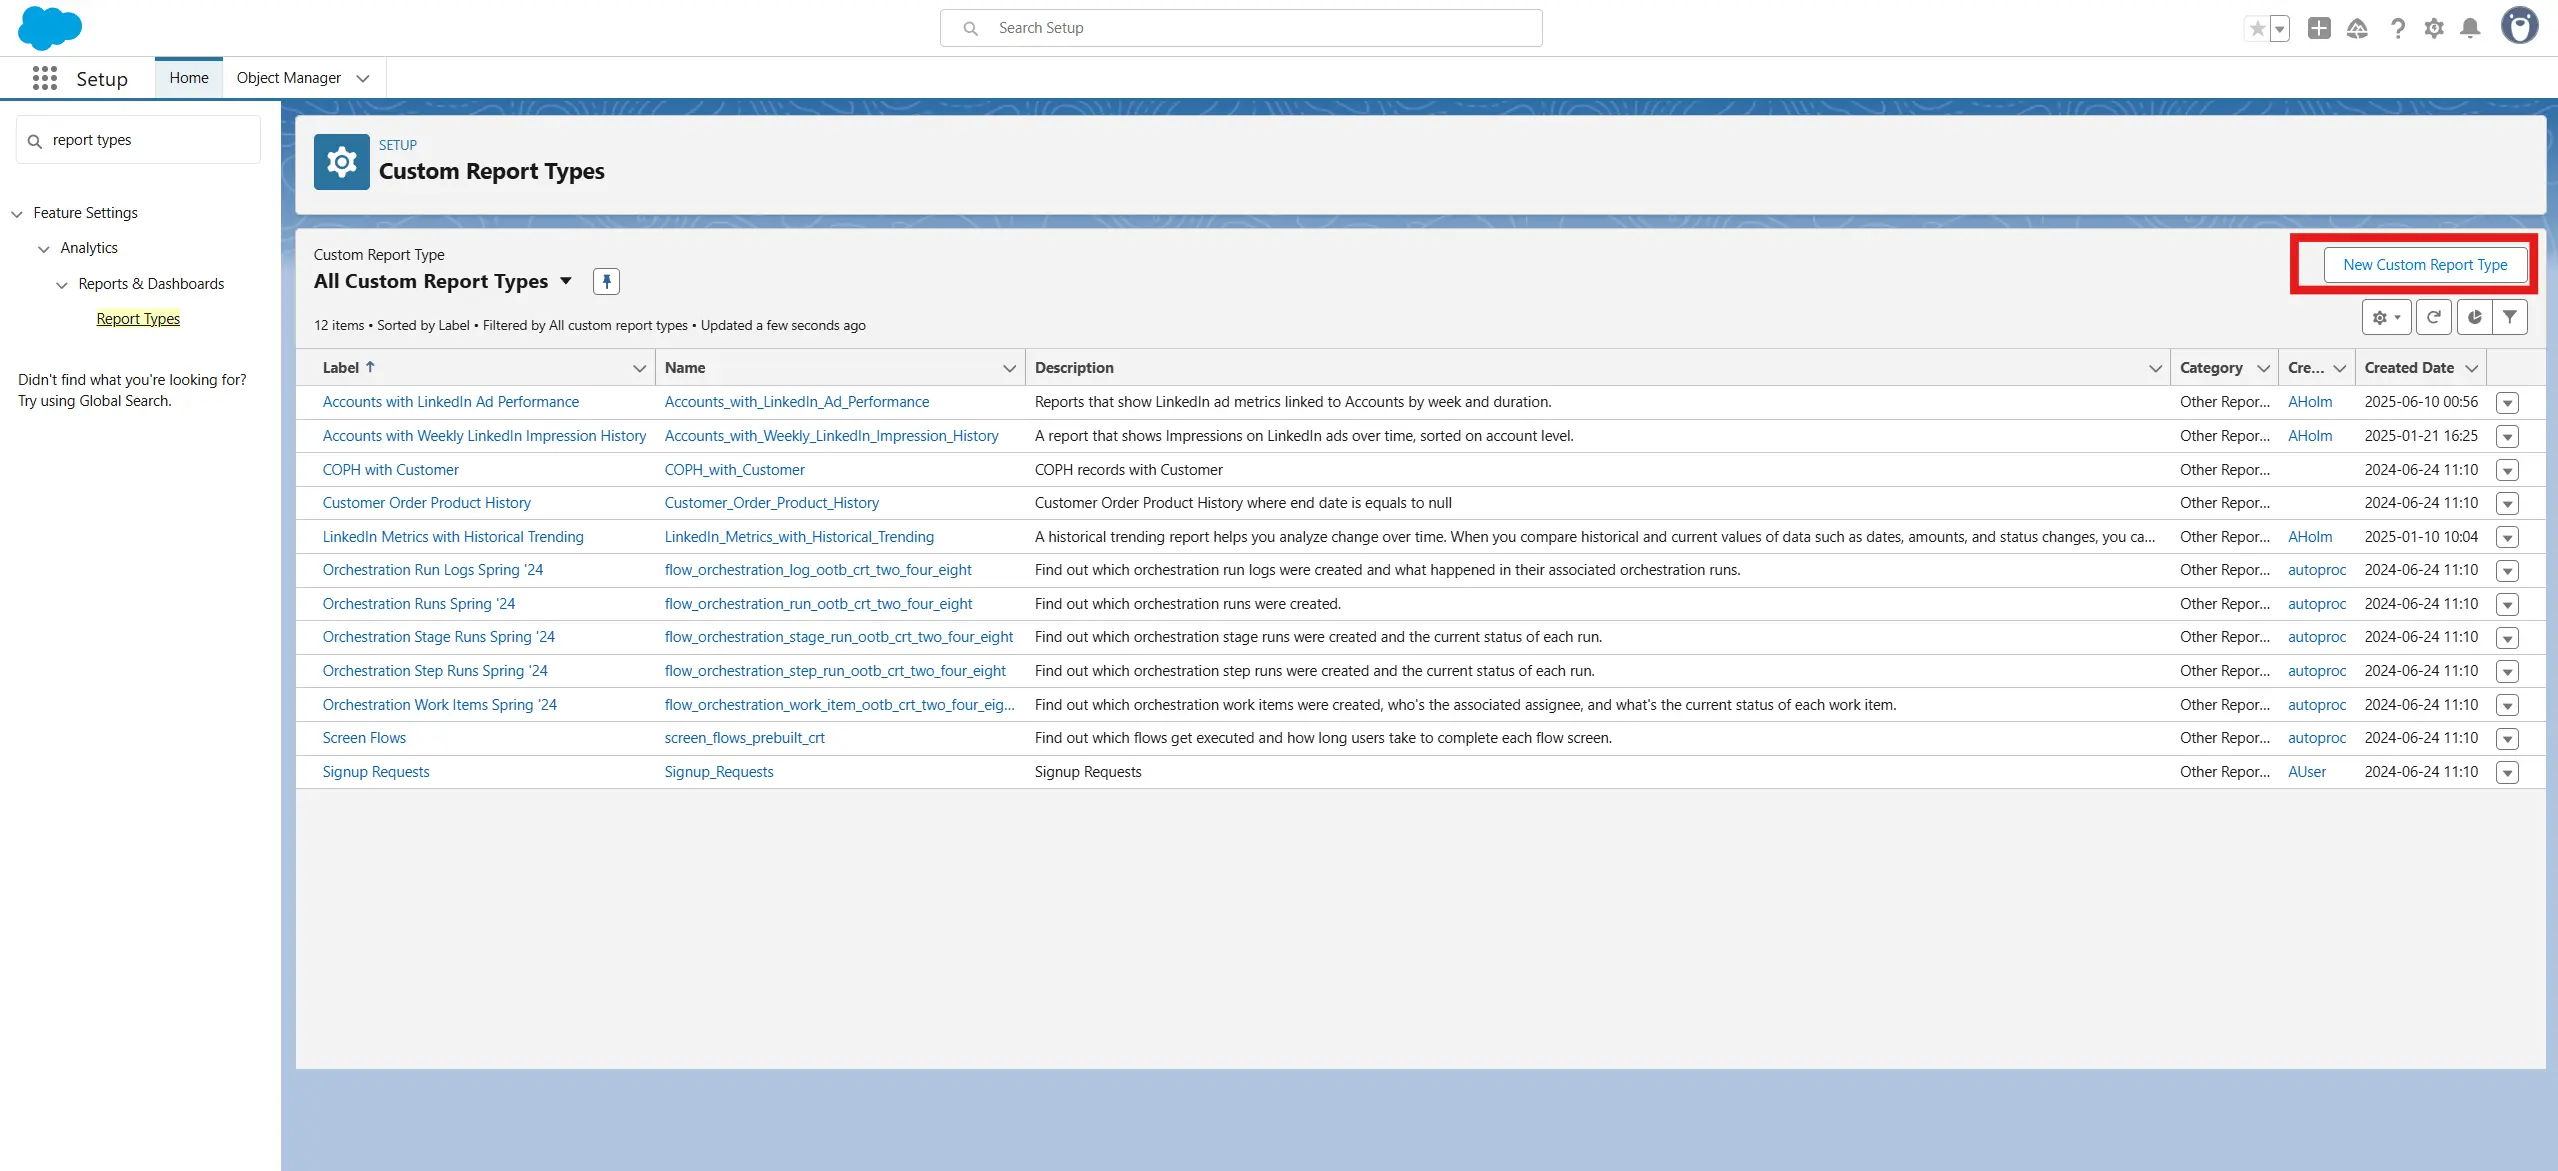
- Go to Setup -> Report Types
- Click the New Custom Report Type button (top right)
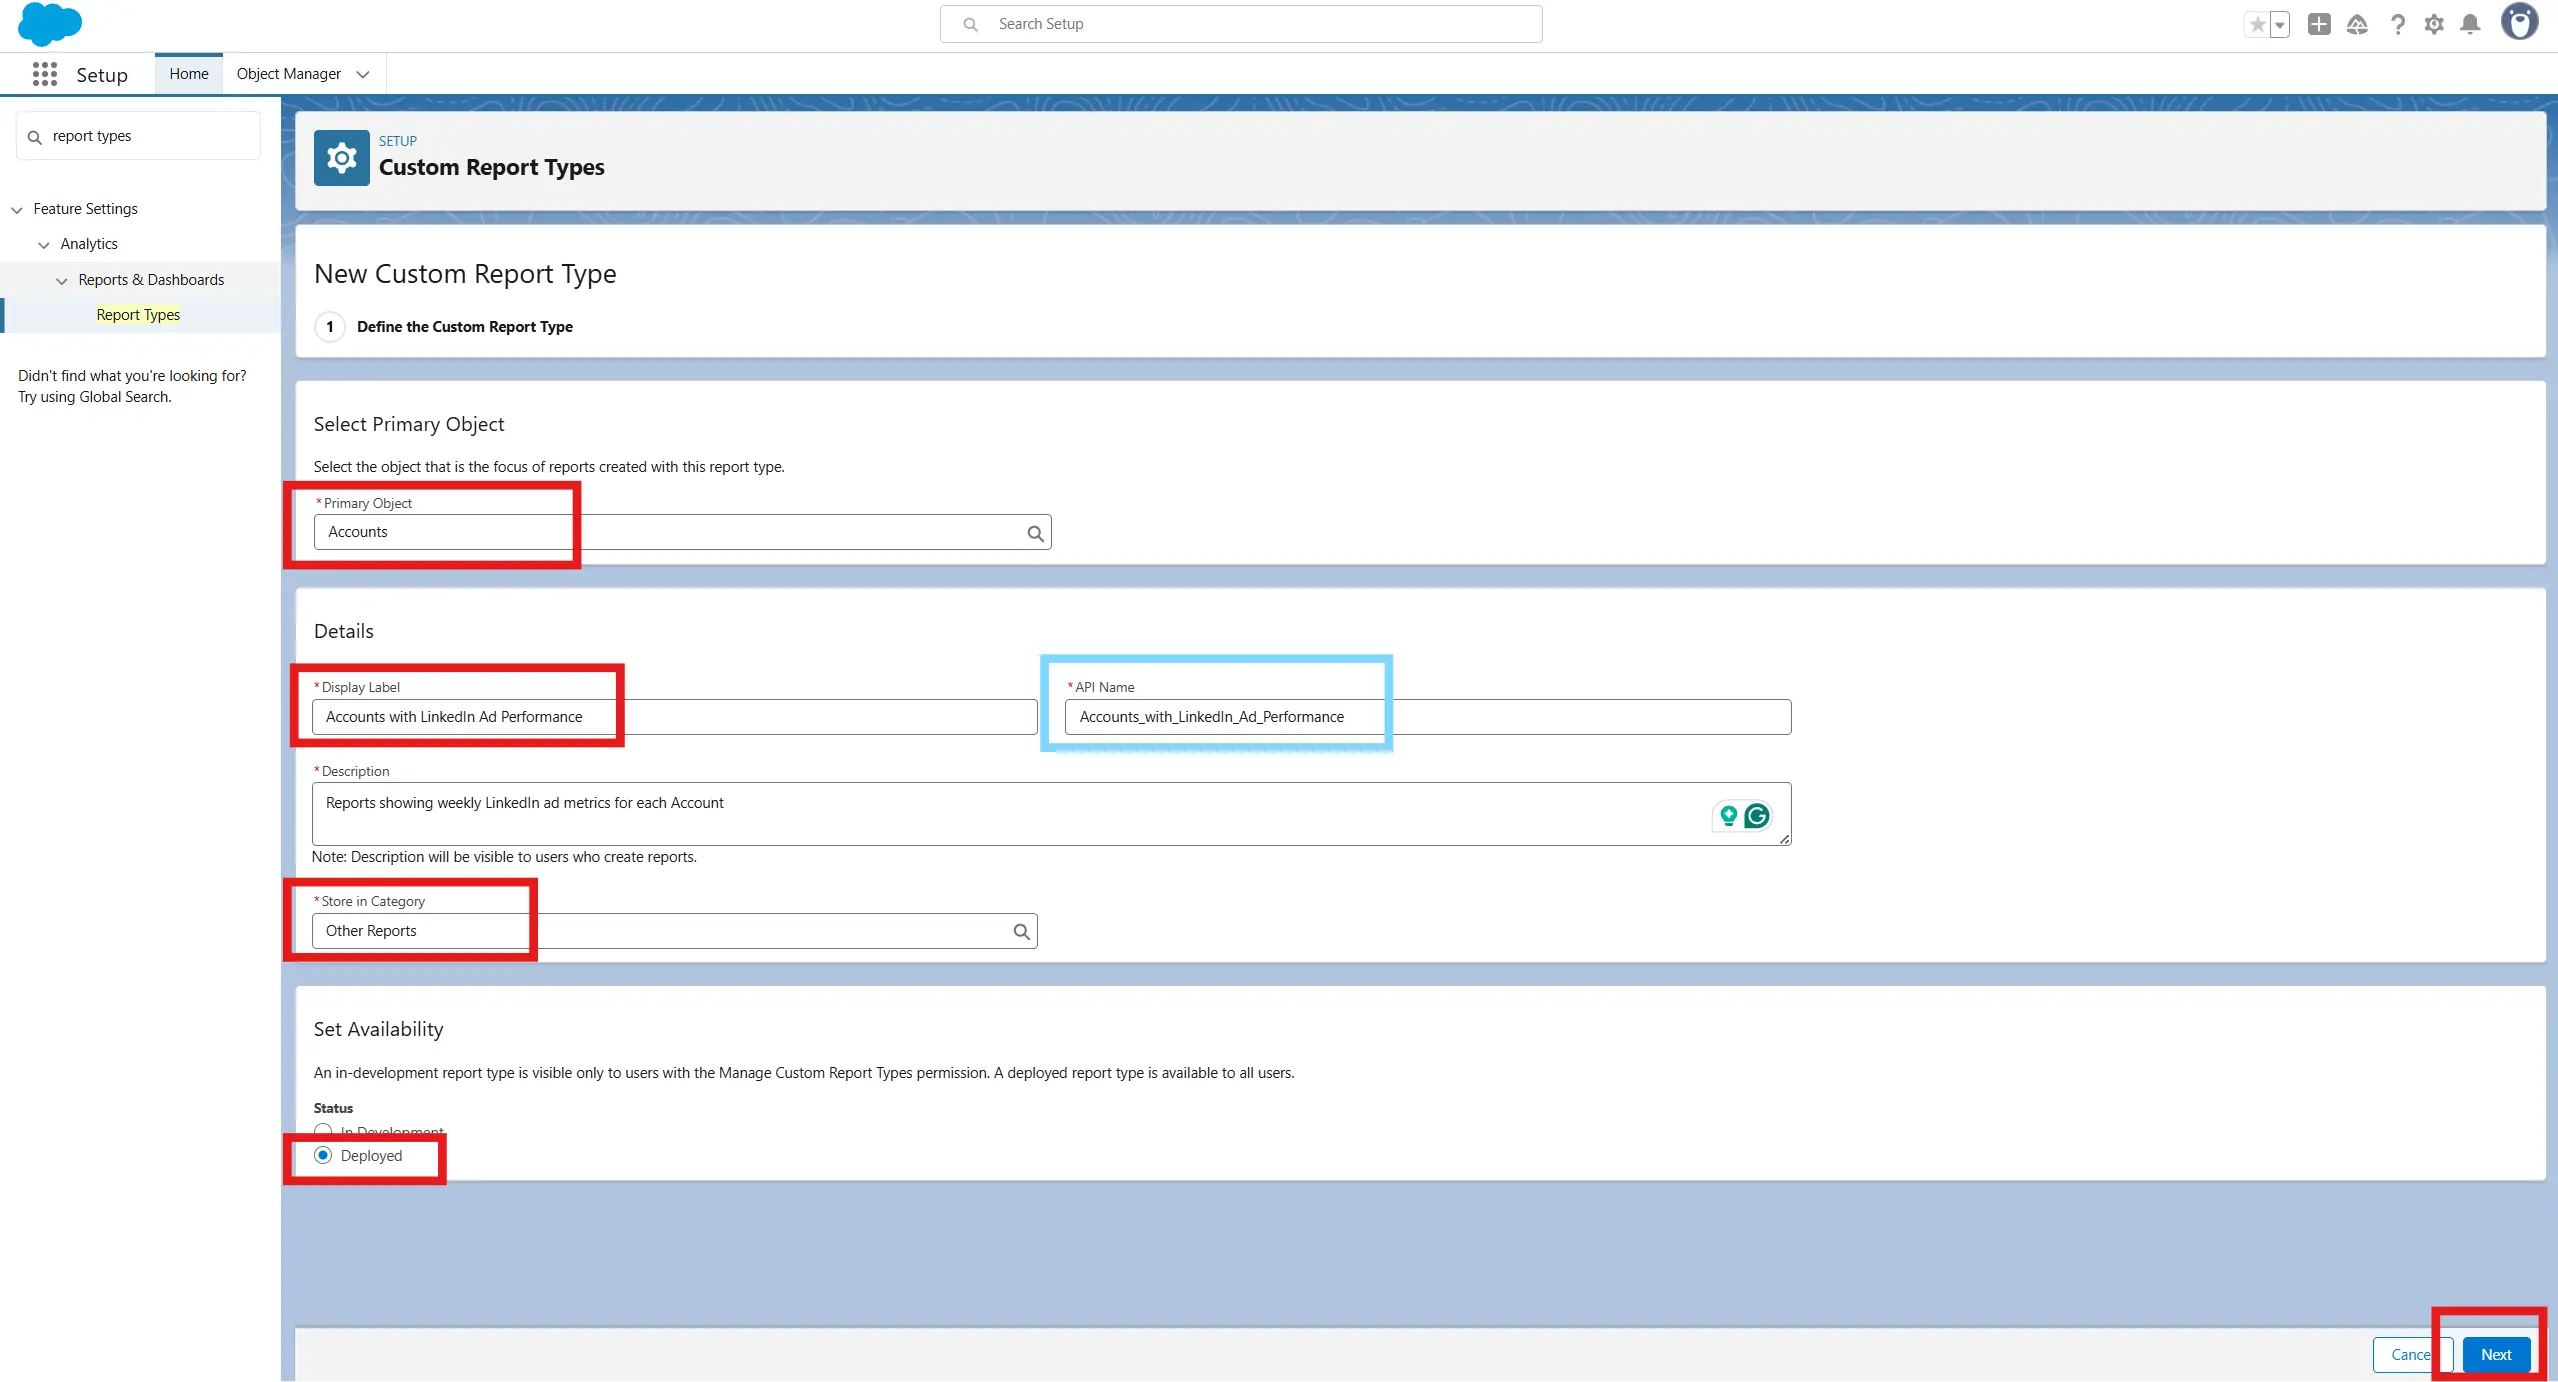
- Fill in the following details:
- Primary Object: Accounts
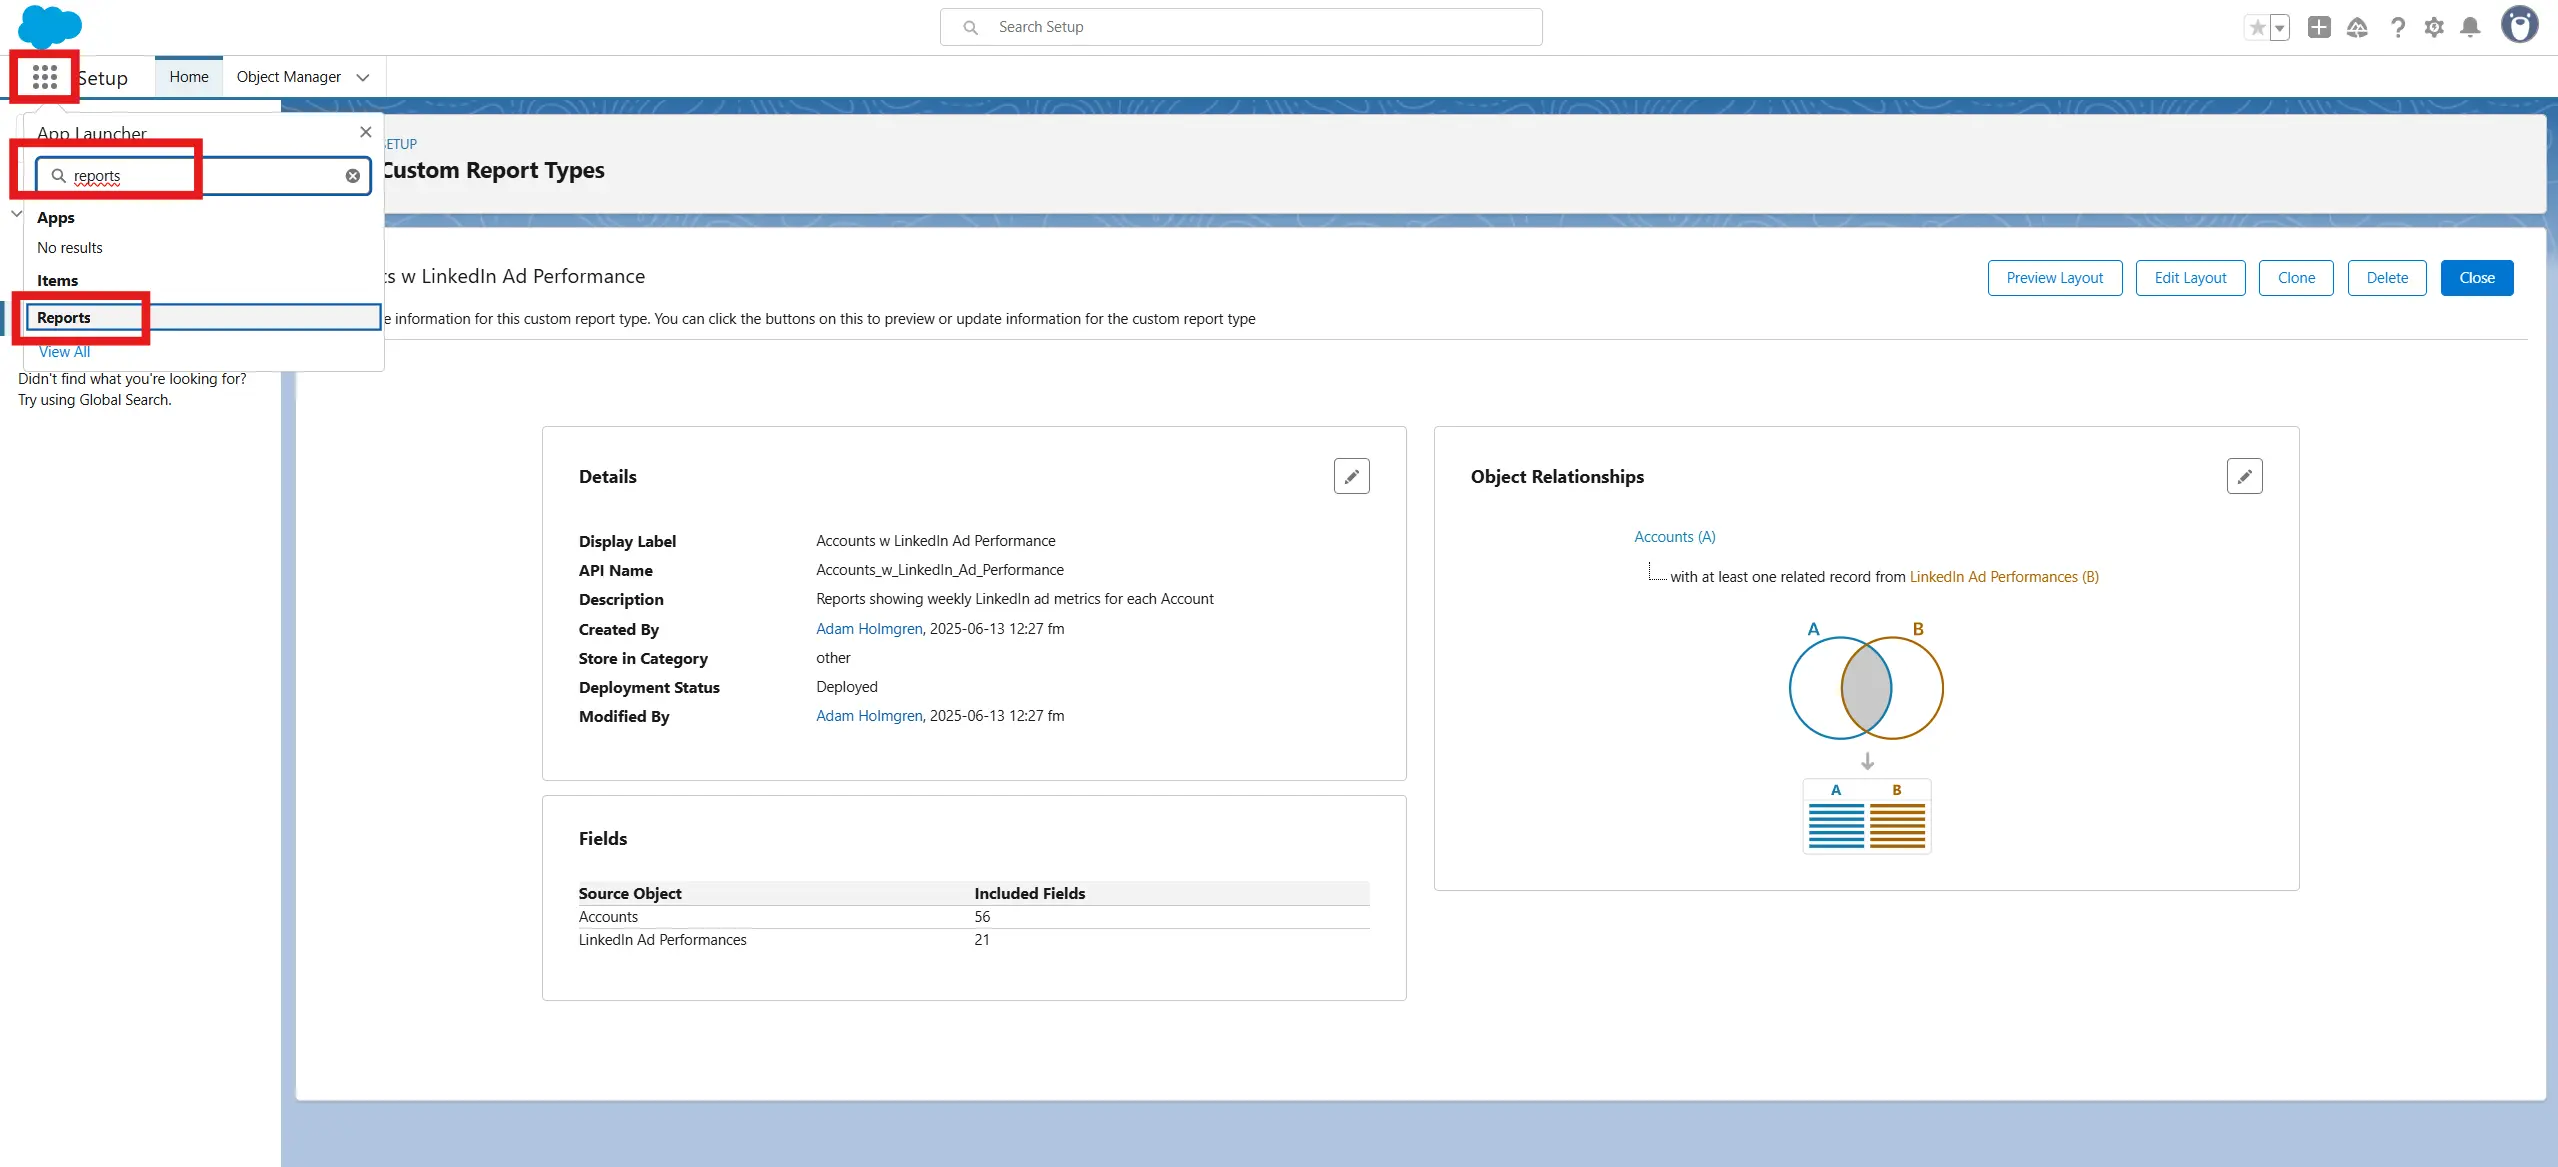
- Display Label: Accounts with LinkedIn Ad Performance
- API Name: Accounts_with_LinkedIn_Ad_Performance (Autofills)
- Description: Reports showing weekly LinkedIn ad metrics for each Account
- Store in Category: Other Reports orAdministrative Reports(choose what fits your org's structure)
- Deployment Status: Deployed
- Click Next
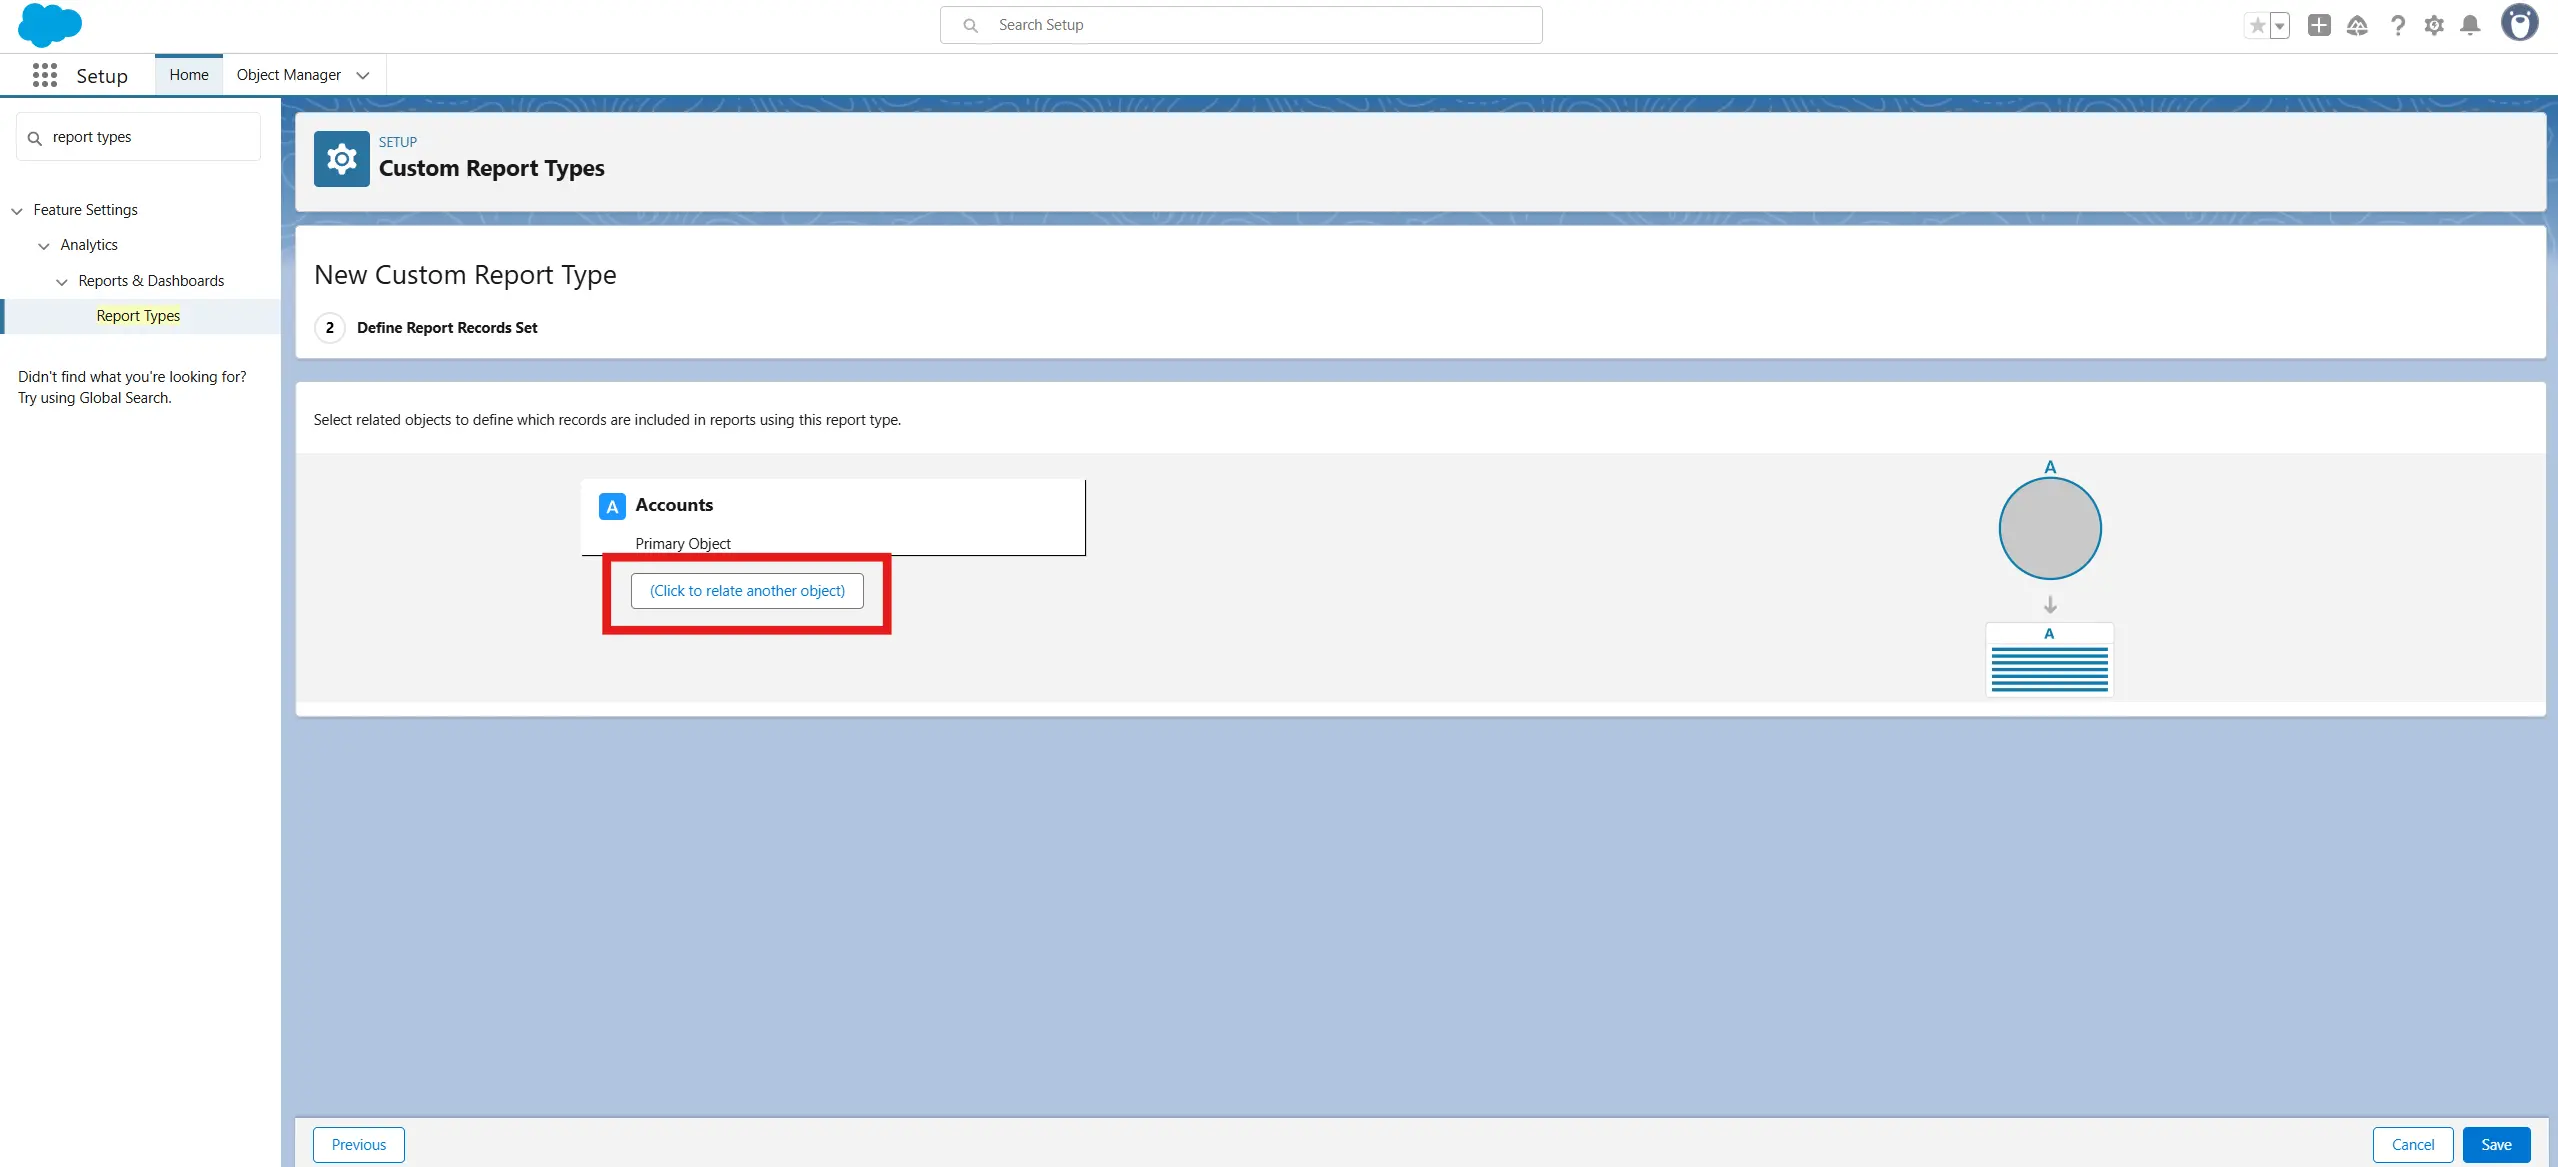
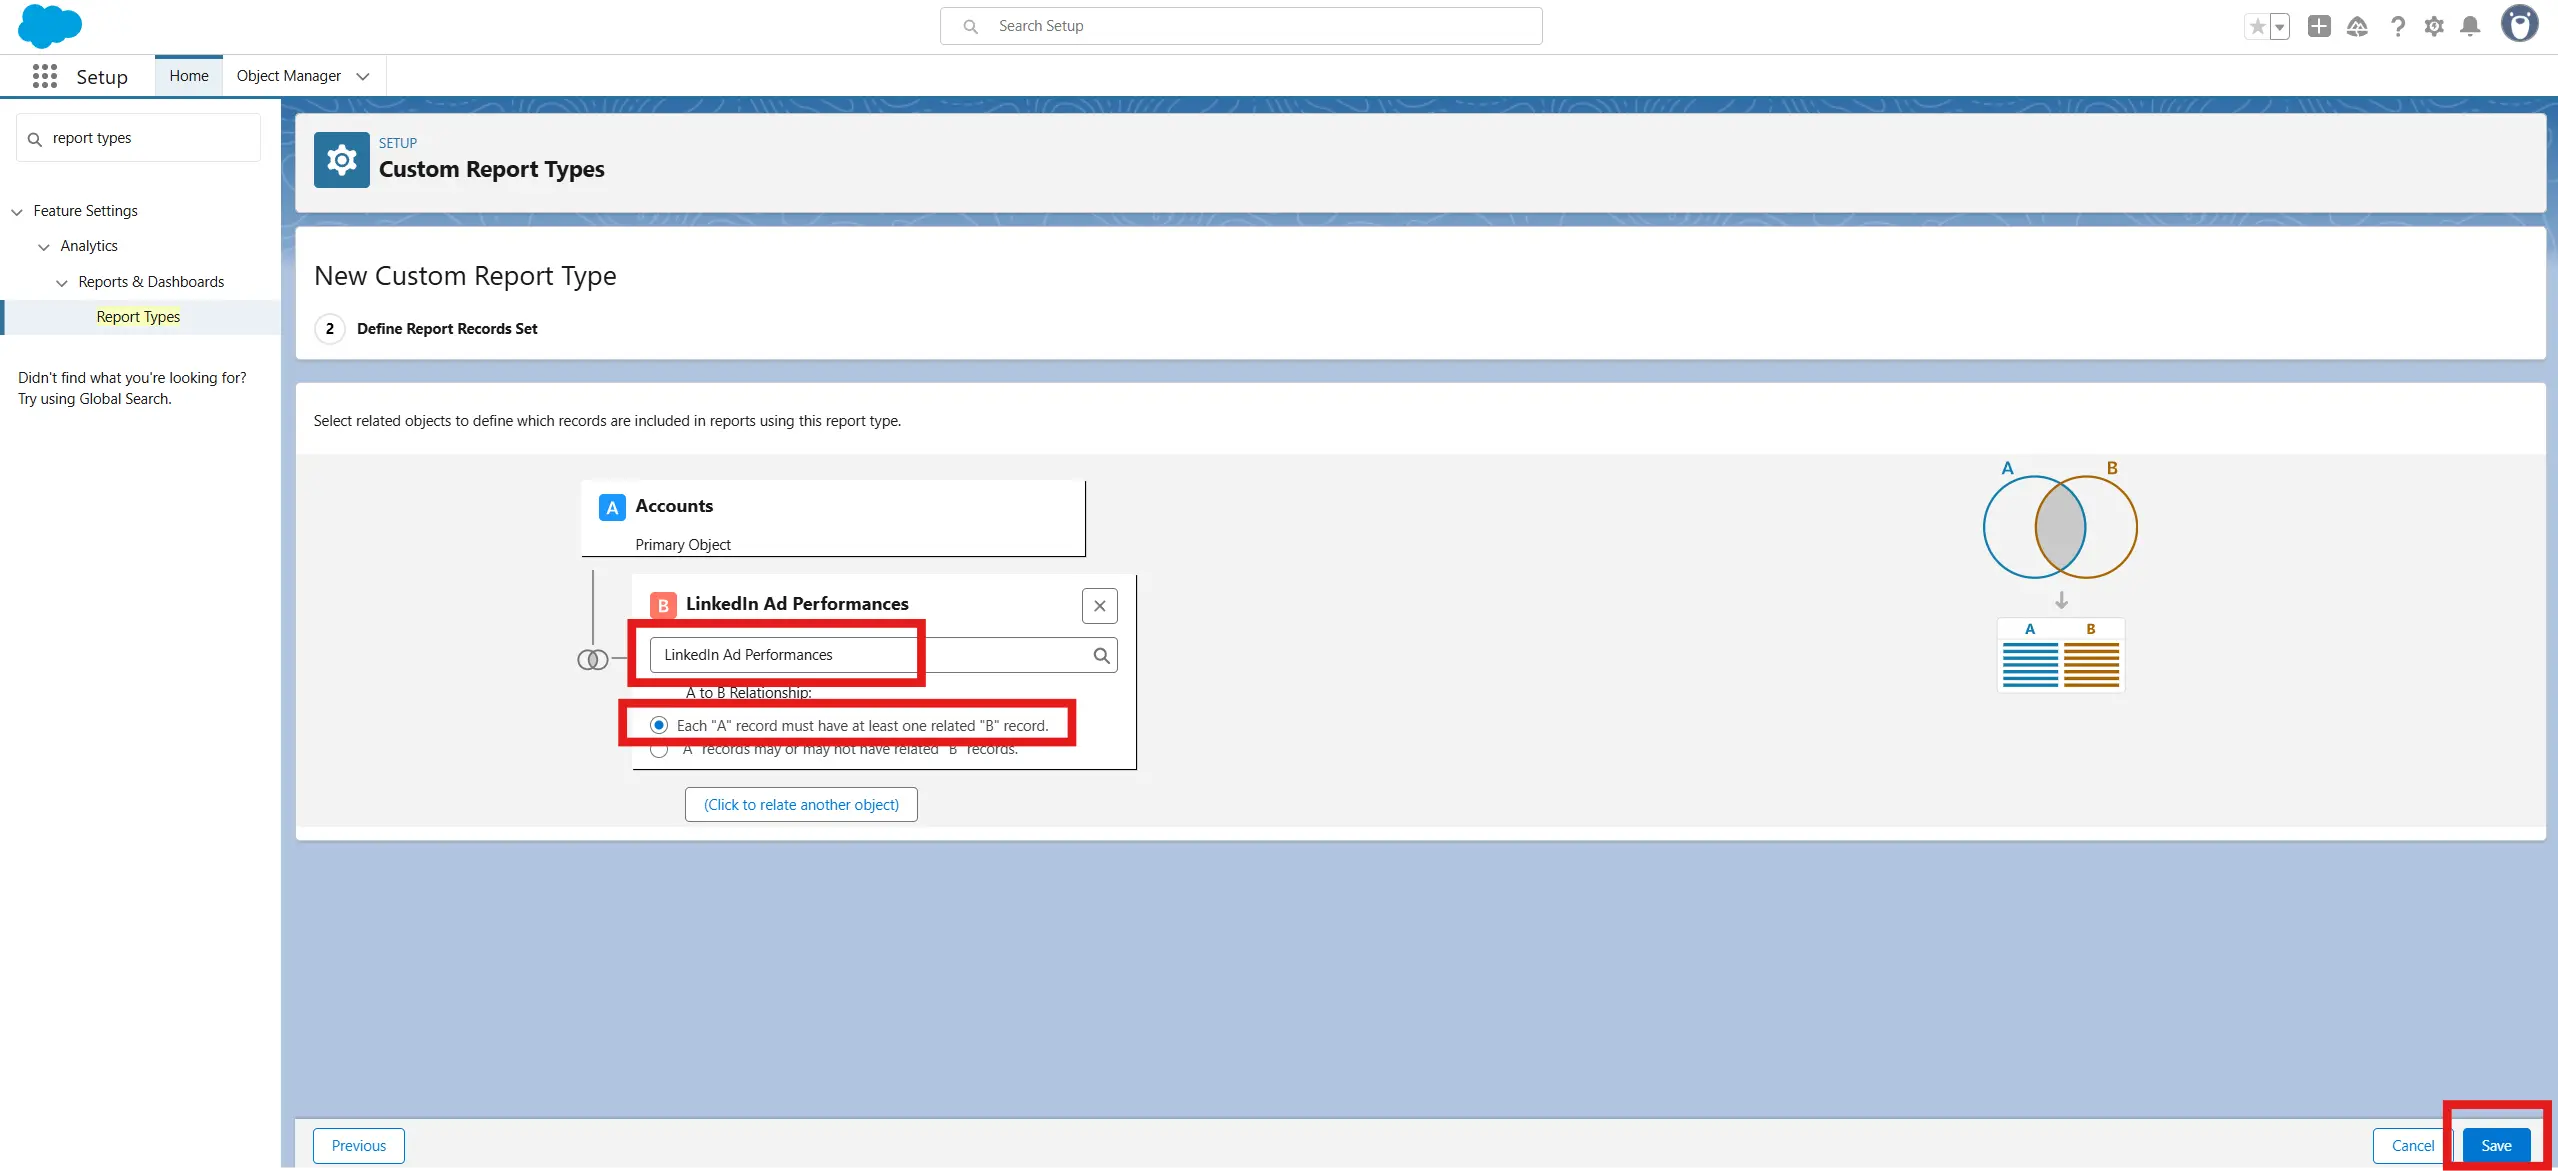
- Click Relate to another object
- Select LinkedIn Ad Performance as your B item (this is your custom object created in Step 5. If you created it with a different name - select that)
- Select Each "A" record must have at least one related "B" record
- Click Save
OPTIONAL STEP - Add fields to the layout
After saving, you'll land on the report type layout editor. You can:
- Click Edit Layout
- Drag any custom fields (e.g., Impressions, Clicks, Week Start Date) into the layout so they appear by default when reporting
- You can skip this if you want full flexibility when creating reports later.
PART B - Create the Report
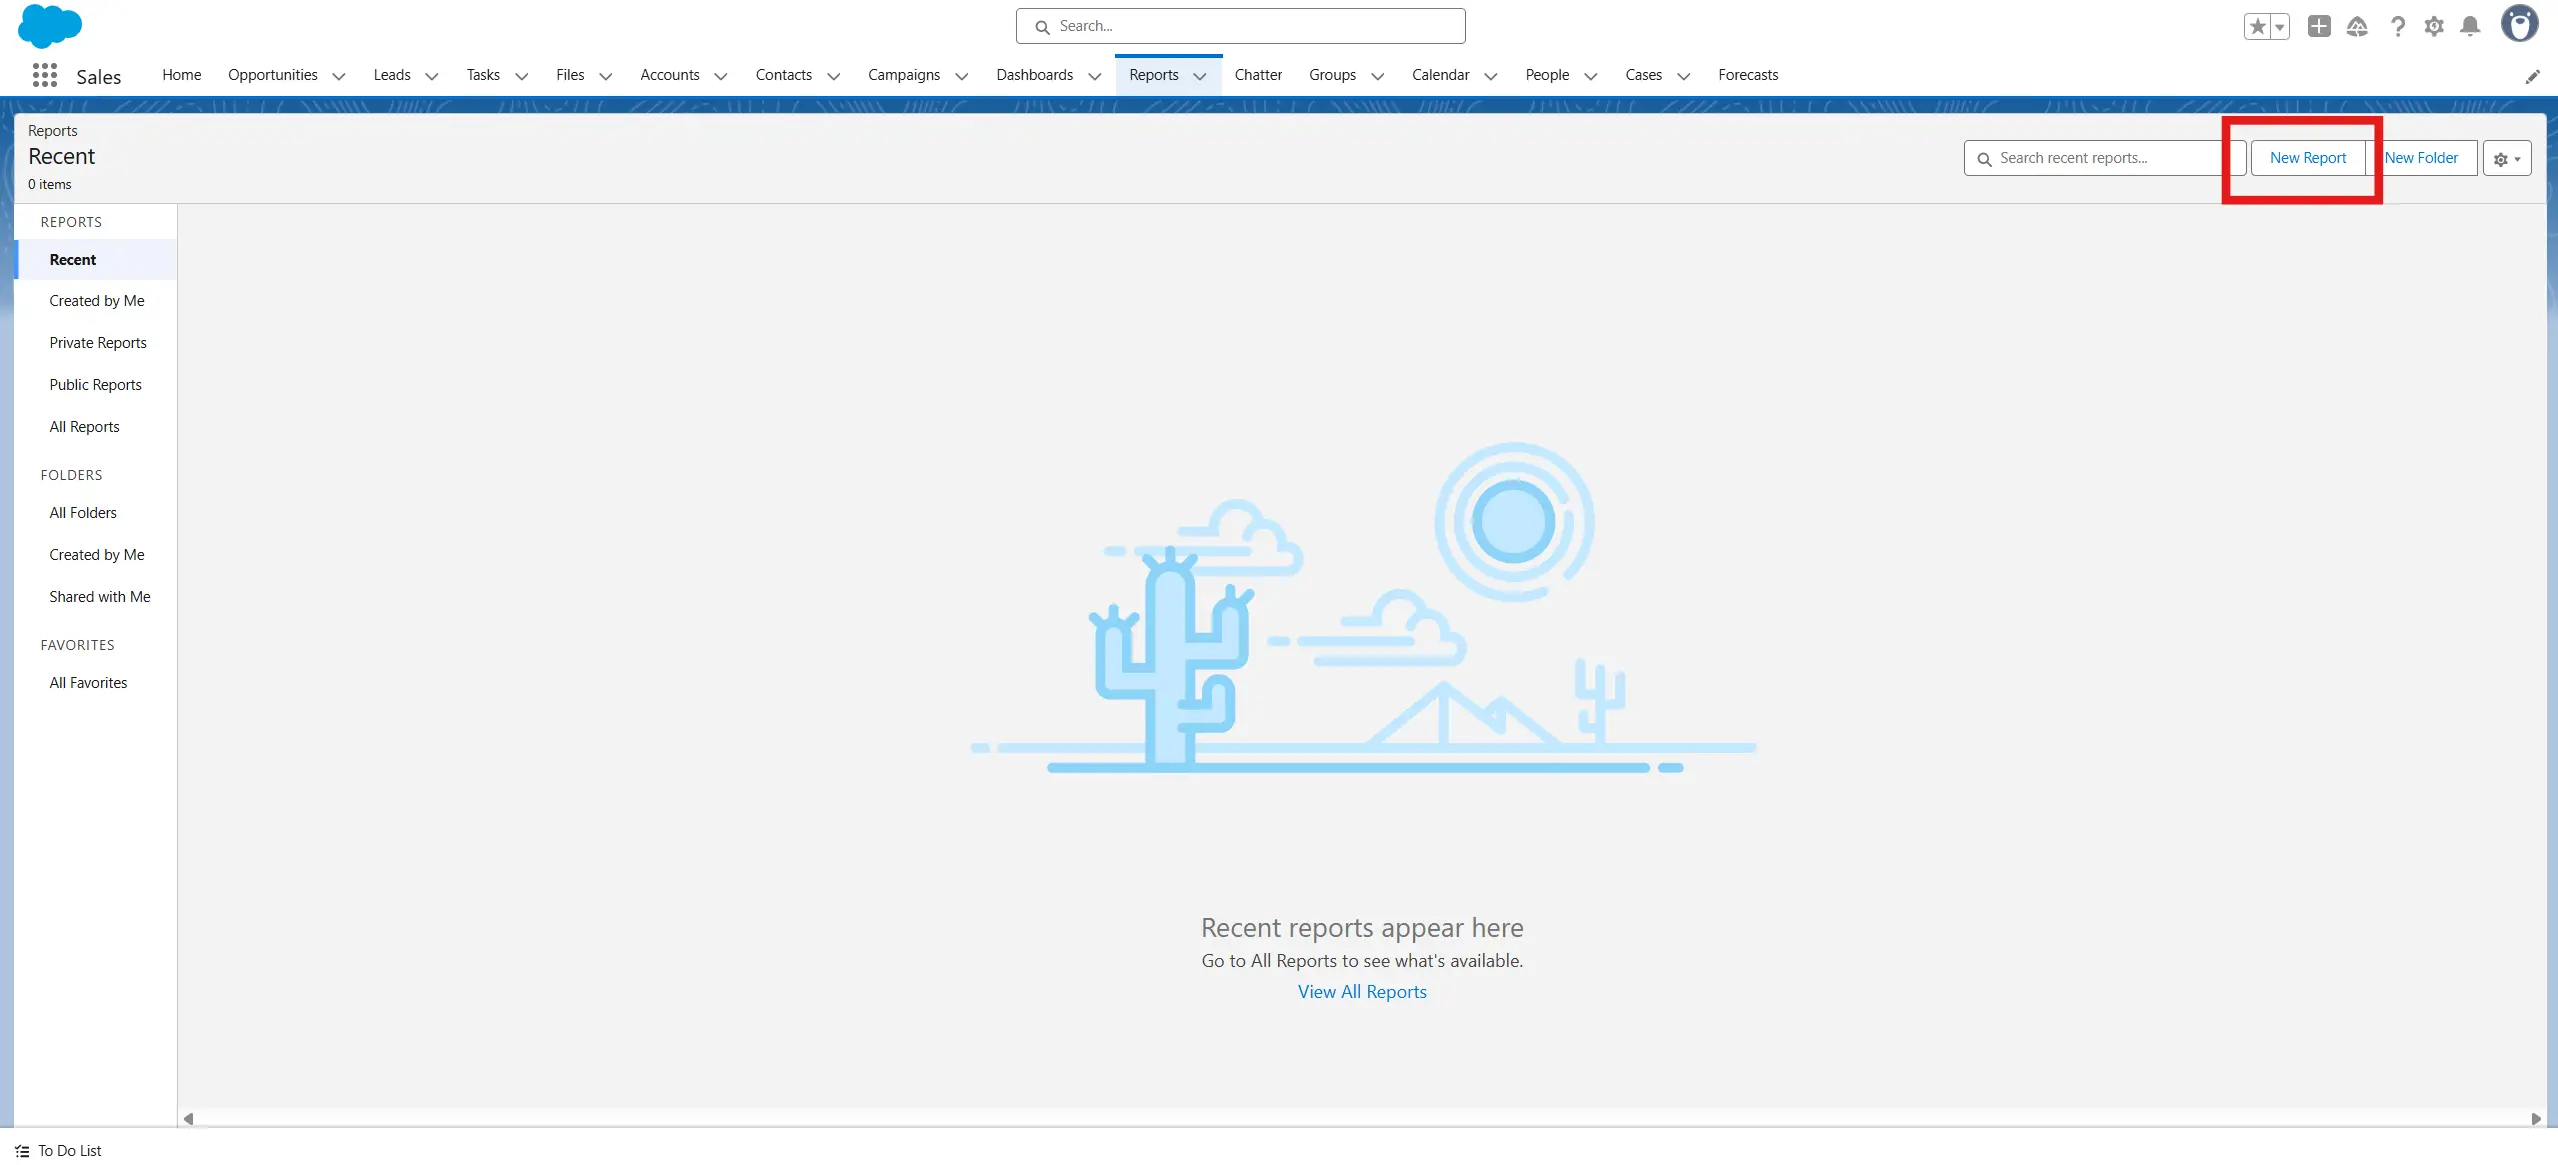
- Go to the App Launcher (grid icon) and search for Reports
- Click New Report
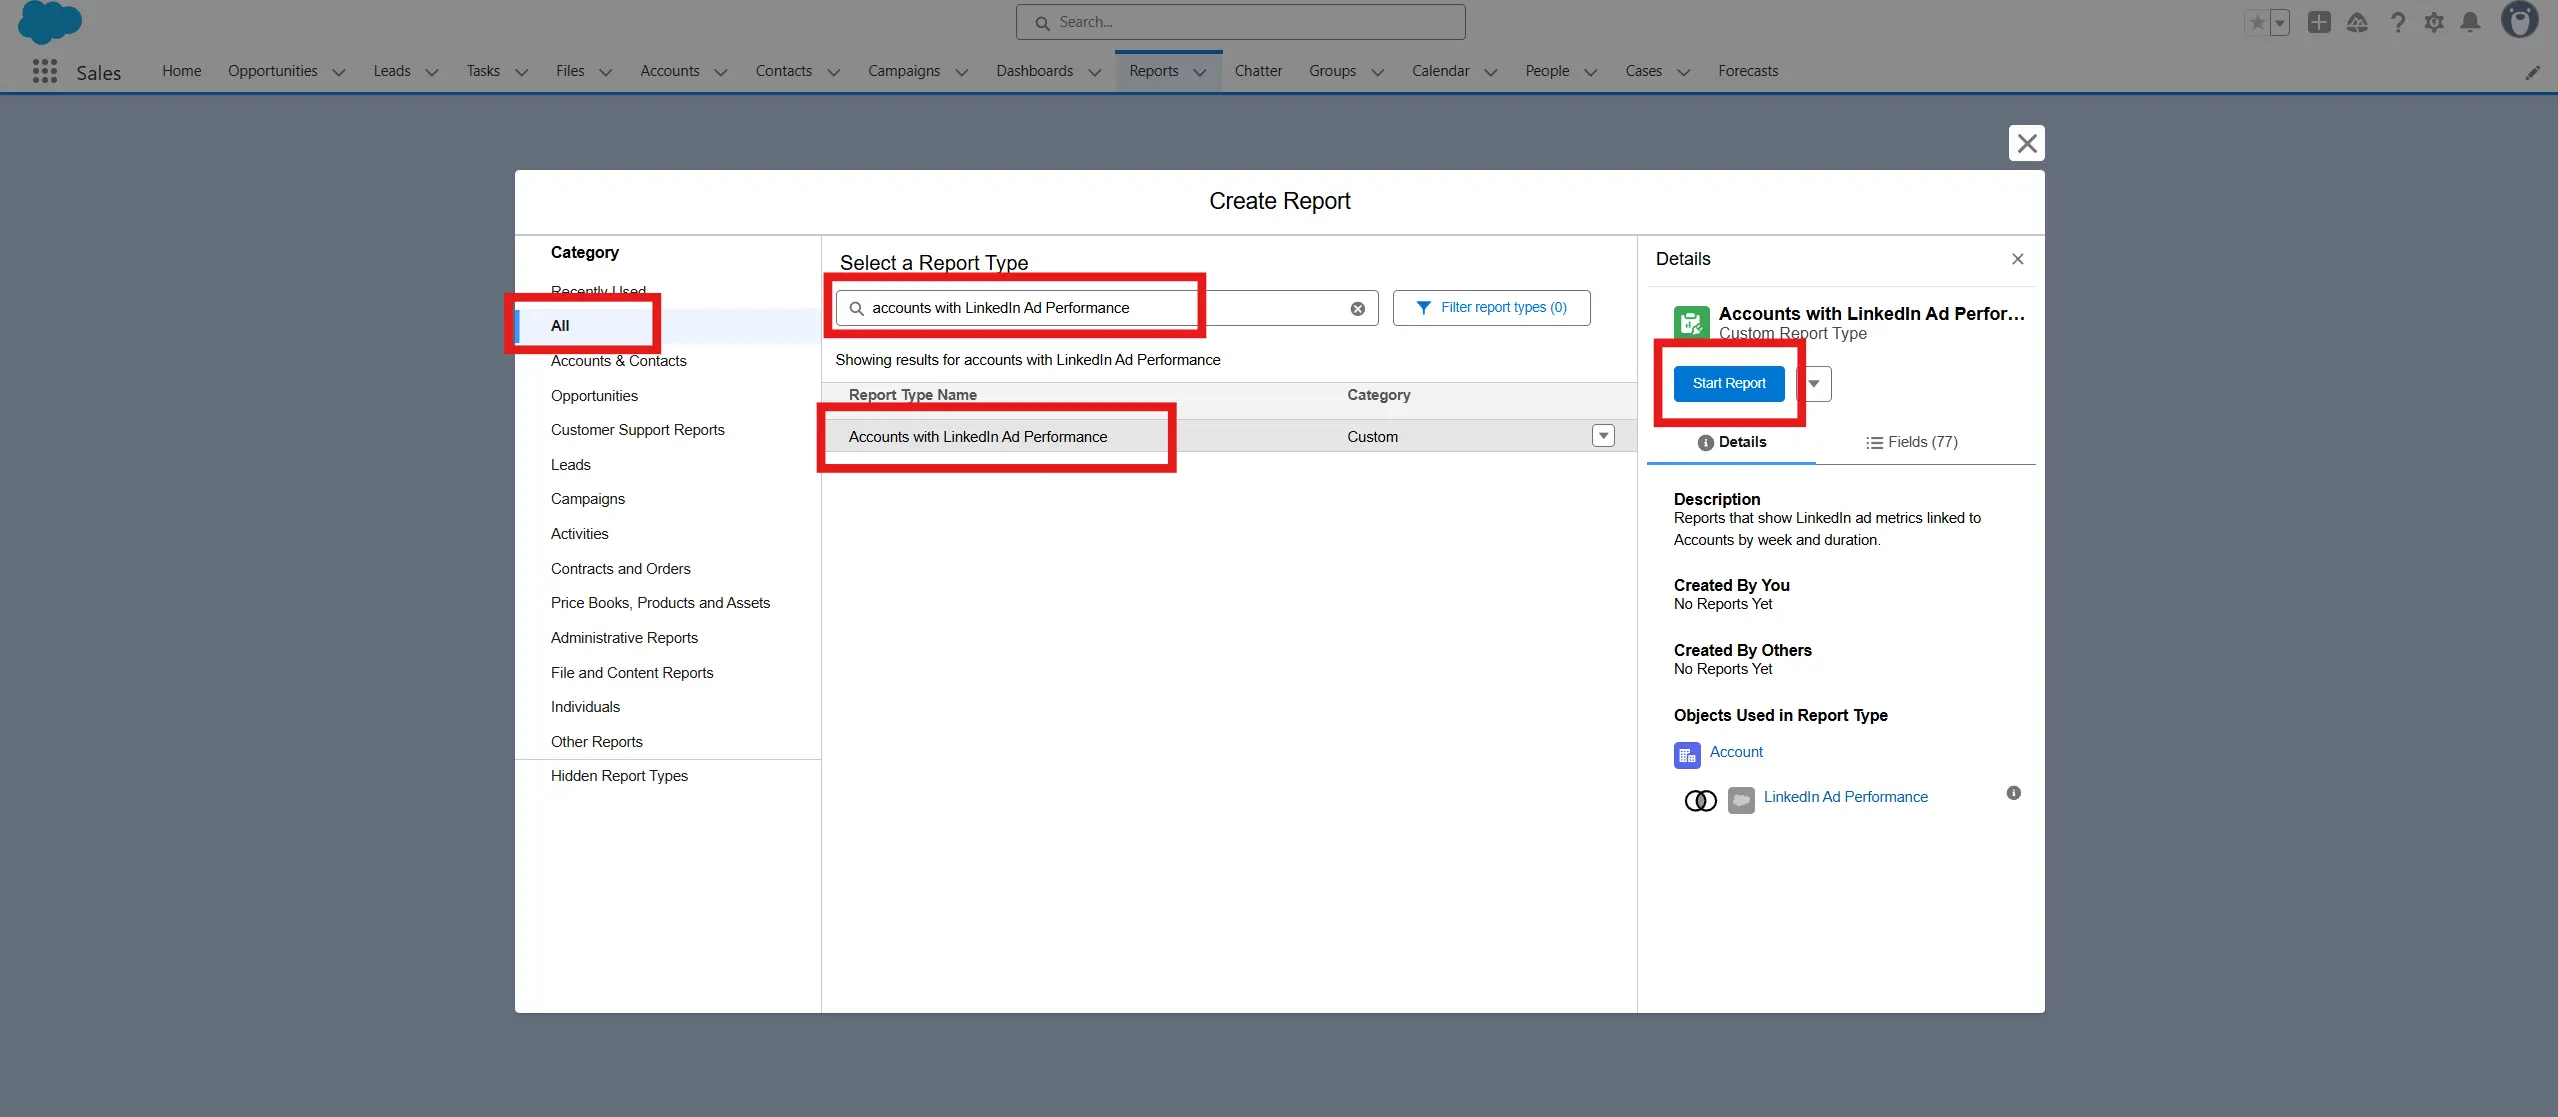
- In the All category, search for and select Accounts with LinkedIn Ad Performance (or whatever you named the report type in Part A above). Click Start Report
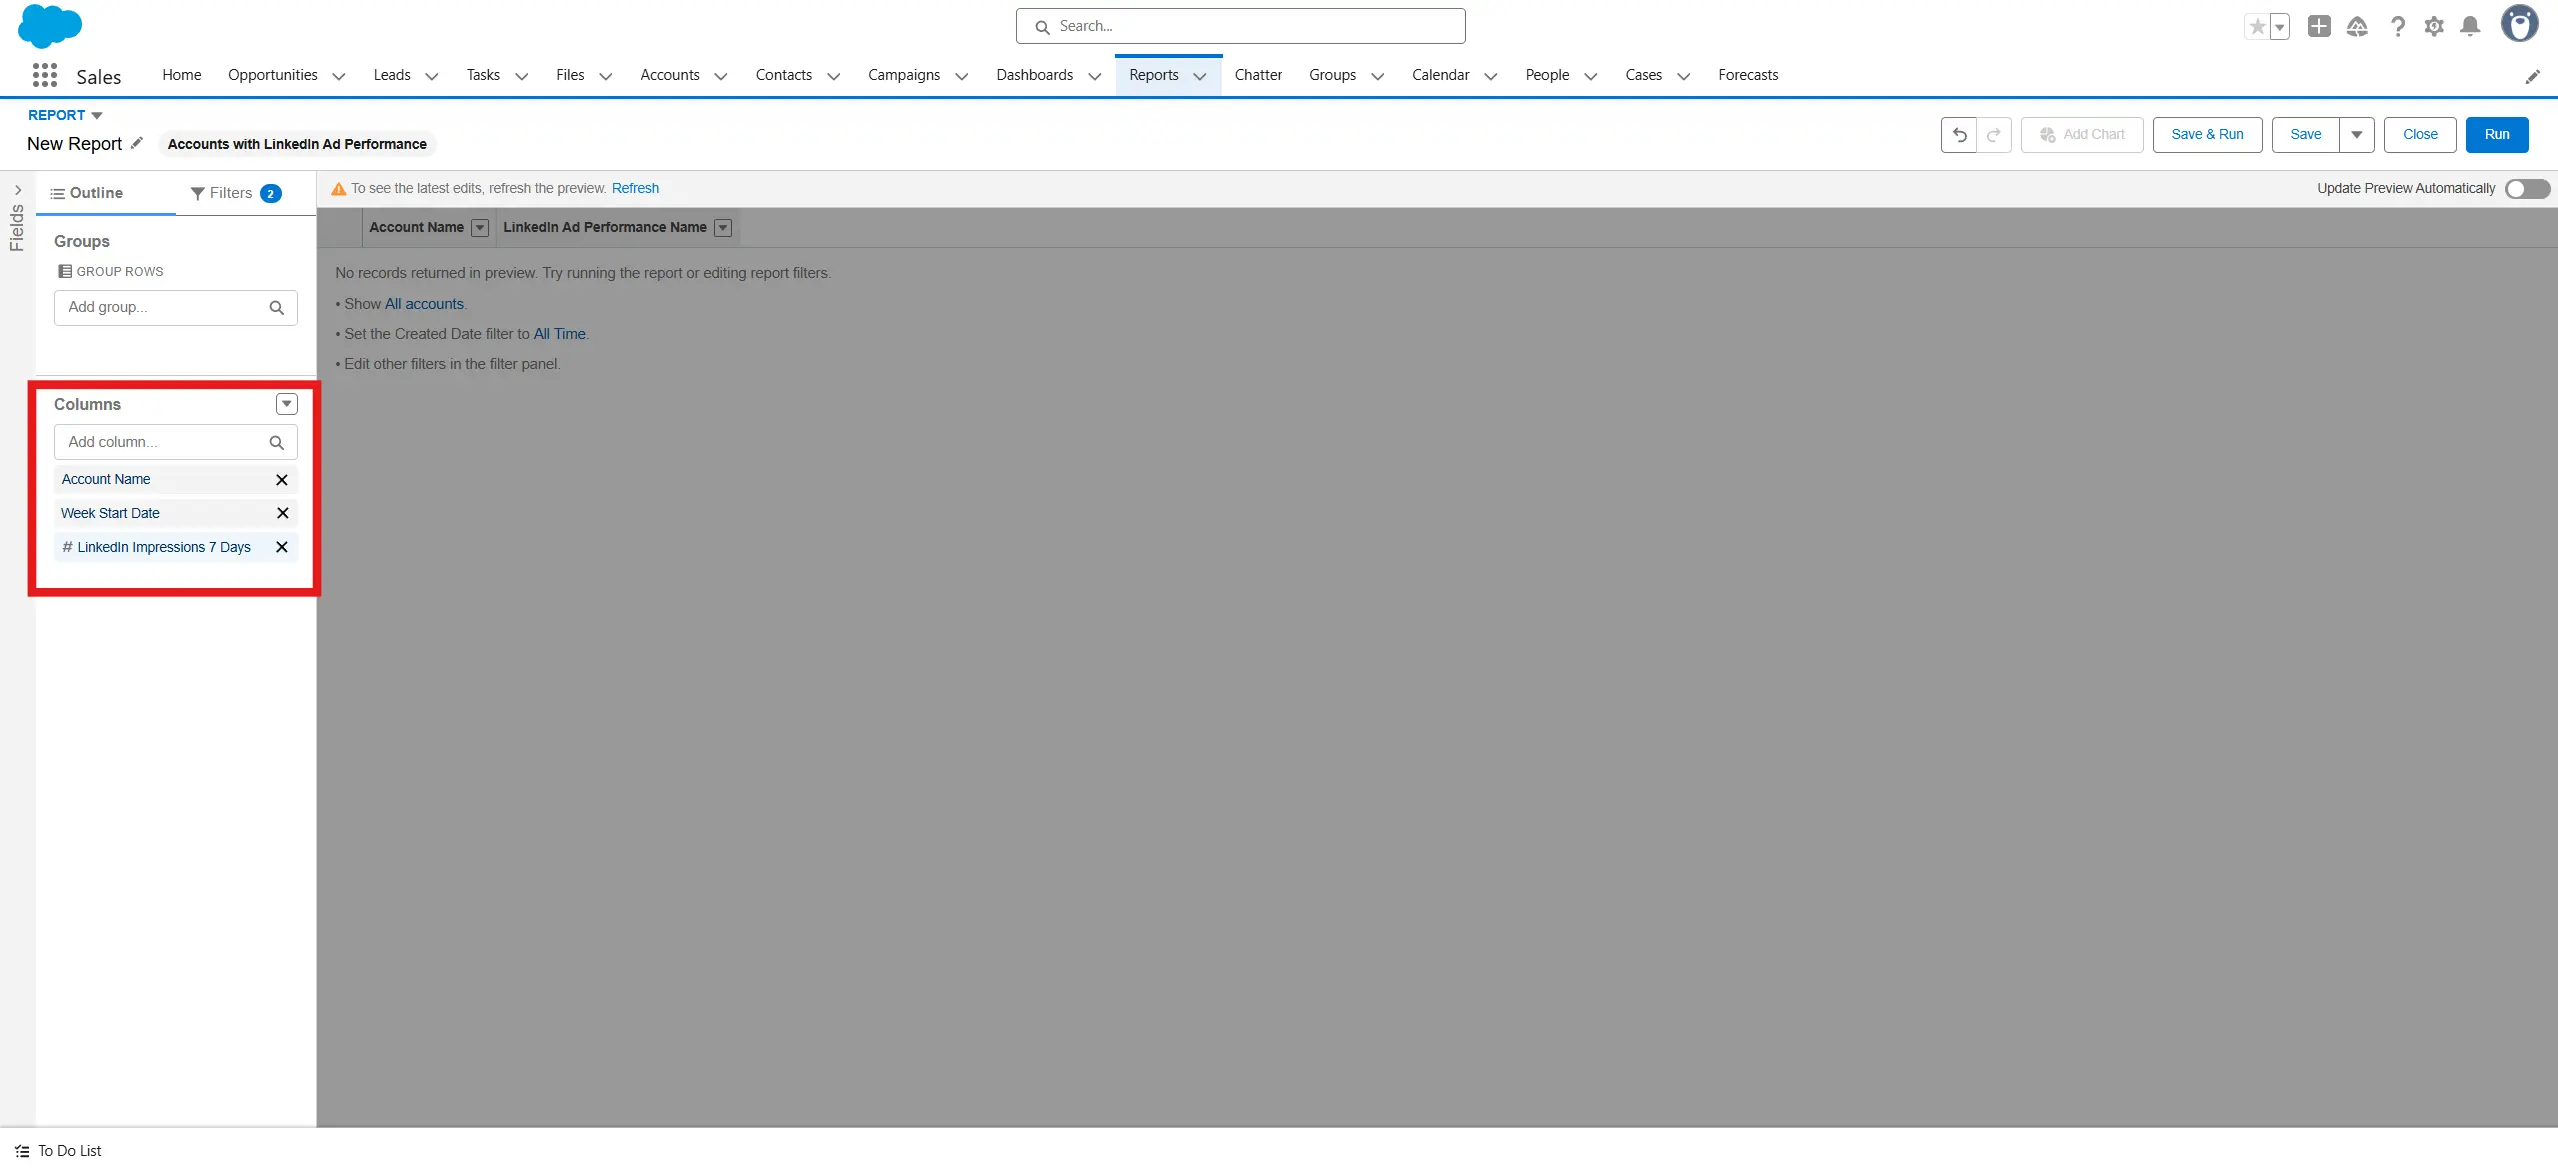
- In the report builder, make sure the following columns are visible:
- Account Name
- Week Start Date (from LinkedIn Ad Performance)
- Impressions (7 Days) (from LinkedIn Ad Performance)
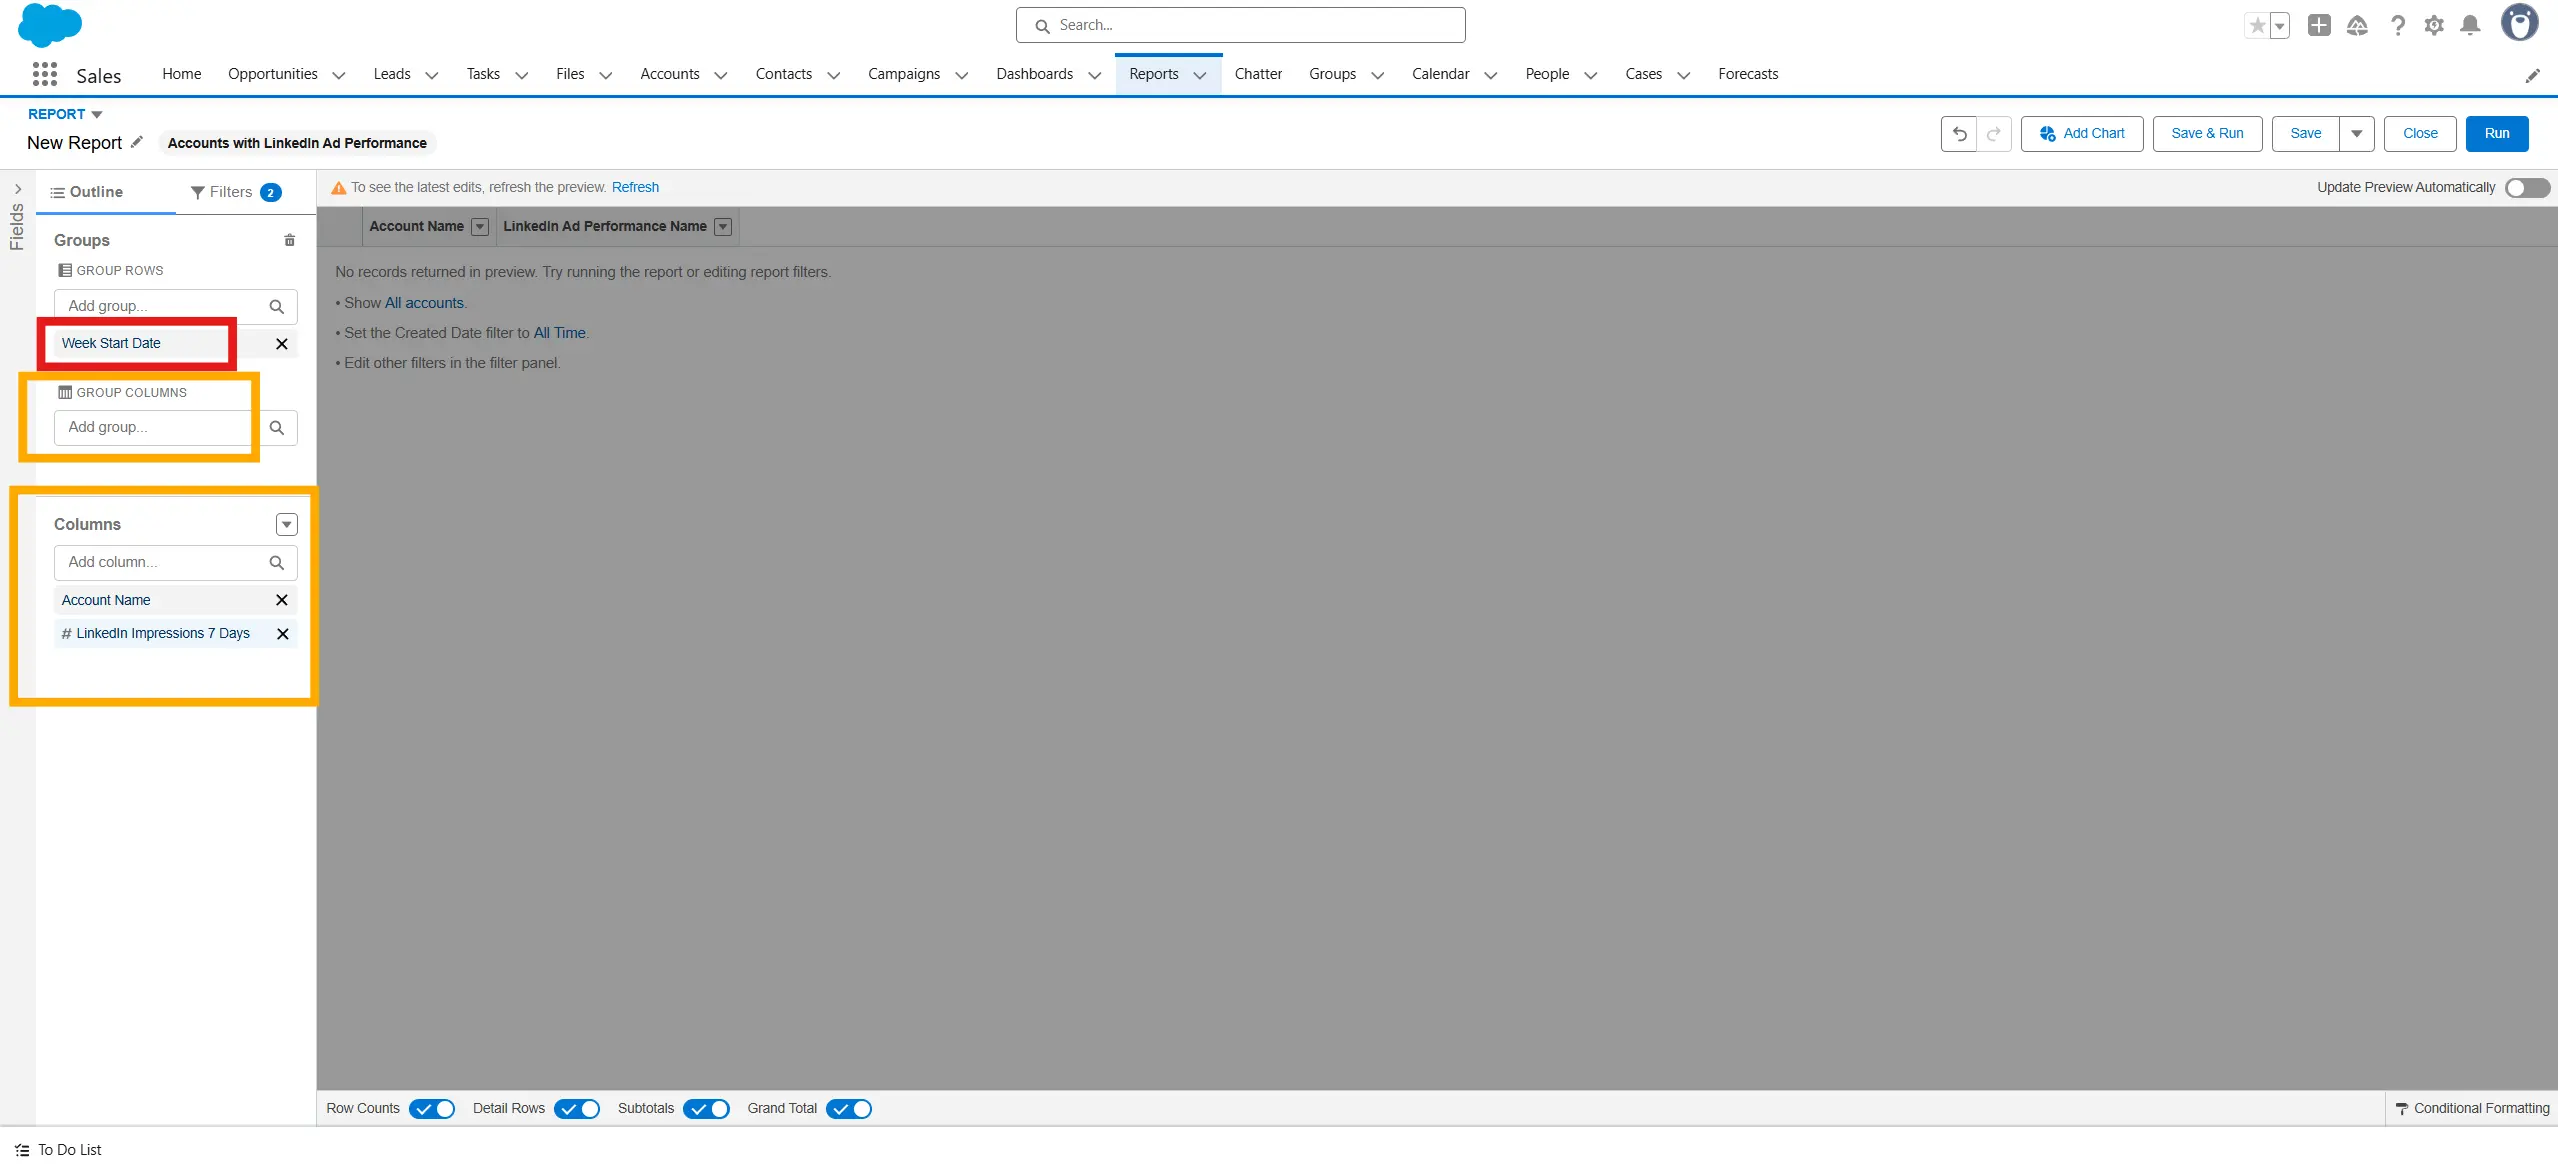
- Drag Week Start Date into Group Rows
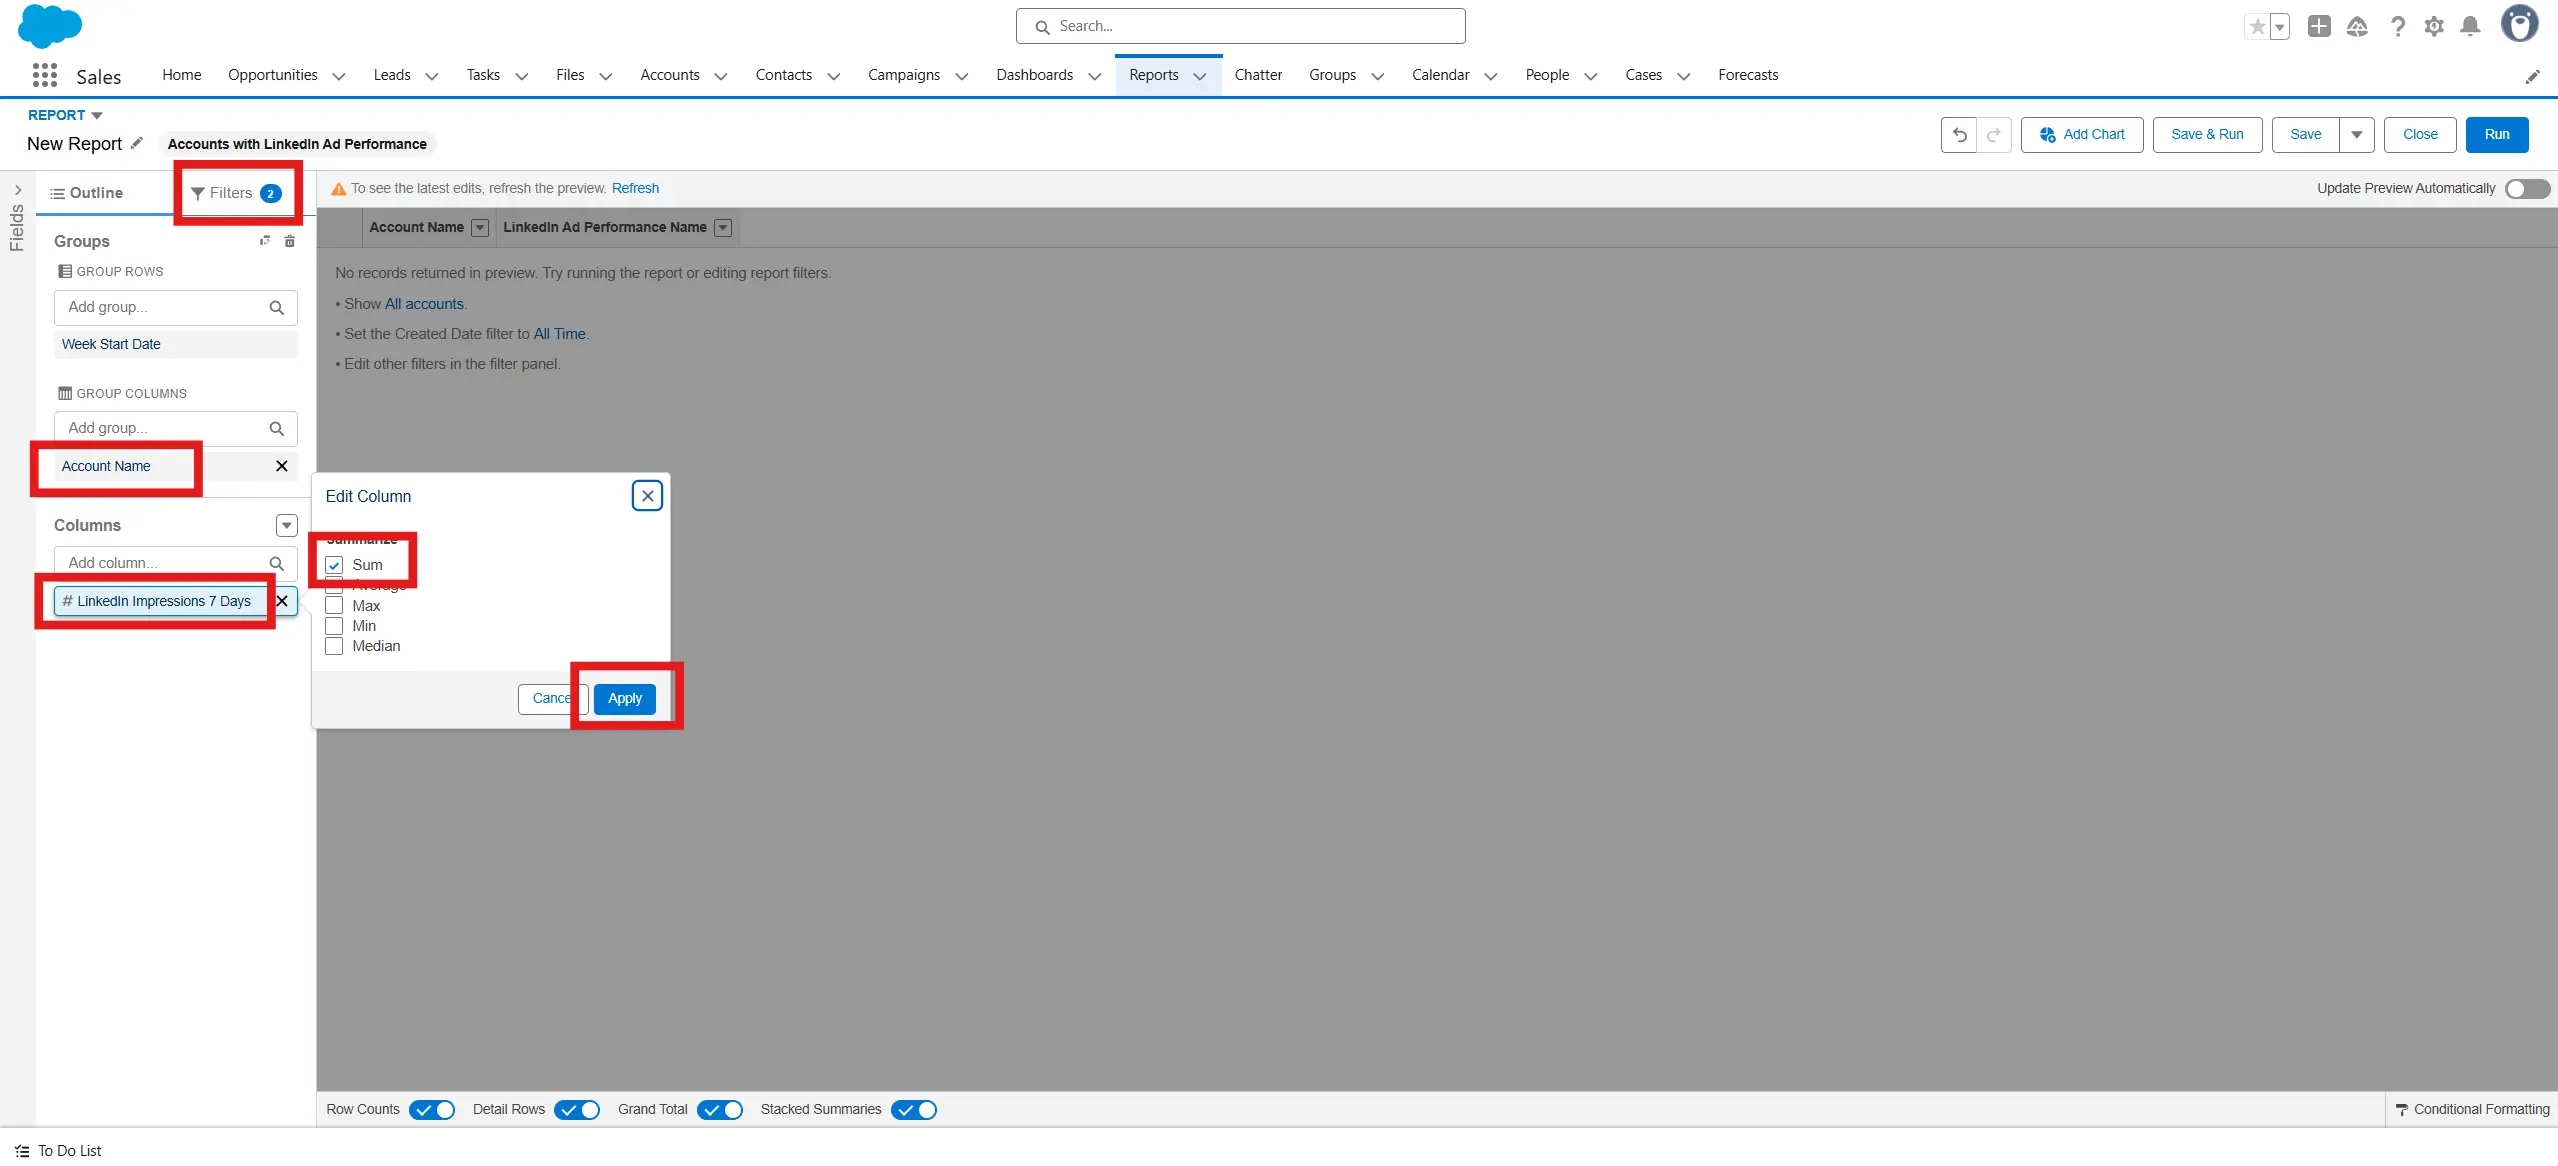
This defines your X-axis for the line chart. Note that when doing this it is moved from the Columns section, and theGroup Columns option becomes available. - Drag Account Name into Group Columns
This lets Salesforce draw one line per Account in your line chart - Click LinkedIn Impressions 7 days to open the drop-down menu. Select Sum(if it isn't by default). Click Apply
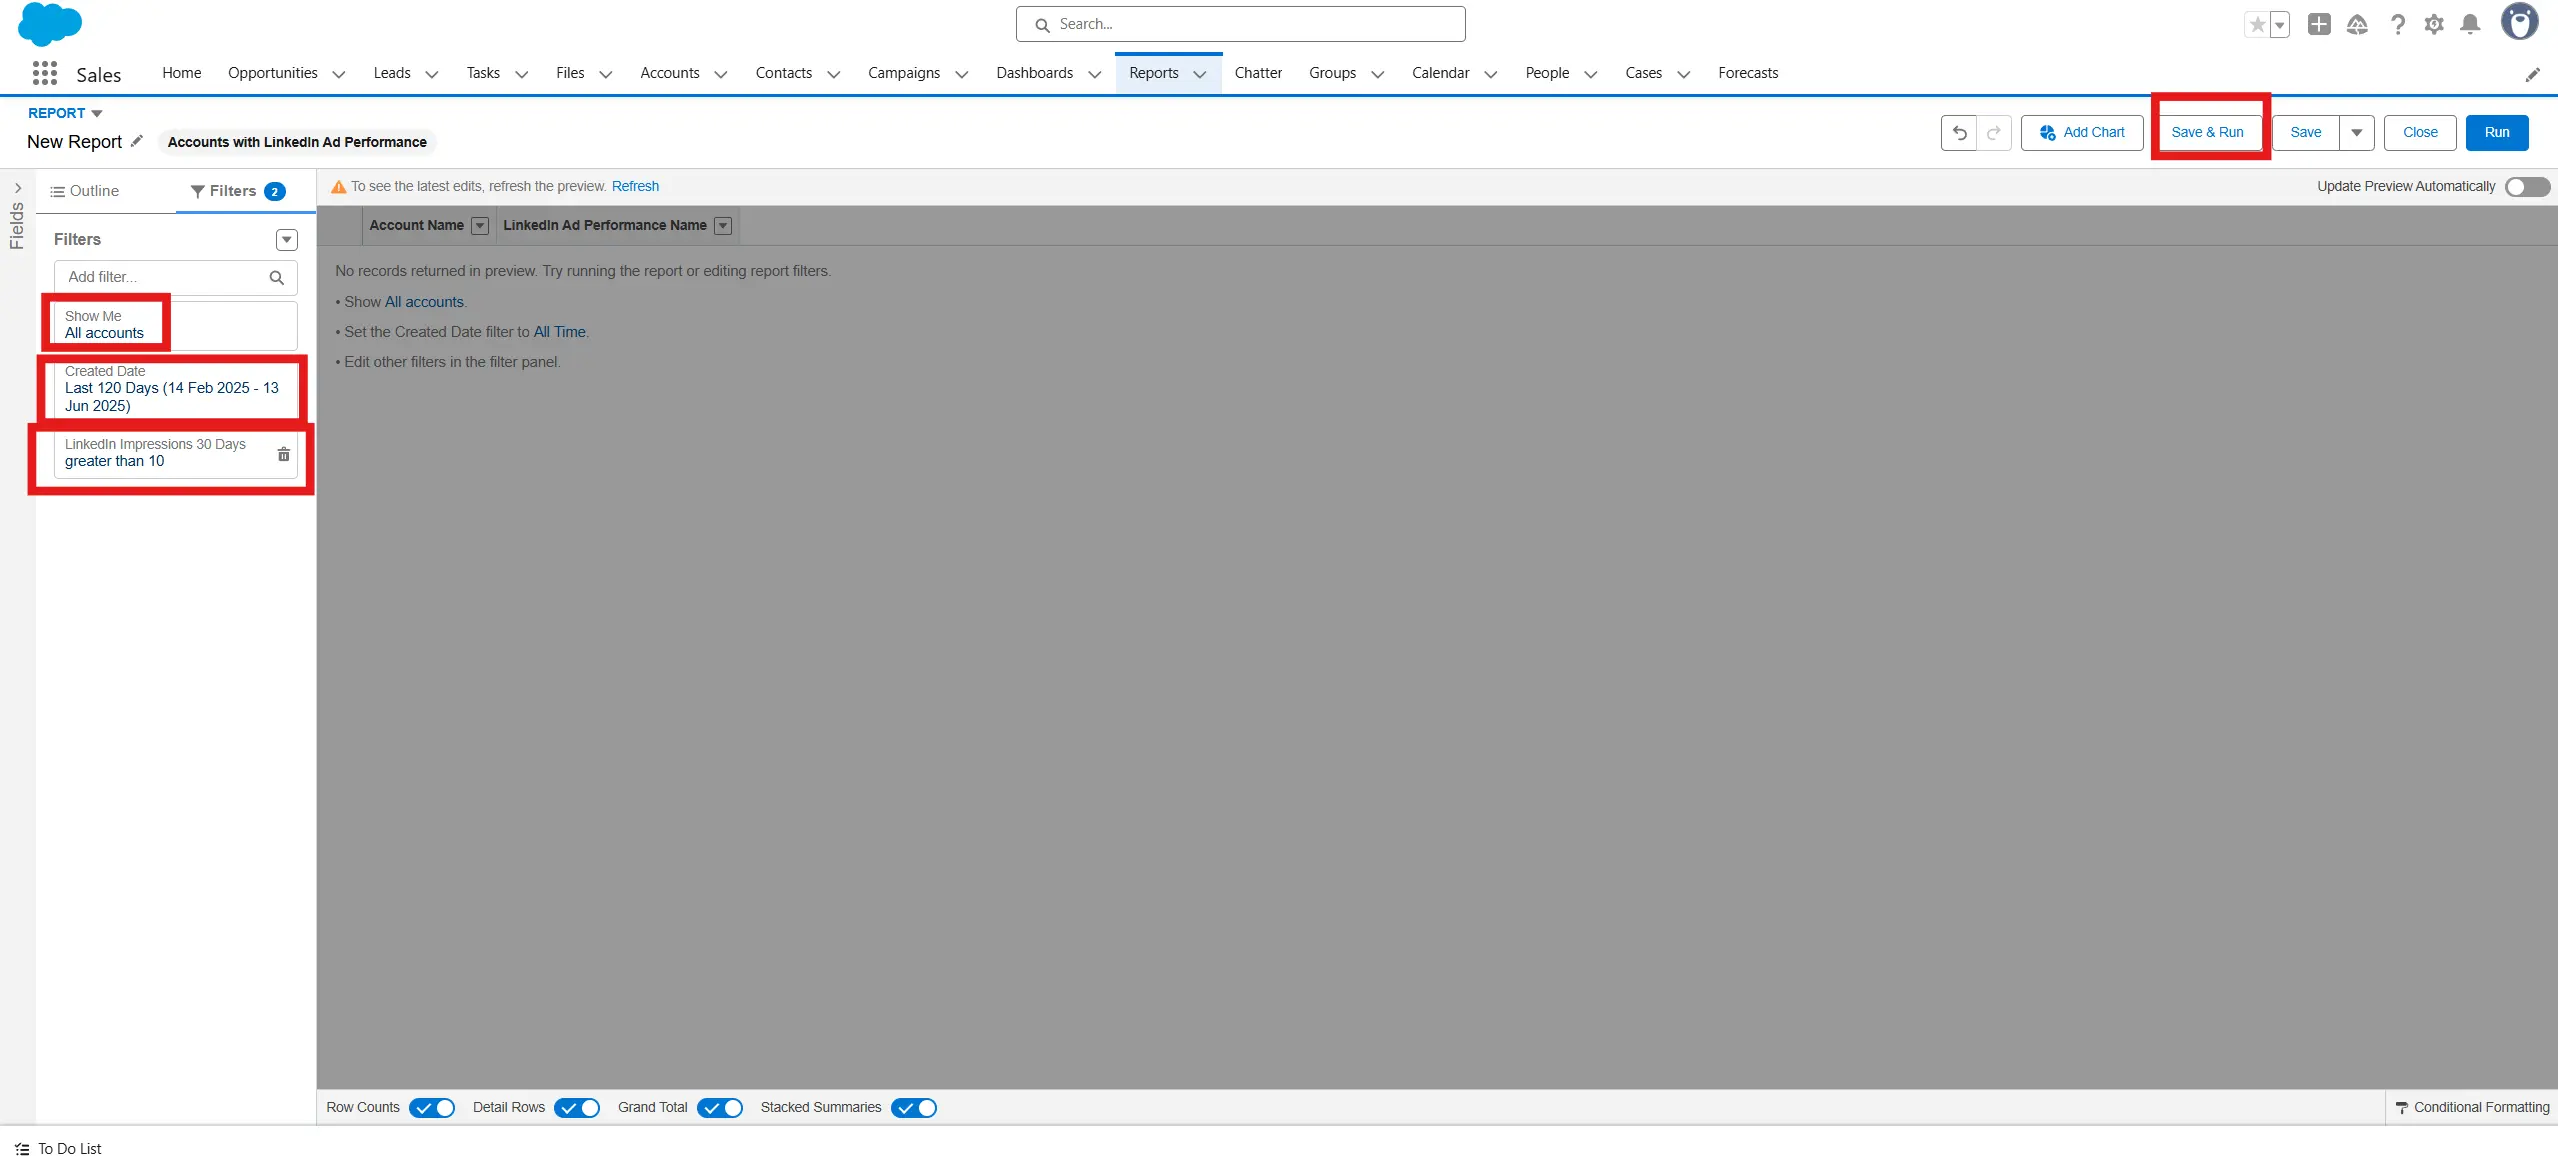
- Click Filters at the top of the left-side menu
- Select filters that align with the report you're looking to create. For example:
- Show All Accounts
- Show Last 120 days (Only shows accounts created in the last 120 days - set to "all time" if you want to include older accounts)
- Show accounts where LinkedIn Impressions 7 days is greater than 10
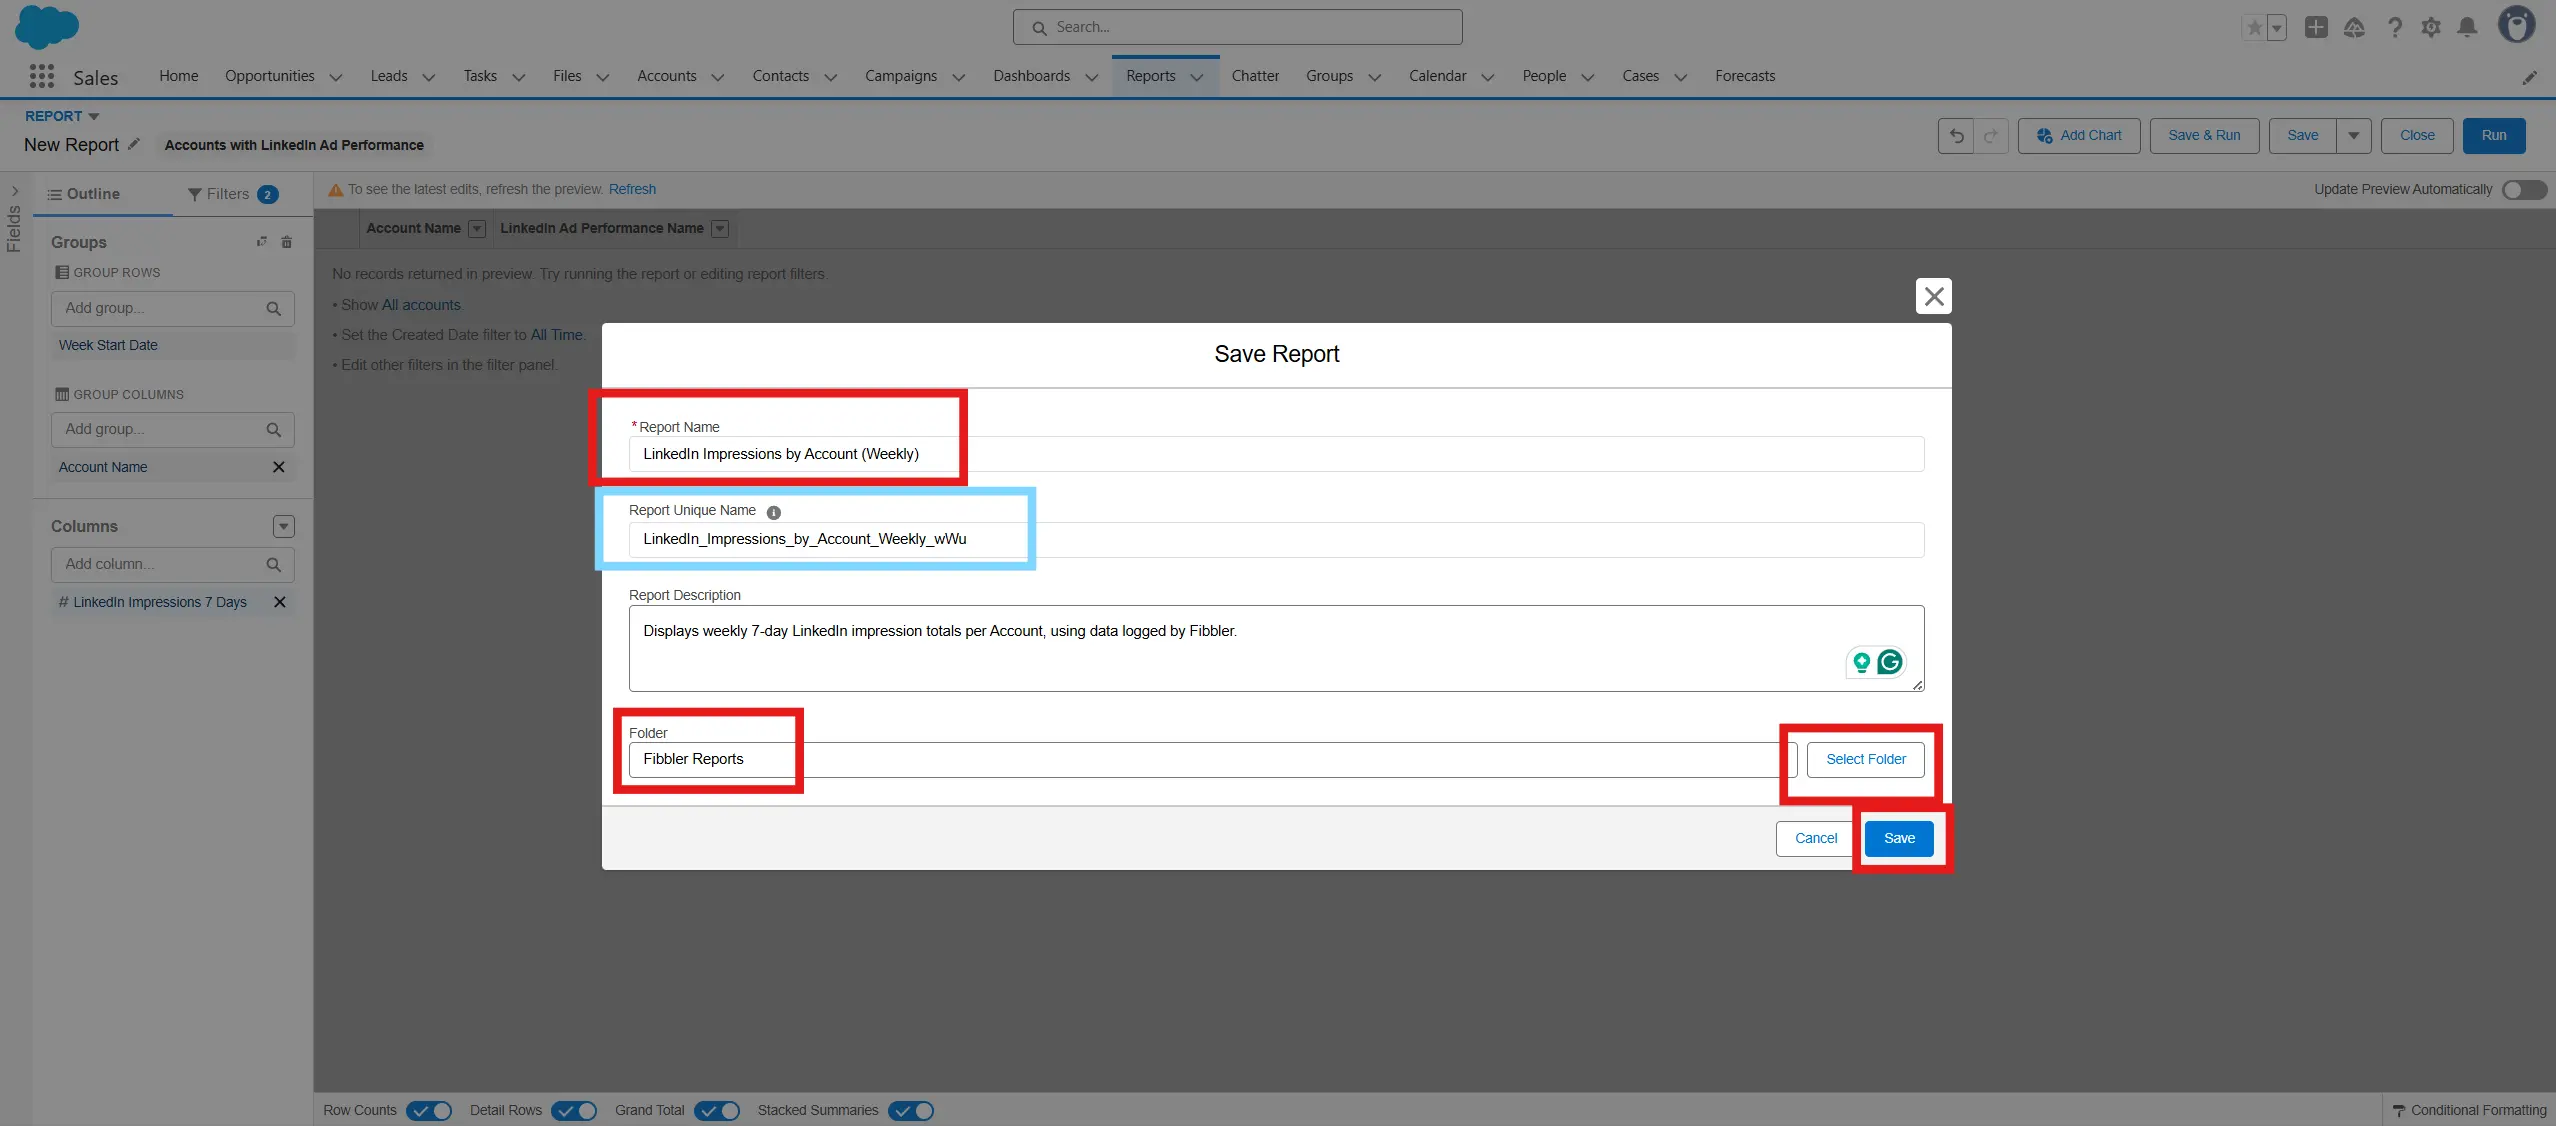
- Click Save & Run
- Enter the following data when saving the report:
- Report Name: LinkedIn Impressions by Account (Weekly)
- Report Unique Name: LinkedIn_Impressions_by_Account_(Weekly) (Autofills if left blank - Strong recommendation to leave blank)
- Report Description: Displays weekly 7-day LinkedIn impression totals per Account, using data logged by Fibbler.
- Folder: Choose a shared folder like Marketing Reports, Campaign Performance, a custom folder like Fibbler reports, or keep it in Private Reports if just testing for now. (Click Select Folder if you wish to change the folder where the report is saved)
- Click Save
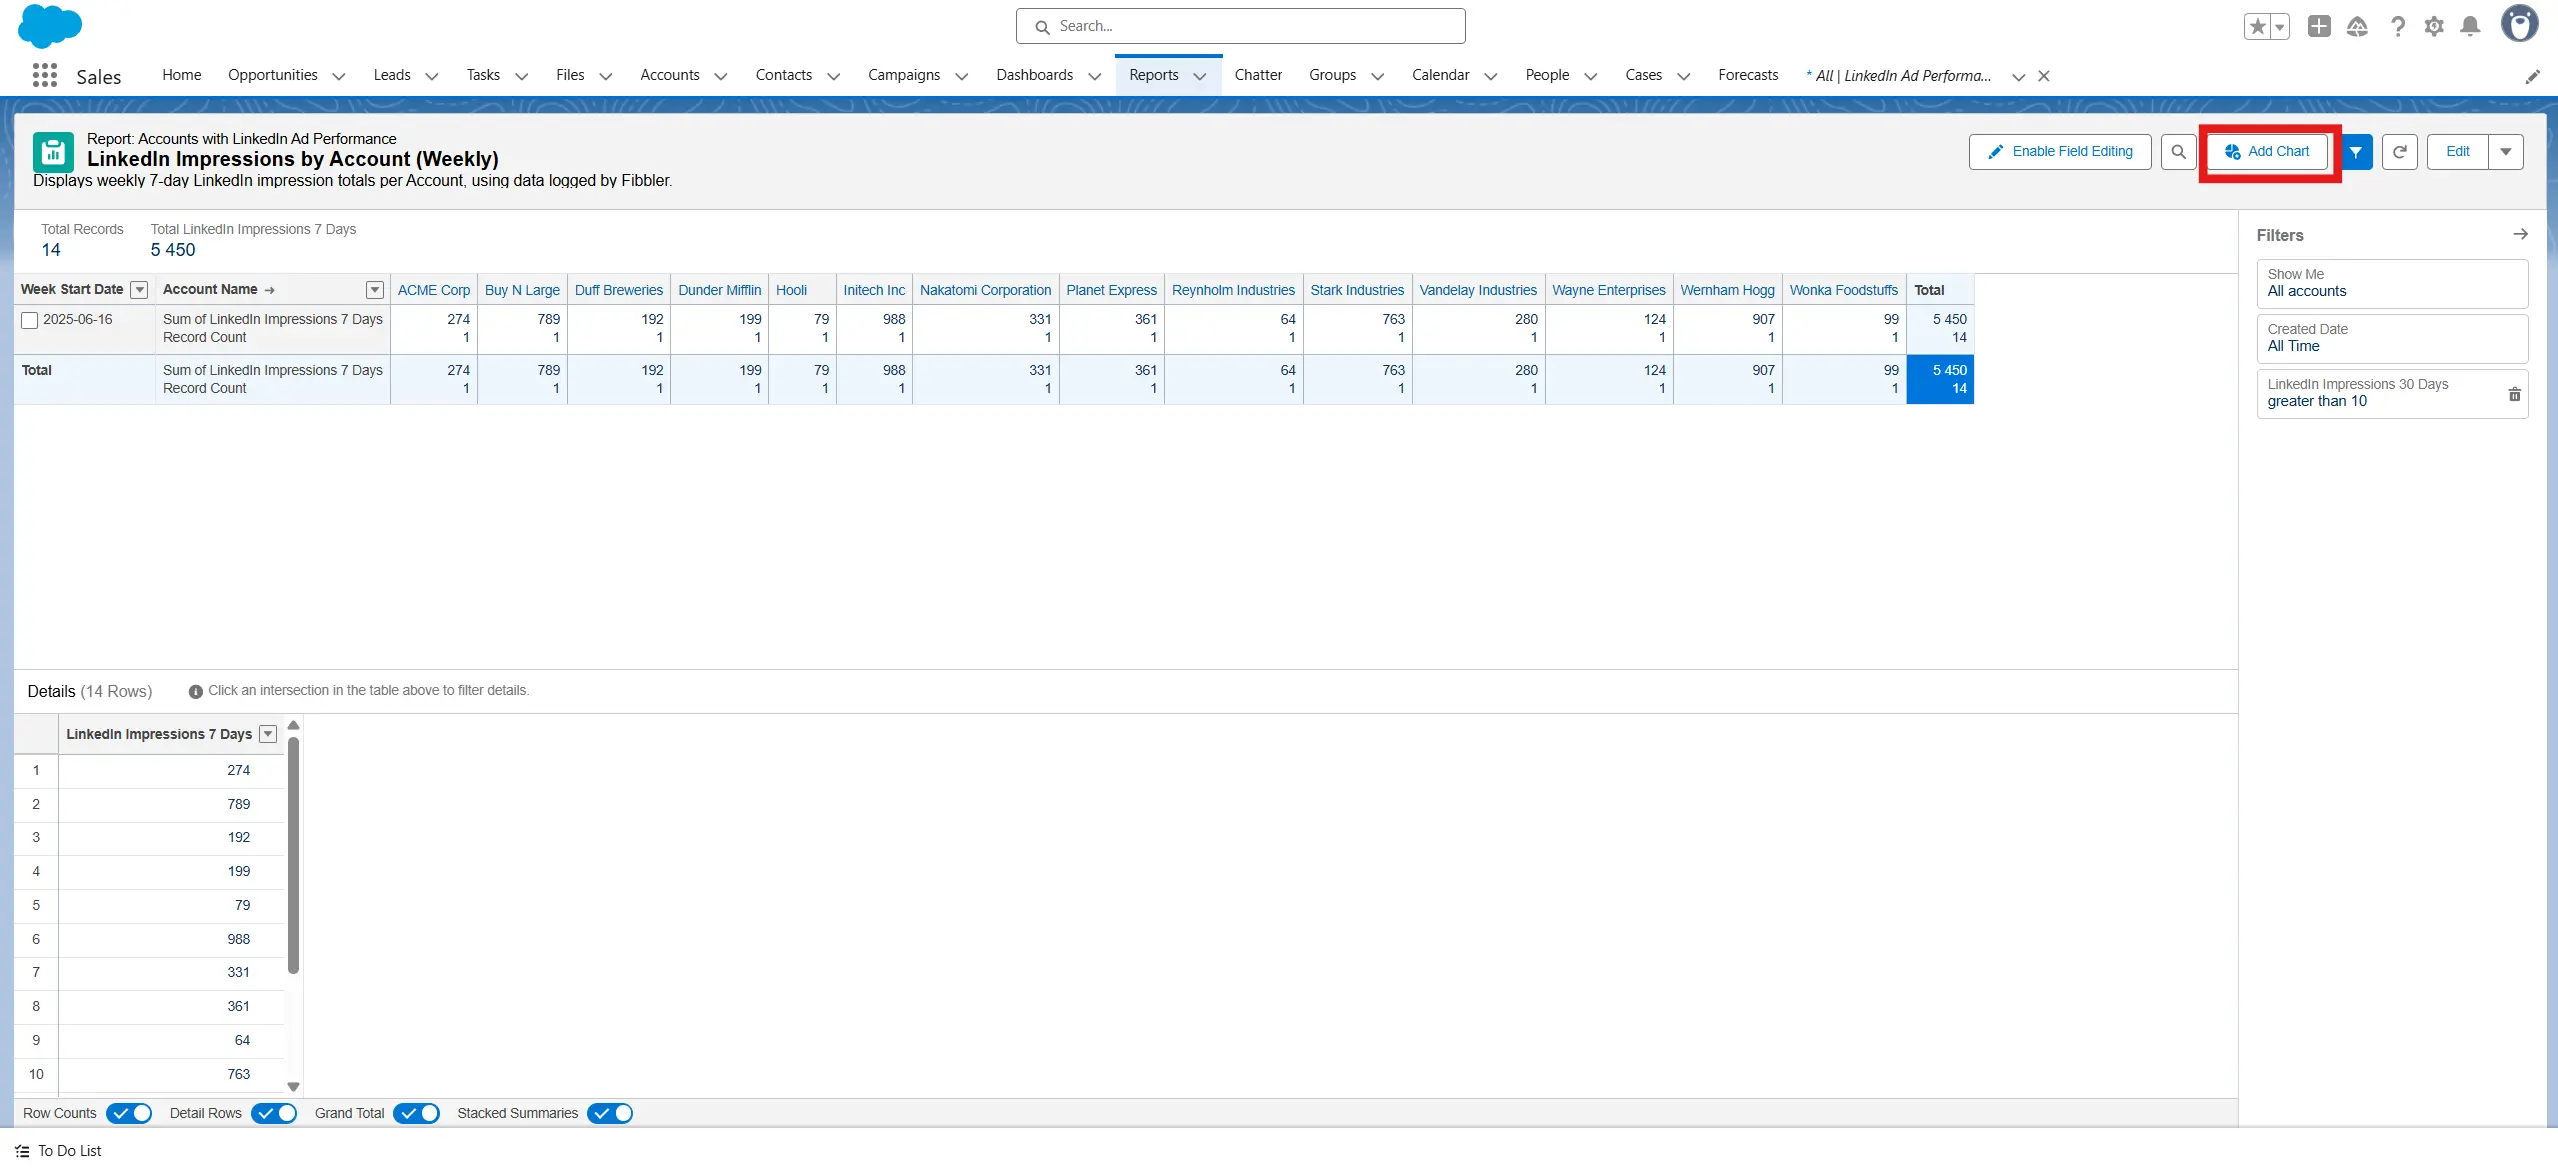
- Wait for relevant fields to change (or update them manually) and open the report you created. Ensure the report populates.
PART C - Creating the Graph
- While in the report view click Add Chart
- In the chart settings:
- Chart Type: Line
- X-Axis: Week Start Date
- Y-Axis: LinkedIn Impressions 7 Days
- Grouping: Account Name (each account becomes its own line)
- Click Apply
- Click Save & Run
- Name the report something like: Weekly LinkedIn Ad Impressions by Account
- Click Save
- Repeat for the other metrics you wish to track graphically
Outcome Step 6
You should now see a line chart where each account has its own line, and each point on the line shows the impression count for that week. This gives you a visual overview of how LinkedIn Ad performance changes over time on the account level.
Final Notes
Congratulations, you've set up your Salesforce environment to both automatically receive LinkedIn Ad Performance Data from Fibbler and to make reports that visualize said data over time.
Here are some final things to consider:
- Fibbler Data Security:
- All data is encrypted using TLS during transmission.
- Offline access tokens are securely stored with AES encryption.
- Maintain Accounts:
- Regularly review Salesforce Accounts to ensure domain matching accuracy.
Do you have any more questions? Send us a message at support@fibbler.co.
Written by

Carl Wilhelm Hagander
Chief Revenue Officer @ ReSocialize